共计 8184 个字符,预计需要花费 21 分钟才能阅读完成。
刚刚开始学 OCP。第一关,安装 Oracle 10g,被折腾得心碎。查询了大量资料,多次失败后终于总结出一些经验,简单整理如下。
需要注意的是:如果想尝试我提供的环境设置脚本,一定要根据自己的实际情况修改变量!
CentOS 6.6 安装 Oracle 10g
一、安装流程
1、最小安装 CentOS 6.6 虚拟机(虚拟机系统推荐 Virtualbox https://www.virtualbox.org),CentOS6 镜像地址 http://mirrors.163.com/centos/6.6/isos/x86_64/CentOS-6.6-x86_64-minimal.iso
- CPU:2
- MEM:2G
- DISK:>=20G (创建固定大小的虚拟硬盘文件能提高安装速度)
- 分区时选最上面的 Use All Space
- 手工指定主机名、分配 IP 地址
2、上传环境设置脚本,编辑变量部分,IP、主机名等值必须与本机相符。核查无误后,运行环境设置脚本(因为脚本没有做容错,所以只能运行一次),环境设置脚本会提示如下错误,忽略。
error: “net.bridge.bridge-nf-call-ip6tables” is an unknown key
error: “net.bridge.bridge-nf-call-iptables” is an unknown key
error: “net.bridge.bridge-nf-call-arptables” is an unknown key
3、安装桌面环境和依赖包
[root@centos6 ~]# yum install wget -y && \
yum groupinstall "Desktop" "X Window System" && \
yum install ksh make sysstat binutils* compat-libstdc++-33* \
elfutils-libelf* gcc gcc-c++ glibc* glibc*.i686 libgcc* libgcc*.i686 \
libaio* libaio*.i686 libstdc++* libstdc++*.i686 libXp libXp.i686 \
libXt libXt.i686 libXtst libXtst.i686
安装过程中以 orausr 用户登录,将学习用的 Oracle10g 安装包复制到 /home/orausr,解压缩。如果虚拟机磁盘文件是自动增长的,此时可以用 dd 指令扩扩容。
[orausr@centos6 ~]$ wget http://10.34.67.204/package/oracle10g/Oracle10g-10201-Linux-X64.cpio.gz
[orausr@centos6 ~]$ gunzip Oracle10g-10201-Linux-X64.cpio.gz
[orausr@centos6 ~]$ cpio -idmv < Oracle10g-10201-Linux-X64.cpio
[orausr@centos6 ~]$
[orausr@centos6 ~]$ rm Oracle10g-10201-Linux-X64.cpio
[orausr@centos6 tmp]$ cd /tmp
[orausr@centos6 tmp]$ dd if=/dev/zero of=test bs=10M count=800 oflag=sync
[orausr@centos6 tmp]$ rm test
4、 安装完成后重启系统!
5、 以 orausr 用户登录控制台, 运行 startx 启动桌面,桌面里打开终端运行 ./database/runInstaller 安装 Oracle10g。以下选择仅供参考:
- 选择 Advanced Installation
- 仔细核查安装目录是否跟脚本一致
- 选择 Enterprise Edition,选择 Product Languages,增加 Simplified Chinese
- Name 推荐跟主机名一致,再次核查安装目录
- 等待自检依赖项,完毕后点 Next
- 选择 Create a database
- 选择 General Purpose
- Global Database Name、SID 可以不动,选择 Database Character Set 为 Unicode standard UTF-8 AL32UTF8,选择 Create database with sample schemas
- 点 Next
- 选择 File System,核查数据文件位置
- 选择 Do not enable Automatic backups
- 选择 Use the same password for all the accounts,输入密码,需要字母开头,大小写数字结合
- 点 Install
- 忽略报错,点 Continue
- 点 OK
- 以 root 身份运行完两个脚本后,点 OK
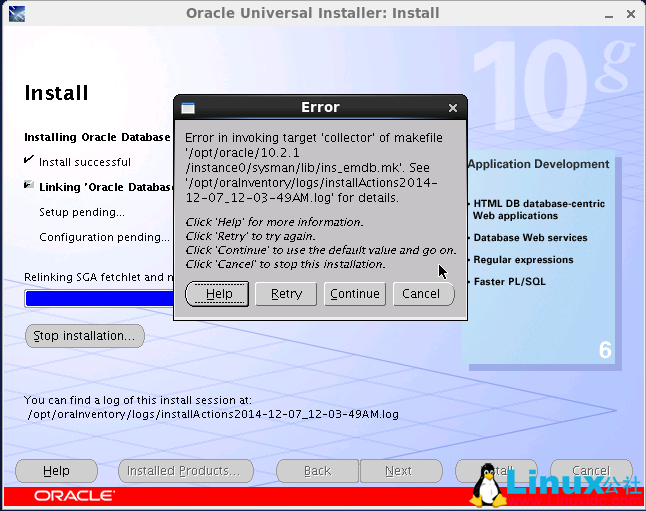
中间会出现一个编译错误,Error in invoking target ‘collector’ of makefile ‘/opt/oracle/10.2.1/instance0/sysman/lib/ins_emdb.mk’. 可以点“Continue”忽略。

6、安装结束时,runInstaller 会提示在 root 终端窗口运行两个脚本 orainstRoot.sh,root.sh,照做就行,接着完成 Installer 里面的操作,重启服务器。
如果安装失败,重新安装之前需要删除安装目录和一些文件
/opt/oracle/*
/opt/oraInventory/*
/etc/oratab
/usr/local/bin/*(新装系统这里只有 3 个 Oracle 程序,不会有其他文件)
二、使用 Oracle
1、启动
[orausr@centos6 ~]$ emctl start dbconsole
[orausr@centos6 ~]$ lsnrctl start
[orausr@centos6 ~]$ dbstart
emctl start dbconsole 启动时间很长,要耐心。
第一次手工运行 dbstart 会报错,需要修改 dbstart 脚本 。嗯,oracle 有个工程师叫 vikrkuma,他写脚本有点儿马虎 。。。
[orausr@centos6 ~]$ vi $ORACLE_HOME/bin/dbstart
ORACLE_HOME_LISTNER=/ade/vikrkuma_new/oracle  替换为 ORACLE_HOME_LISTNER=$ORACLE_HOME
2、访问
sqlplus 访问:
[orausr@centos6 ~]$ sqlplus /nolog
SQL> conn /as sysdba
SQL> startup
SQL> show linesize;
linesize 80
SQL> set linesize 160;
SQL> select * from scott.emp;

     EMPNO ENAME      JOB           MGR HIREDATE        SAL       COMM     DEPTNO
---------- ---------- --------- ---------- --------- ---------- ---------- ----------
      7369 SMITH      CLERK          7902 17-DEC-80        800            20
      7499 ALLEN      SALESMAN          7698 20-FEB-81       1600        300       30
      7521 WARD       SALESMAN          7698 22-FEB-81       1250        500       30
      7566 JONES      MANAGER          7839 02-APR-81       2975            20
      7654 MARTIN     SALESMAN          7698 28-SEP-81       1250       1400       30
      7698 BLAKE      MANAGER          7839 01-MAY-81       2850            30
      7782 CLARK      MANAGER          7839 09-JUN-81       2450            10
      7788 SCOTT      ANALYST          7566 19-APR-87       3000            20
      7839 KING       PRESIDENT        17-NOV-81       5000            10
      7844 TURNER     SALESMAN          7698 08-SEP-81       1500      0       30
      7876 ADAMS      CLERK          7788 23-MAY-87       1100            20

     EMPNO ENAME      JOB           MGR HIREDATE        SAL       COMM     DEPTNO
---------- ---------- --------- ---------- --------- ---------- ---------- ----------
      7900 JAMES      CLERK          7698 03-DEC-81        950            30
      7902 FORD       ANALYST          7566 03-DEC-81       3000            20
      7934 MILLER     CLERK          7782 23-JAN-82       1300            10

14 rows selected.

SQL>
SQL> create user jerry identified by password123;
SQL> grant create session to jerry;
SQL> conn jerry/password123
SQL> show user;
OEM Web 管理( 需要先在 sqlplus 运行 startup 后才能正常 ):
http://192.168.122.2:1158/em
三、环境设置脚本
ins-c6-10g.sh
#!/bin/bash
#script for Oracle10g installation on Centos6.6
#Change the following variables for your installation.
local_ip="192.168.122.2"
host_name="centos6"
host_name_fqdn="centos6.localdomain"
oracle_user="orausr"
oracle_user_password="mysql"
oracle_base="/opt/oracle"
oracle_home="/opt/oracle/10.2.1/instance0"
oracle_data="/opt/oracle/data"
oracle_data_recoveryarea="/opt/oracle/data_recover"
oracle_inventory="/opt/oraInventory"
oracle_sid="centos6"
#Change the above variables for your installation.

echo "${local_ip} ${host_name} ${host_name_fqdn}" >>/etc/hosts
groupadd -g 505 dba
groupadd oinstall
groupadd oper
useradd ${oracle_user}
echo ${oracle_user_password}|passwd --stdin ${oracle_user}
usermod -g oinstall -G dba ${oracle_user}

mkdir -p ${oracle_base}
mkdir -p ${oracle_data}
mkdir -p ${oracle_data_recoveryarea}
mkdir -p ${oracle_home}
mkdir -p ${oracle_inventory}
chown -R ${oracle_user}:oinstall ${oracle_base}
chmod -R 755 ${oracle_base}
chmod -R g+s ${oracle_base}
chown -R ${oracle_user}:oinstall ${oracle_inventory}
chmod -R 755 ${oracle_inventory}
chmod -R g+s ${oracle_inventory}

sysctl_value="kernel.sem = 250 32000 100 128
fs.file-max = 65536
kernel.shmall = 2097152
kernel.shmmax = 1054525444
kernel.shmmni = 4096
net.ipv4.ip_local_port_range = 1024 65000
net.core.rmem_default = 262144
net.core.rmem_max = 262144
net.core.wmem_default = 262144
net.core.wmem_max = 262144
vm.hugetlb_shm_group = 505
"/bin/cp /etc/sysctl.conf /etc/sysctl.conf.bak
echo -e "${sysctl_value}" >> /etc/sysctl.conf
sysctl -p

limits_value="${oracle_user}  soft    nofile  1024
${oracle_user}  hard    nofile  65536
${oracle_user}  soft    nproc   2047
${oracle_user}  hard    nproc   16384
"/bin/cp /etc/security/limits.conf /etc/security/limits.conf.bak
echo -e "${limits_value}" >> /etc/security/limits.conf

bash_profile_value="umask 022
ORACLE_BASE=${oracle_base}
ORACLE_SID=${oracle_sid}
ORACLE_HOME=${oracle_home}
ORACLE_UNQNAME=${oracle_sid}
export ORACLE_BASE ORACLE_SID ORACLE_HOME ORACLE_UNQNAME
PATH=$PATH:${oracle_home}/bin
export PATH
"/bin/cp /home/${oracle_user}/.bash_profile /home/${oracle_user}/.bash_profile.bak
echo -e "${bash_profile_value}" >> /home/${oracle_user}/.bash_profile

/bin/cp /etc/RedHat-release /root/redhat-release.bak
echo "redhat4" > /etc/redhat-release
service iptables stop
service ip6tables stop
chkconfig iptables off
chkconfig ip6tables off
setenforce 0
sed 's/SELINUX=enforcing/SELINUX=disabled/g' /etc/sysconfig/selinux -i

echo
echo "All prepared! Restart the system and then run Oracle Installer in linux GUI."
四、启动过程示范:
[orausr@centos6 ~]$ emctl start dbconsole
TZ set to PRC
Oracle Enterprise Manager 10g Database Control Release 10.2.0.1.0
Copyright (c) 1996, 2005 Oracle Corporation.  All rights reserved.
http://c608:1158/em/console/aboutApplication
Starting Oracle Enterprise Manager 10g Database Control .............................. started.
------------------------------------------------------------------
Logs are generated in directory /opt/oracle/10.2.1/instance0/c608_c608/sysman/log

[orausr@centos6 ~]$
[orausr@centos6 ~]$ lsnrctl start

LSNRCTL for Linux: Version 10.2.0.1.0 - Production on 11-DEC-2014 14:36:50

Copyright (c) 1991, 2005, Oracle.  All rights reserved.

Starting /opt/oracle/10.2.1/instance0/bin/tnslsnr: please wait...

TNSLSNR for Linux: Version 10.2.0.1.0 - Production
System parameter file is /opt/oracle/10.2.1/instance0/network/admin/listener.ora
Log messages written to /opt/oracle/10.2.1/instance0/network/log/listener.log
Listening on: (DESCRIPTION=(ADDRESS=(PROTOCOL=ipc)(KEY=EXTPROC1)))
Listening on: (DESCRIPTION=(ADDRESS=(PROTOCOL=tcp)(HOST=c608)(PORT=1521)))

Connecting to (DESCRIPTION=(ADDRESS=(PROTOCOL=IPC)(KEY=EXTPROC1)))
STATUS of the LISTENER
------------------------
Alias                     LISTENER
Version                   TNSLSNR for Linux: Version 10.2.0.1.0 - Production
Start Date                11-DEC-2014 14:36:52
Uptime                    0 days 0 hr. 0 min. 0 sec
Trace Level               off
Security                  ON: Local OS Authentication
SNMP                      OFF
Listener Parameter File   /opt/oracle/10.2.1/instance0/network/admin/listener.ora
Listener Log File         /opt/oracle/10.2.1/instance0/network/log/listener.log
Listening Endpoints Summary...
  (DESCRIPTION=(ADDRESS=(PROTOCOL=ipc)(KEY=EXTPROC1)))
  (DESCRIPTION=(ADDRESS=(PROTOCOL=tcp)(HOST=c608)(PORT=1521)))
Services Summary...
Service "PLSExtProc" has 1 instance(s).
  Instance "PLSExtProc", status UNKNOWN, has 1 handler(s) for this service...
The command completed successfully

[orausr@centos6 ~]$
[orausr@centos6 ~]$ dbstart
[orausr@centos6 ~]$ sqlplus /nolog

SQL*Plus: Release 10.2.0.1.0 - Production on Thu Dec 11 14:37:56 2014

Copyright (c) 1982, 2005, Oracle.  All rights reserved.

SQL> conn /as sysdba
Connected to an idle instance.
SQL> startup
ORACLE instance started.

Total System Global Area  557842432 bytes
Fixed Size              2022280 bytes
Variable Size         163579000 bytes
Database Buffers      385875968 bytes
Redo Buffers            6365184 bytes
Database mounted.
Database opened.
SQL> select * from scott.emp;
本文永久更新链接地址 :http://www.linuxidc.com/Linux/2017-10/147651.htm


