共计 3663 个字符,预计需要花费 10 分钟才能阅读完成。
一些有关 Redis 相关问题的解决方案。
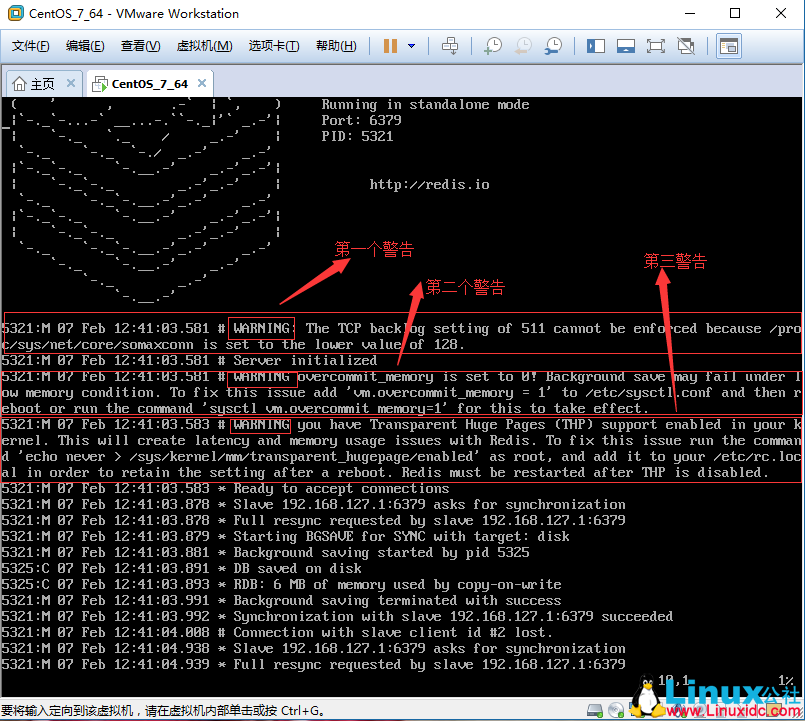
第 1 个案例:当我们启动了 Redis 服务器之后,会看到 3 个警告,如果没看到,那是很好的,但是我看到了。看到了就不能不管,所以就好好的解决一下。我把这三个警告的信息截图了,大家可以有更直接的感觉。效果截图如下:

1)、第一个警告信息提示:The TCP backlog setting of 511 cannot be enforced because /proc/sys/net/core/somaxconn is set to the lower value of 128
2)、第二个警告信息提示:WARNING overcommit_memory is set to 0! Background save may fail under low memory condition. To fix this issue add‘vm.overcommit_memory = 1‘to /etc/sysctl.conf and then reboot or run the command‘sysctl vm.overcommit_memory=1‘for this to take effect.
这两个问题的解决方法很简单,晚上也有类似的解决方案。
解决:
// 针对这两个问题,都要修改 /etc/sysctl.conf 文件,在文件末尾加入以下两句:
net.core.somaxconn= 1024
vm.overcommit_memory = 1
3)、第三个警告信息提示:WARNING you have Transparent Huge Pages (THP) support enabled in your kernel. This will create latency and memory usage issues with Redis. To fix this issue run the command‘echo never > /sys/kernel/mm/transparent_hugepage/enabled‘as root, and add it to your /etc/rc.local in order to retain the setting after a reboot. Redis must be restarted after THP is disabled.
这个问题不容易解决,我搞了好久才搞定的,所以必须记录下来,否则以后想看看都不容易。
大家想了解跟多情况,可以查看该博客 http://docs.Fedoraproject.org/en-US/Fedora/21/html/System_Administrators_Guide/sec-GRUB_2_over_Serial_Console.html#sec-Configuring_GRUB_2。
第一种方式:
我们开始第三个问题的解决吧,如果你也是 grub2 的 linux 系统,请通过以下步骤关闭大内存页面。
步骤一、编辑 /etc/default/grub,在 GRUB_CMDLINE_LINUX 加入选项 transparent_hugepage=never
GRUB_TIMEOUT=5
GRUB_DISTRIBUTOR=”$(sed ‘s, release .*$,,g’ /etc/system-release)”
GRUB_DEFAULT=saved
GRUB_DISABLE_SUBMENU=true
GRUB_TERMINAL_OUTPUT=”console”
GRUB_CMDLINE_LINUX=”rd.lvm.lv=fedora/swap rd.lvm.lv=fedora/root rhgb quiet transparent_hugepage=never”
GRUB_DISABLE_RECOVERY=”true”
步骤二、重新生成 grub 配置文件
[root@linux ~]# grub2-mkconfig -o /boot/grub2/grub.cfg
步骤三、重启你的系统
至此大功告成,如果你使用的是 grub,请把选项写入 grub.conf 文件就好了。
步骤四、查询 hugepage 状态
[root@linux ~]# cat /sys/kernel/mm/transparent_hugepage/enabled
always madvise [never]
第二种方式:
[root@linux ~]$ grep Huge /proc/meminfo
AnonHugePages: 0 kB
HugePages_Total: 0
HugePages_Free: 0
HugePages_Rsvd: 0
HugePages_Surp: 0
Hugepagesize: 2048 kB
解决了,还是很高兴的。其实这三个警告信息已经提供了解决办法,有的是临时方法,有的是永久方法,只是第三个警告不是那么直接好解决。
第 2 个案例:Redis 启动 Sentinel 出现警告的解决
Redis 3.0.7 版本启动时出现警告的解决办法
7283:M 12 Mar 12:13:33.749 # WARNING: The TCP backlog setting of 511 cannot be enforced because /proc/sys/net/core/somaxconn is set to the lower value of 128.
7283:M 12 Mar 12:13:33.749 # Server started, Redis version 3.0.7
7283:M 12 Mar 12:13:33.749 # WARNING overcommit_memory is set to 0! Background save may fail under low memory condition. To fix this issue add ‘vm.overcommit_memory = 1’ to /etc/sysctl.conf and then reboot or run the command ‘sysctl vm.overcommit_memory=1’ for this to take effect.
7283:M 12 Mar 12:13:33.749 * The server is now ready to accept connections on port 6379
第 1 个警告 (WARNING: The TCP backlog setting of 511 ……) 解决办法
方法 1: 临时设置生效: sysctl -w net.core.somaxconn = 1024
方法 2: 永久生效: 修改 /etc/sysctl.conf 文件,增加一行
net.core.somaxconn= 1024
然后执行命令
sysctl -p
补充:
net.core.somaxconn 是 linux 中的一个 kernel 参数,表示 socket 监听(listen)的 backlog 上限。
backlog 是 socket 的监听队列,当一个请求(request)尚未被处理或建立时,他会进入 backlog。
而 socket server 可以一次性处理 backlog 中的所有请求,处理后的请求不再位于监听队列中。
当 server 处理请求较慢,以至于监听队列被填满后,新来的请求会被拒绝。
所以说 net.core.somaxconn 限制了接收新 TCP 连接侦听队列的大小。
对于一个经常处理新连接的高负载 web 服务环境来说,默认的 128 太小了。大多数环境这个值建议增加到 1024 或者更多。
第 2 个警告 (WARNING overcommit_memory is set to 0! ……) 同样也有两个解决办法
方法 1: 临时设置生效: sysctl -w vm.overcommit_memory = 1
方法 2: 永久生效: 修改 /etc/sysctl.conf 文件,增加一行
vm.overcommit_memory = 1
然后执行命令
sysctl -p
补充:
overcommit_memory 参数说明:
设置内存分配策略(可选,根据服务器的实际情况进行设置)
/proc/sys/vm/overcommit_memory
可选值:0、1、2。
0,表示内核将检查是否有足够的可用内存供应用进程使用;如果有足够的可用内存,内存申请允许;否则,内存申请失败,并把错误返回给应用进程。
1,表示内核允许分配所有的物理内存,而不管当前的内存状态如何。
2,表示内核允许分配超过所有物理内存和交换空间总和的内存
注意:redis 在 dump 数据的时候,会 fork 出一个子进程,理论上 child 进程所占用的内存和 parent 是一样的,比如 parent 占用的内存为 8G,这个时候也要同样分配 8G 的内存给 child, 如果内存无法负担,往往会造成 redis 服务器的 down 机或者 IO 负载过高,效率下降。所以这里比较优化的内存分配策略应该设置为 1(表示内核允许分配所有的物理内存,而不管当前的内存状态如何)。
本文永久更新链接地址:https://www.linuxidc.com/Linux/2018-02/150957.htm


