共计 5791 个字符,预计需要花费 15 分钟才能阅读完成。
1、Spring @Enable 模块驱动概述
Spring Framework3.1 是一个其有里程碑意义的发行版本, 从此版本开始,Spring Framework 开始支持 ”@Enable 模块驱动 ”。所谓 ” 模块 ” 是指具备相同领域的功能组件集合, 例如 Web MVC 模块、AspectJ 模块等。
2、理解 @Enable 模块驱动
@Enable 模块驱动在后续的 Spring Framework、Spring Boot 和 Spring Cloud 中一以贯之, 这种模块化的 Annotation 均以 @Enable 作为前缀,例如:@EnableWebFlux、@EnableWebMVC 等。@Enable 模块驱动的意义在于简化装配步骤, 实现 ” 按需装配 ”, 同时屏蔽组件集合装配的细节。
查看 @EnableWebFlux 注解
| @Retention(RetentionPolicy.RUNTIME) // 元注解,表示注解不仅保存在 class 文件,并且 jvm 加载 class 文件之后,仍然存在 | |
| @Target({ElementType.TYPE}) // 表示此注解的标识范围为接口、类、枚举 | |
| @Documented // 表示该注解会被 javadoc 工具记录 | |
| @Import({DelegatingWebFluxConfiguration.class}) // 通过快速导入的方式实现把实例加入 spring 的 IOC 容器中 | |
| public @interface EnableWebFlux { | |
| } | |
| @Configuration(proxyBeanMethods = false | |
| ) | |
| public class DelegatingWebFluxConfiguration extends WebFluxConfigurationSupport { |
3、自定义 @Enable 模块驱动
3.1、创建 maven 工程
pom.xml 内容如下:
| <project xmlns="http://maven.apache.org/POM/4.0.0" | |
| xmlns:xsi="http://www.w3.org/2001/XMLSchema-instance" | |
| xsi:schemaLocation="http://maven.apache.org/POM/4.0.0 http://maven.apache.org/xsd/maven-4.0.0.xsd"> | |
| <modelVersion>4.0.0</modelVersion> | |
| <groupId>com.tyschool</groupId> | |
| <artifactId>enable-driver</artifactId> | |
| <version>1.0-SNAPSHOT</version> | |
| <properties> | |
| <!-- Spring 3.x 最新发布版本 --> | |
| <spring.version>3.2.18.RELEASE</spring.version> | |
| <java.version>1.9</java.version> | |
| </properties> | |
| <dependencies> | |
| <dependency> | |
| <groupId>org.springframework</groupId> | |
| <artifactId>spring-context</artifactId> | |
| <version>${spring.version}</version> | |
| </dependency> | |
| </dependencies> | |
| <build> | |
| <plugins> | |
| <plugin> | |
| <groupId>org.apache.maven.plugins</groupId> | |
| <artifactId>maven-compiler-plugin</artifactId> | |
| <configuration> | |
| <source>${java.version}</source> | |
| <target>${java.version}</target> | |
| </configuration> | |
| </plugin> | |
| </plugins> | |
| </build> | |
| </project> |
3.2、实现 Configuration 类
| public class HelloConfig {/*** | |
| * 创建名为 "helloWorld"String 类型的 Bean | |
| * @return | |
| */ | |
| public String helloWorld(){return "Hello,World"; | |
| } | |
| } |
3.3、实现 ”@Enable 模块驱动 ” 注解
| @Target(ElementType.TYPE) | |
| @Retention(RetentionPolicy.RUNTIME) | |
| @Documented | |
| @Import(HelloConfig.class) | |
| public @interface EnableHello { | |
| } |
3.4、标注 @EnableHello 到引到类
| public class EnableHelloBootStrap {public static void main(String[] args) {// 构建 Annotation 配置驱动 Spring 上下文 | |
| AnnotationConfigApplicationContext context = new AnnotationConfigApplicationContext(); | |
| // 注册当前引导类到 Spring 上下文 | |
| context.register(EnableHelloBootStrap.class); | |
| // 启动上下文 | |
| context.refresh(); | |
| // 获取名称为 "helloWorld" 的 Bean 对象 | |
| String helloWorld = context.getBean("helloWorld", String.class); | |
| // 输出 | |
| System.out.println(helloWorld); | |
| // 关闭上下文 | |
| context.close();} |
4、Spring Web 自动装配概述
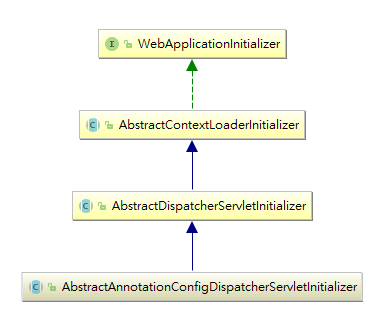
Spring Framwork 3.1.0.RELEASE 中新引入的 WebApplicationInitializer 构建在 Servlet3.0 之上, 应用在 Servlet3.0+ 的环境也可以采用编程手段实现。
WebApplicationInitializer 属于 Spring MVC 提供的接口, 确保 Web ApplicationInitializer 自定义实现能够被任何 Servlet3.0 容器侦测并自动地初始化。如果实现 WebApplicationInitializer 接口较为困难, 也可使用简化实现方案,即 AbstractDispatcherServletInitializer。
AbstractAnnotaionConfigDispatcherServletInitializer 是 AbstactDispatcherServletInitializer 的子类。前者实现属于 Spring Java 代码配置驱动, 后者实现是 Spring XML 配置驱动。

5、自定义 Web 自动装配
5.1、在 pom.xml 文件中添加 web 依赖
| <project xmlns="http://maven.apache.org/POM/4.0.0" | |
| xmlns:xsi="http://www.w3.org/2001/XMLSchema-instance" | |
| xsi:schemaLocation="http://maven.apache.org/POM/4.0.0 http://maven.apache.org/xsd/maven-4.0.0.xsd"> | |
| <modelVersion>4.0.0</modelVersion> | |
| <packaging>war</packaging> | |
| <groupId>com.tyschool</groupId> | |
| <artifactId>enable-driver</artifactId> | |
| <version>1.0-SNAPSHOT</version> | |
| <properties> | |
| <!-- Spring 3.x 最新发布版本 --> | |
| <spring.version>3.2.18.RELEASE</spring.version> | |
| <java.version>1.9</java.version> | |
| </properties> | |
| <dependencies> | |
| <!-- Servlet 3.0 API --> | |
| <dependency> | |
| <groupId>javax.servlet</groupId> | |
| <artifactId>javax.servlet-api</artifactId> | |
| <version>3.0.1</version> | |
| <scope>provided</scope> | |
| </dependency> | |
| <dependency> | |
| <groupId>org.apache.tomcat.maven</groupId> | |
| <artifactId>tomcat7-maven-plugin</artifactId> | |
| <version>2.1</version> | |
| <scope>runtime</scope> | |
| </dependency> | |
| <dependency> | |
| <groupId>org.springframework</groupId> | |
| <artifactId>spring-context</artifactId> | |
| <version>${spring.version}</version> | |
| </dependency> | |
| <!-- Spring Web MVC 依赖 --> | |
| <dependency> | |
| <groupId>org.springframework</groupId> | |
| <artifactId>spring-webmvc</artifactId> | |
| <version>${spring.version}</version> | |
| </dependency> | |
| </dependencies> | |
| <build> | |
| <plugins> | |
| <!-- Maven war 插件 --> | |
| <plugin> | |
| <groupId>org.apache.maven.plugins</groupId> | |
| <artifactId>maven-war-plugin</artifactId> | |
| <configuration> | |
| <!-- 忽略错误,当 web.xml 不存在时 --> | |
| <failOnMissingWebXml>false</failOnMissingWebXml> | |
| </configuration> | |
| </plugin> | |
| <!-- Tomcat Maven 插件用于构建可执行 war --> | |
| <plugin> | |
| <groupId>org.apache.tomcat.maven</groupId> | |
| <artifactId>tomcat7-maven-plugin</artifactId> | |
| <version>2.1</version> | |
| <executions> | |
| <execution> | |
| <id>tomcat-run</id> | |
| <goals> | |
| <!-- 最终打包成可执行的 jar 包 --> | |
| <goal>exec-war-only</goal> | |
| </goals> | |
| <phase>package</phase> | |
| <configuration> | |
| <!-- ServletContext 路径 --> | |
| <path>/</path> | |
| </configuration> | |
| </execution> | |
| </executions> | |
| </plugin> | |
| </plugins> | |
| </build> | |
| </project> |
5.2、新增 @Controller
| // 标识为 controller | |
| public class HelloWorldController {("/hello") | |
| // 返回 json 数据格式 | |
| public String helloWorld(){return "Hello,World!"; | |
| } | |
| } |
5.3、新增 Spring Web MVC 配置
| @EnableWebMvc // 开启 WebMvc | |
| @Configuration // 标识为配置类 | |
| @ComponentScan(basePackageClasses = SpringWebMvcConfiguration.class)// 扫描 SpringWebMvcConfiguration 所在的包及子包 | |
| public class SpringWebMvcConfiguration { } |
5.4、实现 AbstractAnnotationConfigDispatcherServletInitializer
| package com.tyschool.initializer; | |
| import com.tyschool.config.SpringWebMvcConfiguration; | |
| import org.springframework.web.servlet.support.AbstractAnnotationConfigDispatcherServletInitializer; | |
| public class SpringWebMvcServletInitializer extends AbstractAnnotationConfigDispatcherServletInitializer {protected Class<?>[] getRootConfigClasses() {return new Class[0]; | |
| } | |
| //DispatcherServlet 配置 Bean | |
| protected Class<?>[] getServletConfigClasses() {return of(SpringWebMvcConfiguration.class); | |
| } | |
| //DispathcerServlet URL Pattern 映射 | |
| protected String[] getServletMappings() {return of("/*"); | |
| } | |
| private static <T> T [] of(T... values) {return values; | |
| } | |
| } |
5.5、打包并运行
java -jar enable-driver-1.0-SNAPSHOT-war-exec.jar


