共计 3396 个字符,预计需要花费 9 分钟才能阅读完成。
1、使用 Spring Initializr 创建 Spring Boot 工程
Pom.xml:
| <project xmlns="http://maven.apache.org/POM/4.0.0" xmlns:xsi="http://www.w3.org/2001/XMLSchema-instance" | |
| xsi:schemaLocation="http://maven.apache.org/POM/4.0.0 https://maven.apache.org/xsd/maven-4.0.0.xsd"> | |
| <modelVersion>4.0.0</modelVersion> | |
| <parent> | |
| <groupId>org.springframework.boot</groupId> | |
| <artifactId>spring-boot-starter-parent</artifactId> | |
| <version>2.2.7.RELEASE</version> | |
| <relativePath/> <!-- lookup parent from repository --> | |
| </parent> | |
| <groupId>com.tyschool</groupId> | |
| <artifactId>sentinel-demo</artifactId> | |
| <version>0.0.1-SNAPSHOT</version> | |
| <name>sentinel-demo</name> | |
| <description>Demo project for Spring Boot</description> | |
| <properties> | |
| <java.version>1.8</java.version> | |
| <spring-cloud-alibaba.version>2.2.1.RELEASE</spring-cloud-alibaba.version> | |
| </properties> | |
| <dependencies> | |
| <dependency> | |
| <groupId>org.springframework.boot</groupId> | |
| <artifactId>spring-boot-starter-web</artifactId> | |
| </dependency> | |
| <!--Sentinel 依赖 --> | |
| <dependency> | |
| <groupId>com.alibaba.cloud</groupId> | |
| <artifactId>spring-cloud-starter-alibaba-sentinel</artifactId> | |
| </dependency> | |
| <!--actuator 依赖 --> | |
| <dependency> | |
| <groupId>org.springframework.boot</groupId> | |
| <artifactId>spring-boot-starter-actuator</artifactId> | |
| </dependency> | |
| <dependency> | |
| <groupId>org.springframework.boot</groupId> | |
| <artifactId>spring-boot-starter-test</artifactId> | |
| <scope>test</scope> | |
| <exclusions> | |
| <exclusion> | |
| <groupId>org.junit.vintage</groupId> | |
| <artifactId>junit-vintage-engine</artifactId> | |
| </exclusion> | |
| </exclusions> | |
| </dependency> | |
| </dependencies> | |
| <dependencyManagement> | |
| <dependencies> | |
| <dependency> | |
| <groupId>com.alibaba.cloud</groupId> | |
| <artifactId>spring-cloud-alibaba-dependencies</artifactId> | |
| <version>${spring-cloud-alibaba.version}</version> | |
| <type>pom</type> | |
| <scope>import</scope> | |
| </dependency> | |
| </dependencies> | |
| </dependencyManagement> | |
| <build> | |
| <plugins> | |
| <plugin> | |
| <groupId>org.springframework.boot</groupId> | |
| <artifactId>spring-boot-maven-plugin</artifactId> | |
| </plugin> | |
| </plugins> | |
| </build> | |
| <repositories> | |
| <repository> | |
| <id>spring-milestones</id> | |
| <name>Spring Milestones</name> | |
| <url>https://repo.spring.io/milestone</url> | |
| </repository> | |
| <repository> | |
| <id>spring-snapshots</id> | |
| <name>Spring Snapshots</name> | |
| <url>https://repo.spring.io/snapshot</url> | |
| <snapshots> | |
| <enabled>true</enabled> | |
| </snapshots> | |
| </repository> | |
| </repositories> | |
| <pluginRepositories> | |
| <pluginRepository> | |
| <id>spring-milestones</id> | |
| <name>Spring Milestones</name> | |
| <url>https://repo.spring.io/milestone</url> | |
| </pluginRepository> | |
| <pluginRepository> | |
| <id>spring-snapshots</id> | |
| <name>Spring Snapshots</name> | |
| <url>https://repo.spring.io/snapshot</url> | |
| <snapshots> | |
| <enabled>true</enabled> | |
| </snapshots> | |
| </pluginRepository> | |
| </pluginRepositories> | |
| </project> |
2、添加配置
在 application.properties 文件中配置:
| spring.application.name=Sentinel Demo | |
| server.port=8088 | |
| # sentinel dashboard 指定 sentinel 控制台地址 | |
| spring.cloud.sentinel.transport.dashboard=localhost:8080 | |
| # 暴露出所有 actuator 监控的端点 | |
| management.endpoints.web.exposure.include=* |
3、限流埋点
限流埋点可以通过 HTTP 埋点和自定义埋点两种方式实现。
3.1、HTTP 埋点
Sentinel 的 Starter 默认为所有的 HTTP 服务提供了限流埋点。如果只想对某个 HTTP 服务进行限流,则只需要引入依赖,无须修改代码
3.2、自定义埋点
如果需要对某个特定的服务进行限流或降级,则可以通过注解 @SentienlResource 来完成
3.3、添加自定义埋点
| public class SentinelDemoApplication {public static void main(String[] args) {SpringApplication.run(SentinelDemoApplication.class, args); | |
| } | |
| public class TestController{("/hello") | |
| ("hello") | |
| public String hello(){return "Hello Sentinel Demo!"; | |
| } | |
| } | |
| } |
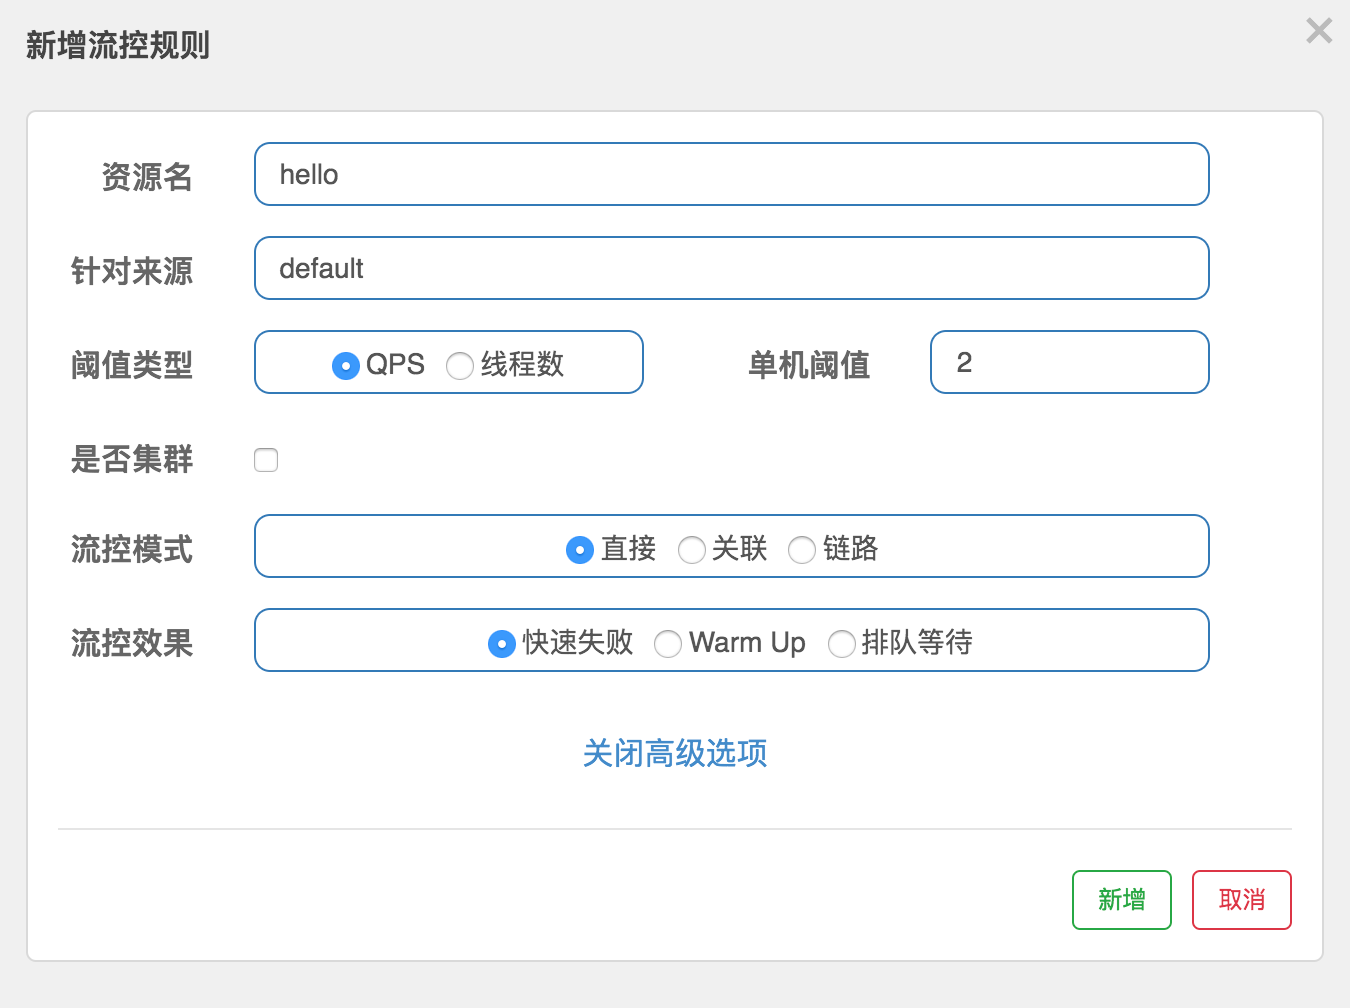
4、创建快速失败的直接限流模式

5、测试快速访问失败的直接限流模式
多次快速访问 http://localhost:8088/hello, 当 QPS 超过 2 时,直接返回页面错误

正文完
星哥玩云-微信公众号


