共计 21399 个字符,预计需要花费 54 分钟才能阅读完成。
一、samba 介绍
在早期的网络世界当中,不同主机的文件传输大多使用 FTP 来进行。不过 FTP 却有个小小的问题,那就是你无法直接修改主机上面的文件内容!也就是说,你想要更改 Linux 主机上面的某个文件时,你必须要将该文件下载后才能修改。在日常办公环境中,操作系统除了 windows 以外,还有 linux 或者 UNIX。windows 和 linux 或 UNIX 之间共享文件是无法直接完成的,为了解析不同系统之间的文件和打印机等资源的共享,我们今天来介绍一下 samba 服务。他可以解决不同系统平台之间的共享问题。
Samba 是在 Linux 和 UNIX 系统上实现 SMB 协议的一个免费软件,由服务器及客户端程序构成,也是一个 C / S 软件。
SMB(Server Messages Block,信息服务块)是一种在局域网上共享文件和打印机的一种通信协议,它为局域网内的不同计算机之间提供文件及打印机等资源的共享服务。SMB 协议是客户机 / 服务器型协议,客户机通过该协议可以访问服务器上的共享文件系统、打印机及其他
应用场景
文件与打印机共享: samba 的主要功能,samba 进程实现资源共享,将文件和打印机甚至是设备(如:CDROM)发布到网络中,以供用户访问
身份验证和权限验证: 对用户身份进行验证及权限设置,通过加密的方式保护共享文件和打印机
名称解析: 通过 nmbd 服务实现名称解析,将 NetBIOS 名称解析为 IP 地址
浏览服务: 在局域中,samba 可以成为本地主浏览器,保存可用
资源列表,当用户访问时,会提供浏览列表
SAMBA 与 NetBIOS
samba 是构建在 NetBIOS 这个协议之上的,而 NetBIOS 最早是从 IBM 诞生的,目的是让局域网内的计算机能够进行网络连接,由于不是针对于大型网络,所以 NetBIOS 是无法跨路由的。而 windows 操作系统也支持这个协议,所以在 Linux 主机上使用 SAMBA 部署的共享服务是可以使用 windows 主机访问的。那么 SAMBA 是不是就不能跨路由提供服务了呢?并不是,我们可以通过一个叫 NetBIOS over TCP/IP 的技术实现跨路由的 SAMBA 服务,但是目前 SAMBA 还是在局域网用的较多
SAMBA 的相关守护进程
nmbd:使用 UDP 的 137、138 来提供名称解析服务(NetBIOS)
smbd:管理共享和数据传输,使用的端为 TCP 的 139、445
SAMBA 的工作流程
1、协议协商
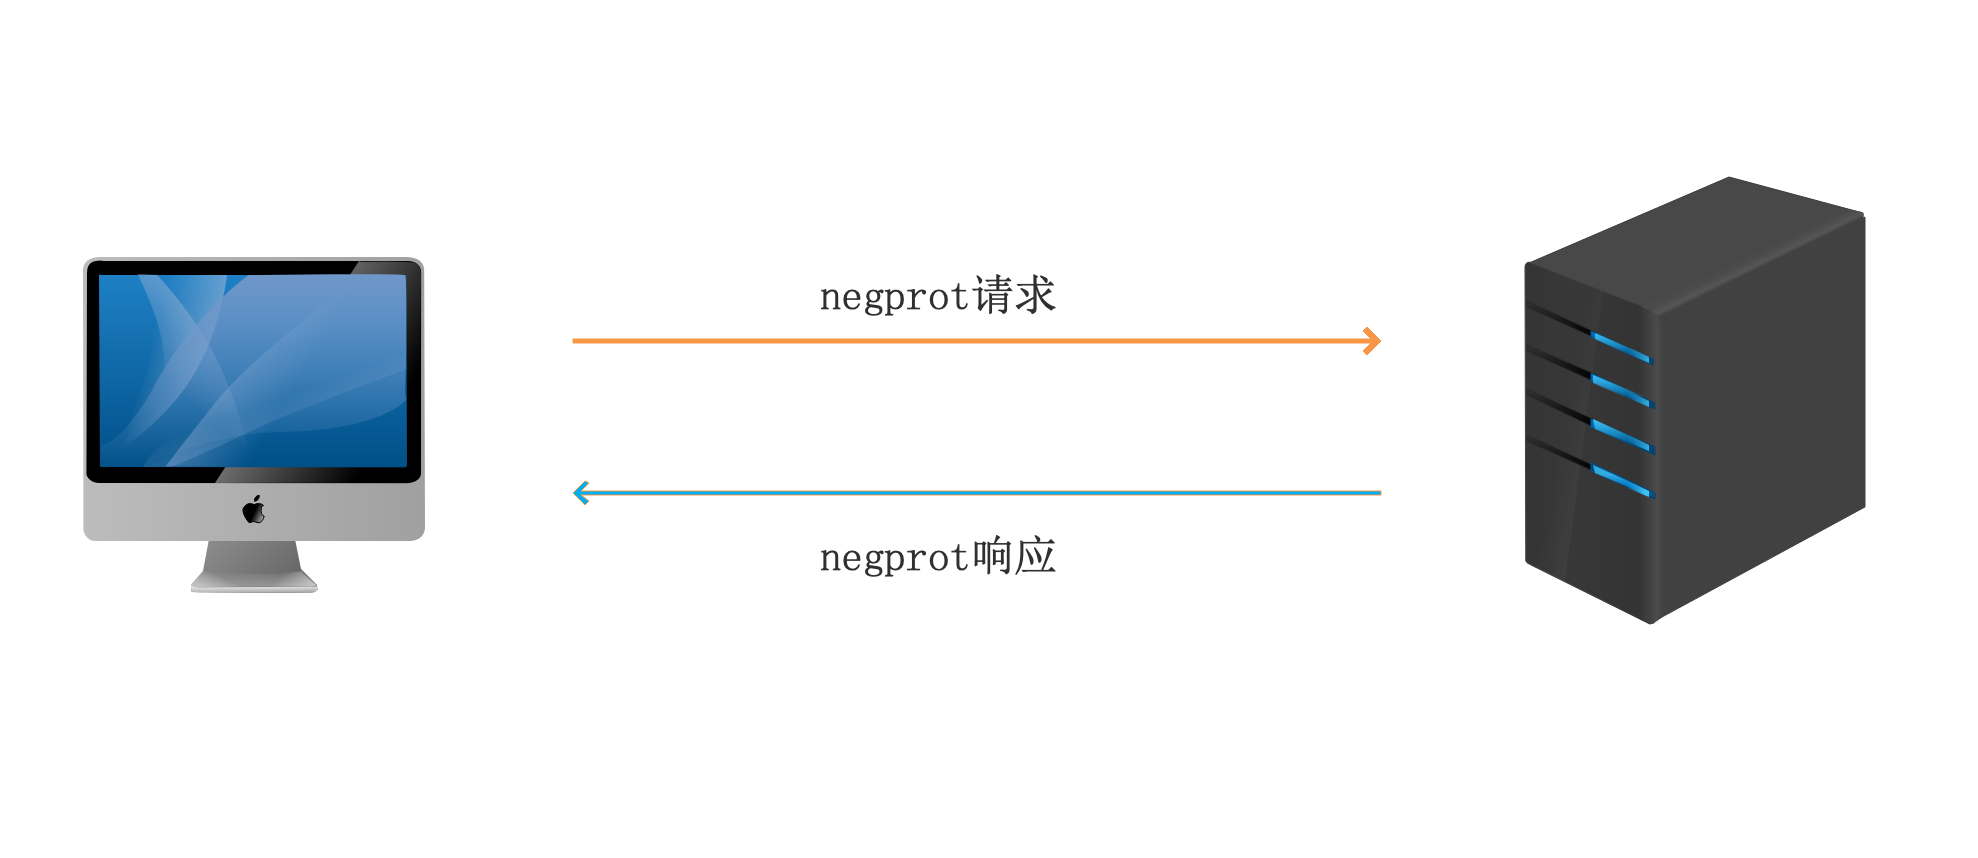
客户端在访问服务器时,发送 negprot 请求,告知服务器自己所支持的 SMB 类型,samba 服务器根据客户端的情况,选择最优的 SMB 类型并作出回应
2、建立连接
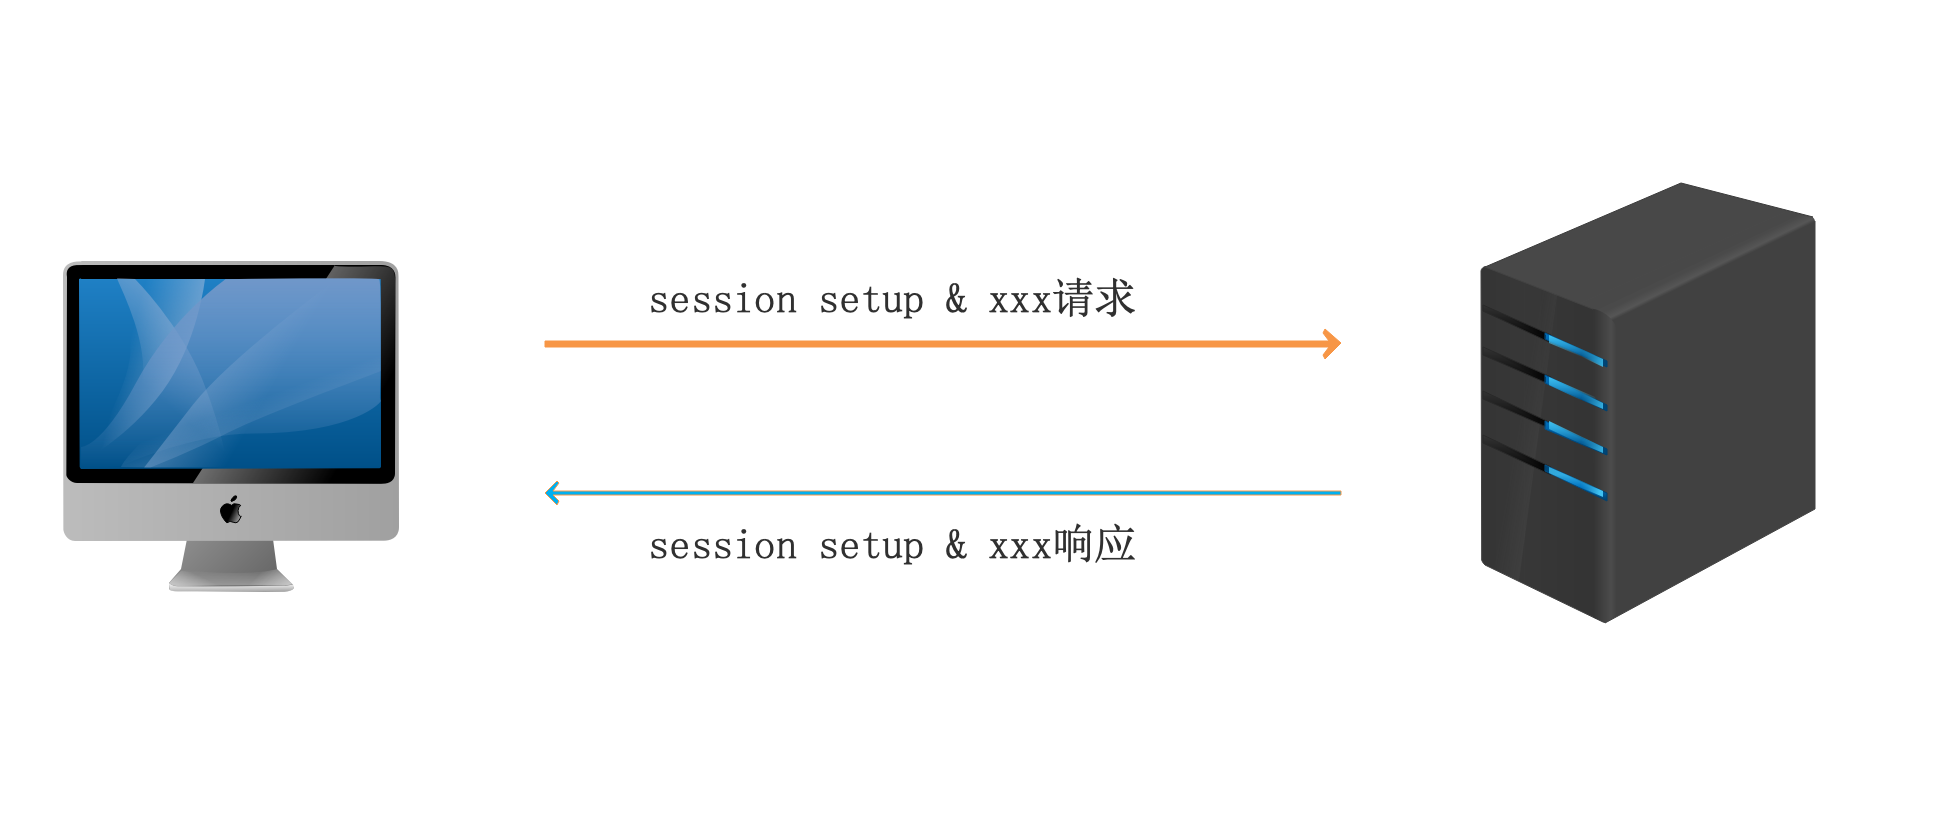
当 SMB 类型确认后,客户端会发送 session setup 指令数据包,提交账号和密码,请求与 samba 服务器建立连接,如果客户端通过身份验证,服务器会作出回应,并为用户分配一个唯一的 UID,在客户端与服务器通信时使用。
3、访问共享资源
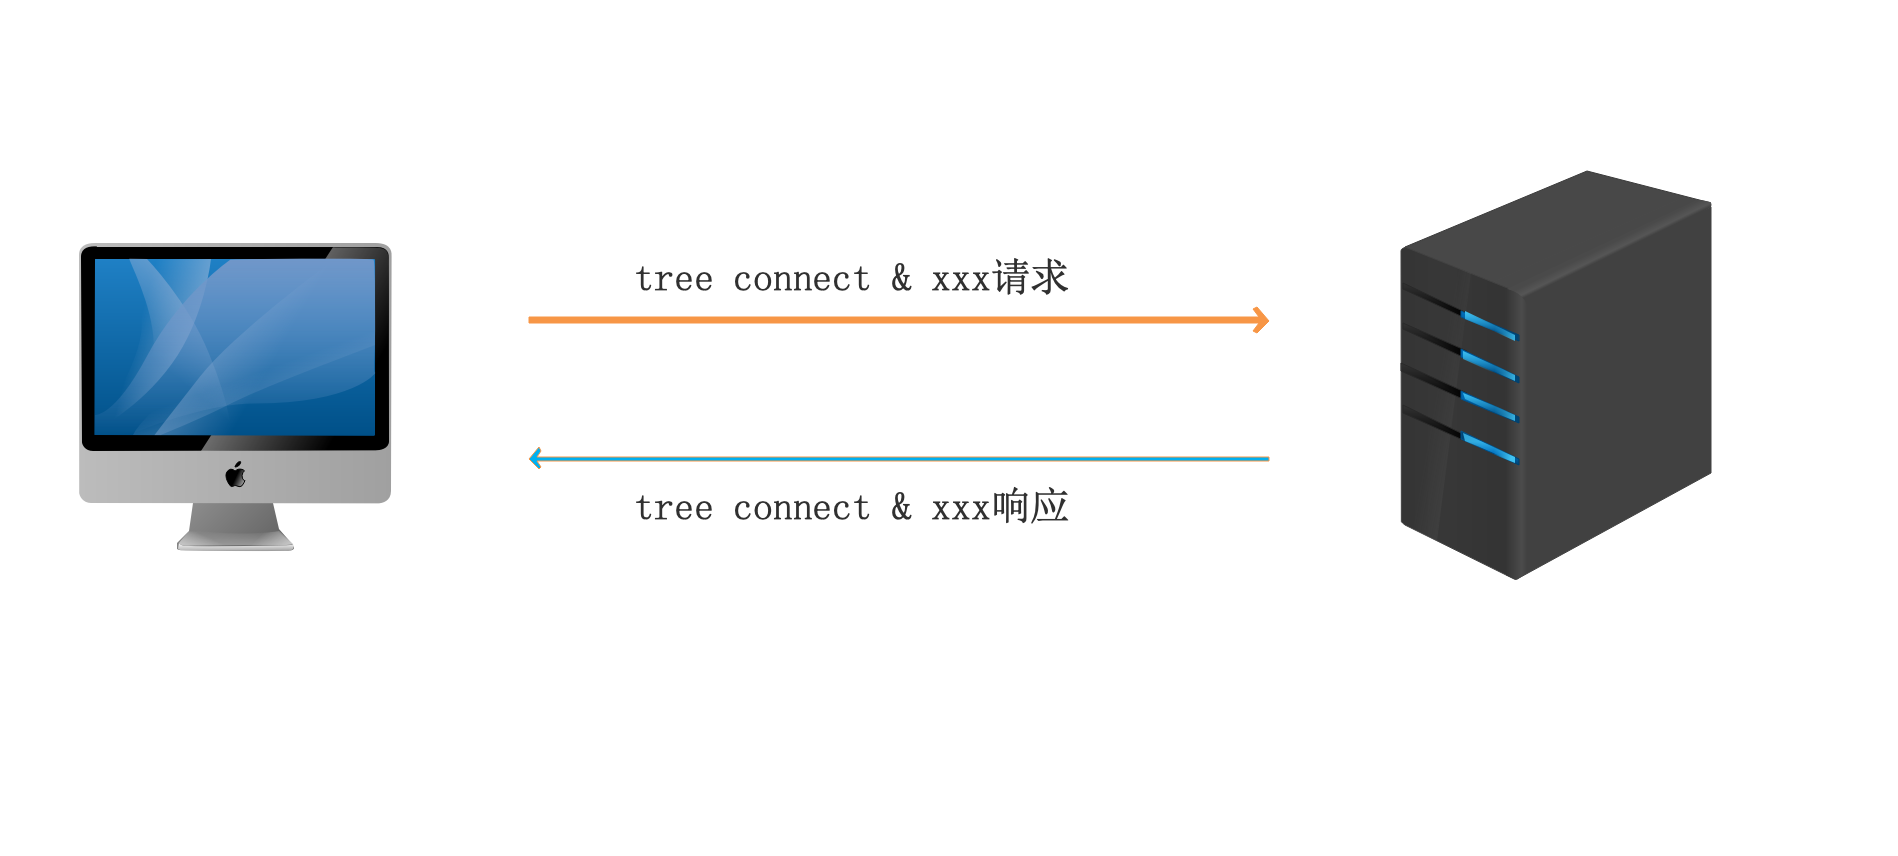
当客户端需要访问共享资源时,会发送 tree connect 数据包,告知服务器需要访问的共享资源的名称,如果设置允许,samba 服务器会为每个客户端与共享资源连接分配一个 TID(线程标识符),客户端就可以访问相应的共享资源
4、断开连接
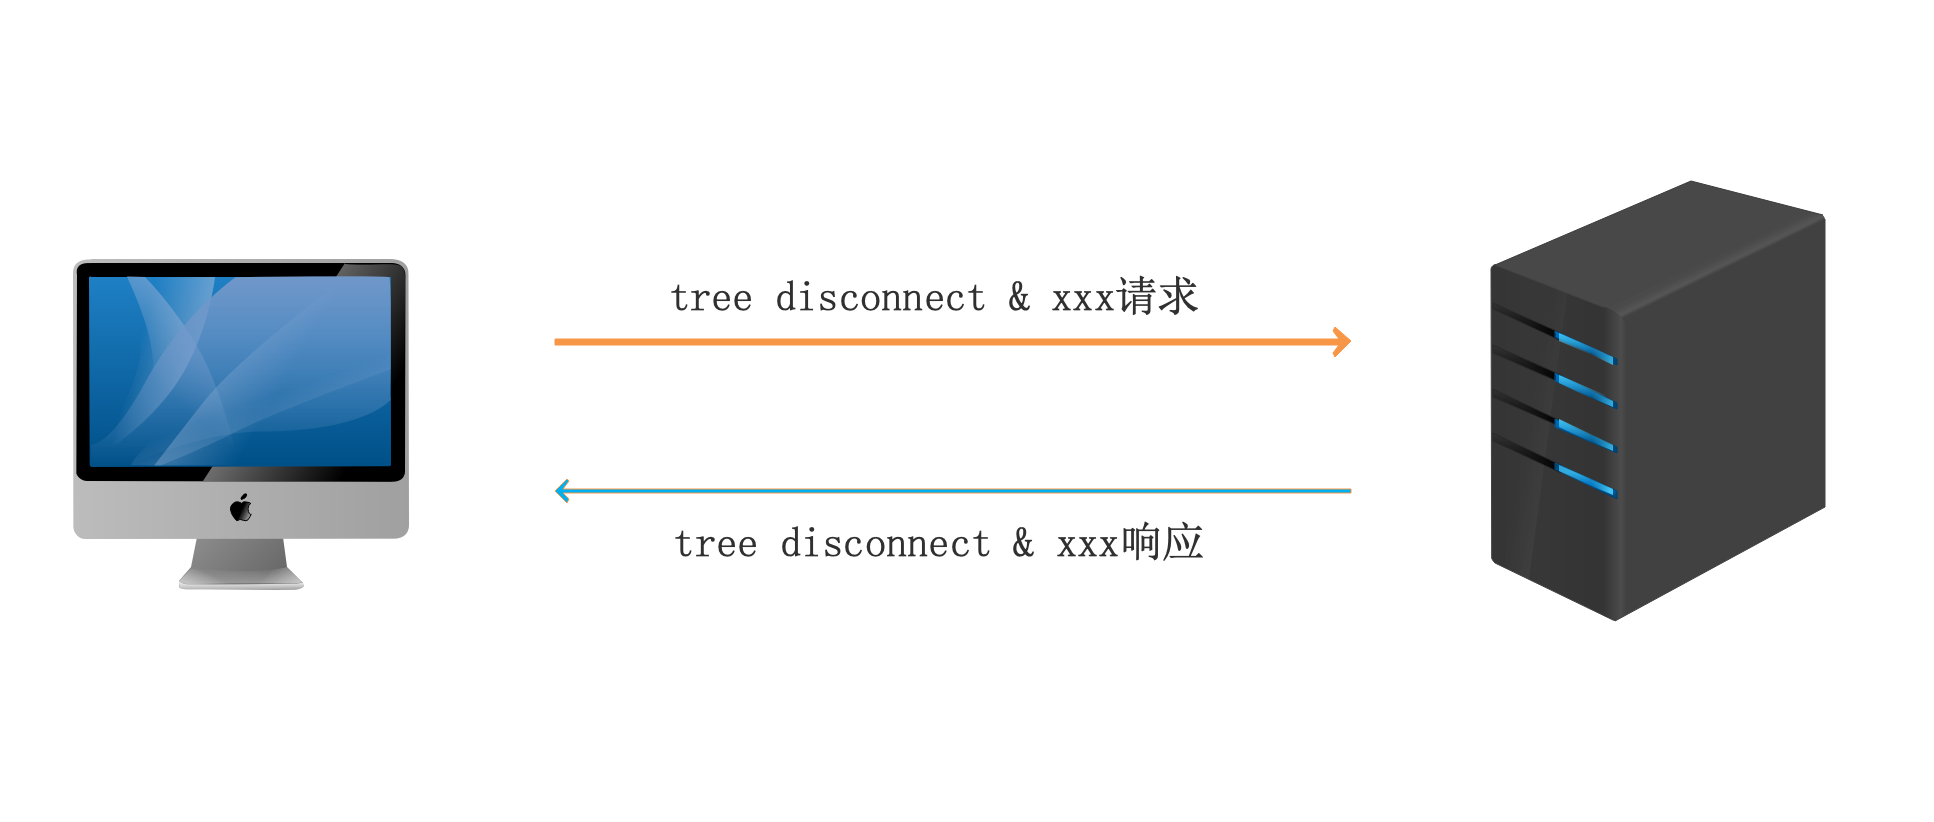
共享使用完毕,客户端向服务器发送 tree disconnect 报文关闭对共享的访问,与服务器断开连接
相关软件包
samba 主程序包,服务端需要
samba-client 客户端工具包
samba-common 通用工具和库文件,客户端服务器端都需要安装
相关文件
-
/etc/samba/smb.conf 主配置文件
-
/etc/samba/smb.conf.example 模板文件
-
/var/log/samba/log.nmbd nmbd 进程的解析信息
-
/var/log/samba/log.smbd 记录用户的访问记录、服务器的问题
二、samba 安装部署
a、安装软件包
[root@node1 ~]# dnf install samba samba-client -y
b、设置服务开机启动
| [root@node1 ~]# systemctl enable nmb.service smb.service | |
| Created symlink /etc/systemd/system/multi-user.target.wants/nmb.service → /usr/lib/systemd/system/nmb.service. | |
| Created symlink /etc/systemd/system/multi-user.target.wants/smb.service → /usr/lib/systemd/system/smb.service. |
c、开启服务
[root@node1 ~]# systemctl start nmb smb
三、samba 配置文件详解
主配文件路径: /etc/samba/smb.conf
模板文件:/etc/samba/smb.conf.example
| [root@baism ~]# cat smb.conf.example | |
| # This is the main Samba configuration file. For detailed information about the | |
| # options listed here, refer to the smb.conf(5) manual page. Samba has a huge | |
| # number of configurable options, most of which are not shown in this example. | |
| # | |
| # The Samba Wiki contains a lot of step-by-step guides installing, configuring, | |
| # and using Samba: | |
| # https://wiki.samba.org/index.php/User_Documentation | |
| # | |
| # In this file, lines starting with a semicolon (;) or a hash (#) are | |
| # comments and are ignored. This file uses hashes to denote commentary and | |
| # semicolons for parts of the file you may wish to configure. | |
| # | |
| # NOTE: Run the "testparm" command after modifying this file to check for basic | |
| # syntax errors. | |
| # | |
| #--------------- | |
| # | |
| SAMBA selinux 相关设置,如果你开启了 selinux,请注意下面的说明 | |
| # | |
| # | |
| #Security-Enhanced Linux (SELinux) Notes: | |
| # | |
| # Turn the samba_domain_controller Boolean on to allow a Samba PDC to use the | |
| # useradd and groupadd family of binaries. Run the following command as the | |
| # root user to turn this Boolean on: | |
| 如果你在域环境中使用 samba 那么请设置下面的 bool 值 | |
| # setsebool -P samba_domain_controller on | |
| # | |
| # Turn the samba_enable_home_dirs Boolean on if you want to share home | |
| # directories via Samba. Run the following command as the root user to turn this | |
| # Boolean on: | |
| # | |
| 假如希望通过 samba 共享用户家目录请设置下面的 bool 值 | |
| # setsebool -P samba_enable_home_dirs on | |
| # | |
| # If you create a new directory, such as a new top-level directory, label it | |
| # with samba_share_t so that SELinux allows Samba to read and write to it. Do | |
| # not label system directories, such as /etc/ and /home/, with samba_share_t, as | |
| # such directories should already have an SELinux label. | |
| # | |
| 加入你想将目录通过 samba 共享,请确认其目录标签为 sambe_share_t | |
| # Run the "ls -ldZ /path/to/directory" command to view the current SELinux | |
| # label for a given directory. | |
| # | |
| # Set SELinux labels only on files and directories you have created. Use the | |
| # chcon command to temporarily change a label: | |
| 标签设置方法 | |
| # chcon -t samba_share_t /path/to/directory | |
| # | |
| # Changes made via chcon are lost when the file system is relabeled or commands | |
| # such as restorecon are run. | |
| # | |
| # Use the samba_export_all_ro or samba_export_all_rw Boolean to share system | |
| # directories. To share such directories and only allow read-only permissions: | |
| 对共享目录的权限的 bool 设置,只读或读写 | |
| # setsebool -P samba_export_all_ro on | |
| # To share such directories and allow read and write permissions: | |
| # setsebool -P samba_export_all_rw on | |
| # | |
| # To run scripts (preexec/root prexec/print command/...), copy them to the | |
| # /var/lib/samba/scripts/ directory so that SELinux will allow smbd to run them. | |
| # Note that if you move the scripts to /var/lib/samba/scripts/, they retain | |
| # their existing SELinux labels, which may be labels that SELinux does not allow | |
| # smbd to run. Copying the scripts will result in the correct SELinux labels. | |
| # Run the "restorecon -R -v /var/lib/samba/scripts" command as the root user to | |
| # apply the correct SELinux labels to these files. | |
| # | |
| #-------------- | |
| # | |
| #======================= Global Settings ===================================== | |
| 全局设置,对整个服务都生效 | |
| [global] | |
| 网络设置 | |
| # ----------------------- Network-Related Options ------------------------- | |
| # | |
| # workgroup = the Windows NT domain name or workgroup name, for example, MYGROUP. | |
| # | |
| # server string = the equivalent of the Windows NT Description field. | |
| # | |
| # netbios name = used to specify a server name that is not tied to the hostname, | |
| # maximum is 15 characters. | |
| # | |
| # interfaces = used to configure Samba to listen on multiple network interfaces. | |
| # If you have multiple interfaces, you can use the "interfaces =" option to | |
| # configure which of those interfaces Samba listens on. Never omit the localhost | |
| # interface (lo). | |
| # | |
| # hosts allow = the hosts allowed to connect. This option can also be used on a | |
| # per-share basis. | |
| # | |
| # hosts deny = the hosts not allowed to connect. This option can also be used on | |
| # a per-share basis. | |
| # | |
| 定义计算机的工作组, 如果希望和 windows 共享,可以设置为 workgroup,这样就可以在 windows 的网上邻居中找到 linux 计算机 | |
| workgroup = MYGROUP | |
| 对 samba 服务器的描述信息 | |
| server string = Samba Server Version %v | |
| 设置 netbios 计算机名称 | |
| ; netbios name = MYSERVER | |
| samba 使用本机的那块网卡 | |
| ; interfaces = lo eth0 192.168.12.2/24 192.168.13.2/24 | |
| 允许那个网段访问 samba 服务器共享,还可以使用“hosts deny”设置禁止的网段,“hosts allow”的优先级高,表现形式可以是具体的 IP 地址和域名,还可以是 *、?、local、all,也可以使用 EXCEPT 排除 | |
| 如:hosts allow = 192.168.0. EXCEPT 192.168.0.100 | |
| ; hosts allow = 127. 192.168.12. 192.168.13. | |
| # | |
| 日志选项 | |
| # --------------------------- Logging Options ----------------------------- | |
| # | |
| # log file = specify where log files are written to and how they are split. | |
| # | |
| # max log size = specify the maximum size log files are allowed to reach. Log | |
| # files are rotated when they reach the size specified with "max log size". | |
| # | |
| samba 日志文件路径,%m 表示客户端的 NetBios 名称,还有其它的变量,可以使用 man smb.conf 通过 man 手册去查看 | |
| # log files split per-machine: | |
| log file = /var/log/samba/log.%m | |
| 日志文件大小,0为不限制,注意不建议这样设置 | |
| # maximum size of 50KB per log file, then rotate: | |
| max log size = 50 | |
| 独立服务选项 | |
| # ----------------------- Standalone Server Options ------------------------ | |
| # | |
| # security = the mode Samba runs in. This can be set to user, share | |
| # (deprecated), or server (deprecated). | |
| # | |
| # passdb backend = the backend used to store user information in. New | |
| # installations should use either tdbsam or ldapsam. No additional configuration | |
| # is required for tdbsam. The "smbpasswd" utility is available for backwards | |
| # compatibility. | |
| # | |
| samba 安全级别 | |
| share: 不需要账号密码,公开共享 | |
| user: 需要提供 samba 账号密码才能访问共享,私密共享 | |
| server:依靠其他 Windows NT/2000或 Samba Server 来验证用户的账号和密码, 是一种代理验证。此种安全模式下, 系统管理员可以把所有的 Windows 用户和口令集中到一个 NT 系统上,> 使用 Windows NT 进行 Samba 认证, 远程服务器可以自动认证全部用户和口令, 如果认证失败,Samba 会使用 user 级别。domain:如果 samba 服务器加入到域环境中,验证工作由域控制器完成。ads:具备 domain 级别的所有功能,并且具备域控制器功能 | |
| auto: 安全级别会受“server role”字段的值影响,“server role”字段默认值为 auto(用户通过验证后可以使用),其余的参数决定了 samba 服务器加入到 window 域环境中的角色是成员还是域控制器 | |
| 一般情况下我们使用 share 和 user 的比较多,除非公司有完整的域环境 | |
| security = user | |
| 用户及密码的管理方式,有三种 smbpasswd、tdbsam、ldapsam | |
| smbpasswd: 使用 samba 自带的工具 smbpasswd 命令为用户(真实用户或虚拟用户)设置密码,密码默认存放在 /var/lib/samba/private/smbpasswd 文件中,也可以使用“smb passwd file = /etc/samba/smbpasswd" 指定密码文件位置 | |
| smbpasswd -a username 添加一个用户 / 修改用户密码 | |
| smbpasswd -d username 禁用用户 | |
| smbpasswd -e username 启用用户 | |
| smbpasswd -x username 删除用户 | |
| tdbsam:在 /var/lib/samba/private 建立一个 passdb.tdb 存放密码,也可以使用“smb passwd file”字段指定存放位置,除了可以使用 smbpasswd 命令管理用户之外,还可以使用 pdbedit 命令指定,而且只能是系统用户(真实用户),用户的建立可以使用 mksmbpasswd 命令建立一个 smbpasswd 文件,再使用 pdbedit 将文件里的用户导入数据库 | |
| cat /etc/passwd | mksmbpasswd > /etc/samba/smbpasswd | |
| pdbedit -i smbpasswd:/etc/samba/smbpasswd | |
| 额外的用法 | |
| pdbedit -a username:新建 Samba 账户。pdbedit -x username:删除 Samba 账户。pdbedit -L:列出 Samba 用户列表,读取 passdb.tdb 数据库文件。pdbedit -Lv:列出 Samba 用户列表的详细信息。pdbedit -c“[D]”–u username:禁用该 Samba 用户的账号。pdbedit -c“[]”–u username:恢复该 Samba 用户的账号。ldapsam:基于 LDAP 的认证方式,首先要有 LDAP 服务,并且加入到 LDAP 中 | |
| passdb backend = tdbsam | |
| 域成员选项 | |
| # ----------------------- Domain Members Options ------------------------ | |
| # | |
| # security = must be set to domain or ads. | |
| # | |
| # passdb backend = the backend used to store user information in. New | |
| # installations should use either tdbsam or ldapsam. No additional configuration | |
| # is required for tdbsam. The "smbpasswd" utility is available for backwards | |
| # compatibility. | |
| # | |
| # realm = only use the realm option when the "security = ads" option is set. | |
| # The realm option specifies the Active Directory realm the host is a part of. | |
| # | |
| # password server = only use this option when the "security = server" | |
| # option is set, or if you cannot use DNS to locate a Domain Controller. The | |
| # argument list can include My_PDC_Name, [My_BDC_Name], and [My_Next_BDC_Name]: | |
| # | |
| # password server = My_PDC_Name [My_BDC_Name] [My_Next_BDC_Name] | |
| # | |
| # Use "password server = *" to automatically locate Domain Controllers. | |
| #设置域共享 | |
| ; security = domain | |
| ; passdb backend = tdbsam | |
| #定义域名称 | |
| ; realm = MY_REALM | |
| #域验证服务器 | |
| ; password server = <NT-Server-Name> | |
| #域控选项 | |
| # ----------------------- Domain Controller Options ------------------------ | |
| # | |
| # security = must be set to user for domain controllers. | |
| # | |
| # passdb backend = the backend used to store user information in. New | |
| # installations should use either tdbsam or ldapsam. No additional configuration | |
| # is required for tdbsam. The "smbpasswd" utility is available for backwards | |
| # compatibility. | |
| # | |
| # domain master = specifies Samba to be the Domain Master Browser, allowing | |
| # Samba to collate browse lists between subnets. Do not use the "domain master" | |
| # option if you already have a Windows NT domain controller performing this task. | |
| # | |
| # domain logons = allows Samba to provide a network logon service for Windows | |
| # workstations. | |
| # | |
| # logon script = specifies a script to run at login time on the client. These | |
| # scripts must be provided in a share named NETLOGON. | |
| # | |
| # logon path = specifies (with a UNC path) where user profiles are stored. | |
| # | |
| # | |
| ; security = user | |
| ; passdb backend = tdbsam | |
| 让 samba 成为域的主浏览器 | |
| ; domain master = yes | |
| 允许 samba 为 windows 提供网络登录服务 | |
| ; domain logons = yes | |
| # the following login script name is determined by the machine name | |
| # (%m): | |
| 定义客户端在登录时要执行的脚本 | |
| ; logon script = %m.bat | |
| # the following login script name is determined by the UNIX user used: | |
| ; logon script = %u.bat | |
| 定义记录用户个性化信息的文件存放的位置,空值表示禁用个性化设置 | |
| ; logon path = \\%L\Profiles\%u | |
| # use an empty path to disable profile support: | |
| ; logon path = | |
| # various scripts can be used on a domain controller or a stand-alone | |
| # machine to add or delete corresponding UNIX accounts: | |
| 定义做为域控时,针对于用户和主机的添加、删除时需要执行的具体操作 | |
| ; add user script = /usr/sbin/useradd "%u" -n -g users | |
| ; add group script = /usr/sbin/groupadd "%g" | |
| ; add machine script = /usr/sbin/useradd -n -c "Workstation (%u)" -M -d /nohome -s /bin/false "%u" | |
| ; delete user script = /usr/sbin/userdel "%u" | |
| ; delete user from group script = /usr/sbin/userdel "%u" "%g" | |
| ; delete group script = /usr/sbin/groupdel "%g" | |
| 这些设置选项主要用于 SMB 网络中进行浏览时,设置 samba 服务器的行为。缺省情况不让 samba 服务器参加 broswser 的推举过程,为了使得 samba 服务器能成为 browser,就需要设定 local master =yes。然后 samba 服务就可以根据 os level 设置的权重进行推举,缺省的 os level 为 0,这个权重不会赢得推举。但可以取消注释,将 os level 设置为 33,这将在与所有 Windows 计算机(包括 Windows NT)的推举竞赛中获得胜利,因为 NT server 的权重为 32。设置比 33 更高的权重,只是在不同的 samba 服务器之间进行选择时才有意义。# | |
| preferred master 可以设置自己优先成为浏览服务器候选人 | |
| # | |
| # ----------------------- Browser Control Options ---------------------------- | |
| # | |
| # local master = when set to no, Samba does not become the master browser on | |
| # your network. When set to yes, normal election rules apply. | |
| # | |
| # os level = determines the precedence the server has in master browser | |
| # elections. The default value should be reasonable. | |
| # | |
| # preferred master = when set to yes, Samba forces a local browser election at | |
| # start up (and gives itself a slightly higher chance of winning the election). | |
| # | |
| ; local master = no | |
| ; os level = 33 | |
| ; preferred master = yes | |
| # | |
| # | |
| wins 服务,如果网络中配置了 wins 服务器可以在此设置 wins 相关项 | |
| #----------------------------- Name Resolution ------------------------------- | |
| # | |
| # This section details the support for the Windows Internet Name Service (WINS). | |
| # | |
| # Note: Samba can be either a WINS server or a WINS client, but not both. | |
| # | |
| # wins support = when set to yes, the NMBD component of Samba enables its WINS | |
| # server. | |
| # | |
| # wins server = tells the NMBD component of Samba to be a WINS client. | |
| # | |
| # wins proxy = when set to yes, Samba answers name resolution queries on behalf | |
| # of a non WINS capable client. For this to work, there must be at least one | |
| # WINS server on the network. The default is no. | |
| # | |
| # dns proxy = when set to yes, Samba attempts to resolve NetBIOS names via DNS | |
| # nslookups. | |
| 设置 nmb 进程支持 wins 服务 | |
| ; wins support = yes | |
| 设置 wins 服务器 ip | |
| ; wins server = w.x.y.z | |
| 设置 wins 代理 IP | |
| ; wins proxy = yes | |
| 设置 Samba 服务器是否在无法联系 WINS 服务器时通过 DNS 去解析主机的 NetBIOS 名 | |
| ; dns proxy = yes | |
| 该部分包括 Samba 服务器打印机相关设置 | |
| # --------------------------- Printing Options ----------------------------- | |
| # | |
| # The options in this section allow you to configure a non-default printing | |
| # system. | |
| # | |
| # load printers = when set you yes, the list of printers is automatically | |
| # loaded, rather than setting them up individually. | |
| # | |
| # cups options = allows you to pass options to the CUPS library. Setting this | |
| # option to raw, for example, allows you to use drivers on your Windows clients. | |
| # | |
| # printcap name = used to specify an alternative printcap file. | |
| # | |
| 是否启用共享打印机 | |
| load printers = yes | |
| cups options = raw | |
| 打印机配置文件 | |
| ; printcap name = /etc/printcap | |
| # obtain a list of printers automatically on UNIX System V systems: | |
| ; printcap name = lpstat | |
| 打印机的系统类型, 现在支持的打印系统有:bsd, sysv, plp, lprng, aix, hpux, qnx,cups | |
| ; printing = cups | |
| 该部分包括 Samba 服务器如何保留从 Windows 客户端复制或移动到 Samba 服务器共享目录文件的 Windows 文件属性的相关配置. | |
| # --------------------------- File System Options --------------------------- | |
| # | |
| # The options in this section can be un-commented if the file system supports | |
| # extended attributes, and those attributes are enabled (usually via the | |
| # "user_xattr" mount option). These options allow the administrator to specify | |
| # that DOS attributes are stored in extended attributes and also make sure that | |
| # Samba does not change the permission bits. | |
| # | |
| # Note: These options can be used on a per-share basis. Setting them globally | |
| # (in the [global] section) makes them the default for all shares. | |
| 当 Windows 客户端将文件复制或移动到 Samba 服务器共享目录时,是否保留文件在 Windows 中的存档属性。默认 no。; map archive = no | |
| 当 Windows 客户端将文件复制或移动到 Samba 服务器共享目录时,是否保留文件在 Windows 中的隐藏属性。默认 no。; map hidden = no | |
| 当 Windows 客户端将文件复制或移动到 Samba 服务器共享目录时,是否保留文件在 Windows 中的只读属性。默认为 no。; map read only = no | |
| 当 Windows 客户端将文件复制或移动到 Samba 服务器共享目录时,是否保留文件在 Windows 中的系统文件属性。默认为 no。; map system = no | |
| 当 Windows 客户端将文件复制或移动到 Samba 服务器共享目录时,是否保留文件在 Windows 中的相关属性(只读、系统、隐藏、存档属性)。默认为 yes。; store dos attributes = yes | |
| 共享设置 | |
| #============================ Share Definitions ============================== | |
| #用户家目录共享 | |
| #共享名称 | |
| [homes] | |
| 描述 | |
| comment = Home Directories | |
| 是否为隐藏共享 | |
| browseable = no | |
| 是否允许写入 | |
| writable = yes | |
| 允许访问该共享资源的 smb 用户,@组 | |
| ; valid users = %S | |
| ; valid users = MYDOMAIN\%S | |
| 打印机共享 | |
| [printers] | |
| 描述 | |
| comment = All Printers | |
| 路径 | |
| path = /var/spool/samba | |
| 是否可浏览,no 类似隐藏共享 | |
| browseable = no | |
| 是否支持 guest 访问,和 public 指令类似 | |
| guest ok = no | |
| 是否可写 | |
| writable = no | |
| 是否允许打印 | |
| printable = yes | |
| # Un-comment the following and create the netlogon directory for Domain Logons: | |
| ; [netlogon] | |
| ; comment = Network Logon Service | |
| ; path = /var/lib/samba/netlogon | |
| ; guest ok = yes | |
| ; writable = no | |
| ; share modes = no | |
| # Un-comment the following to provide a specific roaming profile share. | |
| # The default is to use the user's home directory: | |
| ; [Profiles] | |
| ; path = /var/lib/samba/profiles | |
| ; browseable = no | |
| ; guest ok = yes | |
| # A publicly accessible directory that is read only, except for users in the | |
| # "staff" group (which have write permissions): | |
| ; [public] | |
| ; comment = Public Stuff | |
| ; path = /home/samba | |
| ; public = yes | |
| ; writable = no | |
| ; printable = no | |
| 定义允许哪些 smb 用户写入,+ 和 @表示一个组 | |
| ; write list = +staff |
四、samba 文件共享案例
拓扑图
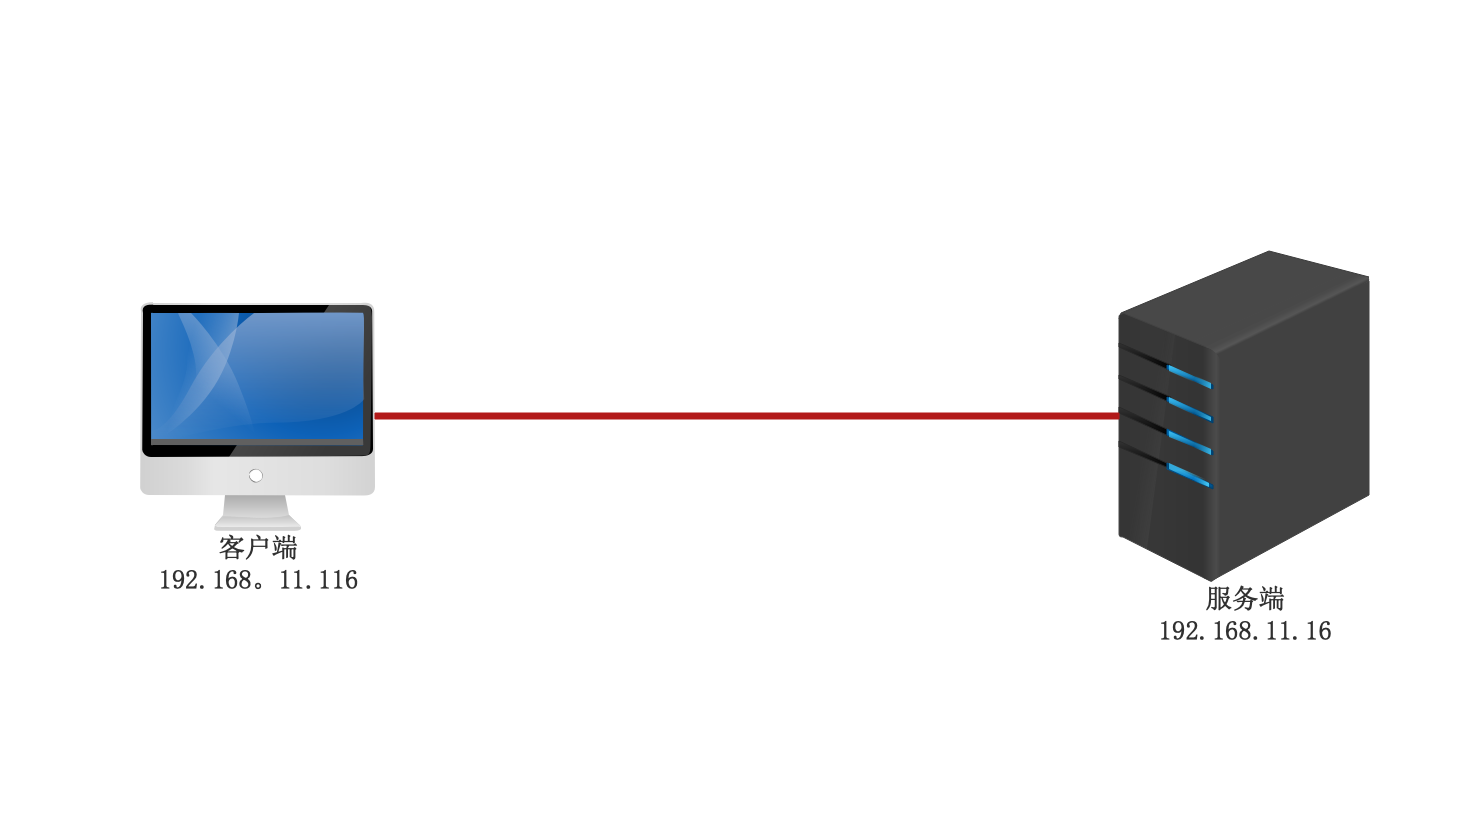
环境:两台安装 CentOS8 的主机,关闭 selinux,关闭防火墙
案例需求:
1)、新建文件夹 /common
2)、在 server 上配置 SMB 服务
3)、您的 SMB 服务器必须是 workgroup 工作组的一个成员
4)、共享 /common 目录 共享名必须为 common
5)、只有 192.168.11.0 网段内的客户端可以访问 common 共享
6)、common 必须是可以浏览的
7)、用户 hello 必须能够读取共享中的内容,如果需要的话,验证的密码是 hello
8)、用户 test 必须能够拥有写权限,如果需要的话,验证的密码是 test
a、创建共享目录
[root@node1 ~]# mkdir /common
b、设置共享目录权限,因为默认权限是 755 除了管理员外,其他人只能读不能写,本实验中要求 test 能写,所以其他人加写权限。在 samba 中共享目录的权限除了看 samba 服务的设置之外,还要看系统的权限设置,系统针对于权限不一致的处理方式是取交集。所以各位在建立共享时一定要注意权限方面的问题
| [root@node1 ~]# chmod 757 /common | |
| [root@node1 ~]# cd /etc/samba/ | |
| [root@node1 ~]# vim /etc/samba/smb.conf | |
| # read the smb.conf manpage. | |
| # Run 'testparm' to verify the config is correct after | |
| # you modified it. | |
| [global] | |
| # 设置工作组为 workgroup | |
| workgroup = workgroup | |
| security = user | |
| passdb backend = tdbsam | |
| printing = cups | |
| printcap name = cups | |
| load printers = yes | |
| cups options = raw | |
| [homes] | |
| comment = Home Directories | |
| valid users = %S, %D%w%S | |
| browseable = no | |
| read only = no | |
| inherit acls = yes | |
| [printers] | |
| comment = All Printers | |
| path = /var/tmp | |
| printable = yes | |
| create mask = 0600 | |
| browseable = no | |
| # 共享设置,参考配置文件详解理解以下选项 | |
| [common] | |
| comment = samba file share test | |
| path = /common # 绝对路径 | |
| browseable = yes | |
| hosts allow = 192.168.11.0/255.255.255.0 | |
| valid users = hello,test | |
| writable = no | |
| write list = test | |
| public = no |
c、重启服务生效
[root@node1 ~] systemctl restart smb nmb
d、创建 samba 用户
使用 useradd 命令创建 hello 和 test 用户并设置密码
| [] | |
| New SMB password: | |
| Retype new SMB password: | |
| [] | |
| New SMB password: | |
| Retype new SMB password: | |
共享指令拓展
| valid users 指定能够进入此资源的特定用户和组 | |
| invalid users 指定不能够使用该共享资源的用户和组 | |
| read list 指定只能读取该共享资源的用户和组。write list 指定能读取和写该共享资源的用户和组。admin list 指定能管理该共享资源(包括读写和权限赋予等)的用户和组。public 指明该共享资源是否能给游客帐号访问,这个开关有时候也叫 guest ok,所以有的配置文件中出现 guest ok = yes 其实和 public = yes 是一样的。hide dot files 指明是不是像 unix 那样隐藏以“.”号开头的文件。create mask 指明新建立的文件的属性,一般是0755。directory mode 指明新建立的目录的属性,一般是0755。sync always 指明对该共享资源进行写操作后是否进行同步操作。preserve case 指明保持大小写。yes/no | |
| case sensitive 指明是否对大小写敏感,一般选 no, 不然可能引起错误。default case 指明缺省的文件名是全部大写还是小写。upper/lower | |
| force user 强制把建立文件的属主是谁。如果我有一个目录,让来宾用户可以写,那么来宾用户就可以删除,如果我用 force user= 王老师 强制建立文件的属主是 王老师,同时限制 create mask=0755,这样来宾用户就不能删除了 | |
| wide links 指明是否允许共享外符号连接,比如共享资源里面有个连接指向非共享资源里面的文件或者目录,如果设置 wide links = no 将使该连接不可用。max connections = n 设定同时连接数是 n。delete readonly 指明能否删除共享资源里面已经被定义为只读的文件 |
五、共享案例 - 客户端访问共享
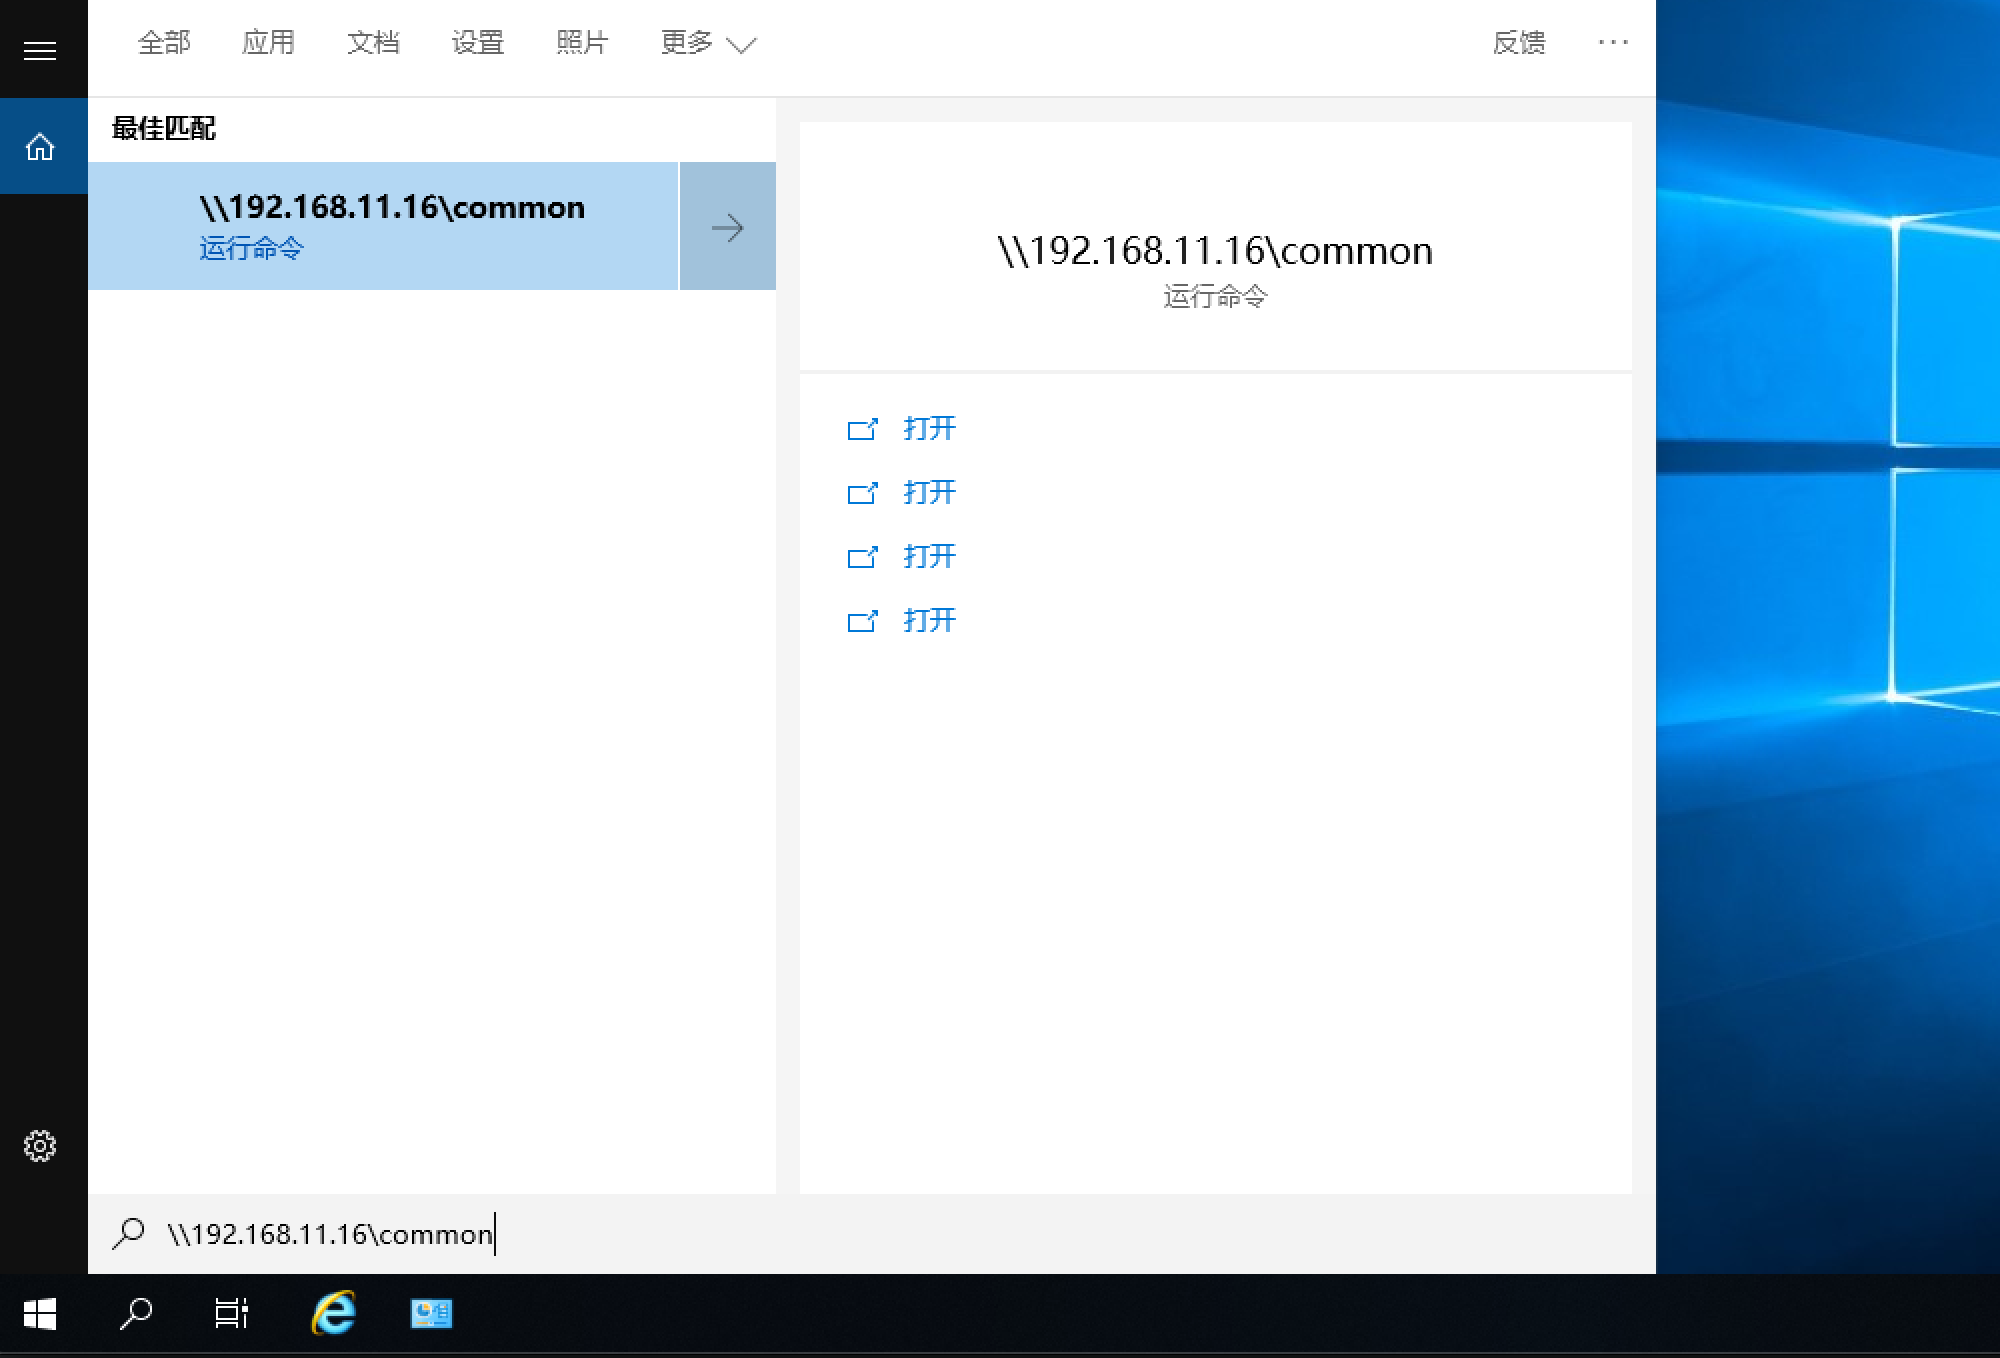
创建好了共享了,如果用户希望访问 samba 共享,windows 用户通过网上邻居或者在运行中输出 [\IP\ 共享名] 的方式访问 samba 共享,也可以通过网络映射的方式将共享挂载的本地。linux 或者 UNIX 用户则可以使用 samba 提供的客户端 smbclient 或者通过 CIFS 协议将共享挂载到本地。
smbclient 客户端命令
| smbclient - 类似 FTP 操作方式的访问 SMB/CIFS 服务器资源的客户端 | |
| 常用命令选项 | |
| -L 此选项允许你查看服务器上可以获得的服务资源 | |
| -U|--user=username[%password] 这个参数指定程序联接时使用的用户名或者用户名和密码,如果没指定 %password,将提示用户输入。-W|--workgroup=domain 设置用户名的 SMB 域。这个选项越过了 smb.conf 配置文件中的默认域。-N 如果指定了这个选项,就会省略通常的口令提示。当访问无需口令的服务资源时它很有用。 |
任务需求
linux 下访问 samba 共享
a、客户端信息
| [root@slave ~]# ifconfig ens33 | |
| ens33: flags=4163<UP,BROADCAST,RUNNING,MULTICAST> mtu 1500 | |
| inet 192.168.11.116 netmask 255.255.255.0 broadcast 192.168.11.255 | |
| inet6 fe80::20c:29ff:fe8e:ea58 prefixlen 64 scopeid 0x20<link> | |
| ether 00:0c:29:8e:ea:58 txqueuelen 1000 (Ethernet) | |
| RX packets 5166 bytes 3736352 (3.5 MiB) | |
| RX errors 0 dropped 0 overruns 0 frame 0 | |
| TX packets 2311 bytes 297960 (290.9 KiB) | |
| TX errors 0 dropped 0 overruns 0 carrier 0 collisions 0 |
b、使用 smbclient 访问共享,验证第四点教学案例设置
| 测试用户 hello | |
| [root@manage01 ~]# smbclient //192.168.11.16/common -U hello | |
| Enter SAMBA\hello's password: | |
| 或 | |
| [root@manage01 ~]# smbclient //192.168.11.16/common -U hello%hello | |
| Try "help" to get a list of possible commands. | |
| smb: \> ls | |
| smb: \> lcd /etc/ | |
| smb: \> put passwd 写入失败 | |
| NT_STATUS_ACCESS_DENIED opening remote file \passwd | |
| 测试用户 test | |
| [root@manage01 ~]# smbclient //192.168.11.16/common -U test%test | |
| Try "help" to get a list of possible commands. | |
| smb: \> lcd /etc/ | |
| smb: \> put passwd | |
| putting file passwd as \passwd (728.2 kb/s) (average 728.2 kb/s) 可以上传 | |
| smb: \> exit | |
| samba 命令类似于 ftp 文本界面命令,参考之前的 vsftp 使用。 |
c、linux 挂载共享
| [] | |
| [] | |
| [] | |
| [] | |
| ...... | |
| //192.168.11.16/common on /opt/samba_share type cifs (rw,relatime,vers=default,cache=strict,username=hello,domain=,uid=0,noforceuid,gid=0,noforcegid,addr=192.168.11.16,file_mode=0755,dir_mode=0755,soft,nounix,serverino,mapposix,rsize=1048576,wsize=1048576,echo_interval=60,actimeo=1) | |
| [] | |
| initial-setup-ks.cfg passwd |
d、windows 访问共享
打开开始菜单如下输入
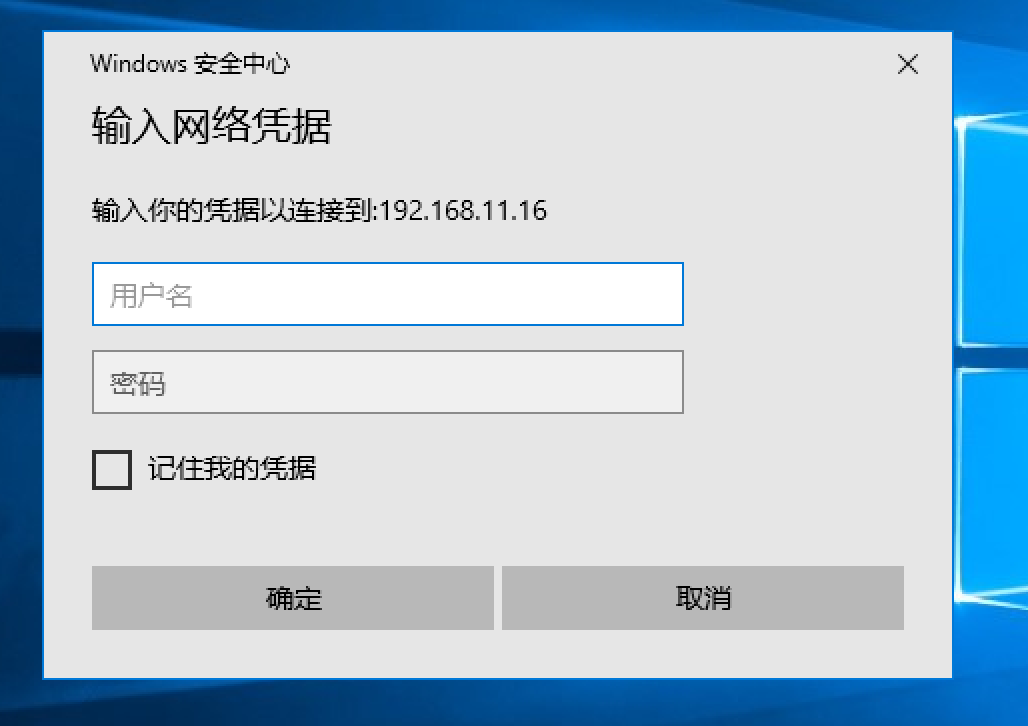
回车以后出现下图,输入账号密码
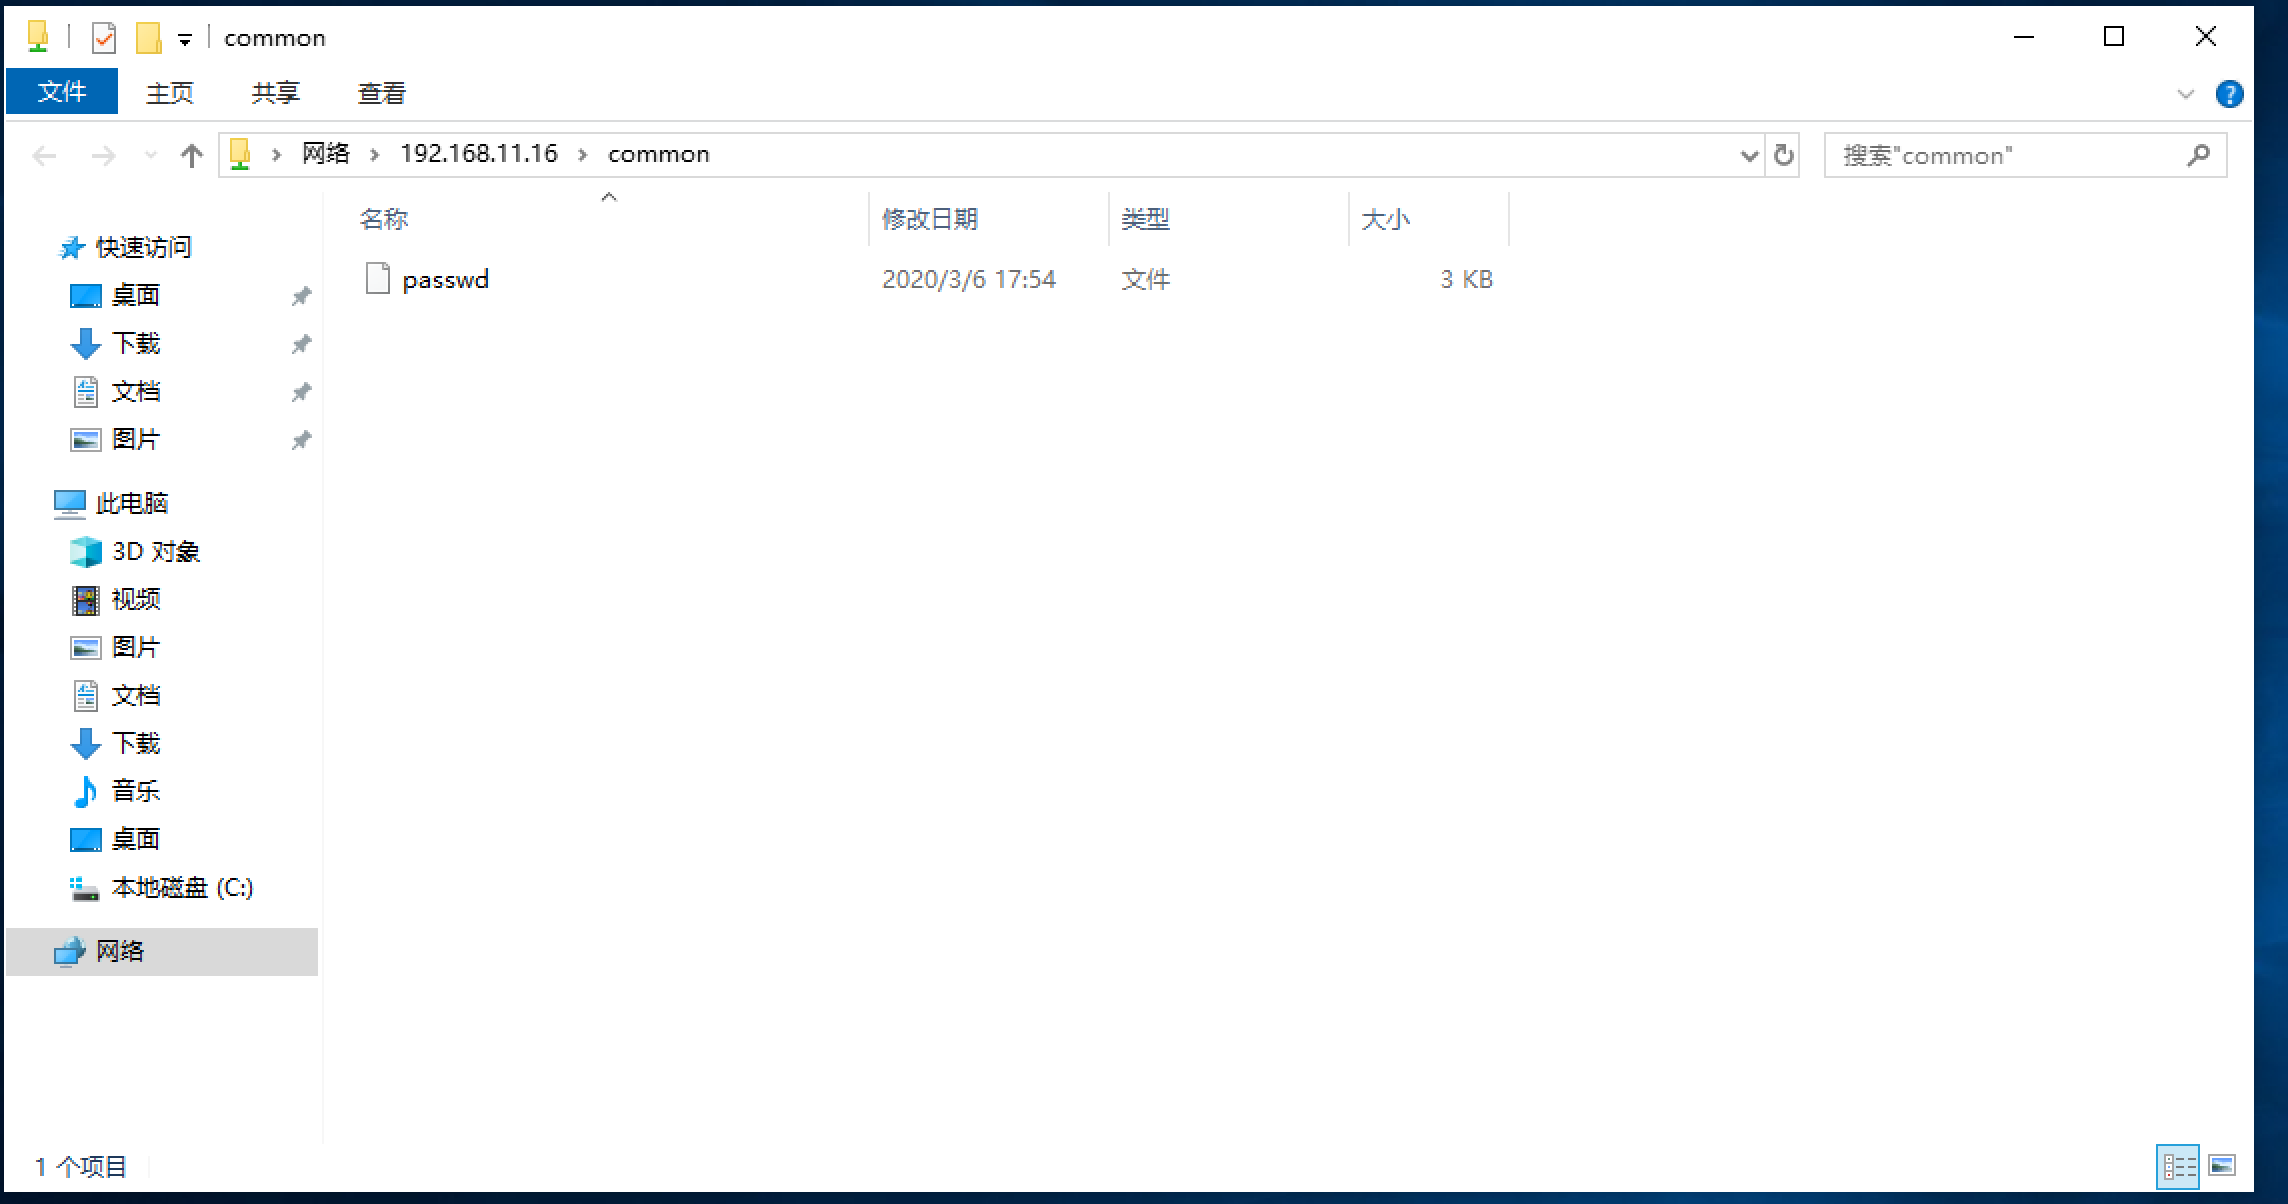
点击确定按钮
六、用户账号映射与访问控制
账号映射
samba 的用户帐号信息是保存在 smbpasswd 文件中,而 且可以访问 samba 服务器的帐号也必须对应一个同名的系 统帐号。基于这一点,所以,对于一些 hacker 来说,只要 知道 samba 服务器 samba 帐号,就等于是知道了 Linux 系 统帐号,只要 crack 其 samba 帐号密码加以利用就可以攻 击 samba 服务器。所以我们要使用用户帐号映射这个功能 来解决这个问题
-
用户帐号映射这个功能需要建立一个帐号映射关系表,里 面记录了 samba 帐号和虚拟帐号的对应关系,客户端访问 samba 服务器时就使用虚拟来登录。
-
编辑主配置文件 /etc/samba/smb.conf 在 global 下添加一行字段 username map = /etc/samba/smbusers 开启用户帐号映射功能。

编辑 /etc/samba/smbusers
smbusers 文件保存帐号映射关系,其有固 定格式:
samba 帐号 = 虚拟帐号(映射帐号)

重新启动服务
访问控制
对于 samba 服务器的安全性,我们已经说过可以使用 valid users 字段去实现用户访问控制,但是如果企业庞大,存在大量用户的话,这种方法操作起来就显得比较麻烦比如 samba 服务器共享出一个目录来访问,但是要禁止某个 IP 子网或某个域的客户端访问此资源,这样情况使用 valid users 字段就无法实现客户端访问控制。使用 hosts allow 和 hosts deny 两个字段来实现该功能。而用好这两个字段关键在于熟悉和清楚它们的使用方法和作用范围
1)hosts allow 和 hosts deny 字段的使用
| hosts allow 字段定义允许访问的客户端 | |
| hosts deny 字段定义禁止访问的客户端 | |
2)使用 IP 地址进行限制
比如公司内部 samba 服务器上共享了一个目录 sales,这个目录是存放销售部的共享目录,公司规定 192.168.0.0/24 这个网段的 IP 地址禁止访问此 sales 共享目录,但是其中 192.168.0.24 这个 IP 地址可以访问。
| hosts deny = 192.168.0. 172.16. | |
| hosts allow = 192.168.0.24 | |
| hosts deny = 192.168.0. 表示禁止所有来自 192.168.0.0/24 网段的 IP 地址访问 | |
| hosts allow = 192.168.0.24 表示允许 192.168.0.24 这个 IP 地址访问 | |
| 当 host deny 和 hosts allow 字段同时出现并定义内容相互冲突时,hosts allow 优先。现在设置的意思就是禁止 C 类地址 192.168.0.0/24 网段主机访问,但是允许 192.168.0.24 主机访问。如果后面的内容有多个时,需要用空格隔开,也可以是域名,如:.hello.com |
如果我们规定所有人不能访问 security 目录,只允许 192.168.0.0 网段的 IP 地址可以访问,但是 192.168.0.10 及 192.168.0.78 的主机是要禁止访问。我们可以使用 hosts deny 禁止所有用户访问,再设置 hosts allow 允许 192.168.0.0 网段主机,但当 hosts deny 和 hosts allow 同时出现而且冲突的时候,hosts allow 生效,如果这样,那么允许 192.168.0.0 网段的 IP 地址可以访问,但 192.168.0.100 及 192.168.0.78 的主机禁止访问就无法生效了
| hosts allow = 192.168.0. EXCEPT 192.168.0.100 192.168.0.78 | |
| 表示允许 192.168.0.0 网段 IP 地址访问,但是 192.168.0.100 和192.168.0.78除外 | |
七、SAMBA 的排错
Linux 服务一般排错方法
1、错误信息
一般仔细看下显示的错误信息,根据错误提示一般就可以判断问题出在 什么地方。
2、配置文件
第 2 个我们可以查配置文件,有时可能误操作导致配置失误,服务无法正 常运行,我们可以通过检查配置文件来确认问题。现在很多服务的软件 包有自带配置文件检查工具,我们可以通过这些工具对配置文件进行检 查
3、日志文件
如果服务出现问题,我们还可以使用 tail - f 命令来动态监控日志文件
Samba 排错
1、使用 testparm 命令检查,软件包有自带的配置文件检查工具,我们可以使 testparm 命令检测 smb.conf 文件的语法,如果报错,说明 smb.conf 文 件设置有错误,这样我们可以根据提示信息来修改主配置文 件和独立配置文件。
| [root@node1 ~]# testparm /etc/samba/smb.conf | |
| Load smb config files from /etc/samba/smb.conf | |
| rlimit_max: increasing rlimit_max (1024) to minimum Windows limit (16384) | |
| Processing section "[homes]" | |
| Processing section "[printers]" | |
| Processing section "[common]" | |
| Loaded services file OK. | |
| Server role: ROLE_STANDALONE |
2、使用 ping 命令测试
samba 服务器主配置文件排除错误后重启 smb 服务,如果客户端仍然 无法连 接 samba 服务器,我们在客户端可以使用 ping 命令进行测试, 这个我们微软的系统中排障一样,根据出现的不同情况可以进行分析。
(1)如果没有收到任何提示,说明客户端 TCP/IP 协议安装有问题,需要重 新安装客户端 TCP/IP 协议,然后重新测试。
(2)如果提示“host not found”则检查客户端 DNS 或者 /etc/hosts 文件有没正确设置,确保客户端能够使用名称访问 samba 服务器。
(3)无法 ping 通还可能是防火墙设置问题,需要重新设置防火墙的 规则,开启 samba 与外界联系的端口。
(4)当然还有一种低级的情况,那就是由于主机名输入错误导致不 能 ping 通
3、使用 smbclient 命令进行测试
如果客户端与 samba 服务器可以 ping 通,说明客户端与服务器间的连接没有问题,如果还是不能访问 samba 共享资源,可以执行 smbclient 命令进一步测试服务器端的配置。如果测试 samba 服务器正常,并且输入了正确的帐号和密码,那么执行 smbclient 命令就可以获得共享列表。
smbclient -L 192.168.0.188 -U joy%123
如果我们看到了错误信息提示“tree connect failed”则说明可以在 smb.conf 文件中设置了 host deny 字段拒绝了客户端的 IP 地址或域 名,我们可以修改 smb.conf 配置文件允许客户端访问就可以了
如果返回信息是“connection refused”提示拒绝连接则说明是 samba 服务器 smbd 进程可以没有被开启,我们必须确保 smbd 和 nmbd 进程处于开启状态,并使用 netstat 命令检查 netbios 所使用的 139 端口是否处于监听状态。
如果提示“session setup failed”连接建立失败则说明服务器拒绝了连接请求,这是因为输入的用户名和密码错误引起
有时也会收到比如“Your server software is being unfriendly”错误信息,提示服务器软 件存在问题,这个故障一般是因为配置 smbd 时使用了错误的参数或者启用 smbd 时 遇到的类似严重破坏错误,我们可以使用 testparm 来检查相应的配置文件并同时检查 相关日志文件。


