共计 6447 个字符,预计需要花费 17 分钟才能阅读完成。
关于 Ganglia 软件,Ganglia 是一个跨平台可扩展的,高性能计算系统下的分布式监控系统,如集群和网格。它是基于分层设计,它使用广泛的技术,如 XML 数据代表,便携数据传输,RRDtool 用于数据存储和可视化。它利用精心设计的数据结构和算法实现每节点间并发非常低的。
它已移植到广泛的操作系统和处理器架构上,目前在世界各地成千上万的集群正在使用。它已 被用来连结大学校园和世界各地,可以处理 2000 节点的规模。
Ganglia 3.1.x 下扩展 Python 模块(翻译自官方 wiki) http://www.linuxidc.com/Linux/2014-04/99565.htm
使用 Ganglia 监控 Hadoop 集群 http://www.linuxidc.com/Linux/2012-05/61349.htm
在 VMware Workstation 的 Ubuntu 下安装和配置 Hadoop 与 Ganglia http://www.linuxidc.com/Linux/2013-06/85856.htm
Ganglia 安装部署之一建立 Grid http://www.linuxidc.com/Linux/2013-05/83673.htm
Ganglia 极其简单安装教程 yum 版 http://www.linuxidc.com/Linux/2012-12/76536.htm
Ganglia 快速开始向导(翻译自官方 wiki)http://www.linuxidc.com/Linux/2013-11/92747.htm
CentOS 集群上安装 Ganglia-3.6.0 监控 Hadoop-2.2.0 和 HBase-0.96.0 http://www.linuxidc.com/Linux/2014-01/95804.htm
Ganglia 在 CentOS 6.5 的安装 http://www.linuxidc.com/Linux/2014-05/102024.htm
好,准备安装!
1、首先,需要确保在 Ubuntu14.04 上安装了 LAMP 服务。
Ganglia 由两个所谓主要守护进程 gmond(Ganglia 监测守护进程)和 gmetad(Ganglia 元守护进程),一个基于 PHP 的 Web 前端和其他一些小的实用程序。
2、在 Ubuntu14.04 上安装 Ganglia。
打开终端,运行以下命令:
sudo apt-get install ganglia-monitor rrdtool gmetad ganglia-webfrontend
在安装过程中,你应该会看到类似下面的安装后与 apache2 服务器重启选择,直接 Yes,然后按 Enter 键。

3、配置 Ganglia
已经完成了基本的安装,现在我们按照下面必要的步骤来配置
4、Ganglia 主节点配置
现在,你需要复制 Ganglia webfrontend Apache 配置,使用下面的命令来正确的位置:
sudo cp /etc/ganglia-webfrontend/apache.conf /etc/apache2/sites-enabled/ganglia.conf
现在,您需要使用以下命令来编辑 Ganglia 元守护程序的配置文件:
sudo vi /etc/ganglia/gmetad.conf
更改如下:
data_source "my cluster" localhost
修改为:
data_source "my cluster" 50 192.168.56.10:8649
下面列出机器服务的数据源,IP:端口或服务器名称:端口。如果未指定端口号 8649(默认 gmond 端口)。
需要使用下面的命令编辑主节点的配置文件:
sudo vi /etc/ganglia/gmond.conf
做下面的变化:
/* If a cluster attribute is specified, then all gmond hosts are wrapped inside
* of a tag. If you do not specify a cluster tag, then all will
* NOT be wrapped inside of a tag. */
cluster {
name = "unspecified"
owner = "unspecified"
latlong = "unspecified"
url = "unspecified"
}
修改为:
cluster {
name = "my cluster"
owner = "unspecified"
latlong = "unspecified"
url = "unspecified"
}
/* Feel free to specify as many udp_send_channels as you like. Gmond
used to only support having a single channel */
udp_send_channel {
mcast_join = 239.2.11.71
port = 8649
ttl = 1
}
修改为:
/* Feel free to specify as many udp_send_channels as you like. Gmond
used to only support having a single channel */
udp_send_channel {
# mcast_join = 239.2.11.71
host = 192.168.56.10
port = 8649
ttl = 1
}
/* You can specify as many udp_recv_channels as you like as well. */
udp_recv_channel {
mcast_join = 239.2.11.71
port = 8649
bind = 239.2.11.71
}
修改为:
/* You can specify as many udp_recv_channels as you like as well. */
udp_recv_channel {
# mcast_join = 239.2.11.71
port = 8649
#bind = 239.2.11.71
}
保存并关闭文件。
需要重启服务:
sudo /etc/init.d/ganglia-monitor start
sudo /etc/init.d/gmetad start
sudo /etc/init.d/apache2 restart
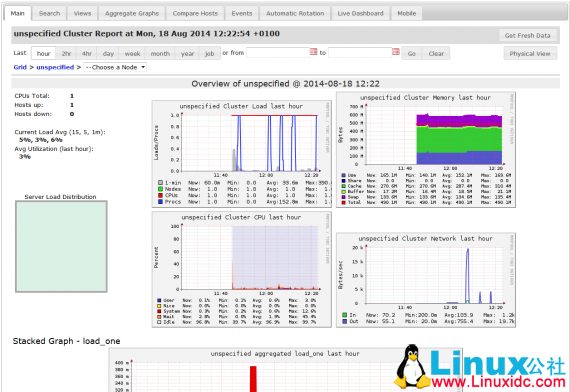
现在你可以使用以下命令访问 gnglia webinterface:
http://serverip/ganglia/

更多详情见请继续阅读下一页的精彩内容:http://www.linuxidc.com/Linux/2014-08/105838p2.htm
5、ganglia 客户端安装
你需要安装以下所有服务器要监视客户端包
sudo apt-get install ganglia-monitor
6、ganglia 客户端配置
你需要使用下面的命令编辑 gmond.conf 文件
sudo vi /etc/ganglia/gmond.conf
修改内容如下:/* If a cluster attribute is specified, then all gmond hosts are wrapped inside
* of a tag. If you do not specify a cluster tag, then all will
* NOT be wrapped inside of a tag. */
cluster {
name = "unspecified"
owner = "unspecified"
latlong = "unspecified"
url = "unspecified"
}
修改为:
cluster {
name = "my cluster"
owner = "unspecified"
latlong = "unspecified"
url = "unspecified"
}
/* Feel free to specify as many udp_send_channels as you like. Gmond
used to only support having a single channel */
udp_send_channel {
mcast_join = 239.2.11.71
port = 8649
ttl = 1
}
修改为:
/* Feel free to specify as many udp_send_channels as you like. Gmond
used to only support having a single channel */
udp_send_channel {
# mcast_join = 239.2.11.71
host = 192.168.56.10
port = 8649
ttl = 1
}
/* You can specify as many udp_recv_channels as you like as well. */
udp_recv_channel {
mcast_join = 239.2.11.71
port = 8649
bind = 239.2.11.71
}
修改为:
/* You can specify as many udp_recv_channels as you like as well. */
#udp_recv_channel {
# mcast_join = 239.2.11.71
# port = 8649
#bind = 239.2.11.71
#}
保存并退出。
重启 ganglia monitor 服务
sudo /etc/init.d/ganglia-monitor restart
OK,搞定!
更多 Ubuntu 相关信息见Ubuntu 专题页面 http://www.linuxidc.com/topicnews.aspx?tid=2
关于 Ganglia 软件,Ganglia 是一个跨平台可扩展的,高性能计算系统下的分布式监控系统,如集群和网格。它是基于分层设计,它使用广泛的技术,如 XML 数据代表,便携数据传输,RRDtool 用于数据存储和可视化。它利用精心设计的数据结构和算法实现每节点间并发非常低的。
它已移植到广泛的操作系统和处理器架构上,目前在世界各地成千上万的集群正在使用。它已 被用来连结大学校园和世界各地,可以处理 2000 节点的规模。
Ganglia 3.1.x 下扩展 Python 模块(翻译自官方 wiki) http://www.linuxidc.com/Linux/2014-04/99565.htm
使用 Ganglia 监控 Hadoop 集群 http://www.linuxidc.com/Linux/2012-05/61349.htm
在 VMware Workstation 的 Ubuntu 下安装和配置 Hadoop 与 Ganglia http://www.linuxidc.com/Linux/2013-06/85856.htm
Ganglia 安装部署之一建立 Grid http://www.linuxidc.com/Linux/2013-05/83673.htm
Ganglia 极其简单安装教程 yum 版 http://www.linuxidc.com/Linux/2012-12/76536.htm
Ganglia 快速开始向导(翻译自官方 wiki)http://www.linuxidc.com/Linux/2013-11/92747.htm
CentOS 集群上安装 Ganglia-3.6.0 监控 Hadoop-2.2.0 和 HBase-0.96.0 http://www.linuxidc.com/Linux/2014-01/95804.htm
Ganglia 在 CentOS 6.5 的安装 http://www.linuxidc.com/Linux/2014-05/102024.htm
好,准备安装!
1、首先,需要确保在 Ubuntu14.04 上安装了 LAMP 服务。
Ganglia 由两个所谓主要守护进程 gmond(Ganglia 监测守护进程)和 gmetad(Ganglia 元守护进程),一个基于 PHP 的 Web 前端和其他一些小的实用程序。
2、在 Ubuntu14.04 上安装 Ganglia。
打开终端,运行以下命令:
sudo apt-get install ganglia-monitor rrdtool gmetad ganglia-webfrontend
在安装过程中,你应该会看到类似下面的安装后与 apache2 服务器重启选择,直接 Yes,然后按 Enter 键。

3、配置 Ganglia
已经完成了基本的安装,现在我们按照下面必要的步骤来配置
4、Ganglia 主节点配置
现在,你需要复制 Ganglia webfrontend Apache 配置,使用下面的命令来正确的位置:
sudo cp /etc/ganglia-webfrontend/apache.conf /etc/apache2/sites-enabled/ganglia.conf
现在,您需要使用以下命令来编辑 Ganglia 元守护程序的配置文件:
sudo vi /etc/ganglia/gmetad.conf
更改如下:
data_source "my cluster" localhost
修改为:
data_source "my cluster" 50 192.168.56.10:8649
下面列出机器服务的数据源,IP:端口或服务器名称:端口。如果未指定端口号 8649(默认 gmond 端口)。
需要使用下面的命令编辑主节点的配置文件:
sudo vi /etc/ganglia/gmond.conf
做下面的变化:
/* If a cluster attribute is specified, then all gmond hosts are wrapped inside
* of a tag. If you do not specify a cluster tag, then all will
* NOT be wrapped inside of a tag. */
cluster {
name = "unspecified"
owner = "unspecified"
latlong = "unspecified"
url = "unspecified"
}
修改为:
cluster {
name = "my cluster"
owner = "unspecified"
latlong = "unspecified"
url = "unspecified"
}
/* Feel free to specify as many udp_send_channels as you like. Gmond
used to only support having a single channel */
udp_send_channel {
mcast_join = 239.2.11.71
port = 8649
ttl = 1
}
修改为:
/* Feel free to specify as many udp_send_channels as you like. Gmond
used to only support having a single channel */
udp_send_channel {
# mcast_join = 239.2.11.71
host = 192.168.56.10
port = 8649
ttl = 1
}
/* You can specify as many udp_recv_channels as you like as well. */
udp_recv_channel {
mcast_join = 239.2.11.71
port = 8649
bind = 239.2.11.71
}
修改为:
/* You can specify as many udp_recv_channels as you like as well. */
udp_recv_channel {
# mcast_join = 239.2.11.71
port = 8649
#bind = 239.2.11.71
}
保存并关闭文件。
需要重启服务:
sudo /etc/init.d/ganglia-monitor start
sudo /etc/init.d/gmetad start
sudo /etc/init.d/apache2 restart
现在你可以使用以下命令访问 gnglia webinterface:
http://serverip/ganglia/

更多详情见请继续阅读下一页的精彩内容:http://www.linuxidc.com/Linux/2014-08/105838p2.htm


