共计 10956 个字符,预计需要花费 28 分钟才能阅读完成。
一、varnish 的基础知识
Varnish 工作原理

1、varnish 工作原理
客户端请求到达 varnish 代理,child 线程中的 accept 接收下请求进程,交给 worker threads 处理,worker threads 先去 object expiry 找缓存,没找到就去上游服务器 backend lcatinon 找到资源,返回 varnish 代理,查看是否符合缓存规则,符合则缓存,不符合则直接返回给客户端
2、缓存分类
代理缓存:客户端请求代理,先去找缓存,缓存没有,代理会去上游服务器找到资源,并缓存在代理,然后返回给客户端
旁路缓存:客户端去缓存找缓存,缓存没命中返回客户端,客户端去上游服务器找到资源返回到本地,然后再把资源缓存到缓存
3、Memcache 适用的场景
memcache 的缺点:不能适应实时更新,如果实时更新,缓存不命中,命中率低。
memcache 支持分布式缓存,有 mysql 主从就不需要 memcache,memcache 适合多台 mysql 集群环境,此时直接到 mysql 缓存取查询性能较好
4、varnish 各状态引擎的功用:
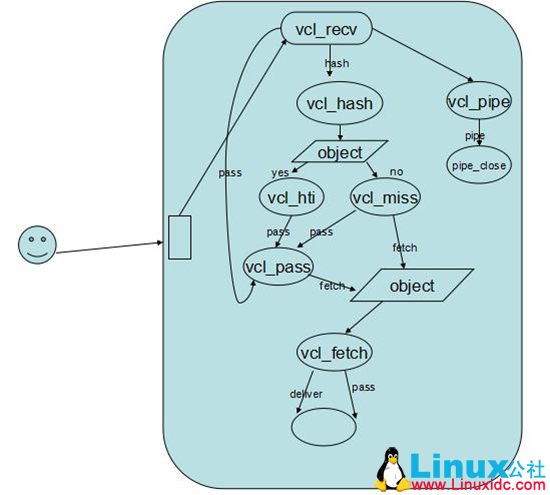
vcl_recv:实现安全策略,仅处理可以识别 http 方法,且只缓存 get 和 head 的方法,不缓存用户特有的数据(根据客户端的请求作出的缓存策略)
vcl_fetch:根据服务端的响应作出的策略缓存
vcl_pipe: 用于将请求直接发往后端主机;
vcl_hash: 自定义 hash 生成时的数据来源
vcl_pass: 用于将请求直接传递至后端主机;
vcl_hit: 从缓存中查找到缓存对象时要执行的操作;
vcl_miss: 从缓存中款查找到缓存对象时要执行的操作;
vcl_deliver: 将用户请求的内容响应给客户端时用到的方法;
vcl_error: 在 varnish 端合成错误响应时的缓存策略;
5、Varnish 缓存的原理

————————————————————
Varnish Cache 的架构笔记 http://www.linuxidc.com/Linux/2013-10/91016.htm
CentOS 5.8 下 Varnish-2.1.5 的安装配置 http://www.linuxidc.com/Linux/2013-09/89916.htm
RedHat 脚本改用 CentOS 源更新安装 Nginx、PHP 5.3、Varnish http://www.linuxidc.com/Linux/2012-07/65801.htm
利用 Varnish 构建 Cache 服务器笔记 http://www.linuxidc.com/Linux/2012-07/65234.htm
缓存服务 Varnish 安装配置 http://www.linuxidc.com/Linux/2012-07/65228.htm
Varnish 编译安装所需准备 http://www.linuxidc.com/Linux/2012-07/65230.htm
Linux 下 Varnish 缓存的配置优化 http://www.linuxidc.com/Linux/2012-03/56435.htm
Varnish 基础概念详解 http://www.linuxidc.com/Linux/2014-07/104535.htm
———————————————————————————–
二、varnish 的实验
Node1 172.16.11.143 centos6.5+varnish
Node2 172.16.11.144 centos6.5+http
1、软件安装
http://repo.varnish-cache.org/redhat/varnish-3.0/el6/x86_64/varnish/
varnish-libs-3.0.5-1.el6.x86_64.rpm
varnish-3.0.5-1.el6.x86_64.rpm
varnish-docs-3.0.5-1.el6.x86_64.rpm
node1
rpm -ivh varnish-libs-3.0.5-1.el6.x86_64.rpm varnish-3.0.5-1.el6.x86_64.rpm
/etc/logrotate.d/varnish #滚动日志
/etc/rc.d/init.d/varnish #服务
/etc/rc.d/init.d/varnishlog #日志
/var/lib/varnish #共享缓存
/var/log/varnish #日志存放
/etc/varnish/default.vcl #配置文件
2、简单的代理配置
node1
VARNISH_LISTEN_PORT=80
VARNISH_STORAGE_SIZE=64M #设置缓存大小
#
# # Backend storage specification
#VARNISH_STORAGE=”file,${VARNISH_STORAGE_FILE},${VARNISH_STORAGE_SIZE}”
VARNISH_STORAGE=”malloc,${VARNISH_STORAGE_SIZE}” #缓存名字叫什么
Vim /etc/varnish/default.vcl
backend default {
.host = “172.16.11.144”;
.port = “80”;
}
Service varnish restart
Ss -tnl #查看端口是否监听
Node2
Yum install httpd -y
Vim /var/www/html/index.html
<h1>node2</h1>
Service httpd restart
Chkconfig –add httpd
Chkconfig httpd on
3、让后端服务器可以查看是那个客户端访问自己的
Node1
Cp /etc/varnish/default.vcl /etc/varnish/test.vcl
Vim /etc/varnish/test.vcl
sub vcl_recv {
if (req.restarts == 0) {
if (req.http.x-forwarded-for) {
set req.http.X-Forwarded-For =
req.http.X-Forwarded-For + “, ” + client.ip;
} else {
set req.http.X-Forwarded-For = client.ip;
}
}
return (lookup);
}
[root@localhost ~]# varnishadm -S /etc/varnish/secret -T 127.0.0.1:6082
varnish> vcl.list #查看哪些可用
200
active 2 boot
available 0 test1
varnish> vcl.load test1 test1.vcl #编译
200
VCL compiled.
varnish> vcl.use test1 #使用
200
varnish> vcl.list #查看具体可用
200
available 2 boot
active 0 test1
Node2
Vim //etc/httpd/conf/httpd.conf
LogFormat “%{X-Forwarded-For}i %l %u %t \”%r\” %>s %b \”%{Referer}i\” \”%{User-Agent}i\”” combined
Service httpd reload
#####################################################################################
浏览器测试 http://172.16.11.143
Node2
tail /var/log/httpd/access_log
172.16.0.101 – – [04/Sep/2014:16:43:27 +0800] “GET /favicon.ico HTTP/1.1” 404 288 “-” “Mozilla/5.0 (Windows NT 6.1; WOW64) AppleWebKit/537.36 (KHTML, like Gecko) Chrome/31.0.1650.63 Safari/537.36”
4、设置查看是否命中缓存
Node1
Vim /etc/varnish/test.vcl
sub vcl_deliver {
if (obj.hits > 0) {
set resp.http.X-Cache = “Hit Via”+” “+ server.hostname;
} else {
set resp.http.X-Cache = “Miss Via”+” “+ server.hostname;
}
return (deliver);
}
[root@localhost ~]# varnishadm -S /etc/varnish/secret -T 127.0.0.1:6082
varnish> vcl.load test2 test1.vcl
200
VCL compiled.
varnish> vcl.use test2
200
varnish> vcl.list
200
available 0 boot
available 2 test1
active 0 test2
浏览器访问 F12 查看
5、精确设置那个页面不用缓存
if(req.url ~”~/test.html$”){
Return(pass)
}
编译使用
Vcl.load test3 test1.vcl
Vcl.use test2
Vcl.list
浏览器测试
http://172.16.11.143/test/index.html
变量使用规则
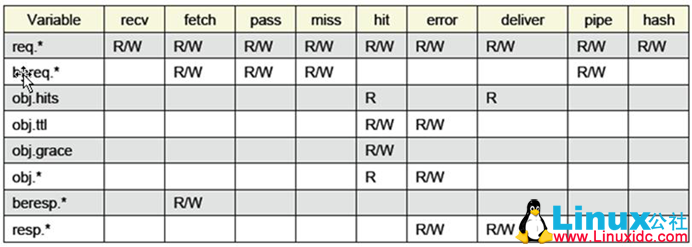
6、内置变量使用的在那个状态引擎中

更多详情见请继续阅读下一页的精彩内容 :http://www.linuxidc.com/Linux/2014-09/107264p2.htm
7、Varnish 内置变量:
请求到达时可用的内置变量:
req.url
req.request
req.http.HEADER
req.restarts: 请求被重启的次数;
server.ip
server.port
server.hostname
client.ip
req.backend
向后后端主机请求时可用的内置变量
bereq.url
bereq.request
bereq.http.HEADER
bereq.connect_timeout
bereq.proto
从后端主机获取到响应的 object 时可用的内置变量
beresp.status
beresp.response
beresp.http.HEADER
beresp.ttl
beresp.backend.name
beresp.backend.ip
beresp.backend.port
缓存对象进入缓存时可用的内置变量(只能用于 vcl_hit 或 vcl_error,且大多为只读)
obj.status
obj.response
obj.ttl
obj.hits
obj.http.HEADER
响应给客户端时可用的内置变量
resp.proto
resp.status
resp.response
resp.http.HEADER
8、设置定义 acl 清除缓存
acl purgers {
“127.0.0.1”;
“192.168.0.0”/24; #定义那些可以来清除缓存
}
sub vcl_recv {
if (req.request ==“PURGE”) {
if (!client.ip ~ purgers) {
error 405“Method not allowed”;
} #判断 ip 是否为 acl 内的地址,不是的话就不用去寻找缓存
return (lookup); #是 acl 里定义内的地址就去查找缓存
}
}
# 在 hash 下面设置 miss 和 hit
sub vcl_hit {
if (req.request ==“PURGE”) {
purge;
error 200“Purged”;
} #缓存命中给它个返回 error200
}
sub vcl_miss {
if (req.request ==“PURGE”) {
purge;
error 404“Not in cache”;
} #缓存没有命中给它个 error404
}
#sub vcl_pass {
# if (req.request ==“PURGE”) {
# error 502“PURGE on a passed object”;
# }
#}
#####################################################################################
再编译再测试
Curl -I http://172.16.11.143/index.html
Curl -X PURGE http://172.16.11.143/index.html #指定修剪缓存命中
9、varnish 检测健康状态检测
.url 探测健康状态的请求 url
.request 探测请求内容的格式
.window: 至少要检测多少次资源
.threshold: 至少要检测多少次资源从无到有或从有到无
.initial:varnish 启动时对后端主机至少需要多少次成功探测,默认为 threshold
.interval:探测请求发送的周期
.expected_response: 期望主机响应的状态码
.timeout : 每次探测请求的过期时长,默认为 2 秒
示例
在 backend default 主机下面定义
backend default {
.host = “172.16.11.144”;
.port = “80”;
.probe = {
.url = “/index.html”;
.interval = 2s;
.window = 8;
.threshold = 2;
}
#####################################################################################
编译配置
Varnishstat
Backend.list #查看健康状态
我们可以去后端停掉 http,在查看,开启,再查看
10、定义轮询
增加一个节点
node3 172.16.11.145 CentOS6.5+http
backend web1 {
.host = “172.16.11.144”;
.port = “80”;
.probe = {
.url = “/index.html”;
.interval = 2s;
.window = 8;
.threshold = 2;
}
}
backend web2 {
.host = “172.16.11.145”;
.port = “80”;
.probe = {
.url = “/index.html”;
.interval = 2s;
.window = 8;
.threshold = 2;
}
}
director webservers round-robin {
{.backend = web1;}
{.backend = web2;}
}
# return (pass);
# }
set req.backend = webservers;
return (lookup);
}
[root@localhost ~]# varnishadm -S /etc/varnish/secret -T 127.0.0.1:6082
varnish> varnish> vcl.load test9 test1.vcl
200
VCL compiled.
varnish> vcl.use test9
200
varnish> backend.list
200
Backend name Refs Admin Probe
default(172.16.11.144,,80) 5 probe Healthy (no probe)
web1(172.16.11.144,,80) 1 probe Healthy 8/8
web2(172.16.11.145,,80) 1 probe Healthy 8/8
也可以去网页测试
http://172.16.11.143
Varnish 的详细介绍 :请点这里
Varnish 的下载地址 :请点这里
一、varnish 的基础知识
Varnish 工作原理

1、varnish 工作原理
客户端请求到达 varnish 代理,child 线程中的 accept 接收下请求进程,交给 worker threads 处理,worker threads 先去 object expiry 找缓存,没找到就去上游服务器 backend lcatinon 找到资源,返回 varnish 代理,查看是否符合缓存规则,符合则缓存,不符合则直接返回给客户端
2、缓存分类
代理缓存:客户端请求代理,先去找缓存,缓存没有,代理会去上游服务器找到资源,并缓存在代理,然后返回给客户端
旁路缓存:客户端去缓存找缓存,缓存没命中返回客户端,客户端去上游服务器找到资源返回到本地,然后再把资源缓存到缓存
3、Memcache 适用的场景
memcache 的缺点:不能适应实时更新,如果实时更新,缓存不命中,命中率低。
memcache 支持分布式缓存,有 mysql 主从就不需要 memcache,memcache 适合多台 mysql 集群环境,此时直接到 mysql 缓存取查询性能较好
4、varnish 各状态引擎的功用:
vcl_recv:实现安全策略,仅处理可以识别 http 方法,且只缓存 get 和 head 的方法,不缓存用户特有的数据(根据客户端的请求作出的缓存策略)
vcl_fetch:根据服务端的响应作出的策略缓存
vcl_pipe: 用于将请求直接发往后端主机;
vcl_hash: 自定义 hash 生成时的数据来源
vcl_pass: 用于将请求直接传递至后端主机;
vcl_hit: 从缓存中查找到缓存对象时要执行的操作;
vcl_miss: 从缓存中款查找到缓存对象时要执行的操作;
vcl_deliver: 将用户请求的内容响应给客户端时用到的方法;
vcl_error: 在 varnish 端合成错误响应时的缓存策略;
5、Varnish 缓存的原理

————————————————————
Varnish Cache 的架构笔记 http://www.linuxidc.com/Linux/2013-10/91016.htm
CentOS 5.8 下 Varnish-2.1.5 的安装配置 http://www.linuxidc.com/Linux/2013-09/89916.htm
RedHat 脚本改用 CentOS 源更新安装 Nginx、PHP 5.3、Varnish http://www.linuxidc.com/Linux/2012-07/65801.htm
利用 Varnish 构建 Cache 服务器笔记 http://www.linuxidc.com/Linux/2012-07/65234.htm
缓存服务 Varnish 安装配置 http://www.linuxidc.com/Linux/2012-07/65228.htm
Varnish 编译安装所需准备 http://www.linuxidc.com/Linux/2012-07/65230.htm
Linux 下 Varnish 缓存的配置优化 http://www.linuxidc.com/Linux/2012-03/56435.htm
Varnish 基础概念详解 http://www.linuxidc.com/Linux/2014-07/104535.htm
———————————————————————————–
二、varnish 的实验
Node1 172.16.11.143 centos6.5+varnish
Node2 172.16.11.144 centos6.5+http
1、软件安装
http://repo.varnish-cache.org/redhat/varnish-3.0/el6/x86_64/varnish/
varnish-libs-3.0.5-1.el6.x86_64.rpm
varnish-3.0.5-1.el6.x86_64.rpm
varnish-docs-3.0.5-1.el6.x86_64.rpm
node1
rpm -ivh varnish-libs-3.0.5-1.el6.x86_64.rpm varnish-3.0.5-1.el6.x86_64.rpm
/etc/logrotate.d/varnish #滚动日志
/etc/rc.d/init.d/varnish #服务
/etc/rc.d/init.d/varnishlog #日志
/var/lib/varnish #共享缓存
/var/log/varnish #日志存放
/etc/varnish/default.vcl #配置文件
2、简单的代理配置
node1
VARNISH_LISTEN_PORT=80
VARNISH_STORAGE_SIZE=64M #设置缓存大小
#
# # Backend storage specification
#VARNISH_STORAGE=”file,${VARNISH_STORAGE_FILE},${VARNISH_STORAGE_SIZE}”
VARNISH_STORAGE=”malloc,${VARNISH_STORAGE_SIZE}” #缓存名字叫什么
Vim /etc/varnish/default.vcl
backend default {
.host = “172.16.11.144”;
.port = “80”;
}
Service varnish restart
Ss -tnl #查看端口是否监听
Node2
Yum install httpd -y
Vim /var/www/html/index.html
<h1>node2</h1>
Service httpd restart
Chkconfig –add httpd
Chkconfig httpd on
3、让后端服务器可以查看是那个客户端访问自己的
Node1
Cp /etc/varnish/default.vcl /etc/varnish/test.vcl
Vim /etc/varnish/test.vcl
sub vcl_recv {
if (req.restarts == 0) {
if (req.http.x-forwarded-for) {
set req.http.X-Forwarded-For =
req.http.X-Forwarded-For + “, ” + client.ip;
} else {
set req.http.X-Forwarded-For = client.ip;
}
}
return (lookup);
}
[root@localhost ~]# varnishadm -S /etc/varnish/secret -T 127.0.0.1:6082
varnish> vcl.list #查看哪些可用
200
active 2 boot
available 0 test1
varnish> vcl.load test1 test1.vcl #编译
200
VCL compiled.
varnish> vcl.use test1 #使用
200
varnish> vcl.list #查看具体可用
200
available 2 boot
active 0 test1
Node2
Vim //etc/httpd/conf/httpd.conf
LogFormat “%{X-Forwarded-For}i %l %u %t \”%r\” %>s %b \”%{Referer}i\” \”%{User-Agent}i\”” combined
Service httpd reload
#####################################################################################
浏览器测试 http://172.16.11.143
Node2
tail /var/log/httpd/access_log
172.16.0.101 – – [04/Sep/2014:16:43:27 +0800] “GET /favicon.ico HTTP/1.1” 404 288 “-” “Mozilla/5.0 (Windows NT 6.1; WOW64) AppleWebKit/537.36 (KHTML, like Gecko) Chrome/31.0.1650.63 Safari/537.36”
4、设置查看是否命中缓存
Node1
Vim /etc/varnish/test.vcl
sub vcl_deliver {
if (obj.hits > 0) {
set resp.http.X-Cache = “Hit Via”+” “+ server.hostname;
} else {
set resp.http.X-Cache = “Miss Via”+” “+ server.hostname;
}
return (deliver);
}
[root@localhost ~]# varnishadm -S /etc/varnish/secret -T 127.0.0.1:6082
varnish> vcl.load test2 test1.vcl
200
VCL compiled.
varnish> vcl.use test2
200
varnish> vcl.list
200
available 0 boot
available 2 test1
active 0 test2
浏览器访问 F12 查看
5、精确设置那个页面不用缓存
if(req.url ~”~/test.html$”){
Return(pass)
}
编译使用
Vcl.load test3 test1.vcl
Vcl.use test2
Vcl.list
浏览器测试
http://172.16.11.143/test/index.html
变量使用规则
6、内置变量使用的在那个状态引擎中

更多详情见请继续阅读下一页的精彩内容 :http://www.linuxidc.com/Linux/2014-09/107264p2.htm


