共计 7524 个字符,预计需要花费 19 分钟才能阅读完成。
简介:
Corosync 是实现高可用性群集的一款软件,它的前身是 openais,openais 是一个研究高可用性群集的项目,后来项目停止。Corosync 能够满足高可用性群集架构的第一 第二 第四层,第一层是 message layer 心跳探测,corosync 的心跳检测端口是与用户相连的接口,没有心跳线,第二层是 成员管理 ccm, 用来实现验证,第四层是 resource agent 资源代理。
Pacemaker 是用于高可用性群集架构的第三层,资源管理的一款软件,它提供一个工具 crm 提供命令行界面。
实验拓扑图:

1:用 ssh 实现高可用性群集节点之间的无障碍通信:
[root@node1 ~]# ssh-keygen -t rsa #在管理员家目录下创建管理员的公钥私钥对
Generating public/private rsa key pair.
Enter file in which to save the key (/root/.ssh/id_rsa): #要实现节点之间的无障碍通信不需要输入密码
Created directory ‘/root/.ssh’. # 在管理员的家目录下将产生.ssh 的隐藏文件用于存放私钥公钥
Enter passphrase (empty for no passphrase):
Enter same passphrase again:
Your identification has been saved in /root/.ssh/id_rsa.
Your public key has been saved in /root/.ssh/id_rsa.pub.

ssh-copy-id -i id_rsa.pub node2 #把公钥拷给节点 2 第一次拷贝需要密码,以后节点之间再拷贝东西不需要输入密码,这样就做到了节点之间的无障碍通信。在节点 2 上要做相同的步骤。
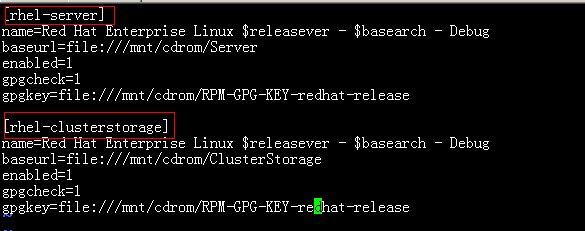
在两个节点上修改 yum 的配置文件,执行 yum localinstall *.rpm –nogpgcheck 本地安装。
2:在两个节点上执行 hwclock -s 保持 时钟同步
3:在节点一:
进入到 corosync 服务的配置文件里
cp corosync.conf.example corosync.conf
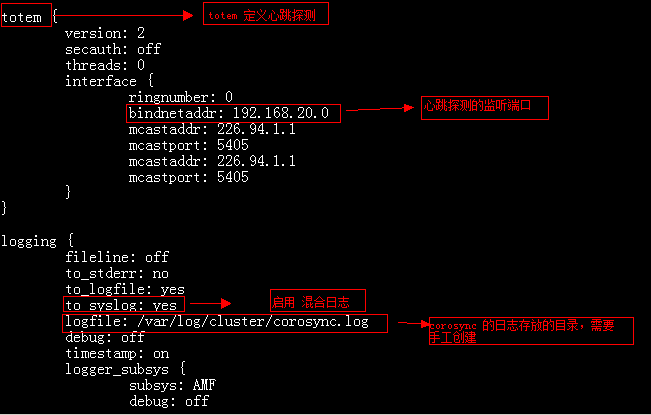

mkdir /var/log/cluster
[root@node1 corosync]# corosync-keygen
Corosync Cluster Engine Authentication key generator.
Gathering 1024 bits for key from /dev/random.
Press keys on your keyboard to generate entropy.
Writing corosync key to
/etc/corosync/authkey.

4:在节点二,要进行相同的操作,保持 corosync 配置文件和验证文件保持一致。
5:在节点上启动 corosync
service corosync start
6:验证 corosync 的引擎是否正常启动
Grep -i -e“corosync cluster engine”-e“configuration file”/var/log/messages
[root@node2 corosync]# grep -i -e “corosync cluster engine” -e “configuration file ” /var/log/messages
Oct 3 01:40:52 localhost smartd[3943]: Opened configuration file /etc/smartd.conf
Oct 3 01:40:52 localhost smartd[3943]: Configuration file /etc/smartd.conf was parsed, found DEVICESCAN, scanning devices
Oct 3 07:01:13 localhost smartd[3913]: Opened configuration file /etc/smartd.conf
Oct 3 07:01:13 localhost smartd[3913]: Configuration file /etc/smartd.conf was parsed, found DEVICESCAN, scanning devices
Oct 9 18:42:07 localhost corosync[16061]: [MAIN] Corosync Cluster Engine (‘1.2.7’): started and ready to provide service.#corosync 引擎启动准备提供服务
Oct 9 18:42:07 localhost corosync[16061]: [MAIN] Successfully read main configuration file ‘/etc/corosync/corosync.conf’.
更多详情见请继续阅读下一页的精彩内容 :http://www.linuxidc.com/Linux/2013-11/92499p2.htm
相关阅读 :
搭建基于 Corosync+DRBD 的高可用 MySQL 集群 http://www.linuxidc.com/Linux/2013-10/91386.htm
分别基于 NFS 服务和 DRBD 服务利用 Corosync 配置高可用集群 http://www.linuxidc.com/Linux/2013-09/90410.htm
Linux 高可用(HA)集群之 Corosync 详解 http://www.linuxidc.com/Linux/2013-08/88733.htm
pacemaker + Corosync 搭建高可用集群 http://www.linuxidc.com/Linux/2013-06/85972.htm
Corosync+pacemaker+RA 实现 MySQL 高可用 http://www.linuxidc.com/Linux/2012-08/67949.htm
7:查看初始化节点是否发出心跳通知
Grep -i totem /var/log/messages
[root@node2 corosync]# grep -i totem /var/log/messages
Oct 9 18:42:07 localhost corosync[16061]: [TOTEM] Initializing transport (UDP/IP).
Oct 9 18:42:07 localhost corosync[16061]: [TOTEM] Initializing transmit/receive security: libtomcrypt SOBER128/SA1HMAC (mode 0).
Oct 9 18:42:07 localhost corosync[16061]: [TOTEM] The network interface [192.168.20.40] is now up. #监听端口已经起来
Oct 9 18:42:08 localhost corosync[16061]: [TOTEM] A processor joined or left the membership and a new membershipwas formed.
8:检测混合日志中是否有错误:
因为我们没有使用 stonish 设备,所以没有 stonish 资源,stonish 设备有电源交换机,如果有一个节点失效,电源交换机将自动断开这个节点。
[root@node1 corosync]# grep -i error /var/log/messages
Oct 7 23:46:15 localhost : error getting update info: Cannot retrieve repository metadata (repomd.xml) for repository: rhel-server. Please verify its path and try again
Oct 8 00:46:46 localhost : error getting update info: Cannot retrieve repository metadata (repomd.xml) for repository: rhel-server. Please verify its path and try again
Oct 9 18:41:42 localhost pengine: [11598]: ERROR: unpack_resources: Resource start-up disabled since no STONITH resources have been defined
Oct 9 18:41:42 localhost pengine: [11598]: ERROR: unpack_resources: Either configure some or disable STONITH with the stonith-enabled option
9:查看 pacemaker 的成员管理器是否启动
[root@node1 corosync]# grep -i pcmk_startup /var/log/messages
Oct 9 18:40:39 localhost corosync[11588]: [pcmk] info: pcmk_startup: CRM: Initialized
Oct 9 18:40:39 localhost corosync[11588]: [pcmk] Logging: Initialized pcmk_startup
Oct 9 18:40:39 localhost corosync[11588]: [pcmk] info: pcmk_startup: Maximum core file size is: 4294967295
Oct 9 18:40:39 localhost corosync[11588]: [pcmk] info: pcmk_startup: Service: 9
Oct 9 18:40:39 localhost corosync[11588]: [pcmk] info: pcmk_startup: Local hostname: node1.a.com:
10:执行 crm 进入资源管理器

在任何一个节点上 用资源管理器查看集群的成员状态
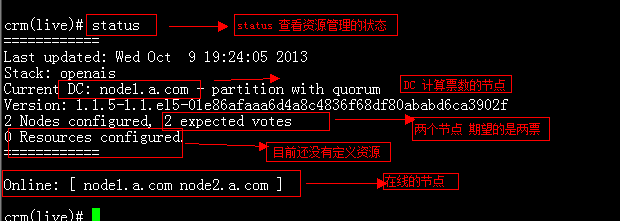
Configure 进入到资源管理的配置模式 show 查看 corosync 的配置信息

Ra 进入到资源管理的资源代理模式
crm(live)ra# help
This level contains commands which show various information about
the installed resource agents. It is available both at the top
level and at the `configure` level.
Available commands:
classes list classes and providers #列出代理类型
list list RA for a class (and provider) # 列出 代理所控制的资源
meta show meta data for a RA #显示 资源代理的使用方法
providers show providers for a RA and a class
quit exit the program
help show help
end go back one level

crm(live)ra# list heartbeat
AudibleAlarm Delay Filesystem ICP IPaddr IPaddr2 IPsrcaddr IPv6addr LVM
LinuxSCSI MailTo OCF Raid1 SendArp ServeRAID WAS WinPopup Xinetd
apache db2 hto-mapfuncs ids portblock
简介:
Corosync 是实现高可用性群集的一款软件,它的前身是 openais,openais 是一个研究高可用性群集的项目,后来项目停止。Corosync 能够满足高可用性群集架构的第一 第二 第四层,第一层是 message layer 心跳探测,corosync 的心跳检测端口是与用户相连的接口,没有心跳线,第二层是 成员管理 ccm, 用来实现验证,第四层是 resource agent 资源代理。
Pacemaker 是用于高可用性群集架构的第三层,资源管理的一款软件,它提供一个工具 crm 提供命令行界面。
实验拓扑图:

1:用 ssh 实现高可用性群集节点之间的无障碍通信:
[root@node1 ~]# ssh-keygen -t rsa #在管理员家目录下创建管理员的公钥私钥对
Generating public/private rsa key pair.
Enter file in which to save the key (/root/.ssh/id_rsa): #要实现节点之间的无障碍通信不需要输入密码
Created directory ‘/root/.ssh’. # 在管理员的家目录下将产生.ssh 的隐藏文件用于存放私钥公钥
Enter passphrase (empty for no passphrase):
Enter same passphrase again:
Your identification has been saved in /root/.ssh/id_rsa.
Your public key has been saved in /root/.ssh/id_rsa.pub.

ssh-copy-id -i id_rsa.pub node2 #把公钥拷给节点 2 第一次拷贝需要密码,以后节点之间再拷贝东西不需要输入密码,这样就做到了节点之间的无障碍通信。在节点 2 上要做相同的步骤。
在两个节点上修改 yum 的配置文件,执行 yum localinstall *.rpm –nogpgcheck 本地安装。

2:在两个节点上执行 hwclock -s 保持 时钟同步
3:在节点一:
进入到 corosync 服务的配置文件里
cp corosync.conf.example corosync.conf


mkdir /var/log/cluster
[root@node1 corosync]# corosync-keygen
Corosync Cluster Engine Authentication key generator.
Gathering 1024 bits for key from /dev/random.
Press keys on your keyboard to generate entropy.
Writing corosync key to
/etc/corosync/authkey.

4:在节点二,要进行相同的操作,保持 corosync 配置文件和验证文件保持一致。
5:在节点上启动 corosync
service corosync start
6:验证 corosync 的引擎是否正常启动
Grep -i -e“corosync cluster engine”-e“configuration file”/var/log/messages
[root@node2 corosync]# grep -i -e “corosync cluster engine” -e “configuration file ” /var/log/messages
Oct 3 01:40:52 localhost smartd[3943]: Opened configuration file /etc/smartd.conf
Oct 3 01:40:52 localhost smartd[3943]: Configuration file /etc/smartd.conf was parsed, found DEVICESCAN, scanning devices
Oct 3 07:01:13 localhost smartd[3913]: Opened configuration file /etc/smartd.conf
Oct 3 07:01:13 localhost smartd[3913]: Configuration file /etc/smartd.conf was parsed, found DEVICESCAN, scanning devices
Oct 9 18:42:07 localhost corosync[16061]: [MAIN] Corosync Cluster Engine (‘1.2.7’): started and ready to provide service.#corosync 引擎启动准备提供服务
Oct 9 18:42:07 localhost corosync[16061]: [MAIN] Successfully read main configuration file ‘/etc/corosync/corosync.conf’.
更多详情见请继续阅读下一页的精彩内容 :http://www.linuxidc.com/Linux/2013-11/92499p2.htm
相关阅读 :
搭建基于 Corosync+DRBD 的高可用 MySQL 集群 http://www.linuxidc.com/Linux/2013-10/91386.htm
分别基于 NFS 服务和 DRBD 服务利用 Corosync 配置高可用集群 http://www.linuxidc.com/Linux/2013-09/90410.htm
Linux 高可用(HA)集群之 Corosync 详解 http://www.linuxidc.com/Linux/2013-08/88733.htm
pacemaker + Corosync 搭建高可用集群 http://www.linuxidc.com/Linux/2013-06/85972.htm
Corosync+pacemaker+RA 实现 MySQL 高可用 http://www.linuxidc.com/Linux/2012-08/67949.htm
资源的类型:
primitive 定义的本地独立的资源比如 ip 地址,只能应用到同一节点上
Group 是对资源的约束,把资源加入到一个组内,资源应用到同一节点上。
因为没有 stonith 设备所以设置为 false, 才可以提交配置
property stonith-enabled=false
11:定义本地资源 资源名称 webip
primitive webip ocf:heartbeat:IPaddr params ip=192.168.20.100

在节点一上查看映射的资源,映射成功
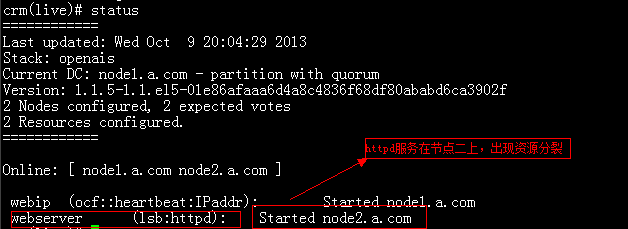
12:定义本地资源 httpd 服务
primitive webserver lsb:httpd
查看资源发现资源出现分裂,httpd 服务在节点二上运行

13:为了避免资源分裂,要把 ip 地址 和服务加入到一个组内
group webgroup webip webserver
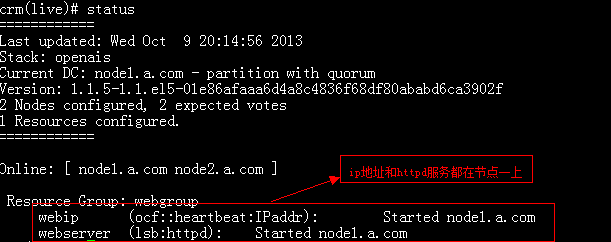
查看资源管理状态
![]()

在节点一上查看 ip 地址和 httpd 服务
:14:高可用性群集的前半部分已经做好,测试 web 页面


