共计 1491 个字符,预计需要花费 4 分钟才能阅读完成。
本文系统 CentOS6.0 puppet 版本:2.6.18
先来看下 module 的路径及最基本的目录结构:
[root@master modules]# puppet master –configprint modulepath
/etc/puppet/modules:/usr/share/puppet/modules
[root@master modules]# pwd
/etc/puppet/modules
[root@master modules]# tree -l
.
└── ssh
├── files #文件目录
│ └── sshd_config #要下载的文件
├── manifests
│ └── init.pp
└── templates #模版文件
4 directories, 2 files
查看 site.pp 要包含模块名
[root@master ~]# vim /etc/puppet/manifests/site.pp
include “ssh”
查看模块内容
[root@master ~]# vim /etc/puppet/modules/ssh/manifests/init.pp
class ssh {
package {“openssh-server”:
ensure => present,
}
file {“/etc/ssh/sshd_config”:
ensure => present,
owner => root,
group => root,
mode => 0600,
source => “puppet:///modules/ssh/sshd_config”,
notify => service[‘sshd’],
}
service {“sshd”:
ensure => running,
enable => true,
hasrestart => true,
hasstatus => true,
}
}
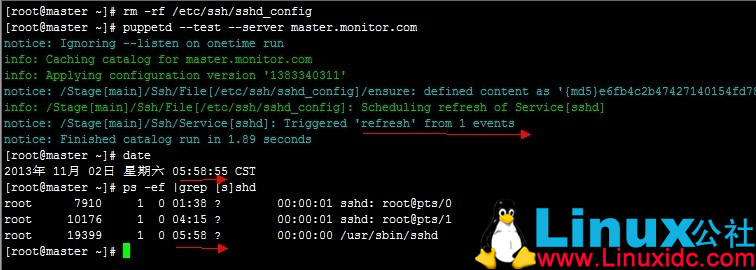
上面文件可以实现:
安装 openssh-server
将 master 端的 sshd_config 下载
然后重启 sshd 服务,并且实现开机启动
下面在客户端

Puppet 的详细介绍:请点这里
Puppet 的下载地址:请点这里
Puppet 学习系列:
Puppet 学习一:安装及简单实例应用 http://www.linuxidc.com/Linux/2013-08/88710.htm
Puppet 学习二: 简单模块配置和应用 http://www.linuxidc.com/Linux/2013-08/88711.htm
相关阅读:
有关 Puppet agent 端三种备份恢复方案探讨研究 http://www.linuxidc.com/Linux/2013-07/87885.htm
选择更安全的方式注册你的 Puppet 节点 http://www.linuxidc.com/Linux/2013-07/87884.htm
通过配置 SSH 深刻理解 Puppet 的语法及工作机制 http://www.linuxidc.com/Linux/2013-07/87882.htm
Puppet 利用 Nginx 多端口实现负载均衡 http://www.linuxidc.com/Linux/2013-02/79794.htm
CentOS(5 和 6)下 Puppet 的 C / S 模式实例 http://www.linuxidc.com/Linux/2011-12/50502.htm


