共计 3365 个字符,预计需要花费 9 分钟才能阅读完成。
开发机器上安装 jdk1.7.0_60 和 scala2.10.4,配置好相关环境变量。网上资料很多,安装过程忽略。此外,Eclipse 使用 Luna4.4.1,IDEA 使用 14.0.2 版本。
1. Eclipse 开发环境搭建
1.1. 安装 scala 插件
安装 eclipse-scala-plugin 插件,下载地址 http://scala-ide.org/download/prev-stable.html

解压缩以后把 plugins 和 features 复制到 eclipse 目录,重启 eclipse 以后即可。
Window -> Open Perspective -> Other…,打开 Scala,说明安装成功。

1.2. 创建 maven 工程
打开 File -> New -> Other…,选择 Maven Project:
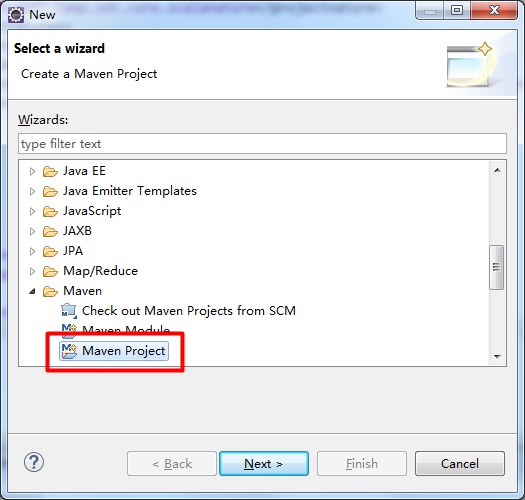
点击 Next,输入项目存放路径:
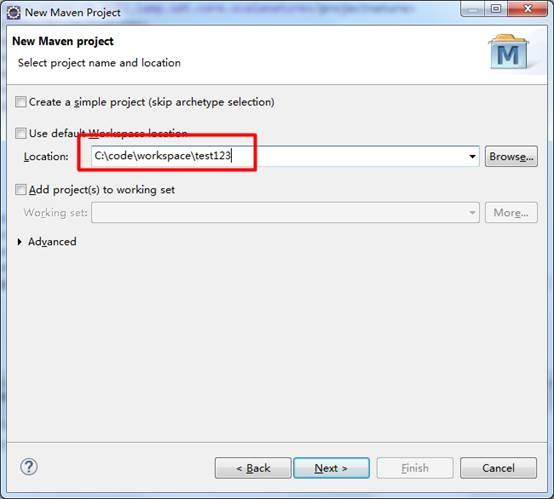
点击 Next,选择 org.scala-tools.archetypes:
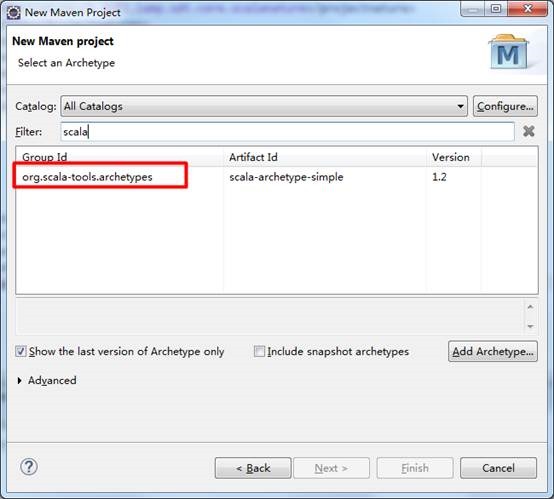
点击 Next,输入 artifact 相关信息:
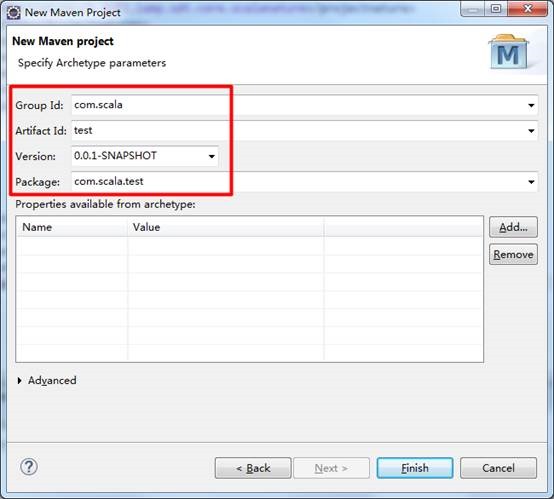
点击 Finish 即可。默认创建好的工程目录结构如下:
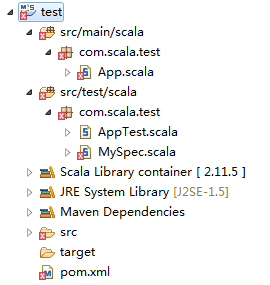
修改 pom.xml 文件:

至此,一个默认的 scala 工程新建完成。
2. Spark 开发环境搭建
2.1. 安装 scala 插件
开发机器使用的 IDEA 版本为 IntelliJ IEDA 14.0.2。为了使 IDEA 支持 scala 开发,需要安装 scala 插件,如图:
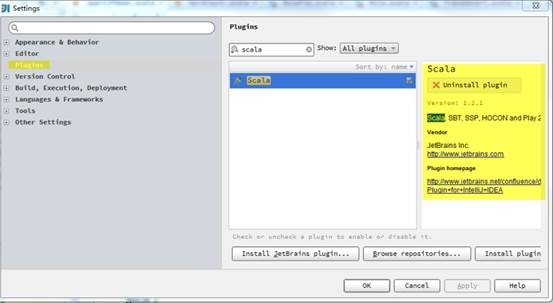
插件安装完成后,IntelliJ IDEA 会要求重启。
2.2. 创建 maven 工程
点击 Create New Project,在 Project SDK 选择 jdk 安装目录(建议开发环境中的 jdk 版本与 Spark 集群上的 jdk 版本保持一致)。点击左侧的 Maven,勾选 Create from archetype,选择 org.scala-tools.archetypes:scala-archetype-simple:
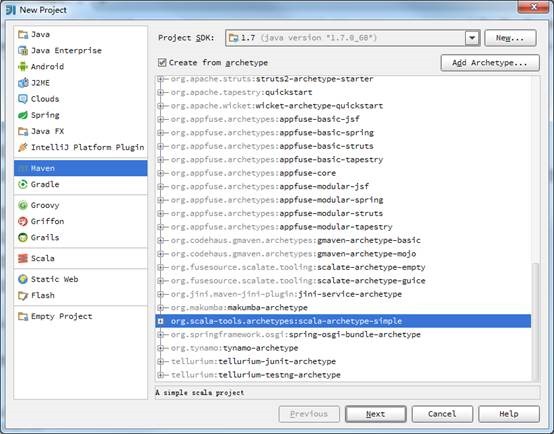
点击 Next 后,可根据需求自行填写 GroupId,ArtifactId 和 Version(请保证之前已经安装 maven)。点击 Finish 后,maven 会自动生成 pom.xml 和下载依赖包。同 1.2 章节中 eclipse 下创建 maven 工程一样,需要修改 pom.xml 中 scala 版本。

至此,IDEA 下的一个默认 scala 工程创建完毕。
3. WordCount 示例程序
3.1. 修改 pom 文件
在 pom 文件中添加 spark 和 Hadoop 相关依赖包:
<!– Spark –>
<dependency>
<groupId>org.apache.spark</groupId>
<artifactId>spark-core_2.10</artifactId>
<version>1.1.0</version>
</dependency>
<!– Spark Steaming–>
<dependency>
<groupId>org.apache.spark</groupId>
<artifactId>spark-streaming_2.10</artifactId>
<version>1.1.0</version>
</dependency>
<!– HDFS –>
<dependency>
<groupId>org.apache.hadoop</groupId>
<artifactId>hadoop-client</artifactId>
<version>2.6.0</version>
</dependency>
在 <build></build> 中使用 maven-assembly-plugin 插件,目的是 package 时把依赖 jar 也打包。
<plugin>
<artifactId>maven-assembly-plugin</artifactId>
<version>2.5.5</version>
<configuration>
<appendAssemblyId>false</appendAssemblyId>
<descriptorRefs>
<descriptorRef>jar-with-dependencies</descriptorRef>
</descriptorRefs>
<archive>
<manifest>
<mainClass>com.ccb.WordCount</mainClass>
</manifest>
</archive>
</configuration>
<executions>
<execution>
<id>make-assembly</id>
<phase>package</phase>
<goals>
<goal>assembly</goal>
</goals>
</execution>
</executions>
</plugin>
3.2. WordCount 示例
WordCount 用来统计输入文件中所有单词出现的次数,代码参考:
package com.ccb
import org.apache.spark.{SparkConf, SparkContext}
import org.apache.spark.SparkContext._
/**
* 统计输入目录中所有单词出现的总次数
*/
object WordCount {
def main(args: Array[String]) {
val dirIn = “hdfs://192.168.62.129:9000/user/vm/count_in”
val dirOut = “hdfs://192.168.62.129:9000/user/vm/count_out”
val conf = new SparkConf()
val sc = new SparkContext(conf)
val line = sc.textFile(dirIn)
val cnt = line.flatMap(_.split(” “)).map((_, 1)).reduceByKey(_ + _) // 文件按空格拆分,统计单词次数
val sortedCnt = cnt.map(x => (x._2, x._1)).sortByKey(ascending = false).map(x => (x._2, x._1)) // 按出现次数由高到低排序
sortedCnt.collect().foreach(println) // 控制台输出
sortedCnt.saveAsTextFile(dirOut) // 写入文本文件
sc.stop()
}
}
3.3. 提交 spark 执行
使用 maven pacakge 打包得到 sparktest-1.0-SNAPSHOT.jar, 并提交到 spark 集群运行。
执行命令参考:
./spark-submit –name WordCountDemo –class com.ccb.WordCount sparktest-1.0-SNAPSHOT.jar
即可得到统计结果。
Ubuntu 安装 2.10.x 版本的 Scala http://www.linuxidc.com/Linux/2015-04/116455.htm
Spark1.0.0 部署指南 http://www.linuxidc.com/Linux/2014-07/104304.htm
CentOS 6.2(64 位) 下安装 Spark0.8.0 详细记录 http://www.linuxidc.com/Linux/2014-06/102583.htm
Spark 简介及其在 Ubuntu 下的安装使用 http://www.linuxidc.com/Linux/2013-08/88606.htm
安装 Spark 集群 (在 CentOS 上) http://www.linuxidc.com/Linux/2013-08/88599.htm
Hadoop vs Spark 性能对比 http://www.linuxidc.com/Linux/2013-08/88597.htm
Spark 安装与学习 http://www.linuxidc.com/Linux/2013-08/88596.htm
Spark 并行计算模型 http://www.linuxidc.com/Linux/2012-12/76490.htm
Scala 的详细介绍 :请点这里
Scala 的下载地址 :请点这里
本文永久更新链接地址 :http://www.linuxidc.com/Linux/2015-08/120946.htm


