共计 2931 个字符,预计需要花费 8 分钟才能阅读完成。
主机环境 rhel6 selinux and iptables disabled
实验主机 172.25.254.2 varnish
172.25.254.3 apache
172.25.254.4 apache
首先得到这两个包
varnish-3.0.5-1.el6.x86_64.rpm varnish-libs-3.0.5-1.el6.x86_64.rpm
安装
yum install varnish-* -y
### 配置一个后端服务器
Vim /etc/varnish/default.vcl
.host = “172.25.254.3”;
.port = “80”;
}
这里写的 3 为后端,那先给它创建一个首页,方便测试
### 配置 varnish 服务端口
sub vcl_deliver {
if (obj.hits > 0) {
set resp.http.X-Cache = “HIT from xp1 cache”;
}
else {
set resp.http.X-Cache = “MISS from xp1 cache”;
}
return (deliver);
}
### 测试缓存命中
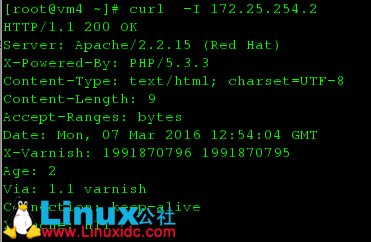
在 4 上
[root@vm4 ~]# curl 172.25.254.2
haha-vm3

age 后面是时间,默认是 120 妙
HIT 就代表命中 MISS 就代表去后端查询去了
### 通过 varnishadm 手动清除缓存
# varnishadm ban.url .*$
# 清除所有
# varnishadm ban.url /index.html
# 清除 index.html 页面缓存
# varnishadm ban.url /admin/$
# 清除 admin 目录缓存
### 定义多个不同域名站点的后端服务器
backend xp1 {
.host = “172.25.39.3”;
.port = “80”;
}
backend xp2 {
.host = “172.25.39.4”;
.port = “80”;
}
sub vcl_recv {
if (req.http.host ~ “^(www.)?linuxidc.com”) {
set req.http.host = “www.linuxidc.com”;
set req.backend = xp1;
} elsif (req.http.host ~ “^bbs.linuxidc.com”) {
set req.backend = xp2;
} else {error 404 “linuxidc cache”;
}
}

{.backend = xp1;}
{.backend = xp2;}
}
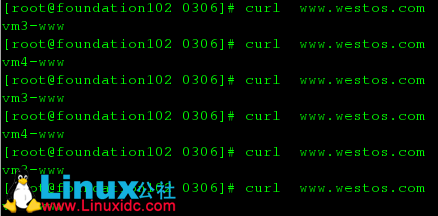
上面采用 rr 算法,还有其他算法如 hash,fallback,random 等
if (req.http.host ~ “^(www.)?linuxidc.com”) {
set req.http.host = “www.linuxidc.com”;
set req.backend = lb;
return (pass); #为了测试方便, 不进行缓存。
} elsif (req.http.host ~ “^bbs.linuxidc.com”) {
set req.backend = xp2;
} else {
error 404 “linuxidc cache”;
}
}
测试效果

http://code.google.com/p/varnish-php-bansys/
# 需要安装 php 支持
unzip bansys.zip -d /var/www/html
vim /var/www/html/bansys/config.php #只保留如下设置, 其余注释掉
<?php
$var_group1 = array(
‘host’ => array(‘172.25.254.2’),
‘port’ => ‘6082’,
);
//varnish 群组定义
// 对主机列表进行绑定
$VAR_CLUSTER = array(
‘www.linuxidc.com’ => $var_group1,
);
//varnish 版本 //2.x 和 3.x 推送命令不一样
$VAR_VERSION = “3”;
?>
bansys 有两种工作模式, 分别是:telnet 和 http 模式。
telnet 模式需要关闭 varnish 服务管理端口的验证, 注释掉 /etc/sysconfig/varnish 文件中的“-S $
{VARNISH_SECRET_FILE}”这行, 重启 varnish 服务即可。
如果是 http 模式需要做如下设置:
vim /etc/varnish/default.vcl
acl linuxidc {
# 设置访问控制
“127.0.0.1”;
“172.25.254.0”/24;
}
sub vcl_recv {
if (req.request == “BAN”) {
if (!client.ip ~ linuxidc) {
error 405 “Not allowed.”;
}
ban(“req.url ~ ” + req.url);
error 200 “ban added”;
}
}
然后在浏览器中就可以查看了
缓存服务器 Varnish 概念篇 http://www.linuxidc.com/Linux/2014-05/101389.htm
缓存服务器 Varnish 概念篇 http://www.linuxidc.com/Linux/2014-05/101389.htm
Varnish Cache 的架构笔记 http://www.linuxidc.com/Linux/2013-10/91016.htm
CentOS 5.8 下 Varnish-2.1.5 的安装配置 http://www.linuxidc.com/Linux/2013-09/89916.htm
RedHat 脚本改用 CentOS 源更新安装 Nginx、PHP 5.3、Varnish http://www.linuxidc.com/Linux/2012-07/65801.htm
利用 Varnish 构建 Cache 服务器笔记 http://www.linuxidc.com/Linux/2012-07/65234.htm
缓存服务 Varnish 安装配置 http://www.linuxidc.com/Linux/2012-07/65228.htm
Varnish 编译安装所需准备 http://www.linuxidc.com/Linux/2012-07/65230.htm
Linux 下 Varnish 缓存的配置优化 http://www.linuxidc.com/Linux/2012-03/56435.htm
Varnish 的详细介绍:请点这里
Varnish 的下载地址:请点这里
本文永久更新链接地址:http://www.linuxidc.com/Linux/2016-03/129284.htm


