共计 5456 个字符,预计需要花费 14 分钟才能阅读完成。
Zabbix 是一个企业级开源分布式监控软件,打算学习下,这篇文章介绍 Linux 下 Zabbix 源码编译安装过程图解。
一 环境信息
zabbix server: 192.168.2.37
zabbix agent: 192.168.2.38
二 zabbix 服务端安装
– 下载
http://sourceforge.net/projects/zabbix/files/ZABBIX%20Latest%20Stable/2.2.6/zabbix-2.2.6.tar.gz/download
– 解压
[root@db1 soft_bak]# tar zxvf zabbix-2.2.6.tar.gz
– 创建 zabbix 用户
[root@db1 soft_bak]# groupadd zabbix
[root@db1 soft_bak]# useradd -g zabbix zabbix
[root@db1 soft_bak]# passwd zabbix
– 创建 zabbix 数据库
[linuxidc94@db1 ~]$ mkdir –p /database/linuxidc94/pg_tbs/tbs_zabbix
[linuxidc94@db1 ~]$ psql –h 127.0.0.1
psql (9.4beta1)
Type“help”for help.
postgres=# CREATE ROLE zabbix LOGIN ENCRYPTED PASSWORD ‘zabbix’ nosuperuser noinherit nocreatedb nocreaterole ;
CREATE ROLE
[linuxidc94@db1 ~]$ psql –h 127.0.0.1
psql (9.4beta1)
Type“help”for help.
postgres=# create tablespace tbs_zabbix owner postgres LOCATION ‘/database/linuxidc94/pg_tbs/tbs_zabbix’;
CREATE TABLESPACE
postgres=# CREATE DATABASE zabbix
postgres–# WITH OWNER = postgres
postgres–# TEMPLATE = template0
postgres–# ENCODING = ‘UTF8’
postgres–# TABLESPACE = tbs_zabbix;
CREATE DATABASE
postgres=# grant all on database zabbix to zabbix with grant option;
GRANT
postgres=# grant all on tablespace tbs_zabbix to zabbix;
GRANT
– 导入 zabbix 数据
[linuxidc93@db1 ~]$ cd /opt/soft_bak/zabbix–2.2.6/database/postgresql/
[linuxidc94@db1 postgresql]$ psql –h 127.0.0.1–d zabbix –U zabbix –a –f schema.sql
[linuxidc94@db1 postgresql]$ psql –h 127.0.0.1–d zabbix –U zabbix –a –f images.sql
[linuxidc94@db1 postgresql]$ psql –h 127.0.0.1–d zabbix –U zabbix –a –f data.sql
备注:zabbix 数据库字符集为 UTF-8。
– 编译
[root@db1 zabbix–2.2.6]# mkdir /usr/local/zabbix
[root@db1 zabbix–2.2.6]# ./configure –prefix=/usr/local/zabbix –enable-server –enable-agent –with-postgresql –enable-ipv6 –with-net-snmp –with-libcurl –with-libxml2
– 编译报错
….
checking for file /proc/stat… yes
checking for file /proc/cpuinfo… yes
checking for file /proc/0/psinfo…no
checking for file /proc/loadavg… yes
checking for file /proc/net/dev… yes
checking forlonglong format…no
checking for–rdynamic linking option… yes
checking for libperfstat 5.2.0.40 fileset…no
checking for libperfstat 5.3.0.60 fileset…no
checking for architecture… linux (linux–gnu)
checking for the linux kernel version…2.6 family (2.6.32–220.el6.i686)
checking size of void*…4
checking forOracle support…no
checking for pg_config…no
configure: error:PostgreSQL library not found
备注:找不到 postgresql 相关信息,环境变量没加上,加上环境变量编译通过,如果还没其它包没装,yum 安装即可。
–yum 补充安装的包
yum install libxml2–devel
yum install net–snmp–devel.i686
yum install libcurl–devel
– 安装
[root@db1 zabbix–2.2.6]# make install
– 配置 php 前端
[root@db1 php]# mkdir -p /var/www/html/zabbix
[root@db1 php]# cp -r /opt/soft_bak/zabbix-2.2.6/frontends/php/* /var/www/html/zabbix/
备注:将 php 程序复制到指定目录即可。
– 设置 zabbix 环境变量
export ZABBIX_HOME=/usr/local/zabbix
export PGHOME=/opt/pgsql_9.4beta1
export LD_LIBRARY_PATH=$PGHOME/lib:$ZABBIX_HOME/lib:/lib64:/usr/lib64:/usr/local/lib64:/lib:/usr/lib:/usr/local/lib
export PATH=$ZABBIX_HOME/bin:$ZABBIX_HOME/sbin:$PATH.
– 打开浏览器
http://192.168.2.37/zabbix/setup.php

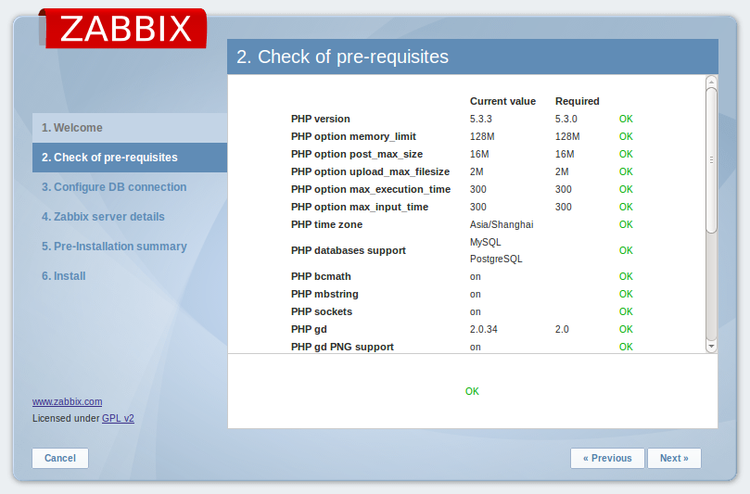
点 Next , 进入 “Check of pre-requisites” 界面,一开始,我这步有很多选项没通过,没通过的参数只需要更改 /etc/php.ini 里的相应配置,并重启 httpd 即可,其它缺少的包需要安装。

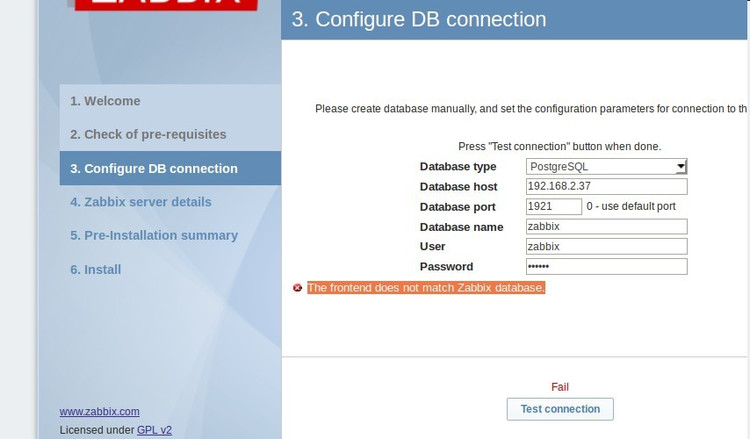
接下来配置数据库连接,我这边用的是 PostgreSQL 数据库,遇到这个问题:

报错代码 “the frontend does not match zabbix database”,经分析是由于在 zabbix 数据库中创建了 zabbix 模式,而默认的情况 zabbix 读取的是 public 模式,所以不通过了
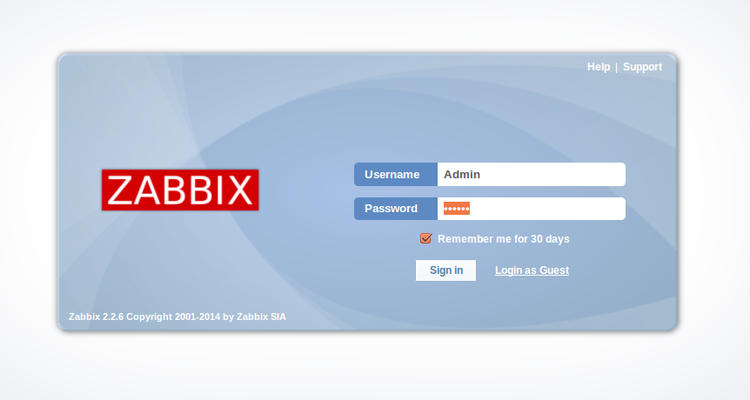
全部配置通过后,看到如下界面:

默认用户名 Admin,密码 zabbix。
– 如需查看 php 配置
[root@db1 ~]# cat /var/www/html/index.php
<?php
phpinfo();
?>
备注:浏览器输入http://192.168.2.37/index.php 可查看 php 配置。
– 配置 /usr/local/etc/zabbix_server.conf
[root@db1 etc]# grep “^[A-Z]” zabbix_server.conf
LogFile=/tmp/zabbix_server.log
DBHost=127.0.0.1
DBName=zabbix
DBUser=zabbix
DBPort=1921
– 开启 zabbix 服务
[zabbix@db1 ~]$ zabbix_server
– 可能遇到的错误
[zabbix@db1 ~]$ zabbix_server —help
zabbix_server: error while loading shared libraries: libpq.so.5: cannot open shared object file:No such file or directory
备注:是由于没配好 LD_LIBRARY_PATH 的原因。
三 zabbix agent 客户端安装
– 下载
http://www.zabbix.com/downloads/2.2.5/zabbix_agents_2.2.5.linux2_6.i386.tar.gz
– 解压
[root@db2 zabbix]# cd /usr/local/zabbix
[root@db2 zabbix]# tar zxvf zabbix_agents_2.2.5.linux2_6.i386.tar.gz
– 配置 /usr/local/zabbix/conf/zabbix_agentd.conf
LogFile=/tmp/zabbix_agentd.log
SourceIP=192.168.2.38 ## zabbix 客户端 IP
Server=192.168.2.37 ## zabbix 服务端 IP
ListenPort=10050
Hostname=db2
– 开启 agentd
[zabbix@db2 sbin]$ zabbix_agentd –c /usr/local/zabbix/conf/zabbix_agentd.conf
– 查看 agentd 进程
[root@db2 ~]# ps -ef | grep zabbix_agent
zabbix 3292 1 009:47? 00:00:00 zabbix_agentd –c /usr/local/zabbix/conf/zabbix_agentd.conf
zabbix 3293 3292 009:47? 00:00:02 zabbix_agentd: collector [idle 1 sec]
zabbix 3294 3292 009:47? 00:00:00 zabbix_agentd: listener #1 [waiting for connection]
zabbix 3295 3292 009:47? 00:00:00 zabbix_agentd: listener #2 [waiting for connection]
zabbix 3296 3292 009:47? 00:00:00 zabbix_agentd: listener #3 [waiting for connection]
root 4163 3648 010:31 pts/2 00:00:00 grep zabbix_agent
– 可能遇到的问题
浏览器输入“http://192.168.2.37/zabbix/” 进入主界面,看到了如下告警
Zabbix agent on db2 is unreachable for5 minutes
备注:经过一段时间检查,发现 agentd 的端口号配置错了,配置页面 Configuraton -> Hosts -> DB2,如下图

一些 Zabbix 相关教程集合:
Ubuntu 14.04 下 Zabbix2.4.5 源码编译安装 http://www.linuxidc.com/Linux/2015-05/117657.htm
安装部署分布式监控系统 Zabbix 2.06 http://www.linuxidc.com/Linux/2013-07/86942.htm
《安装部署分布式监控系统 Zabbix 2.06》http://www.linuxidc.com/Linux/2013-07/86942.htm
CentOS 6.3 下 Zabbix 安装部署 http://www.linuxidc.com/Linux/2013-05/83786.htm
Zabbix 分布式监控系统实践 http://www.linuxidc.com/Linux/2013-06/85758.htm
CentOS 6.3 下 Zabbix 监控 apache server-status http://www.linuxidc.com/Linux/2013-05/84740.htm
CentOS 6.3 下 Zabbix 监控 MySQL 数据库参数 http://www.linuxidc.com/Linux/2013-05/84800.htm
64 位 CentOS 6.2 下安装 Zabbix 2.0.6 http://www.linuxidc.com/Linux/2014-11/109541.htm
ZABBIX 的详细介绍:请点这里
ZABBIX 的下载地址:请点这里
本文永久更新链接地址:http://www.linuxidc.com/Linux/2016-04/130440.htm


