共计 19653 个字符,预计需要花费 50 分钟才能阅读完成。
有空在 Ubuntu 14.04 下折腾了以下几个东西,MediaWiki(维基),NodeBB(论坛),GitLab(私有 git 服务器)。本来的目的是搭建一个 wiki, 选用了 MediaWiki 后,使用 Apache 搭建好了。
搭论坛的时候,一开始想用 Discourse,但配置总有问题,就先放弃了,找了个 NodeBB 看起来也还可以。
但 NodeBB 是使用 Nginx 做代理的,考虑之后决定放弃 Apache,全部统一用 Nginx。
于是搭建了 Nginx+MediaWiki+NodeBB+Everything(这个是别人配置好的,只是在 Nginx 中设置了代理)。
后来又添上了 GitLab。整理安装记录如下。
/****************************************安装 Nginx 分割线****************************************************************/
先装 Nginx(参考 http://www.linuxidc.com/Linux/2016-05/131138.htm 基本没什么问题)
1, 由于需要大量的权限操作,方便起见临时提升权限,使用 root 账号
sudo su2,安装 apt 源管理工具、添加 nginx 和 php 的安装源
apt-get install python-software-properties
add-apt-repository ppa:nginx/stable
add-apt-repository ppa:ondrej/php5
3,更新系统软件
apt-get update4、安装 mysql
apt-get install mysql-server注:在安装过程中,会要求你输入 MySQL 的 root 账号的密码,输入并记住。
5、安装 php 及对 mysql 的支持
apt-get install php5 php5-fpm php5-mysql php-apc6、根据实际需要,选择性的安装 php 的各类功能模块。
apt-get install php-pear php5-dev php5-curl
apt-get install php5-gd php5-intl php5-imagick
apt-get install php5-imap php5-mcrypt php5-memcache
apt-get install php5-ming php5-ps php5-pspell
apt-get install php5-recode php5-snmp php5-sqlite
apt-get install php5-tidy php5-xmlrpc php5-xsl7、安装 nginx
apt-get install nginx8、配置 php
vim /etc/php5/fpm/php.ini在文件中找到:
;cgi.fix_pathinfo=1改为:
cgi.fix_pathinfo=09、配置 nginx
创建一个 /www 目录设置为 755 权限
mkdir /www
chmod 755 /www
将网站根目录设置到 /www 目录下,注意不要写成 /www/ 这种格式
vim /etc/nginx/sites-enabled/default找到:
root /usr/share/nginx/html;改为:
root /www;找到:
index index.html index.htm;增加 index.php,即改为:
index index.php index.html index.htm;找到:location ~ .php$ {*} 区块
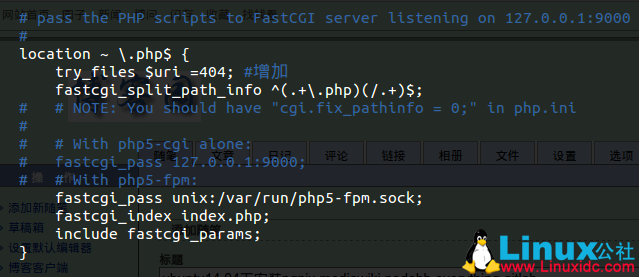
做如下调整(改动之处于行末有注释):
location ~ .php$ {try_files $uri =404; #增加
fastcgi_split_path_info ^(.+.php)(/.+)$; #反注释
## NOTE: You should have "cgi.fix_pathinfo = 0;" in php.ini
#
## With php5-cgi alone:
# fastcgi_pass 127.0.0.1:9000;
## With php5-fpm:
fastcgi_pass unix:/var/run/php5-fpm.sock; #反注释
fastcgi_index index.php; #反注释
include fastcgi_params; #反注释
}
即下图

10、解决 php-fpm 与 nginx 的小 bug
按上述步骤操作后,由于 nginx 与 php-fpm 之间的一个小 bug,会导致这样的现象:网站中的静态页面 *.html 都能正常访问,而 *.php 文件虽然会返回 200 状态码,但实际输出给浏览器的页面内容却是空白。
简而言之,原因是 nginx 无法正确的将 *.php 文件的地址传递给 php-fpm 去解析,相当于 php-fpm 接受到了请求,但这请求却指向一个不存在的文件,于是返回空结果。
为了解决这个问题,需要改动 nginx 默认的 fastcgi_params 配置文件:
vim /etc/nginx/fastcgi_params在文件的最后增加一行:
fastcgi_param SCRIPT_FILENAME $document_root$fastcgi_script_name;关于这行的内容,多说几句,其中有两个参数:
$document_root 即是指网站的根目录,也就是我们在前面刚设置的 root /www;
我在前面说配置 nginx 时,写成了 root /www/; 这种写法,对于 nginx 不成问题,但它在向 php-fpm 传递 php 文件路径时,会形成:/www//test/script.php 这样的文件地址无效(获取不到正确的 php 文件),于是出现返回空白的问题。这个问题是如此之隐蔽,以至于我花了大量时间在查看 LOG、寻找资料和调整设置上。
11,重启各项服务
service php5-fpm reload
service nginx reload
重新加载各项配置改动。
12、测试
vim /www/index.php内容:
<?php echo phpinfo(); ?>请打开你的浏览器访问:htpt://localhost 若一切正常,将输出 php 环境信息。
(以上 Nginx 安装参考 http://www.linuxidc.com/Linux/2016-05/131138.htm)
一般这样子就没问题了。
我按着这个步骤,也没什么问题,但是打开 htpt://localhost 的时候,我看到的是 apache!
是的,这个机子被别人安装过 apache 了,捷足先登抢占了 80 端口。
那先把 apache 的端口改掉。
修改两个文件 /etc/apache2/ports.conf 和 /etc/apache2/sites-available/000-default.conf
将 80 改成 81.
重启服务
service apache2 restart
service nginx restart
就可以了。
重启 Nginx 的时候 注意看是 OK 还是 fail。
如果 fail 运行 nginx - t 查看报错信息。
更多 Nginx 相关教程见以下内容:
CentOS 6.2 实战部署 Nginx+MySQL+PHP http://www.linuxidc.com/Linux/2013-09/90020.htm
使用 Nginx 搭建 WEB 服务器 http://www.linuxidc.com/Linux/2013-09/89768.htm
搭建基于 Linux6.3+Nginx1.2+PHP5+MySQL5.5 的 Web 服务器全过程 http://www.linuxidc.com/Linux/2013-09/89692.htm
CentOS 6.3 下 Nginx 性能调优 http://www.linuxidc.com/Linux/2013-09/89656.htm
CentOS 6.3 下配置 Nginx 加载 ngx_pagespeed 模块 http://www.linuxidc.com/Linux/2013-09/89657.htm
CentOS 6.4 安装配置 Nginx+Pcre+php-fpm http://www.linuxidc.com/Linux/2013-08/88984.htm
Nginx 安装配置使用详细笔记 http://www.linuxidc.com/Linux/2014-07/104499.htm
Nginx 日志过滤 使用 ngx_log_if 不记录特定日志 http://www.linuxidc.com/Linux/2014-07/104686.htm
Nginx 的详细介绍:请点这里
Nginx 的下载地址:请点这里
/****************************************安装 mediawiki 分割线***********************************************************/
参考官方安装指南
https://www.mediawiki.org/wiki/Manual:Installing_MediaWiki
先下载稳定版本
wget https://releases.wikimedia.org/mediawiki/1.26/mediawiki-1.26.2.tar.gz直接解压到 /www 下面
tar xvzf mediawiki-*.tar.gz -C /www重命名
mv /www/mediawiki-1.26.2 /www/midiawikiifconfig 看到本机 IP,这里假设是 192.168.1.2 吧
修改 host 文件,方便��忆
vim /etc/hosts想个好记的域名,加入
192.168.1.2 www.zqb.local保存退出
重启网络使修改生效
/etc/init.d/networking restart然后再浏览器中就可以通过 www.zqb.local 访问了
下面通过浏览器访问 www.zqb.local/mediawiki
就可以通过网页交互安装 mediawiki 了。
不过安装的时候要用到 mysql,先来设置以下。
上文安装 Nginx 的时候已经把 mysql 也装上了,假设设置的 root 用户密码也是 root。
那就
mysql -u root -proot创建数据库 wikidb,创建用户 wikiuser 密码 wikipwd
CREATE DATABASE wikidb;
GRANT ALL PRIVILEGES ON wikidb.* TO 'wikiuser'@'127.0.0.1' IDENTIFIED BY 'wikipwd';
Exit
然后通过网页面交互进行安装。
安装过程中,在插件选择时勾上WikiEditor,这个能让编辑器更友好一些,其他的插件也可以根据需要勾一些。
安装后会提示下载
LocalSettings.php
移动到 wiki 目录下
mv /home/ 你的用户名 / 下载/LocalSettings.php /www/mediawiki/LocalSettings.php编辑
vim /www/mediawiki/LocalSettings.php加上
# Enables use of WikiEditor by default but still allows users to disable it in preferences
$wgDefaultUserOptions['usebetatoolbar'] = 1;

# Enables link and table wizards by default but still allows users to disable them in preferences
$wgDefaultUserOptions['usebetatoolbar-cgd'] = 1;

# Displays the Preview and Changes tabs
$wgDefaultUserOptions['wikieditor-preview'] = 1;

# Displays the Publish and Cancel buttons on the top right side
$wgDefaultUserOptions['wikieditor-publish'] = 1;
注意,还需要修改 mediawiki 文件夹的权限, 比如简单粗暴改成 777
chmod -R 777 /www/mediawiki然后就可以正常使用 mediawiki 了。
/****************************************安装 nodebb 分割线*********************************************************/
参考官方文档 https://docs.nodebb.org/en/latest/installing/os/ubuntu.html
nodebb 基于 nodejs, 先装 nodejs
curl -sL https://deb.nodesource.com/setup_4.x | sudo -E bash -sudo apt-get install -y git nodejs mongodb build-essentialnodebb 需要数据库 mongodb 或 redis。
发现本机已经安装过 mongdb,查看版本
mongo --version是 2.4.9, 版本太低。查了一下升级还挺麻烦,那还是直接装 redis 吧。
sudo apt-add-repository ppa:chris-lea/redis-server
sudo apt-get update
sudo apt-get install redis-server
运行一下确认安装成功
redis-server然后准备装 nodebb,先装这两个
apt-get install nodejs-legacy
apt-get install npm
好了,开始装 nodebb
Cd /www
git clone -b v1.0.0 https://github.com/NodeBB/NodeBB.git nodebb
cd nodebb/
npm install --production
./  setup
然后它会告诉你在 0.0.0.0:4567, 于是浏览器访问 http://127.0.0.1:4567/,交互式安装。
数据库选 redis,其他都不改(是的就是 127.0.0.1 就是 0 号数据库)
或者为了安全,也可以查一下,加个密码,我查了但懒得弄。
安装完成后,启动就行了
./nodebb start现在就可以在 http://127.0.0.1:4567/ 使用论坛了。
然后需要用 Nginx 代理。
cd /etc/nginx/
vim conf.d/nodebb.conf
加入
server {listen 80;

        server_name www.forum.zqb.local forum.zqb.local;
            location / {proxy_set_header X-Real-IP $remote_addr;
            proxy_set_header X-Forwarded-For $proxy_add_x_forwarded_for;
            proxy_set_header Host $http_host;
            proxy_set_header X-NginX-Proxy true;
            proxy_pass http://127.0.0.1:4567/;
            proxy_redirect off;

            # Socket.IO Support
            proxy_http_version 1.1;
            proxy_set_header Upgrade $http_upgrade;
            proxy_set_header Connection "upgrade";
            }
}
重启 nginx
service nginx restart修改 host
vim /etc/hosts加入(注意换成自己的域名和 IP)
192.168.1.2 www.forum.zqb.local重启网络使修改生效
/etc/init.d/networking restart然后就可以访问了。
/****************************************安装 everything 分割线*****************************************************/
everything 是已经装好的,在 192.168.1.2:8080 可以使用的,目前只需要在 nginx 中增加配置文件,代理一下。
基本同上 就是
server_name 这一行,改成 server_name www.everything.zqb.local everything.zqb.local; http://127.0.0.1:4567/; 改成 http://192.168.1.2:8080/;
/**************************************** 安装 gitlab 分割线 *********************************/
参考官方安装说明 https://about.gitlab.com/downloads/#ubuntu1404 和 http://my.oschina.net/u/160089/blog/421168?fromerr=plKVWzZrsudo apt-get install curl openssh-server ca-certificates postfix

官方说明可以这么装
curl -sS https://packages.gitlab.com/install/repositories/gitlab/gitlab-ce/script.deb.sh | sudo bash
sudo apt-get install gitlab-ce
在终端下载,很慢,中断了,于是我选择直接到 https://packages.gitlab.com/gitlab/gitlab-ce 下载 deb 包
更多详情见请继续阅读下一页的精彩内容:http://www.linuxidc.com/Linux/2016-05/131137p2.htm
下载后安装就好
dpkg -i gitlab-ce-XXX.deb配置一下
sudo vim /etc/gitlab/gitlab.rb
打算放到 8081 端口,修改这些(也许不用改这么多 但反正这么改后可以用……)
external_url 'http://192.168.1.2:8081'
#注意换成本机 ip 和端口

## Note: configuration settings below are optional.
## Uncomment and change the value.
############################
# gitlab.yml configuration #
############################

# gitlab_rails['gitlab_ssh_host'] = 'ssh.host_example.com'
gitlab_rails['time_zone'] = 'Asia/Shanghai'
gitlab_rails['gitlab_email_enabled'] = true
gitlab_rails['gitlab_email_from'] = '你的邮箱 @gmail.com'
gitlab_rails['gitlab_email_display_name'] = 'mygitlab'
gitlab_rails['gitlab_email_reply_to'] = '你的邮箱 @gmail.com'
# gitlab_rails['gitlab_default_can_create_group'] = true
# gitlab_rails['gitlab_username_changing_enabled'] = true
gitlab_rails['gitlab_default_theme'] = 2##################
# GitLab Unicorn #
##################
## Tweak unicorn settings.
# unicorn['worker_timeout'] = 60
# unicorn['worker_processes'] = 2
## Advanced settings
# unicorn['listen'] = '127.0.0.1'
unicorn['port'] = 8081
# unicorn['socket'] = '/var/opt/gitlab/gitlab-rails/sockets/gitlab.socket'
# unicorn['pidfile'] = '/opt/gitlab/var/unicorn/unicorn.pid'
# unicorn['tcp_nopush'] = true
# unicorn['backlog_socket'] = 1024
# Make sure somaxconn is equal or higher then backlog_socket
# unicorn['somaxconn'] = 1024
# We do not recommend changing this setting
# unicorn['log_directory'] = "/var/log/gitlab/unicorn"
################
# GitLab Nginx #
################
## see: https://gitlab.com/gitlab-org/omnibus-gitlab/tree/629def0a7a26e7c2326566f0758d4a27857b52a3/doc/settings/nginx.md

nginx['enable'] = true
# nginx['client_max_body_size'] = '250m'
# nginx['redirect_http_to_https'] = false
# nginx['redirect_http_to_https_port'] = 80
# nginx['ssl_client_certificate'] = "/etc/gitlab/ssl/ca.crt" # Most root CA's are included by default
# nginx['ssl_certificate'] = "/etc/gitlab/ssl/#{node['fqdn']}.crt"
# nginx['ssl_certificate_key'] = "/etc/gitlab/ssl/#{node['fqdn']}.key"
# nginx['ssl_ciphers'] = "ECDHE-RSA-AES256-GCM-SHA384:ECDHE-RSA-AES128-GCM-SHA256"
# nginx['ssl_prefer_server_ciphers'] = "on"
# nginx['ssl_protocols'] = "TLSv1 TLSv1.1 TLSv1.2" # recommended by https://raymii.org/s/tutorials/Strong_SSL_Security_On_nginx.html & https://cipherli.st/
# nginx['ssl_session_cache'] = "builtin:1000  shared:SSL:10m" # recommended in http://nginx.org/en/docs/http/ngx_http_ssl_module.html
# nginx['ssl_session_timeout'] = "5m" # default according to http://nginx.org/en/docs/http/ngx_http_ssl_module.html
# nginx['ssl_dhparam'] = nil # Path to dhparams.pem, eg. /etc/gitlab/ssl/dhparams.pem
nginx['listen_addresses'] = ['192.168.1.2']# 注意换成本机 ip
nginx['listen_port'] = 8081 # override only if you use a reverse proxy: https://gitlab.com/gitlab-org/omnibus-gitlab/blob/master/doc/settings/nginx.md#setting-the-nginx-listen-port
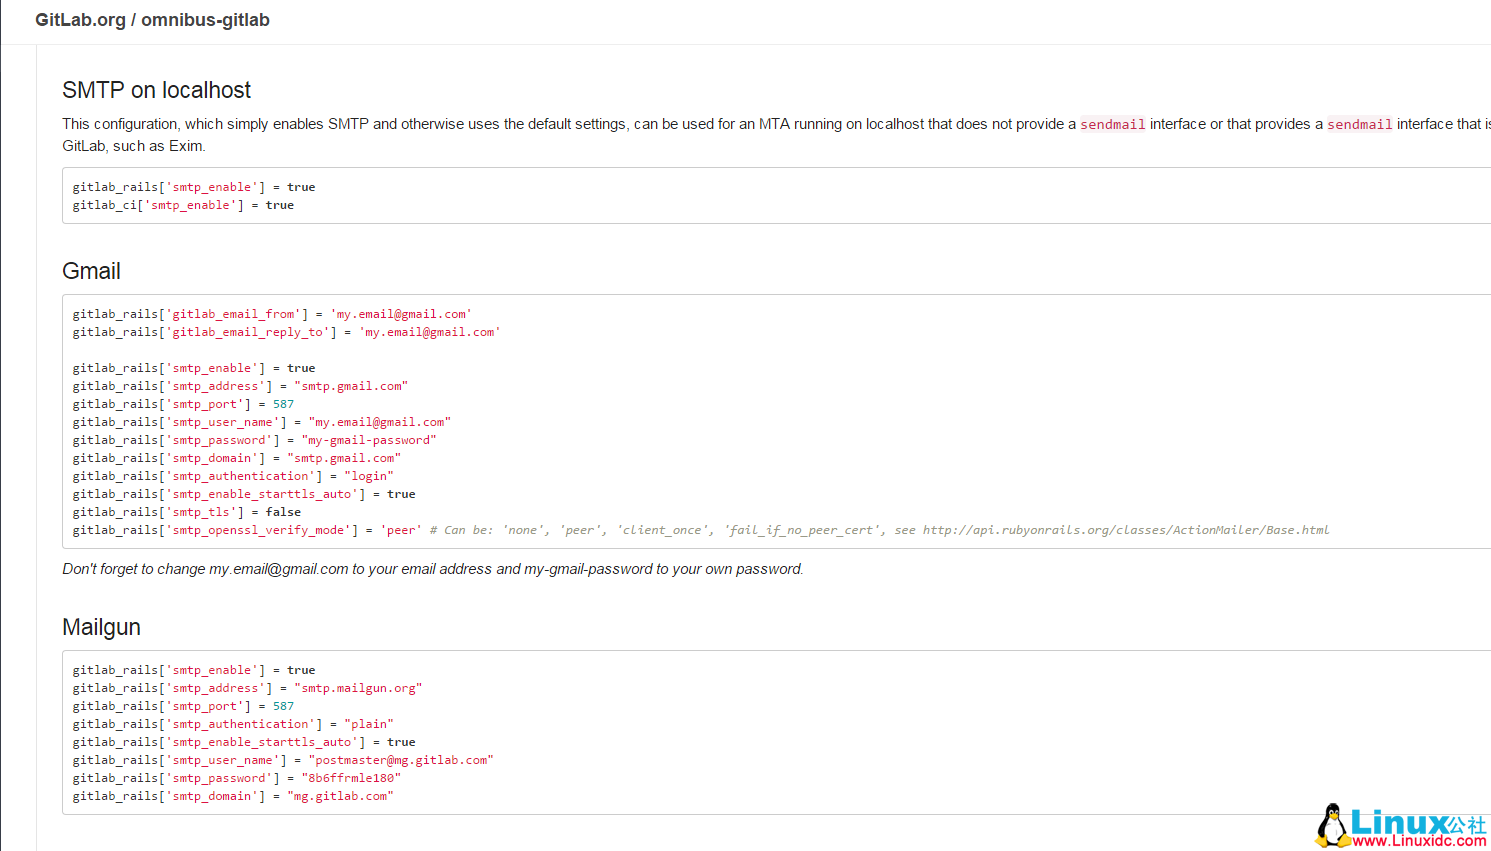
补充一张邮箱参考

配置一下
sudo gitlab-ctl reconfigure然后
vim /etc/nginx/conf.d/gitlab.confserver {listen 80;
server_name www.gitlab.zqb.local gitlab.zqb.local;
location / {proxy_set_header X-Real-IP $remote_addr;
proxy_set_header X-Forwarded-For $proxy_add_x_forwarded_for;
proxy_set_header Host $http_host;
proxy_set_header X-NginX-Proxy true;
proxy_pass http://192.168.1.2:8081/;
proxy_redirect off;
# Socket.IO Support
proxy_http_version 1.1;
proxy_set_header Upgrade $http_upgrade;
proxy_set_header Connection "upgrade";
}
}重启 nginx
service nginx restart修改 host
vim /etc/hosts加入
192.168.1.2 www.gitlab.zqb.local重启网络使修改生效
/etc/init.d/networking restart然后就可以访问 gitlab 了初始用户名root 密码 5iveL!fe
更多 GitLab 相关教程见以下内容:
Ubuntu 14.04 下安装 GitLab 指南 http://www.linuxidc.com/Linux/2015-12/126876.htm
如何在 Ubuntu Server 14.04 下安装 Gitlab 中文版 http://www.linuxidc.com/Linux/2015-12/126875.htm
CentOS 源码安装 GitLab 汉化版 http://www.linuxidc.com/Linux/2015-10/124648.htm
在 Ubuntu 12.04 上安装 GitLab http://www.linuxidc.com/Linux/2012-12/75249.htm
GitLab 5.3 升级注意事项 http://www.linuxidc.com/Linux/2013-06/86473.htm
在 CentOS 上部署 GitLab (自托管的 Git 项目仓库) http://www.linuxidc.com/Linux/2013-06/85754.htm
在 RHEL6/CentOS6/ScientificLinux6 上安装 GitLab 6.0.2 http://www.linuxidc.com/Linux/2014-03/97831.htm
CentOS 6.5 安装 GitLab 教程及相关问题解决 http://www.linuxidc.com/Linux/2014-05/101526.htm
GitLab 的详细介绍:请点这里
GitLab 的下载地址:请点这里
本文永久更新链接地址:http://www.linuxidc.com/Linux/2016-05/131137.htm
有空在 Ubuntu 14.04 下折腾了以下几个东西,MediaWiki(维基),NodeBB(论坛),GitLab(私有 git 服务器)。本来的目的是搭建一个 wiki, 选用了 MediaWiki 后,使用 Apache 搭建好了。
搭论坛的时候,一开始想用 Discourse,但配置总有问题,就先放弃了,找了个 NodeBB 看起来也还可以。
但 NodeBB 是使用 Nginx 做代理的,考虑之后决定放弃 Apache,全部统一用 Nginx。
于是搭建了 Nginx+MediaWiki+NodeBB+Everything(这个是别人配置好的,只是在 Nginx 中设置了代理)。
后来又添上了 GitLab。整理安装记录如下。
/****************************************安装 Nginx 分割线****************************************************************/
先装 Nginx(参考 http://www.linuxidc.com/Linux/2016-05/131138.htm 基本没什么问题)
1, 由于需要大量的权限操作,方便起见临时提升权限,使用 root 账号
sudo su2,安装 apt 源管理工具、添加 nginx 和 php 的安装源
apt-get install python-software-properties
add-apt-repository ppa:nginx/stable
add-apt-repository ppa:ondrej/php5
3,更新系统软件
apt-get update4、安装 mysql
apt-get install mysql-server注:在安装过程中,会要求你输入 MySQL 的 root 账号的密码,输入并记住。
5、安装 php 及对 mysql 的支持
apt-get install php5 php5-fpm php5-mysql php-apc6、根据实际需要,选择性的安装 php 的各类功能模块。
apt-get install php-pear php5-dev php5-curl
apt-get install php5-gd php5-intl php5-imagick
apt-get install php5-imap php5-mcrypt php5-memcache
apt-get install php5-ming php5-ps php5-pspell
apt-get install php5-recode php5-snmp php5-sqlite
apt-get install php5-tidy php5-xmlrpc php5-xsl7、安装 nginx
apt-get install nginx8、配置 php
vim /etc/php5/fpm/php.ini在文件中找到:
;cgi.fix_pathinfo=1改为:
cgi.fix_pathinfo=09、配置 nginx
创建一个 /www 目录设置为 755 权限
mkdir /www
chmod 755 /www
将网站根目录设置到 /www 目录下,注意不要写成 /www/ 这种格式
vim /etc/nginx/sites-enabled/default找到:
root /usr/share/nginx/html;改为:
root /www;找到:
index index.html index.htm;增加 index.php,即改为:
index index.php index.html index.htm;找到:location ~ .php$ {*} 区块
做如下调整(改动之处于行末有注释):
location ~ .php$ {try_files $uri =404; #增加
fastcgi_split_path_info ^(.+.php)(/.+)$; #反注释
## NOTE: You should have "cgi.fix_pathinfo = 0;" in php.ini
#
## With php5-cgi alone:
# fastcgi_pass 127.0.0.1:9000;
## With php5-fpm:
fastcgi_pass unix:/var/run/php5-fpm.sock; #反注释
fastcgi_index index.php; #反注释
include fastcgi_params; #反注释
}
即下图

10、解决 php-fpm 与 nginx 的小 bug
按上述步骤操作后,由于 nginx 与 php-fpm 之间的一个小 bug,会导致这样的现象:网站中的静态页面 *.html 都能正常访问,而 *.php 文件虽然会返回 200 状态码,但实际输出给浏览器的页面内容却是空白。
简而言之,原因是 nginx 无法正确的将 *.php 文件的地址传递给 php-fpm 去解析,相当于 php-fpm 接受到了请求,但这请求却指向一个不存在的文件,于是返回空结果。
为了解决这个问题,需要改动 nginx 默认的 fastcgi_params 配置文件:
vim /etc/nginx/fastcgi_params在文件的最后增加一行:
fastcgi_param SCRIPT_FILENAME $document_root$fastcgi_script_name;关于这行的内容,多说几句,其中有两个参数:
$document_root 即是指网站的根目录,也就是我们在前面刚设置的 root /www;
我在前面说配置 nginx 时,写成了 root /www/; 这种写法,对于 nginx 不成问题,但它在向 php-fpm 传递 php 文件路径时,会形成:/www//test/script.php 这样的文件地址无效(获取不到正确的 php 文件),于是出现返回空白的问题。这个问题是如此之隐蔽,以至于我花了大量时间在查看 LOG、寻找资料和调整设置上。
11,重启各项服务
service php5-fpm reload
service nginx reload
重新加载各项配置改动。
12、测试
vim /www/index.php内容:
<?php echo phpinfo(); ?>请打开你的浏览器访问:htpt://localhost 若一切正常,将输出 php 环境信息。
(以上 Nginx 安装参考 http://www.linuxidc.com/Linux/2016-05/131138.htm)
一般这样子就没问题了。
我按着这个步骤,也没什么问题,但是打开 htpt://localhost 的时候,我看到的是 apache!
是的,这个机子被别人安装过 apache 了,捷足先登抢占了 80 端口。
那先把 apache 的端口改掉。
修改两个文件 /etc/apache2/ports.conf 和 /etc/apache2/sites-available/000-default.conf
将 80 改成 81.
重启服务
service apache2 restart
service nginx restart
就可以了。
重启 Nginx 的时候 注意看是 OK 还是 fail。
如果 fail 运行 nginx - t 查看报错信息。
更多 Nginx 相关教程见以下内容:
CentOS 6.2 实战部署 Nginx+MySQL+PHP http://www.linuxidc.com/Linux/2013-09/90020.htm
使用 Nginx 搭建 WEB 服务器 http://www.linuxidc.com/Linux/2013-09/89768.htm
搭建基于 Linux6.3+Nginx1.2+PHP5+MySQL5.5 的 Web 服务器全过程 http://www.linuxidc.com/Linux/2013-09/89692.htm
CentOS 6.3 下 Nginx 性能调优 http://www.linuxidc.com/Linux/2013-09/89656.htm
CentOS 6.3 下配置 Nginx 加载 ngx_pagespeed 模块 http://www.linuxidc.com/Linux/2013-09/89657.htm
CentOS 6.4 安装配置 Nginx+Pcre+php-fpm http://www.linuxidc.com/Linux/2013-08/88984.htm
Nginx 安装配置使用详细笔记 http://www.linuxidc.com/Linux/2014-07/104499.htm
Nginx 日志过滤 使用 ngx_log_if 不记录特定日志 http://www.linuxidc.com/Linux/2014-07/104686.htm
Nginx 的详细介绍:请点这里
Nginx 的下载地址:请点这里
/****************************************安装 mediawiki 分割线***********************************************************/
参考官方安装指南
https://www.mediawiki.org/wiki/Manual:Installing_MediaWiki
先下载稳定版本
wget https://releases.wikimedia.org/mediawiki/1.26/mediawiki-1.26.2.tar.gz直接解压到 /www 下面
tar xvzf mediawiki-*.tar.gz -C /www重命名
mv /www/mediawiki-1.26.2 /www/midiawikiifconfig 看到本机 IP,这里假设是 192.168.1.2 吧
修改 host 文件,方便��忆
vim /etc/hosts想个好记的域名,加入
192.168.1.2 www.zqb.local保存退出
重启网络使修改生效
/etc/init.d/networking restart然后再浏览器中就可以通过 www.zqb.local 访问了
下面通过浏览器访问 www.zqb.local/mediawiki
就可以通过网页交互安装 mediawiki 了。
不过安装的时候要用到 mysql,先来设置以下。
上文安装 Nginx 的时候已经把 mysql 也装上了,假设设置的 root 用户密码也是 root。
那就
mysql -u root -proot创建数据库 wikidb,创建用户 wikiuser 密码 wikipwd
CREATE DATABASE wikidb;
GRANT ALL PRIVILEGES ON wikidb.* TO 'wikiuser'@'127.0.0.1' IDENTIFIED BY 'wikipwd';
Exit
然后通过网页面交互进行安装。
安装过程中,在插件选择时勾上WikiEditor,这个能让编辑器更友好一些,其他的插件也可以根据需要勾一些。
安装后会提示下载
LocalSettings.php
移动到 wiki 目录下
mv /home/ 你的用户名 / 下载/LocalSettings.php /www/mediawiki/LocalSettings.php编辑
vim /www/mediawiki/LocalSettings.php加上
# Enables use of WikiEditor by default but still allows users to disable it in preferences
$wgDefaultUserOptions['usebetatoolbar'] = 1;

# Enables link and table wizards by default but still allows users to disable them in preferences
$wgDefaultUserOptions['usebetatoolbar-cgd'] = 1;

# Displays the Preview and Changes tabs
$wgDefaultUserOptions['wikieditor-preview'] = 1;

# Displays the Publish and Cancel buttons on the top right side
$wgDefaultUserOptions['wikieditor-publish'] = 1;
注意,还需要修改 mediawiki 文件夹的权限, 比如简单粗暴改成 777
chmod -R 777 /www/mediawiki然后就可以正常使用 mediawiki 了。
/****************************************安装 nodebb 分割线*********************************************************/
参考官方文档 https://docs.nodebb.org/en/latest/installing/os/ubuntu.html
nodebb 基于 nodejs, 先装 nodejs
curl -sL https://deb.nodesource.com/setup_4.x | sudo -E bash -sudo apt-get install -y git nodejs mongodb build-essentialnodebb 需要数据库 mongodb 或 redis。
发现本机已经安装过 mongdb,查看版本
mongo --version是 2.4.9, 版本太低。查了一下升级还挺麻烦,那还是直接装 redis 吧。
sudo apt-add-repository ppa:chris-lea/redis-server
sudo apt-get update
sudo apt-get install redis-server
运行一下确认安装成功
redis-server然后准备装 nodebb,先装这两个
apt-get install nodejs-legacy
apt-get install npm
好了,开始装 nodebb
Cd /www
git clone -b v1.0.0 https://github.com/NodeBB/NodeBB.git nodebb
cd nodebb/
npm install --production
./  setup
然后它会告诉你在 0.0.0.0:4567, 于是浏览器访问 http://127.0.0.1:4567/,交互式安装。
数据库选 redis,其他都不改(是的就是 127.0.0.1 就是 0 号数据库)
或者为了安全,也可以查一下,加个密码,我查了但懒得弄。
安装完成后,启动就行了
./nodebb start现在就可以在 http://127.0.0.1:4567/ 使用论坛了。
然后需要用 Nginx 代理。
cd /etc/nginx/
vim conf.d/nodebb.conf
加入
server {listen 80;

        server_name www.forum.zqb.local forum.zqb.local;
            location / {proxy_set_header X-Real-IP $remote_addr;
            proxy_set_header X-Forwarded-For $proxy_add_x_forwarded_for;
            proxy_set_header Host $http_host;
            proxy_set_header X-NginX-Proxy true;
            proxy_pass http://127.0.0.1:4567/;
            proxy_redirect off;

            # Socket.IO Support
            proxy_http_version 1.1;
            proxy_set_header Upgrade $http_upgrade;
            proxy_set_header Connection "upgrade";
            }
}
重启 nginx
service nginx restart修改 host
vim /etc/hosts加入(注意换成自己的域名和 IP)
192.168.1.2 www.forum.zqb.local重启网络使修改生效
/etc/init.d/networking restart然后就可以访问了。
/****************************************安装 everything 分割线*****************************************************/
everything 是已经装好的,在 192.168.1.2:8080 可以使用的,目前只需要在 nginx 中增加配置文件,代理一下。
基本同上 就是
server_name 这一行,改成 server_name www.everything.zqb.local everything.zqb.local; http://127.0.0.1:4567/; 改成 http://192.168.1.2:8080/;
/**************************************** 安装 gitlab 分割线 *********************************/
参考官方安装说明 https://about.gitlab.com/downloads/#ubuntu1404 和 http://my.oschina.net/u/160089/blog/421168?fromerr=plKVWzZrsudo apt-get install curl openssh-server ca-certificates postfix

官方说明可以这么装
curl -sS https://packages.gitlab.com/install/repositories/gitlab/gitlab-ce/script.deb.sh | sudo bash
sudo apt-get install gitlab-ce
在终端下载,很慢,中断了,于是我选择直接到 https://packages.gitlab.com/gitlab/gitlab-ce 下载 deb 包
更多详情见请继续阅读下一页的精彩内容:http://www.linuxidc.com/Linux/2016-05/131137p2.htm


