共计 6233 个字符,预计需要花费 16 分钟才能阅读完成。
反向代理负载均衡(Apache2+Tomcat7/8)
使用代理服务器可以将请求转发给内部的 Web 服务器,让代理服务器将请求均匀地转发给多台内部 Web 服务器之一上,从而达到负载均衡的目的。这种代理方式与普通的代理方式有所不同,标准代理方式是客户使用代理访问多个外部 Web 服务器,而这种代理方式是多个客户使用它访问内部 Web 服务器,因此也被称为反向代理模式。
此次使用的代理为 mod_proxy 的方式来实现的,因为在 Apache2 以上的版本中已经集成了,因此不需要再另行安装和配置了,只需要把注释去掉即可,此去掉的配置,个人感觉与 Apache 虚拟机的实现相类似,去掉以下模块的注释:
LoadModule proxy_module modules/mod_proxy.so #提供代理服务器功能
LoadModule proxy_balancer_module modules/mod_proxy_balancer.so #提供负载均衡功能
LoadModule proxy_http_module modules/mod_proxy_http.so #让代理服务器能支持 HTTP 协议
然后把:
#Include conf/extra/httpd-vhosts.conf 的注释也去掉,配置的负载均衡
具体配置如下:
# 虚拟机配置, 负载均衡配置 注意空格
<VirtualHost *:9999>
ServerAdmin binbin@locahost
ServerName localhost
ServerAlias localhost
ProxyPass / balancer://cluster/ stickysession=JSESSIONID|jsessionid nofailover=On
ProxyPassReverse / balancer://cluster/
#ErrorLog “logs/error.log”
#CustomLog “logs/access.log” common
</VirtualHost>
#The ProxyRequests directive should usually be set off when using ProxyPass.
ProxyRequests Off
<proxy balancer://cluster>
BalancerMember ajp://localhost:8009 loadfactor=1 route=tomcat8_local smax=5 max=20 ttl=120 retry=300 timeout=15
BalancerMember ajp://192.168.1.250:8009 loadfactor=1 route=tomcat8_250 smax=5 max=20 ttl=120 retry=300 timeout=15
ProxySet lbmethod=byrequests
</proxy>
其中:localhost:8009 和 192.168.1.250:8009 为两个负载均衡服务器
loadfactor=1 route=tomcat8_local smax=5 max=20 ttl=120 retry=300 timeout=15 这个为配置的参数,最大链接,超时,等等
route=tomcat8_local 可以不写
ProxySet lbmethod=byrequests 为实现负载均衡的方式,共有三种类型
#lbmethod=byrequests 按照请求次数均衡(默认)
#lbmethod=bytraffic 按照流量均衡
#lbmethod=bybusyness 按照繁忙程度均衡(总是分配给活跃请求数最少的服务器)
route=tomcat8_local 根据这个 route 的值,分别在两个 Tomat 中的 Service.xml 的 Engine 节点配置上 jvmRoute 的内容,如下:<Engine name=”Catalina” defaultHost=”localhost” jvmRoute=”tomcat8_local”> 和以及 jvmRoute=”tomcat8_250″,不过我在测试是,感觉如果不配置,也不会影响程序的执行。
启动以上程序就可以进行测试了,测试页面来源于网络:
<%@ page contentType=”text/html; charset=GBK” %>
<%@ page import=”Java.util.*” %>
<html><head><title>Cluster Test</title></head>
<body>
<%
//HttpSession session = request.getSession(true);
System.out.println(session.getId());
out.println(“<br> SESSION ID:” + session.getId()+”<br>”);
// 如果有新的请求,则添加 session 属性
String name = request.getParameter(“name”);
if (name != null && name.length() > 0) {
String value = request.getParameter(“value”);
session.setAttribute(name, value);
}
out.print(“<b>Session List:</b>”);
Enumeration<String> names = session.getAttributeNames();
while (names.hasMoreElements()) {
String sname = names.nextElement();
String value = session.getAttribute(sname).toString();
out.println(sname + ” = ” + value+”<br>”);
System.out.println(sname + ” = ” + value);
}
%>
<form action=”testCluster.jsp” method=”post”>
名称:<input type=text size=20 name=”name”>
<br>
值:<input type=text size=20 name=”value”>
<br>
<input type=submit value=” 提交 ”>
</form>
<b> 负载均衡测试:此为:Tomcat7_a 上的文件,<font color=red>aaaaaaaaaaaaaaaaaaaaaaaaaaaaaaaaa</font><b>
</body>
</html>
和
<%@ page contentType=”text/html; charset=GBK” %>
<%@ page import=”java.util.*” %>
<html><head><title>Cluster Test</title></head>
<body>
<%
//HttpSession session = request.getSession(true);
System.out.println(session.getId());
out.println(“<br> SESSION ID:” + session.getId()+”<br>”);
// 如果有新的请求,则添加 session 属性
String name = request.getParameter(“name”);
if (name != null && name.length() > 0) {
String value = request.getParameter(“value”);
session.setAttribute(name, value);
}
out.print(“<b>Session List:</b>”);
Enumeration<String> names = session.getAttributeNames();
while (names.hasMoreElements()) {
String sname = names.nextElement();
String value = session.getAttribute(sname).toString();
out.println(sname + ” = ” + value+”<br>”);
System.out.println(sname + ” = ” + value);
}
%>
<form action=”testCluster.jsp” method=”post”>
名称:<input type=text size=20 name=”name”>
<br>
值:<input type=text size=20 name=”value”>
<br>
<input type=submit value=” 提交 ”>
</form>
<b> 负载均衡测试:此为:Tomcat7_a 上的文件,<font color=red>bbbbbbbbbbbbbbbbbbbbbbbbbbbbbbbbbbbb</font><b>
</body>
</html>
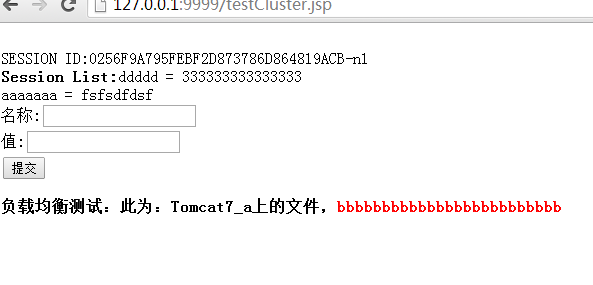
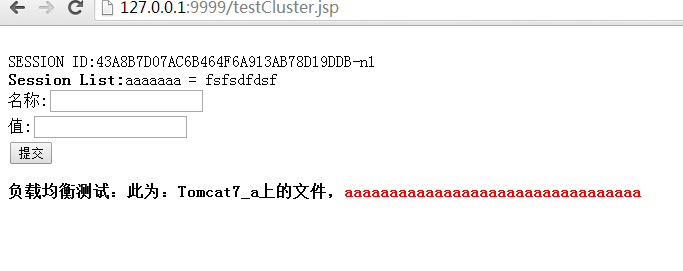
此时访问就会再个不同的页面了,一个为 aaaaaaaaaaaaaaaaaaaaaaaaaaaa 一个为 bbbbbbbbbbbbbbbbbbbbbbbbbbb;
如下图所示:


看到的两个 Session 的值不同,因为这里还没有 session 的共享配置
注意:
以上仅仅实现了负载均衡,但是对于两个负载同时宕机的话,就需要另外的一台服务器来代替了,这第 n + 1 台服务器就叫热备服务器,配置方式与以上相同,仅需要写上 status=+H 标识即可。
BalancerMember http://192.168.1.218:8009 status=+H
以上负载均衡就算全部完成了,如果要实现 Session 共享,最简单的方式就是在 Tomcat 中进行配置,配置如下:
在 service.xml 文件中的 Engine 节点,添加如下代码:
<Cluster className=”org.apache.catalina.ha.tcp.SimpleTcpCluster”
channelSendOptions=”8″>
<Manager className=”org.apache.catalina.ha.session.DeltaManager”
expireSessionsOnShutdown=”false”
notifyListenersOnReplication=”true”/>
<Channel className=”org.apache.catalina.tribes.group.GroupChannel”>
<Membership className=”org.apache.catalina.tribes.membership.McastService”
address=”228.0.0.4″
port=”45564″
frequency=”500″
dropTime=”3000″/>
<Receiver className=”org.apache.catalina.tribes.transport.nio.NioReceiver”
address=”auto”
port=”4001″
autoBind=”100″
selectorTimeout=”5000″
maxThreads=”6″/>
<Sender className=”org.apache.catalina.tribes.transport.ReplicationTransmitter”>
<Transport className=”org.apache.catalina.tribes.transport.nio.PooledParallelSender”/>
</Sender>
<Interceptor className=”org.apache.catalina.tribes.group.interceptors.TcpFailureDetector”/>
<Interceptor className=”org.apache.catalina.tribes.group.interceptors.MessageDispatch15Interceptor”/>
</Channel>
<Valve className=”org.apache.catalina.ha.tcp.ReplicationValve”
filter=””/>
<Valve className=”org.apache.catalina.ha.session.JvmRouteBinderValve”/>
<Deployer className=”org.apache.catalina.ha.deploy.FarmWarDeployer”
tempDir=”/tmp/war-temp/”
deployDir=”/tmp/war-deploy/”
watchDir=”/tmp/war-listen/”
watchEnabled=”false”/>
</Cluster>
更多 Nginx 负载均衡配置 相关教程见以下内容:
Nginx 负载均衡配置说明 http://www.linuxidc.com/Linux/2016-03/129424.htm
Linux 下 Nginx+Tomcat 负载均衡和动静分离配置要点 http://www.linuxidc.com/Linux/2016-01/127255.htm
Docker+Nginx+Tomcat7 配置简单的负载均衡 http://www.linuxidc.com/Linux/2015-12/125907.htm
Nginx 负载均衡(主备)+Keepalived http://www.linuxidc.com/Linux/2015-12/126865.htm
使用 Nginx 作为负载均衡器 http://www.linuxidc.com/Linux/2015-12/125789.htm
使用 Nginx 简单实现负载均衡 http://www.linuxidc.com/Linux/2016-08/134443.htm
Nginx 负载均衡与高可用的实现 http://www.linuxidc.com/Linux/2016-04/130350.htm
Nginx 的详细介绍:请点这里
Nginx 的下载地址:请点这里
本文永久更新链接地址:http://www.linuxidc.com/Linux/2016-10/136076.htm


