共计 6376 个字符,预计需要花费 16 分钟才能阅读完成。
一. 反向代理
我们都知道,80 端口是 web 服务的默认端口,其他主机访问 web 服务器也是默认和 80 端口进行 web 交互,而一台服务器也只有一个 80 端口,这是约定俗成的标准.
我们来看下面两个场景:
1. 服务器的 80 端口被占用了,我们想实现服务器的其他端口(比如 port:2368)web 服务.
2. 我们想在一台服务器上实现多个站点的 web 服务.
要解决这个问题,需要用到反向代理,下面的小对话可能更容易理解‘反向代理’这个概念:
—————————————————-
主机 H: 我给你发了一个 http get 请求,IP 分组部分信息为:
a. 我访问的域名(解析前的域名,如:www.domain.com).
b. 我要访问的 IP(www.domain.com 域名解析后的公网 IP).
服务器 S 的 web 服务程序收到 IP 分组后,先把这个 IP 分组丢给 nginx(或 Apache 反向代理服务)看,nginx 拿到 IP 分组后根据 a. 要访问的域名来检查配置文件,看是否需要转其他端口. 例如:配置文件里面有这样的描述:
如果这个分组的 a 是 www.domain1.com,那么转到 2368 端口;
如果这个分组的 a 是 www.domain2.com,那么转到 1243 端口;
如果这个分组的 a 是 www.domain3.com,那么转到 2104 端口;
否则就用 80 端口.
web 服务程序照做,把相应端口的数据传给主机 H.
—————————————————-
通俗的说,就是:服务器根据主机来访域名区分需要转哪个端口.
利用上面的配置,我们就可以实现在一台服务器上建立 4 个 web 服务站点.
二. 如何实现
实现反向代理一般有两种方法:
1.Apache 反向代理服务
2.nginx 反向代理服务
其中 nginx 在负载均衡这方面比 Apache 更专业,小巧专一,很是优雅.
nginx 反向代理的具体操作如下:
安装 nginx
以 RedHat 为例
1. 下载介质
nginx 部署之前,首先根据项目的需要选择需要安装的组件,实际环境一般会考虑需要支持 gzip 压缩和 rewrite 模块,所以安装的第一步是下载 Ngix 及 Ngix 的相关组件.
1) nginx 本身
下载地址:http://nginx.org/en/download.html
建议下载最新版本介质,目前最新的是:1.9.9
2) gzip 压缩依赖库:zlib
下载地址:http://www.zlib.net
下载版本:Version 1.2.5
3)Rewrite 模块的正则表达式依赖库:pcre
pcre 库简称:Perl 兼容正则表达式
下载地址:http://www.pcre.org
下载版本:pcre-8.38
2. 开始安装
1) . 安装 pcre
| tar -zxvf pcre-8.02.tar.gz | |
| ./configure | |
| make | |
| make install |
默认安装到 /usr/local/lib 下即可,安装完成后可以 #ls -l /usr/local/lib/libpcre.so
2). 安装 nginx
| tar zxvf nginx-1.0.11.tar.gz | |
| cd nginx-1.0.11 | |
| ./configure --prefix=/usr/local/nginx --with-poll_module --with-http_stub_status_module | |
| make && make install |
3). 配置 nginx
安装完成之后,配置目录 conf 下有以下配置文件,过滤掉了 xx.default 配置:
| tyler@Ubuntu:/opt/nginx-1.7.7/conf$ tree |grep -v default | |
| . | |
| ├── fastcgi.conf | |
| ├── fastcgi_params | |
| ├── koi-utf | |
| ├── koi-win | |
| ├── mime.types | |
| ├── nginx.conf | |
| ├── scgi_params | |
| ├── uwsgi_params | |
| └── win-utf |
除了 nginx.conf,其余配置文件,一般只需要使用默认提供即可.
nginx.conf
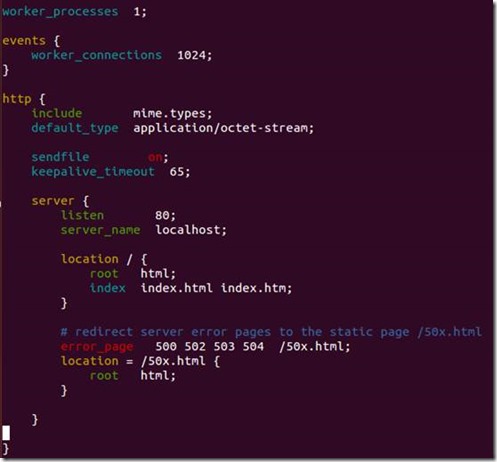
nginx.conf 是主配置文件,默认配置去掉注释之后的内容如下图所示:
l worker_process 表示工作进程的数量,一般设置为 cpu 的核数
l worker_connections 表示每个工作进程的最大连接数
l server{}块定义了虚拟主机
n listener 监听端口
n server_name 监听域名
n location{}是用来为匹配的 URI 进行配置,URI 即语法中的“/uri/”,location / {}匹配任何查询,因为所有请求都以 / 开头.
u root 指定对应 uri 的资源查找路径,这里 html 为相对路径,完整路径为 /opt/ opt/nginx-1.7.7/html/
u index 指定首页 index 文件的名称,可以配置多个,以空格分开。如有多个,按配置顺序查找.

从配置可以看出,nginx 监听了 80 端口、域名为 localhost、跟路径为 html 文件夹(我的安装路径为 /opt/nginx-1.7.7,所以 /opt/nginx-1.7.7/html)、默认 index 文件为 index.html,index.htm、服务器错误重定向到 50x.html 页面。
可以看到 /opt/nginx-1.7.7/html/ 有以下文件:
| tyler@ubuntu:/opt/nginx-1.7.7/html$ ls | |
| 50x.html index.html |
这也是上面在浏览器中输入 http://localhost,能够显示欢迎页面的原因。实际上访问的是 /opt/nginx-1.7.7/html/index.html 文件.
mime.types
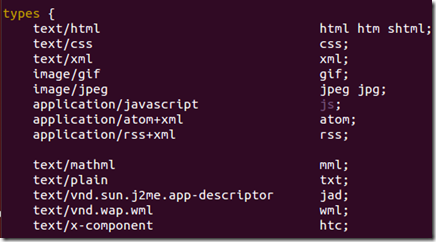
文件扩展名与文件类型映射表,nginx 根据映射关系,设置 http 请求响应头的 Content-Type 值.
当在映射表找不到时,使用 nginx.conf 中 default-type 指定的默认值。例如,默认配置中的指定的 default-type 为 application/octet-stream.
| include mime.types; | |
| default_type application/octet-stream; |
下面截一段 mime.types 定义的文件扩展名与文件类型映射关系,完整的请自行查看:

fastcgi_params
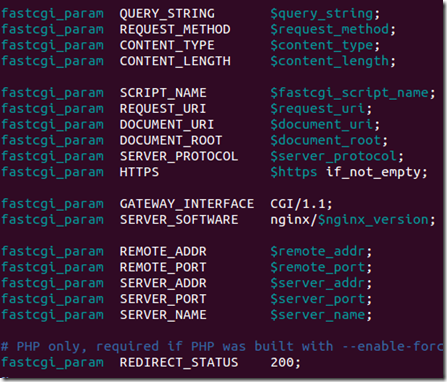
nginx 配置 Fastcgi 解析时会调用 fastcgi_params 配置文件来传递服务器变量,这样 CGI 中可以获取到这些变量的值。默认传递以下变量:

这些变量的作用从其命名可以看出.
2.4.fastcgi.conf
对比下 fastcgi.conf 与 fastcgi_params 文件,可以看出只有以下差异:
| tyler@ubuntu:/opt/nginx-1.7.7/conf$ diff fastcgi.conf fastcgi_params 2d1 | |
| < fastcgi_param SCRIPT_FILENAME $document_root$fastcgi_script_name; |
即 fastcgi.conf 只比 fastcgi_params 多了一行“fastcgi_param SCRIPT_FILENAME $document_root$fastcgi_script_name;”
原本只有 fastcgi_params 文件,fastcgi.conf 是 nginx 0.8.30 (released: 15th of December 2009)才引入的.
原本 nginx 只有 fastcgi_params,后来发现很多人在定义 SCRIPT_FILENAME 时使用了硬编码的方式。例如,fastcgi_param SCRIPT_FILENAME
/var/www/foo$fastcgi_script_name。于是为了规范用法便引入了 fastcgi.conf。
不过这样的话就产生一个疑问:为什么一定要引入一个新的配置文件,而不是修改旧的配置文件?
这是因为 fastcgi_param 指令是数组型的,和普通指令相同的是:内层替换外层;和普通指令不同的是:当在同级多次使用的时候,是新增而不是替换.
换句话说,如果在同级定义两次 SCRIPT_FILENAME,那么它们都会被发送到后端,这可能会导致一些潜在的问题,为了避免此类情况,便引入了一个新的配置文件。
因此不再建议大家使用以下方式(搜了一下,网上大量的文章,并且 nginx.conf 的默认配置也是使用这种方式):
| fastcgi_param SCRIPT_FILENAME $document_root$fastcgi_script_name; | |
| include fastcgi_params; |
而使用最新的方式:
include fastcgi.conf;
uwsgi_params
与 fastcgi_params 一样,传递哪些服务器变量,只有前缀不一样,以 uwsgi_param 开始而非 fastcgi_param.
scgi_params
与 fastcgi_params 一样,传递哪些服务器变量,只有前缀不一样,以 uwsgi_param 开始而非 fastcgi_param.
koi-utf、koi-win、win-utf
这三个文件都是与编码转换映射文件,用于在输出内容到客户端时,将一种编码转换到另一种编码。
| koi-win:charset_map koi8-r < -- > windows-1251 | |
| koi-utf:charset_map koi8-r < -- > utf-8 | |
| win-utf:charset_map windows-1251 < -- > utf-8 |
4). 管理 nginx 服务
启动:
/usr/local/nginx/sbin/nginx
停止
/usr/local/nginx/sbin/nginx -s stop
重启
/usr/local/nginx/sbin/nginx -s reload
查看状态
netstat -autlp| grep nginx
三.nginx 开机自启
实现:编写 shell 脚本,并把 shell 脚本启动命令加到系统自启名单.
vi /etc/init.d/nginx (输入下面的代码)
| # nginx Startup script for the nginx HTTP Server | |
| # it is v.0.0.2 version. | |
| # chkconfig: - 85 15 | |
| # description: nginx is a high-performance web and proxy server. | |
| # It has a lot of features, but it's not for everyone. | |
| # processname: nginx | |
| # pidfile: /var/run/nginx.pid | |
| # config: /usr/local/nginx/conf/nginx.conf | |
| nginxd=/usr/local/nginx/sbin/nginx | |
| nginx_config=/usr/local/nginx/conf/nginx.conf | |
| nginx_pid=/var/run/nginx.pid | |
| RETVAL=0 | |
| prog="nginx" | |
| # Source function library. | |
| . /etc/rc.d/init.d/functions | |
| # Source networking configuration. | |
| . /etc/sysconfig/network | |
| # Check that networking is up. | |
| [${NETWORKING} = "no" ] && exit 0 | |
| [-x $nginxd] || exit 0 | |
| # Start nginx daemons functions. | |
| start() {if [ -e $nginx_pid];then | |
| echo "nginx already running...." | |
| exit 1 | |
| fi | |
| echo -n $"Starting $prog:" | |
| daemon $nginxd -c ${nginx_config} | |
| RETVAL=$? | |
| echo | |
| [$RETVAL = 0] && touch /var/lock/subsys/nginx | |
| return $RETVAL | |
| } | |
| # Stop nginx daemons functions. | |
| stop() { | |
| echo -n $"Stopping $prog:" | |
| killproc $nginxd | |
| RETVAL=$? | |
| echo | |
| [$RETVAL = 0] && rm -f /var/lock/subsys/nginx /var/run/nginx.pid | |
| } | |
| # reload nginx service functions. | |
| reload() { | |
| echo -n $"Reloading $prog:" | |
| #kill -HUP `cat ${nginx_pid}` | |
| killproc $nginxd -HUP | |
| RETVAL=$? | |
| echo | |
| } | |
| # See how we were called. | |
| case "$1" in | |
| start) | |
| start | |
| ;; | |
| stop) | |
| stop | |
| ;; | |
| reload) | |
| reload | |
| ;; | |
| restart) | |
| stop | |
| start | |
| ;; | |
| status) | |
| status $prog | |
| RETVAL=$? | |
| ;; | |
| *) | |
| echo $"Usage: $prog {start|stop|restart|reload|status|help}" | |
| exit 1 | |
| esac | |
| exit $RETVAL |
:wq 保存并退出
设置文件的权限:
chmod a+x /etc/init.d/nginx
这样在控制台就很容易的操作 nginx 了:查看 nginx 当前状态、启动 nginx、停止 nginx、重启 nginx…
同样的修改了 nginx 的配置文件 nginx.conf,也可以使用上面的命令重新加载新的配置文件并运行,可以将此命令加入到 rc.local 文件中,这样开机的时候 nginx 就默认启动了
vi /etc/rc.local
加入一行 /etc/init.d/nginx start 保存并退出,下次重启会生效。
更多 Nginx 相关教程见以下内容:
CentOS 6.2 实战部署 Nginx+MySQL+PHP http://www.linuxidc.com/Linux/2013-09/90020.htm
使用 Nginx 搭建 WEB 服务器 http://www.linuxidc.com/Linux/2013-09/89768.htm
搭建基于 Linux6.3+Nginx1.2+PHP5+MySQL5.5 的 Web 服务器全过程 http://www.linuxidc.com/Linux/2013-09/89692.htm
CentOS 6.3 下 Nginx 性能调优 http://www.linuxidc.com/Linux/2013-09/89656.htm
CentOS 6.3 下配置 Nginx 加载 ngx_pagespeed 模块 http://www.linuxidc.com/Linux/2013-09/89657.htm
CentOS 6.4 安装配置 Nginx+Pcre+php-fpm http://www.linuxidc.com/Linux/2013-08/88984.htm
Nginx 安装配置使用详细笔记 http://www.linuxidc.com/Linux/2014-07/104499.htm
Nginx 日志过滤 使用 ngx_log_if 不记录特定日志 http://www.linuxidc.com/Linux/2014-07/104686.htm
Nginx 的详细介绍:请点这里
Nginx 的下载地址:请点这里
本文永久更新链接地址:http://www.linuxidc.com/Linux/2016-10/136227.htm


