共计 9989 个字符,预计需要花费 25 分钟才能阅读完成。
使用 Clustershell 搭建 Kafka 和 Zookeeper 集群
1、安装环境
虚拟机环境,共有三台虚拟主机:
Router1 192.168.3.116
Router2 192.168.3.115
Router3 192.168.3.121
2、CMD 工具
SecureCRT 7.2.3
具有 Tile 功能,可以将多个 session 窗口并列显示。
设置在菜单 windows ->Tile Vertically,并且有显示 command windows 功能. 设置在菜单 View -> Command windows. 在 command windows 中可以右键设置 send commands to all sessions 菜单,就可以在 commandwindows 中输入命令后向所有 sessions 发送输入的命令。
3、搭建 zookeeper 集群
3.1 设置多台机器免密码
在 command windows 中输入命令
-bash-4.1# ls /root/.ssh
known_hosts
// 删除原有文件
-bash-4.1# rm -rf /root/.ssh/*
-bash-4.1# ls /root/.ssh
// 生成密钥文件
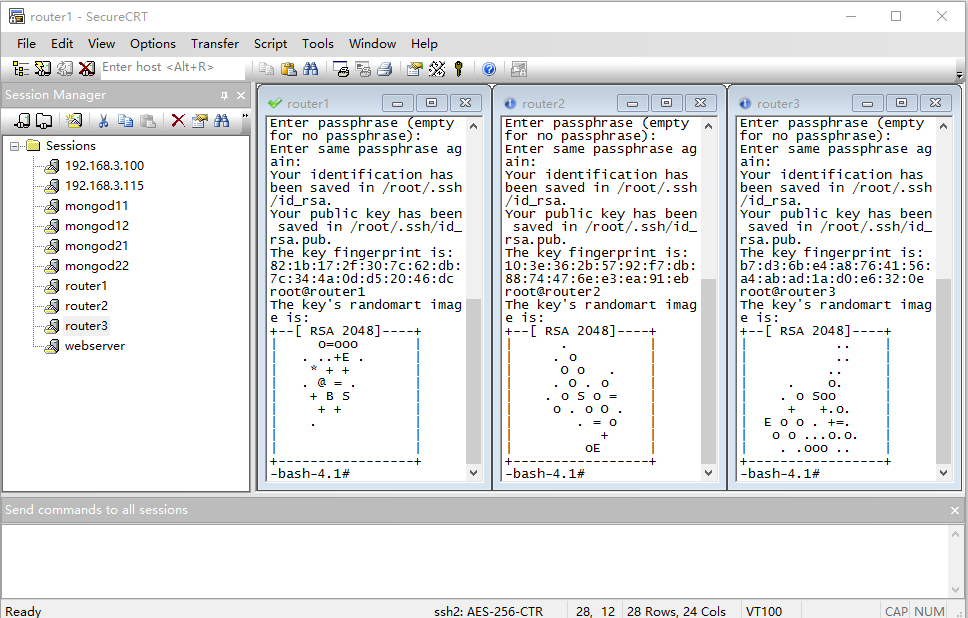
-bash-4.1# ssh-keygen -t rsa
Generating public/private rsa keypair.
Enter file in which to save the key(/root/.ssh/id_rsa):
Enter passphrase (empty for nopassphrase):
Enter same passphrase again:
Your identification has been savedin /root/.ssh/id_rsa.
Your public key has been saved in/root/.ssh/id_rsa.pub.
The key fingerprint is:
82:1b:17:2f:30:7c:62:db:7c:34:4a:0d:d5:20:46:dcroot@router1
The key's randomart image is:
+--[RSA 2048]----+
|    o=ooo      |
|  . ..+E .     |
|   * + +       |
|  . @ = .      |
|   + B S       |
|    + +        |
|   .           |
|                |
|                |
+-----------------+
// 查看是否生成了密钥文件
-bash-4.1# ls /root/.ssh
id_rsa id_rsa.pub

// 向主机一发送密钥文件
-bash-4.1# ssh-copy-id -i /root/.ssh/id_rsa.pub router1
The authenticity of host 'router1(::1)' can't be established.
RSA key fingerprint is12:e8:9d:2d:ee:11:9e:a3:40:98:bf:eb:43:36:01:c7.
Are you sure you want to continueconnecting (yes/no)? yes
Warning: Permanently added'router1' (RSA) to the list of known hosts.
root@router1's password:
Now try logging into the machine,with "ssh'router1'", and check in:

 .ssh/authorized_keys

to make sure we haven't added extrakeys that you weren't expecting.

-bash-4.1# ssh-copy-id -i /root/.ssh/id_rsa.pub router2
The authenticity of host 'router2(192.168.3.115)' can't be established.
RSA key fingerprint is12:e8:9d:2d:ee:11:9e:a3:40:98:bf:eb:43:36:01:c7.
Are you sure you want to continueconnecting (yes/no)? yes
Warning: Permanently added'router2,192.168.3.115' (RSA) to the list of known hosts.
root@router2's password:
Now try logging into the machine,with "ssh'router2'", and check in:

 .ssh/authorized_keys

to make sure we haven't added extrakeys that you weren't expecting.

-bash-4.1# ssh-copy-id -i /root/.ssh/id_rsa.pub router3
The authenticity of host 'router3(192.168.3.121)' can't be established.
RSA key fingerprint is12:e8:9d:2d:ee:11:9e:a3:40:98:bf:eb:43:36:01:c7.
Are you sure you want to continueconnecting (yes/no)? yes
Warning: Permanently added'router3,192.168.3.121' (RSA) to the list of known hosts.
root@router3's password:
Now try logging into the machine,with "ssh'router3'", and check in:

 .ssh/authorized_keys
to make sure we haven't added extrakeys that you weren't expecting.
// 检查三个主机的密钥信息是否已经全部同步
-bash-4.1# cat /root/.ssh/authorized_keys
ssh-rsaAAAAB3NzaC1yc2EAAAABIwAAAQEAo7uexe+lKTBWgDeJarTUmhHqW466K85AYDl6IbFZINFKJquVV9wb1+54KDltXopUYHh2TULY00XFWQ02zHp76jCFq8kYfb+bLlF0He2CP+VegiOs0o0gZXYLkb0zvVEkVju1/2jqAPf+Q3wEcKao2Qu/EppBDLEMGsfFPUp6GmIG6GLd/019zrhupKqzm7zd0csk7uxKoVeP3LW6wpNPbqV6DUwC48AosyVjdwdviCGG+Cmqi5DHy6pwAldo9Hru9n5wtHLUI3AehDjBxZ64SHrond2cMQyVV/yYSpexqBdZsAstKQAW24IBl+qcgu2y4CcbkSVYjjsG5dvZNjXuJQ==root@router1
ssh-rsaAAAAB3NzaC1yc2EAAAABIwAAAQEAxEULXbppPx8In6csFdPHSEG22s/Lkz7xCQ8FGFbkJj5NuHAt4uYdtEdkPUMfsW2d+hmAKDDcZI+Jgsa4dgkVe7OX1qYsuw4hvtN9V/RCpFrk4y/FchaEMwa08w1f0PcuC39AdARuBDCgHRfUEV7GWdS2Sh3+OJpzryflb7yGbGobys7hHbltHfnwiswiram72/Mob62gdqg7FtOC9K4AfejC/g0LBnajAhIALBqp+SSHpWWUFo9vEOAquEyE+DHFb7ojD+psYu8rZenZDSP/ibWE1gWvLADFCBukpi5RBM2mSilTcdDMunw9wjs0jUGiJZtR6y/rZk2QLwaOISmOJQ==root@router3
ssh-rsa AAAAB3NzaC1yc2EAAAABIwAAAQEAyLQZveV/kaD/1IQJPfB+WKyWtPZryECIeXMFufmC8QkQcdQ9SrZxMNzLshQiES8X+dGlNOnvqUlPaegpcbdTpsdKYw+2CbbYyHICePNqFf2sQzOz0GduXnrgSZom8uWfZVZKSGbzzvWtE45Z2NNSsp0/vtBI0ZsfCF93wYDMpKZbfG1iH/FhWpMh0RVpQgBzwQIxF9MsMlrhT/bE1Q996+irqickL44KzwvEAUPqQnicsyX80Swn2Ujuv0g6zdQWigji2YQGlSi3mnhwp7uoi834QQLMoYO4yu7ZCY/fxe6g73KzN15Ghc7Mhjh2PfbFPj7Buwi3/4QNM7sRy+ktPw== root@router2
// 检查免密登录情况 
3.2 设置 zookeeper 集群
在主机 1 中安装 clustershell 工具
访问网站:http://clustershell.readthedocs.io/en/latest/install.html#red-hat-enterprise-linux-and-CentOS
$ yum --enablerepo=extrasinstall epel-release
$ yum installclustershell vim-clustershell
配置 clustershell,建立 group
** 在 /etc/clustersheel 目录下建立 groups 文件 **
Cd /etc/clustersheel
Vi groups
kafka: router[1-3]
注:router 是主机名的前缀
在主机 1 中拷贝和解压安装包
-bash-4.1# tar -zxvfzookeeper-3.4.9.tar.gz
-bash-4.1# tar -zxvfkafka_2.11-0.8.2.1.tgz

通过 clustershell 统一拷贝 zookeeper 和 kafaka 的安装包
-bash-4.1# clush -g kafka -c/opt/kafka/
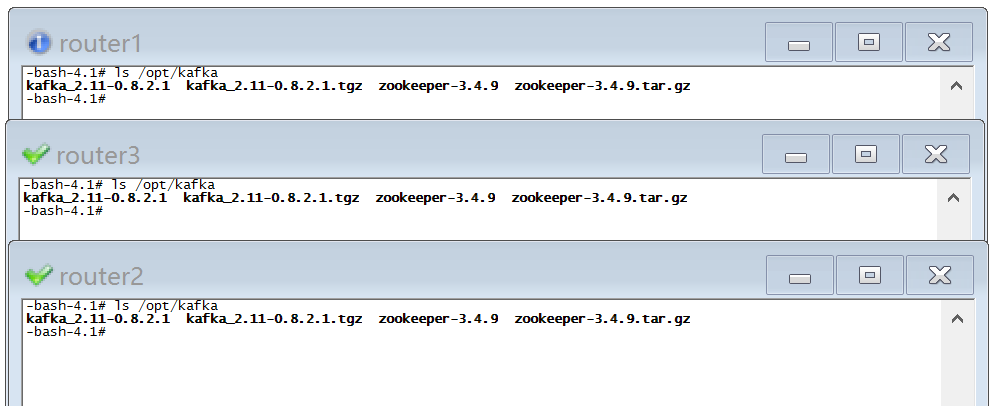
验证是否拷贝成功
Ls /opt/kafka
修改 zookeeper 的配置文件
-bash-4.1# cp zoo_sample.cfgzoo.cfg
修改每台主机的 zoo.cfg中的 zoo.cfg文件
增加集群信息
server.1=router1:2888:3888
server.2=router2:2888:3888
server.3=router3:2888:3888
注:2888端口是作为 leader 与 follow 间通讯的,3888端口是作为 leader 选举的。同步 zookeeper 的配置文件
-bash-4.1# clush -g kafka -c/opt/kafka/zookeeper-3.4.9/conf/zoo.cfg

创建 zookeeper 数据目录
-bash-4.1# clush -g kafka mkdir/tmp/zookeeper


在每台机器中建立 myid 文件
主机 1 执行
-bash-4.1# echo "1" >/tmp/zookeeper/myid

主机 2 执行
-bash-4.1# echo "2" >/tmp/zookeeper/myid

主机 3 执行
-bash-4.1# echo "3" >/tmp/zookeeper/myid

主机 1 上验证
-bash-4.1# clush -g kafka cat/tmp/zookeeper/myid
router2: 2
router3: 3
router1: 1

启动 zookeeper 集群,在主机 1 上执行

-bash-4.1# clush -g kafka"/opt/kafka/zookeeper-3.4.9/bin/zkServer.sh start/opt/kafka/zookeeper-3.4.9/conf/zoo.cfg"
router3: ZooKeeper JMX enabled by default
router3: Using config: /opt/kafka/zookeeper-3.4.9/conf/zoo.cfg
router2: ZooKeeper JMX enabled by default
router2: Using config: /opt/kafka/zookeeper-3.4.9/conf/zoo.cfg
router1: ZooKeeper JMX enabled by default
router1: Using config: /opt/kafka/zookeeper-3.4.9/conf/zoo.cfg
router3: Starting zookeeper ... STARTED
router2: Starting zookeeper ... STARTED
router1: Starting zookeeper ... STARTED

参看监听的端口
-bash-4.1# clush -gkafka lsof -i:2181
router3: COMMAND  PIDUSER  FD  TYPE DEVICE SIZE/OFF NODE NAME
router3: Java   15172root  23u IPv6 111500     0t0 TCP *:eforward (LISTEN)
router1: COMMAND  PIDUSER  FD  TYPE DEVICE SIZE/OFF NODE NAME
router1: java   17708root  23u IPv6 139485     0t0 TCP *:eforward (LISTEN)
router2: COMMAND  PIDUSER  FD  TYPE DEVICE SIZE/OFF NODE NAME
router2: java   16866root  23u IPv6 119179     0t0 TCP *:eforward (LISTEN)

-bash-4.1# clush -g kafka lsof -i:2888

router3: COMMAND  PID USER  FD  TYPE DEVICE SIZE/OFF NODENAME
router3: java   15172 root  27u IPv6 111517     0t0 TCP router3:spcsdlobby (LISTEN)
router3: java   15172 root  28u IPv6 111518     0t0 TCP router3:spcsdlobby->router1:49864 (ESTABLISHED)
router3: java   15172 root  29u IPv6 111519     0t0 TCP router3:spcsdlobby->router2:60446 (ESTABLISHED)
router2: COMMAND  PID USER  FD  TYPE DEVICE SIZE/OFF NODENAME
router2: java   16866 root  26u IPv6 119190     0t0 TCP router2:60446->router3:spcsdlobby (ESTABLISHED)
router1: COMMAND  PID USER  FD  TYPE DEVICE SIZE/OFF NODENAME
router1: java   17708 root  27u IPv6 139496     0t0 TCP router1:49864->router3:spcsdlobby (ESTABLISHED)
-bash-4.1#clush -g kafka lsof -i:3888
router3: COMMAND  PID USER  FD  TYPE DEVICE SIZE/OFF NODENAME
router3: java   15172 root  24u IPv6 111509     0t0 TCP router3:ciphire-serv (LISTEN)
router3: java   15172 root  25u IPv6 111513     0t0 TCP router3:40480->router1:ciphire-serv (ESTABLISHED)
router3: java   15172 root  26u IPv6 111515     0t0 TCP router3:35494->router2:ciphire-serv (ESTABLISHED)
router1: COMMAND  PID USER  FD  TYPE DEVICE SIZE/OFF NODENAME
router1: java   17708 root  24u IPv6 139490     0t0 TCP router1:ciphire-serv (LISTEN)
router1: java   17708 root  25u IPv6 139494     0t0 TCP router1:ciphire-serv->router2:49233 (ESTABLISHED)
router1: java   17708 root  26u IPv6 139495     0t0 TCP router1:ciphire-serv->router3:40480 (ESTABLISHED)
router2: COMMAND  PID USER  FD  TYPE DEVICE SIZE/OFF NODENAME
router2: java   16866 root  24u IPv6 119183     0t0 TCP router2:ciphire-serv (LISTEN)
router2: java   16866 root  25u IPv6 119186     0t0 TCP router2:49233->router1:ciphire-serv (ESTABLISHED)
router2: java   16866 root  27u IPv6 119188     0t0 TCP router2:ciphire-serv->router3:35494 (ESTABLISHED)

# 连接第一个主机的 zookeeper,建立测试键值进行测试
-bash-4.1# bin/zkCli.sh -server router1
Connecting to router1
[zk: router1(CONNECTED) 8] create/test_install hello
Created /test_install
[zk: router1(CONNECTED) 9] ls/
[test_install, zookeeper]

# 连接第二个主机的 zookeeper,查看测试键值是否存在
-bash-4.1# bin/zkCli.sh -serverrouter2
Connecting to router2
ls /
[test_install, zookeeper]
4、建立 kafaka 集群
修改第一台主机中 kafka 目录的 config 子目录中的 server.properties 配置文件
zookeeper.connect=router1:2181,router2:2181,router3:2181/kafka将 server.properties 配置文件分发到其他两台主机中
-bash-4.1# clush-g kafka -c /opt/kafka/kafka_2.11-0.8.2.1/config/server.properties分别修改三台主机的 server.properties 配置文件,配置不同的 broker.id
第一台主机的 broker.id设置为 broker.id=1
第二台主机的 broker.id设置为 broker.id=2
第三台主机的 broker.id设置为 broker.id=3
启动 kafka 集群
-bash-4.1# clush-g kafka /opt/kafka/kafka_2.11-0.8.2.1/bin/kafka-server-start.sh -daemon/opt/kafka/kafka_2.11-0.8.2.1/config/server.properties
验证 9092 端口
-bash-4.1# clush-g kafka lsof -i:9092
router3:COMMAND  PID USER  FD  TYPE DEVICE SIZE/OFF NODE NAME
router3:java   15742 root  55u IPv6 120391     0t0 TCP *:XmlIpcRegSvc (LISTEN)
router3:java   15742 root  56u IPv6 120394     0t0 TCP router3:38028->router1:XmlIpcRegSvc(ESTABLISHED)
router3:java   15742 root  57u IPv6 120395     0t0 TCP router3:51440->router3:XmlIpcRegSvc(ESTABLISHED)
router3:java   15742 root  58u IPv6 120396     0t0 TCP router3:XmlIpcRegSvc->router3:51440(ESTABLISHED)
router3:java   15742 root  59u IPv6 120397     0t0 TCP router3:46242->router2:XmlIpcRegSvc(ESTABLISHED)
router1:COMMAND  PID USER  FD  TYPE DEVICE SIZE/OFF NODE NAME
router1:java   18531 root  55u IPv6 151926     0t0 TCP *:XmlIpcRegSvc (LISTEN)
router1:java   18531 root  56u IPv6 151929     0t0 TCP router1:XmlIpcRegSvc->router3:38028(ESTABLISHED)
router2:COMMAND  PID USER  FD  TYPE DEVICE SIZE/OFF NODE NAME
router2:java   17538 root  55u IPv6 129254     0t0 TCP *:XmlIpcRegSvc (LISTEN)
router2:java   17538 root  56u IPv6 129257     0t0 TCP router2:XmlIpcRegSvc->router3:46242 (ESTABLISHED)
建立测试是 topic
-bash-4.1#bin/kafka-topics.sh -create --topic test1 --zookeeper router1:2181/kakfa--partitions 3 --replication-factor 2
Created topic"topic1".

-bash-4.1#bin/kafka-topics.sh -describe --topic test1 --zookeeper router1:2181/kafka
Topic:topic1   PartitionCount:3       ReplicationFactor:2    Configs:
        Topic: topic1  Partition: 0   Leader: 1      Replicas: 1,2  Isr: 1,2
        Topic: topic1  Partition: 1   Leader: 2      Replicas: 2,3  Isr: 2,3
        Topic: topic1  Partition: 2   Leader: 3      Replicas: 3,1  Isr: 3,1
发送测试消息 
消费测试消息 
至此 Kafka 集群搭建完成!
ZooKeeper 学习总结 http://www.linuxidc.com/Linux/2016-07/133179.htm
Ubuntu 14.04 安装分布式存储 Sheepdog+ZooKeeper http://www.linuxidc.com/Linux/2014-12/110352.htm
CentOS 6 安装 sheepdog 虚拟机分布式储存 http://www.linuxidc.com/Linux/2013-08/89109.htm
ZooKeeper 集群配置 http://www.linuxidc.com/Linux/2013-06/86348.htm
使用 ZooKeeper 实现分布式共享锁 http://www.linuxidc.com/Linux/2013-06/85550.htm
分布式服务框架 ZooKeeper — 管理分布式环境中的数据 http://www.linuxidc.com/Linux/2013-06/85549.htm
ZooKeeper 集群环境搭建实践 http://www.linuxidc.com/Linux/2013-04/83562.htm
ZooKeeper 服务器集群环境配置实测 http://www.linuxidc.com/Linux/2013-04/83559.htm
ZooKeeper 集群安装 http://www.linuxidc.com/Linux/2012-10/72906.htm
Zookeeper3.4.6 的安装 http://www.linuxidc.com/Linux/2015-05/117697.htm
本文永久更新链接地址:http://www.linuxidc.com/Linux/2016-11/136820.htm


