共计 70920 个字符,预计需要花费 178 分钟才能阅读完成。
Zabbix 系列教程:CentOS 7 搭建 Zabbix3.0.4 服务端及配置详解
1. 安装常用的工具软件
yum install -y vim wget
centos7 关闭防火墙
systemctl stop firewalld.service
systemctl disable firewalld.service# 禁止 firewall 开机启动
2. 搭建 zabbix 所需要的 lamp 环境。
下载最新的 yum 源,如下:
wget -P /etc/yum.repos.d http://mirrors.aliyun.com/repo/Centos-7.repo
在开始安装之前,还需要说明下 centos7 自带的 mysql 是 mariadb,我们可以通过如下命令查看:
yum search mysql|tac
现在开始安装 lamp 环境,使用如下命令:
yum -y install mariadb mariadb-server php php-mysql httpd

通过上图,我们可以很明显的看出 centos7 默认安装的是 php5.4、httpd2.4 和 maradb5.5,这个完全符合 zabbix3.0 对软件版本的要求。
3. 配置 mysql 数据库。
设置开机自启动 mysql,并启动 mysql,使用如下命令:
systemctl enable mariadb
systemctl start mariadb

初始化 mysql 数据库,并配置 root 用户密码。使用如下命令:
mysql_secure_installation
注意:在上图中的 Enter current passwdord for root 处,我们直接敲回车键即可。因为 centos7 上 mysql 的默认 root 用户密码为空。
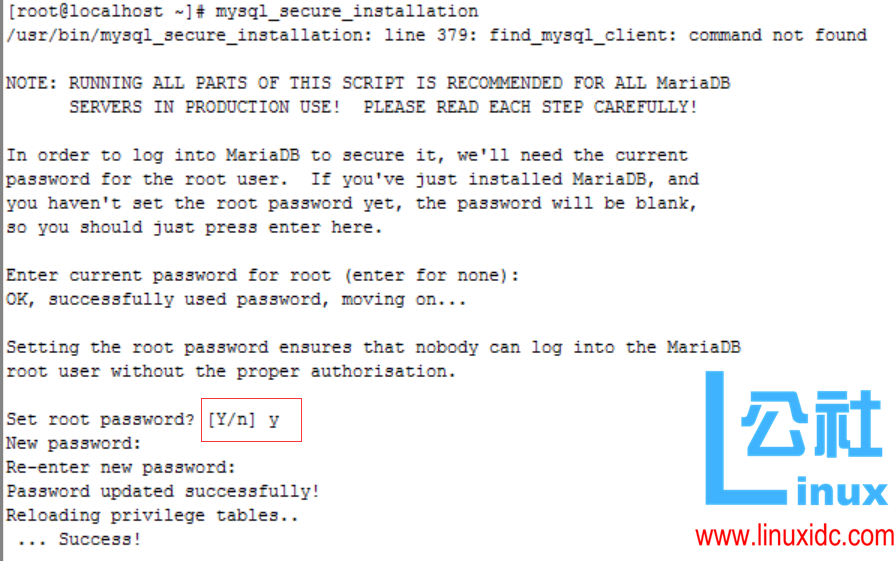
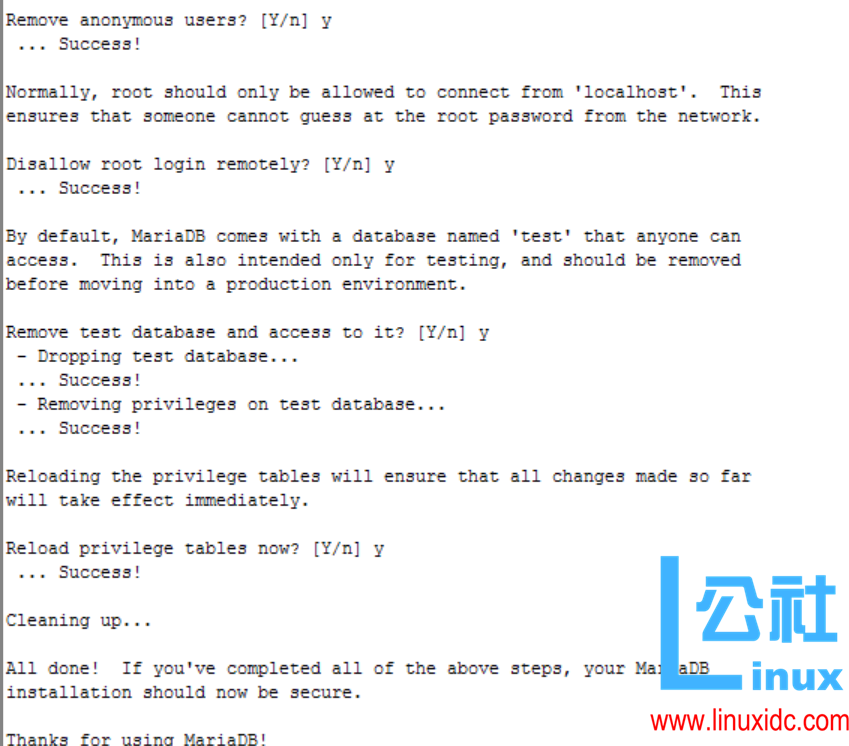
上图中主要是为 root 用户配置密码,并刷新相关权限。
上图中主要是配置匿名用户、test 用户以及 root 用户远程连接等相关配置。
mysql 初始化完毕后,我们现在来创建 zabbix 数据库及其用户,使用如下命令:
mysql -uroot -proot -e “create database zabbix default character set utf8 collate utf8_bin;”
mysql -uroot -proot -e “grant all on zabbix.* to ‘zabbix’@’%’ identified by ‘zabbix’;”
现在来测试刚刚创建的 zabbix 用户,是否可以连接 mysql 数据库,如下:
mysql -uzabbix -pzabbix
show databases;
4. 启动 apache 以及开放 80 端口,如下:
systemctl start httpd
ss -tnlp
如果开启了防火墙,需要配置 80 端口放行
firewall-cmd –zone=public –add-port=80/tcp –permanent
firewall-cmd –reload
5. 安装 zabbix server3.0
lamp 环境搭建完毕后,我们现在开始正式安装 zabbix3.0。
安装 zabbix3.0 所需要 EPEL 源和 zabbix 的 yum 源,如下:
rpm -ivh http://mirrors.aliyun.com/epel/7/x86_64/e/epel-release-7-7.noarch.rpm
rpm -ivh http://repo.zabbix.com/zabbix/3.0/rhel/7/x86_64/zabbix-release-3.0-1.el7.noarch.rpm
以上安装完毕后,我们现在来正式安装 zabbix3.0,使用如下命令:
yum -y install zabbix-server-mysql zabbix-web-mysql zabbix-get

通过上图,我们可以很明显的看出目前 zabbix server 是 3.0.4 版本的。
以上安装完毕后,我们现在开始进行 zabbix 的相关配置。
导入 zabbix 数据库结构,如下:
cd /usr/share/doc/zabbix-server-mysql-3.0.4/
zcat create.sql.gz | mysql -uroot -proot zabbix
数据库导入完毕后,我们现在来修改 zabbix sever 的配置文件,如下:
vim /etc/zabbix/zabbix_server.conf
LogFile=/var/log/zabbix/zabbix_server.log
LogFileSize=0
PidFile=/var/run/zabbix/zabbix_server.pid
DBHost=localhost
DBName=zabbix
DBUser=zabbix
DBPassword=zabbix
SNMPTrapperFile=/var/log/snmptrap/snmptrap.log
Timeout=4
AlertScriptsPath=/usr/lib/zabbix/alertscripts
ExternalScripts=/usr/lib/zabbix/externalscripts
LogSlowQueries=3000
上述配置文件中,我们只需要关注 DBHost、DBName、DBUser、
DBPassword 几项即可。这几项是配置 zabbix server 连接 mysql 数据库的参数。
以上修改完毕后,我们再来修改下 zabbix.conf 文件。如下:
vim /etc/httpd/conf.d/zabbix.conf
Alias /zabbix /usr/share/zabbix
<Directory“/usr/share/zabbix”>
Options FollowSymLinks
AllowOverride None
Require all granted
<IfModule mod_php5.c>
php_value max_execution_time 300
php_value memory_limit 128M
php_value post_max_size 16M
php_value upload_max_filesize 2M
php_value max_input_time 300
php_value always_populate_raw_post_data -1
php_value date.timezone Asia/Chongqing
</IfModule>
</Directory>
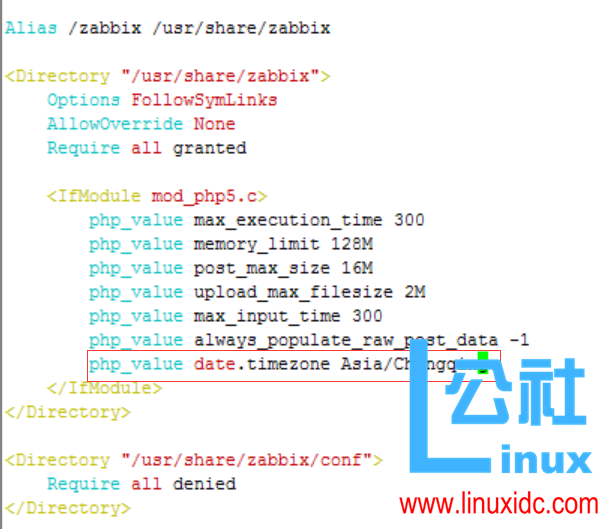
其中 php_value date.timezone Asia/Chongqing 主要是定义 php 的时区。
以上修改完毕后,我们把把 zabbix-server 加入开机启动,并启动 zabbix-server,如下:
systemctl enable zabbix-server
systemctl start zabbix-server
最后重启 apache,如下:
systemctl restart httpd
然后访问 http://192.168.3.108/zabbix/setup.php 这个地址,如下:
通过上图,我们可以很明显的看出 zabbix3.0 已经被正确安装。
当然上述的访问地址也是可以自定义的,我们只需要修改 zabbix.conf 文件中的 alias 即可,如下:
vim /etc/httpd/conf.d/zabbix.conf
6. 配置 zabbix
在第一、二章节中,我们已经安装 zabbix server3.0 的上半部分,这个章节我们来继续安装和配置 zabbix。
注意:本章节我们不再进行文字解释,全部都是图片。
打开前面的显示的 zabbix3.0 的网页,点击下一步,如下: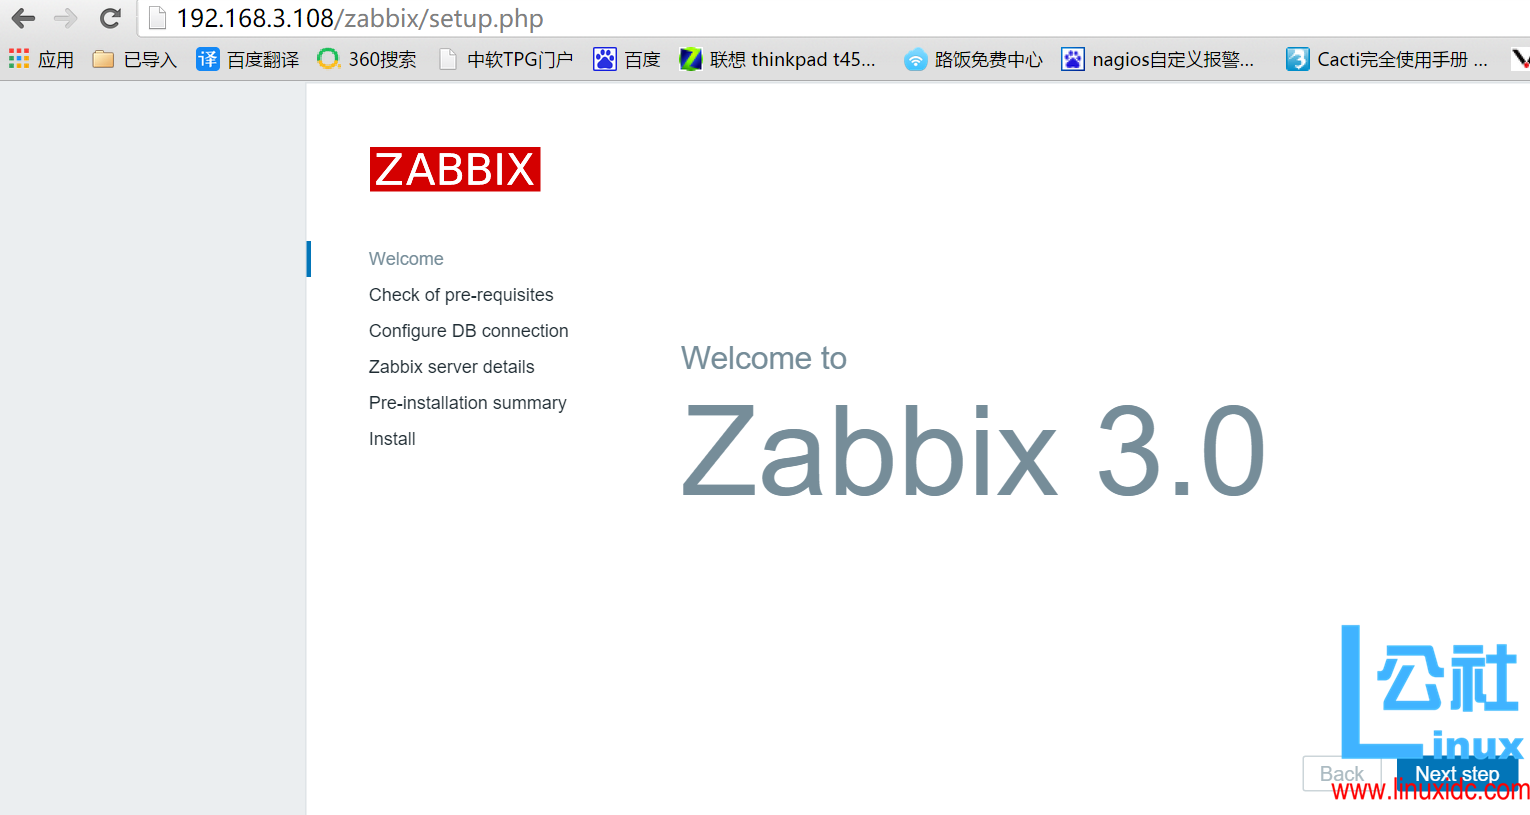
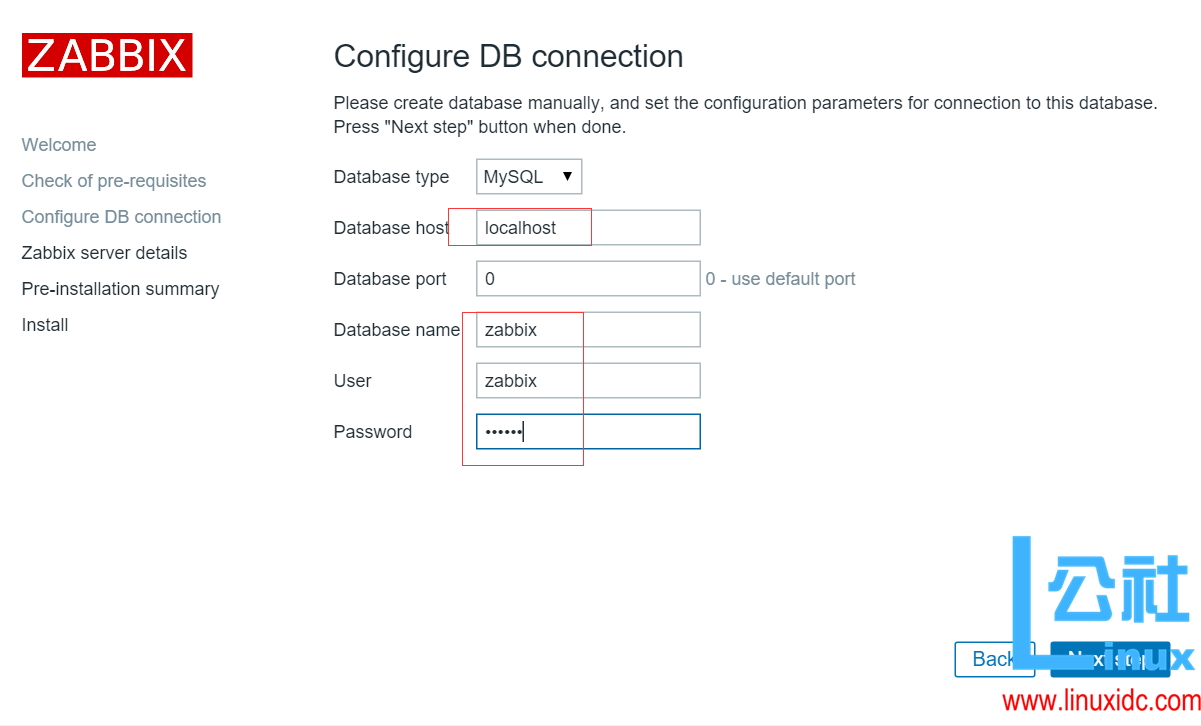
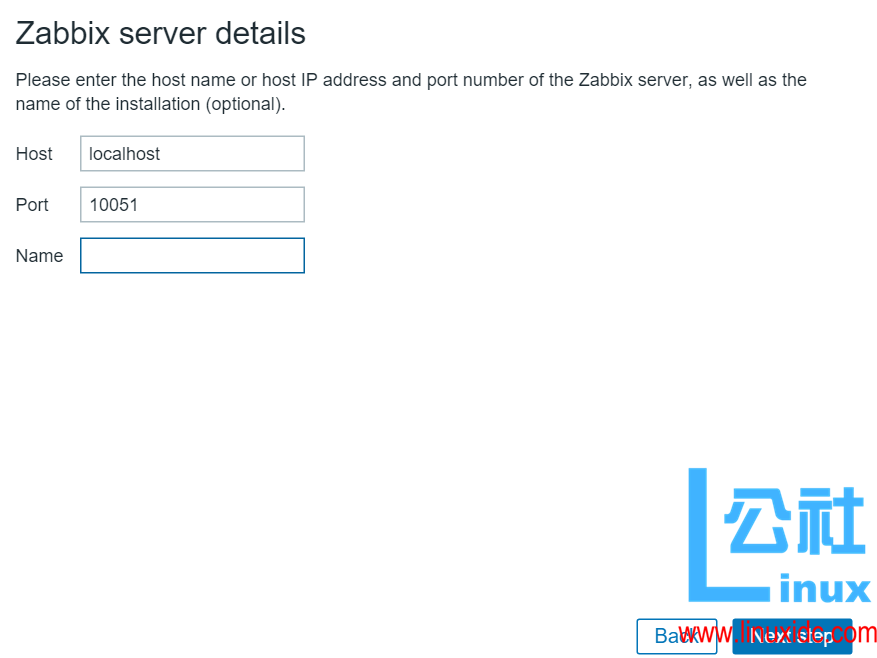
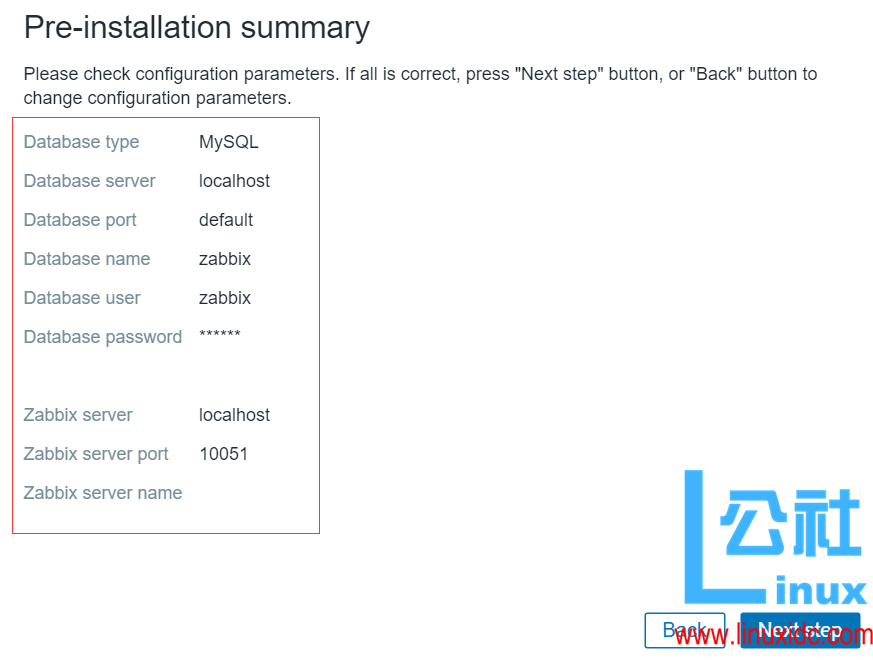
默认账号 Admin 密码 zabbix
7. 安装 zabbix agent
前面我们安装了 zabbix server3.0,本章节我们介绍安装 zabbix agent 端。zabbix agent 的安装比较简单,我们只需要安装相应的仓库,然后执行安装命令即可。
4.1 安装 zabbix agent
在 centos os 上安装 agent,使用如下命令:
rpm -ivh http://mirrors.aliyun.com/zabbix/zabbix/3.0/rhel/6/x86_64/zabbix-release-3.0-1.el6.noarch.rpm
yum clean all
yum -y install zabbix zabbix-agent
配置 zabbix agent
zabbix agent 的配置很简单,只需要修改 zabbix agent 配置文件中的 Server、ServerActive 和 Hostname 这三项即可。
其中 Server、ServerActive 是 zabbix server 服务器的 IP 地址,Hostname 是被监控端的 IP 地址,如下:
vim /etc/zabbix/zabbix_agentd.conf
Server=192.168.3.108
ServerActive=192.168.3.108
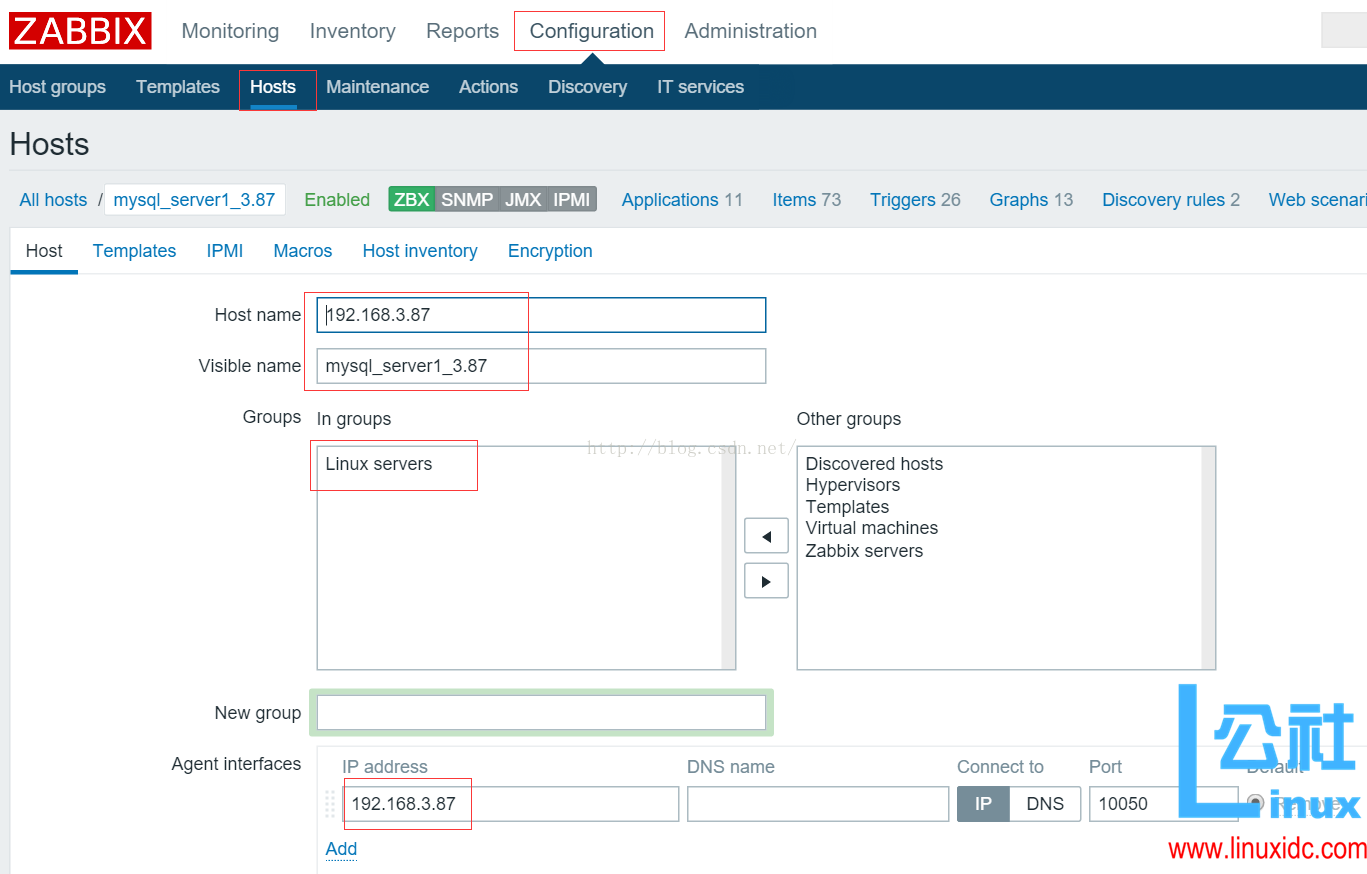
Hostname=agent_hostname #注意此处需要填写被监控端的 hostname,此处 Hostname 要和添加 hosts 时的 Host name 一致,具体如下图
客户端 agent 自启动
chkconfig –add zabbix-agent
以上配置完毕后,我们在 zabbix web 端添加该监控机器时,只需要把 honst name 与该配置文件中的 hostname 对应即可。如下: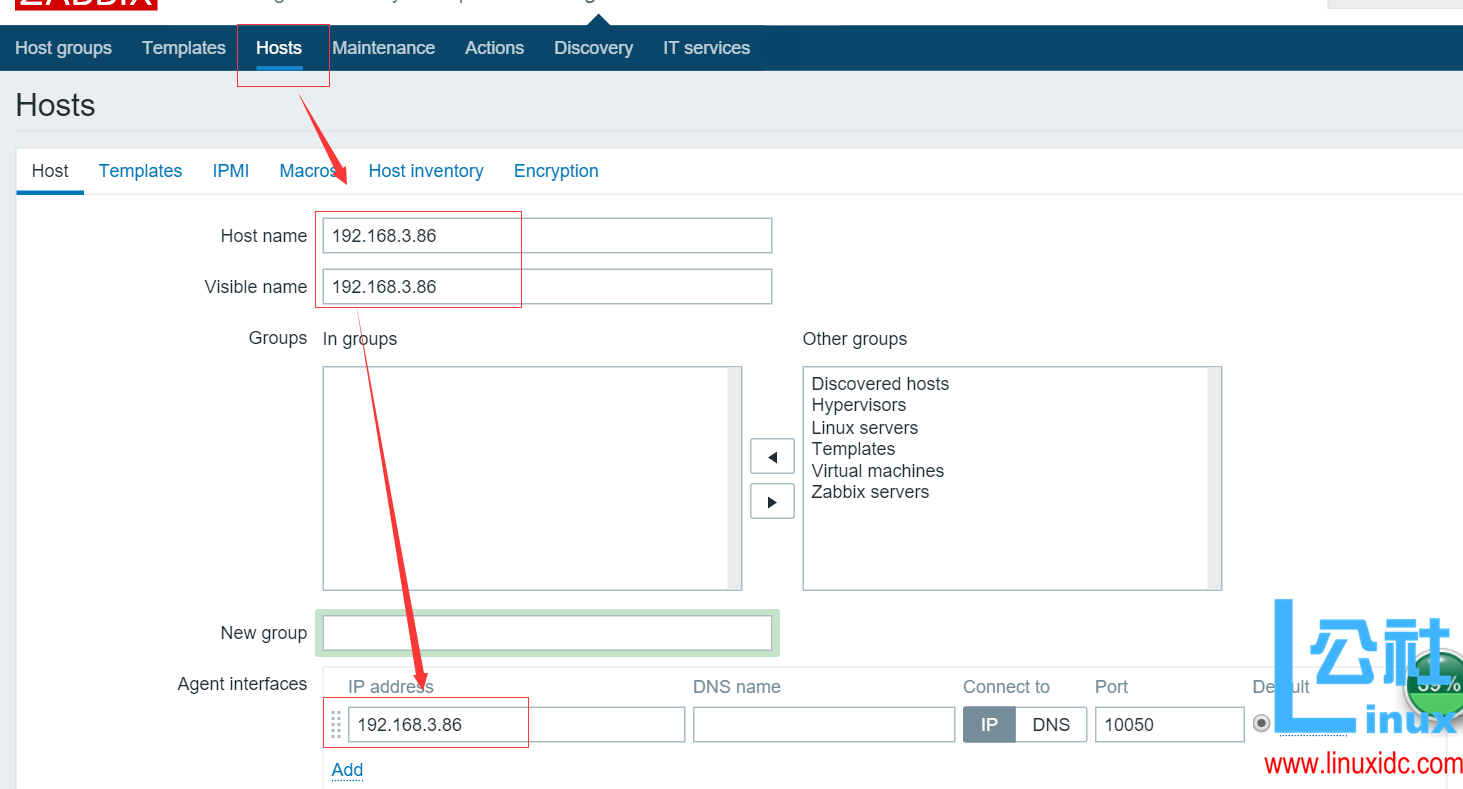
zabbix web 中文显示
默认情况下 zabbix web 显示的是英文,实际上 zabbix 是支持中文的,我们可以通过修改 web 端源文件来开启中文。
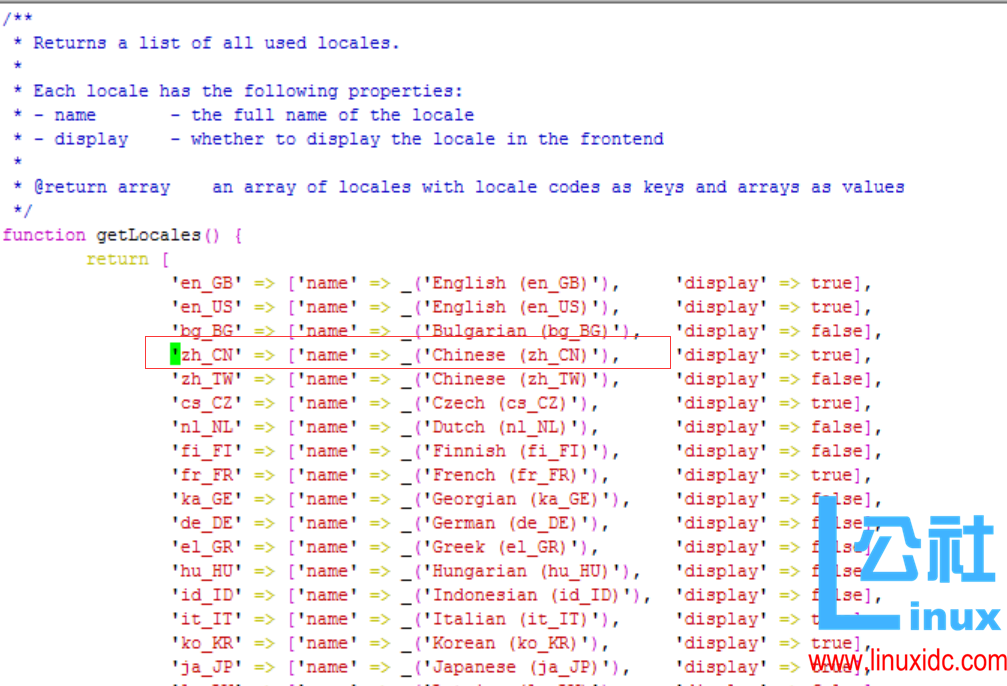
修改 /usr/share/zabbix/include/locales.inc.php 文件,把 zh_CN 所在行的 false 改为 true 即可,如下:
vim /usr/share/zabbix/include/locales.inc.php +55
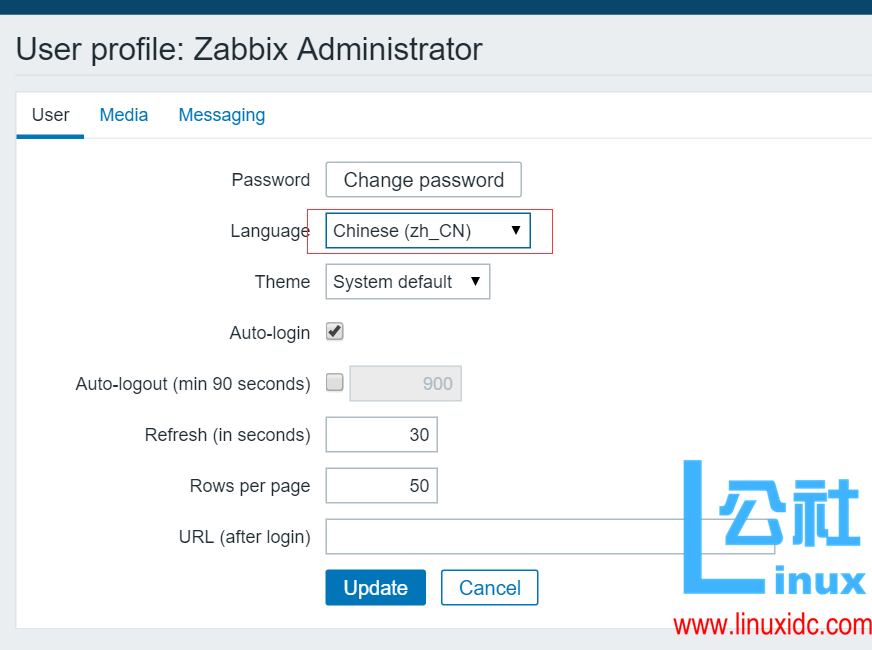
最后后点击 zabbix web 监控网页端右上角人头头像,在弹出的选项卡选择中文语言即可。如下:
自此,zabbix3.0.4 的安装暂告一段路。
更多详情见请继续阅读下一页的精彩内容:http://www.linuxidc.com/Linux/2016-11/137638p2.htm
zabbix3.0.4 添加 Mysql 的监控
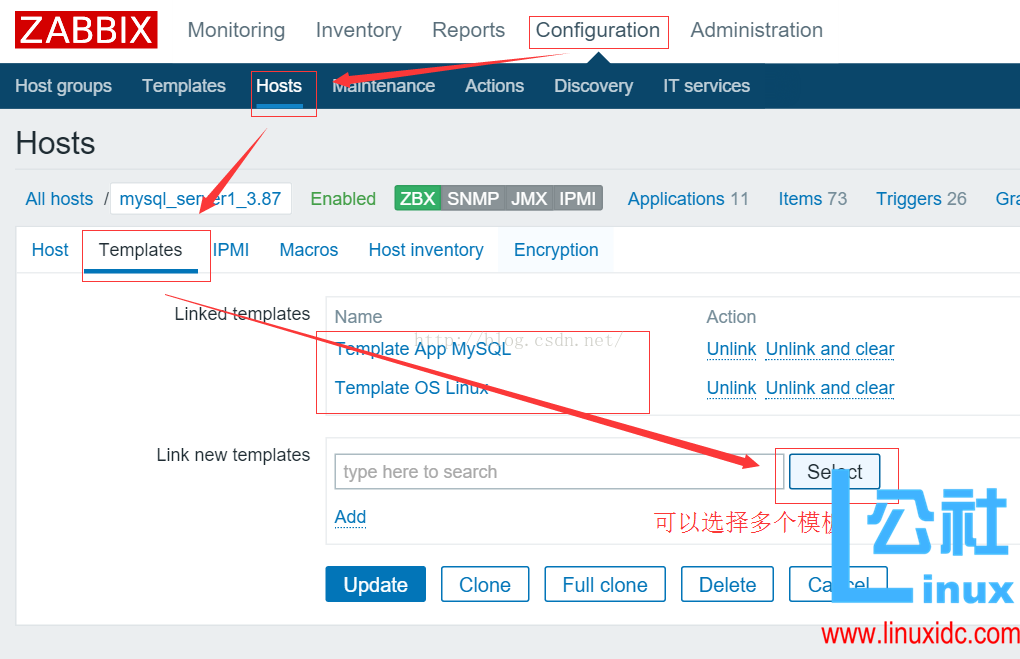
zabbix3.0 server 已自带 mysql 的模板了,只需安装 agent 端,然后在 web 端给主机增加模板就行了。Agent 端操纵 /etc/zabbix/zabbix_agentd.d/userparameter_mysql.conf
zabbix3.0 server 已经自带 MySQL 的模板了,只要修改 agent 端,然后在 web 端给主机添加模板就好了。
Agent 端操作
/etc/zabbix/zabbix_agentd.d/userparameter_mysql.conf 已经存在(自动安装的),还需要的是配置 MySQL 的用户密码信息
被监控的 zabbix-agent 的 mysql 客户端添加 mysql 帐号:
因 zabbix-server 监控 mysql 是通过 zabbix-agent 端的 /etc/zabbix/.my.cnf 配置文件,所以 host 只需要对 localhost 授权即可
GRANT PROCESS,SUPER,REPLICATION CLIENT ON *.* TO zabbix@’localhost’ IDENTIFIED BY ‘zabbixpassword’;
flush privileges;
在 zabbix-agent 目录下 /etc/zabbix/ 创建 .my.cnf 文件
vim /etc/zabbix/.my.cnf
[client]
user=zabbix
password=zabbixpassword
然后查看 userparameter_mysql.conf 文件,看到类似 HOME=/var/lib/zabbix 的路径设置,把路径全都替换为 /etc/zabbix/,使用下面的命令
sed -i ‘s|/var/lib/zabbix|/etc/zabbix|g’ /etc/zabbix/zabbix_agentd.d/userparameter_mysql.conf
修改完之后检查一下,然后重启 agent
/etc/init.d/zabbix-agent restart
测试
在 zabbix-server 命令行测试下
zabbix_get -s zabbix_agent_mysql_client_ip -p 10050 -k “mysql.status[Uptime]”
zabbix_get -s 192.168.3.87 -p 10050 -k “mysql.status[Uptime]”
zabbix_get -s 192.168.3.87 -p10050 -k mysql.status[Com_update]
之后在监控界面增加主机对应的 MySQL 模板就好啦。
Zabbix 系列教程:CentOS 7 搭建 Zabbix3.0.4 服务端及配置详解
1. 安装常用的工具软件
yum install -y vim wget
centos7 关闭防火墙
systemctl stop firewalld.service
systemctl disable firewalld.service# 禁止 firewall 开机启动
2. 搭建 zabbix 所需要的 lamp 环境。
下载最新的 yum 源,如下:
wget -P /etc/yum.repos.d http://mirrors.aliyun.com/repo/Centos-7.repo
在开始安装之前,还需要说明下 centos7 自带的 mysql 是 mariadb,我们可以通过如下命令查看:
yum search mysql|tac
现在开始安装 lamp 环境,使用如下命令:
yum -y install mariadb mariadb-server php php-mysql httpd

通过上图,我们可以很明显的看出 centos7 默认安装的是 php5.4、httpd2.4 和 maradb5.5,这个完全符合 zabbix3.0 对软件版本的要求。
3. 配置 mysql 数据库。
设置开机自启动 mysql,并启动 mysql,使用如下命令:
systemctl enable mariadb
systemctl start mariadb

初始化 mysql 数据库,并配置 root 用户密码。使用如下命令:
mysql_secure_installation
注意:在上图中的 Enter current passwdord for root 处,我们直接敲回车键即可。因为 centos7 上 mysql 的默认 root 用户密码为空。


上图中主要是为 root 用户配置密码,并刷新相关权限。
上图中主要是配置匿名用户、test 用户以及 root 用户远程连接等相关配置。
mysql 初始化完毕后,我们现在来创建 zabbix 数据库及其用户,使用如下命令:
mysql -uroot -proot -e “create database zabbix default character set utf8 collate utf8_bin;”
mysql -uroot -proot -e “grant all on zabbix.* to ‘zabbix’@’%’ identified by ‘zabbix’;”
现在来测试刚刚创建的 zabbix 用户,是否可以连接 mysql 数据库,如下:
mysql -uzabbix -pzabbix
show databases;
4. 启动 apache 以及开放 80 端口,如下:
systemctl start httpd
ss -tnlp
如果开启了防火墙,需要配置 80 端口放行
firewall-cmd –zone=public –add-port=80/tcp –permanent
firewall-cmd –reload
5. 安装 zabbix server3.0
lamp 环境搭建完毕后,我们现在开始正式安装 zabbix3.0。
安装 zabbix3.0 所需要 EPEL 源和 zabbix 的 yum 源,如下:
rpm -ivh http://mirrors.aliyun.com/epel/7/x86_64/e/epel-release-7-7.noarch.rpm
rpm -ivh http://repo.zabbix.com/zabbix/3.0/rhel/7/x86_64/zabbix-release-3.0-1.el7.noarch.rpm
以上安装完毕后,我们现在来正式安装 zabbix3.0,使用如下命令:
yum -y install zabbix-server-mysql zabbix-web-mysql zabbix-get

通过上图,我们可以很明显的看出目前 zabbix server 是 3.0.4 版本的。
以上安装完毕后,我们现在开始进行 zabbix 的相关配置。
导入 zabbix 数据库结构,如下:
cd /usr/share/doc/zabbix-server-mysql-3.0.4/
zcat create.sql.gz | mysql -uroot -proot zabbix
数据库导入完毕后,我们现在来修改 zabbix sever 的配置文件,如下:
vim /etc/zabbix/zabbix_server.conf
LogFile=/var/log/zabbix/zabbix_server.log
LogFileSize=0
PidFile=/var/run/zabbix/zabbix_server.pid
DBHost=localhost
DBName=zabbix
DBUser=zabbix
DBPassword=zabbix
SNMPTrapperFile=/var/log/snmptrap/snmptrap.log
Timeout=4
AlertScriptsPath=/usr/lib/zabbix/alertscripts
ExternalScripts=/usr/lib/zabbix/externalscripts
LogSlowQueries=3000
上述配置文件中,我们只需要关注 DBHost、DBName、DBUser、
DBPassword 几项即可。这几项是配置 zabbix server 连接 mysql 数据库的参数。
以上修改完毕后,我们再来修改下 zabbix.conf 文件。如下:
vim /etc/httpd/conf.d/zabbix.conf
Alias /zabbix /usr/share/zabbix
<Directory“/usr/share/zabbix”>
Options FollowSymLinks
AllowOverride None
Require all granted
<IfModule mod_php5.c>
php_value max_execution_time 300
php_value memory_limit 128M
php_value post_max_size 16M
php_value upload_max_filesize 2M
php_value max_input_time 300
php_value always_populate_raw_post_data -1
php_value date.timezone Asia/Chongqing
</IfModule>
</Directory>

其中 php_value date.timezone Asia/Chongqing 主要是定义 php 的时区。
以上修改完毕后,我们把把 zabbix-server 加入开机启动,并启动 zabbix-server,如下:
systemctl enable zabbix-server
systemctl start zabbix-server
最后重启 apache,如下:
systemctl restart httpd
然后访问 http://192.168.3.108/zabbix/setup.php 这个地址,如下:
通过上图,我们可以很明显的看出 zabbix3.0 已经被正确安装。
当然上述的访问地址也是可以自定义的,我们只需要修改 zabbix.conf 文件中的 alias 即可,如下:
vim /etc/httpd/conf.d/zabbix.conf
6. 配置 zabbix
在第一、二章节中,我们已经安装 zabbix server3.0 的上半部分,这个章节我们来继续安装和配置 zabbix。
注意:本章节我们不再进行文字解释,全部都是图片。
打开前面的显示的 zabbix3.0 的网页,点击下一步,如下:


默认账号 Admin 密码 zabbix
7. 安装 zabbix agent
前面我们安装了 zabbix server3.0,本章节我们介绍安装 zabbix agent 端。zabbix agent 的安装比较简单,我们只需要安装相应的仓库,然后执行安装命令即可。
4.1 安装 zabbix agent
在 centos os 上安装 agent,使用如下命令:
rpm -ivh http://mirrors.aliyun.com/zabbix/zabbix/3.0/rhel/6/x86_64/zabbix-release-3.0-1.el6.noarch.rpm
yum clean all
yum -y install zabbix zabbix-agent
配置 zabbix agent
zabbix agent 的配置很简单,只需要修改 zabbix agent 配置文件中的 Server、ServerActive 和 Hostname 这三项即可。
其中 Server、ServerActive 是 zabbix server 服务器的 IP 地址,Hostname 是被监控端的 IP 地址,如下:
vim /etc/zabbix/zabbix_agentd.conf
Server=192.168.3.108
ServerActive=192.168.3.108
Hostname=agent_hostname #注意此处需要填写被监控端的 hostname,此处 Hostname 要和添加 hosts 时的 Host name 一致,具体如下图
客户端 agent 自启动
chkconfig –add zabbix-agent
以上配置完毕后,我们在 zabbix web 端添加该监控机器时,只需要把 honst name 与该配置文件中的 hostname 对应即可。如下:
zabbix web 中文显示
默认情况下 zabbix web 显示的是英文,实际上 zabbix 是支持中文的,我们可以通过修改 web 端源文件来开启中文。
修改 /usr/share/zabbix/include/locales.inc.php 文件,把 zh_CN 所在行的 false 改为 true 即可,如下:
vim /usr/share/zabbix/include/locales.inc.php +55

最后后点击 zabbix web 监控网页端右上角人头头像,在弹出的选项卡选择中文语言即可。如下:

自此,zabbix3.0.4 的安装暂告一段路。
更多详情见请继续阅读下一页的精彩内容:http://www.linuxidc.com/Linux/2016-11/137638p2.htm
一、准备工作
申请微信公众号,并且是可以有发送消息的接口。添加有个脚本去调用微信的 api。
之后可以参考下 zabbix 的搭建,然后了解下脚本报警,之后再考虑报警方式的多样化。
个人微信一个
个人邮箱一个
手机短信能收到
个人微信绑定了银行卡
二、申请公众号:
1. 申请页面:https://mp.weixin.qq.com/cgi-bin/readtemplate?t=register/step1_tmpl&lang=zh_CN
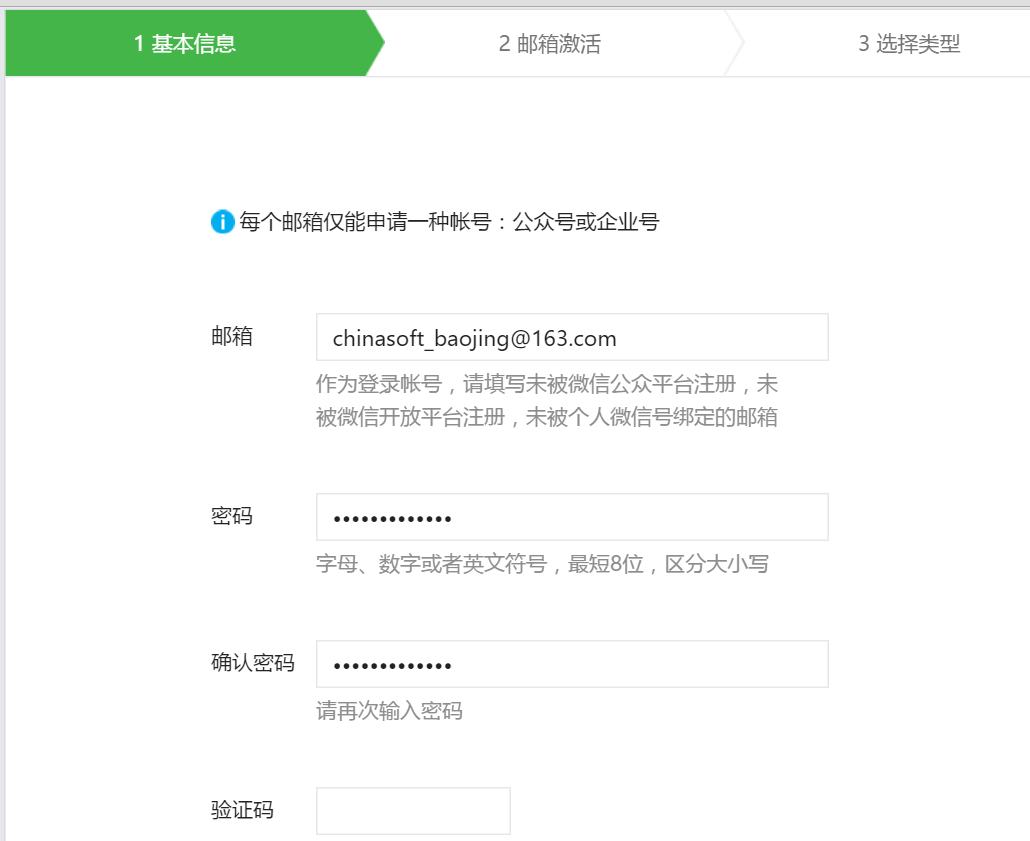
2. 申请时申请企业好 - 选择团队。

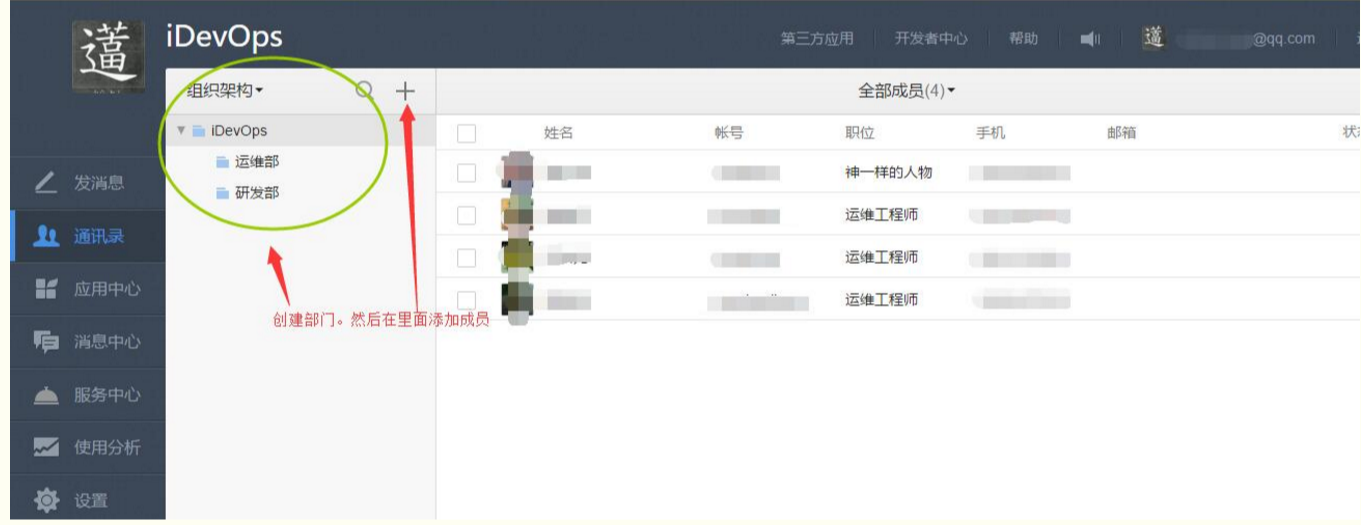
3. 在组织架构中,新建二级组,并添加相关人员,注意添加人员的账号要记清楚。后期 zabbix 发送邮件时需要填写用户名(也可以填写 @all 发送给所有的人)
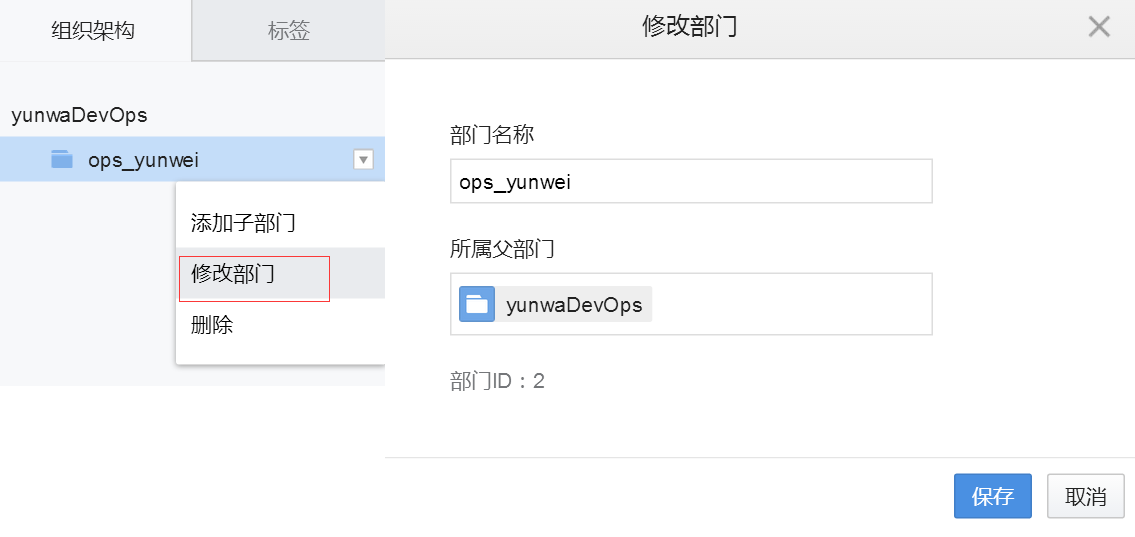
4. 这里有个组的 ID:2, 这个很重要(记得用 360 或者 IE 浏览器,谷歌浏览器不兼容,看不到 ID)
5. 新建应用,应用类型选择消息型
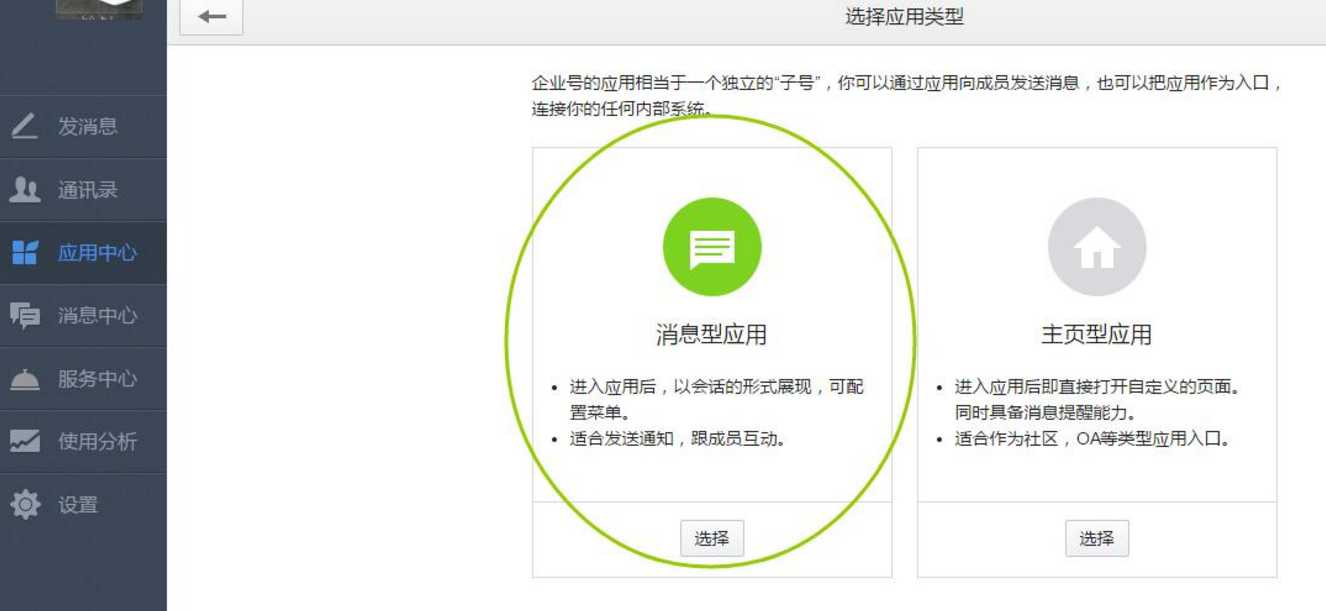
6. 选择部门

7. 下面是我新建的应用权限。

8. 现在去设置 –> 功能设置 –> 权限管理,最重要的是 CorpID,Secret 两个密钥,后期脚本里会利用它俩生成一个 token,然后利用 token 去发送消息,具体参见微信接口文档:http://qydev.weixin.qq.com/debug
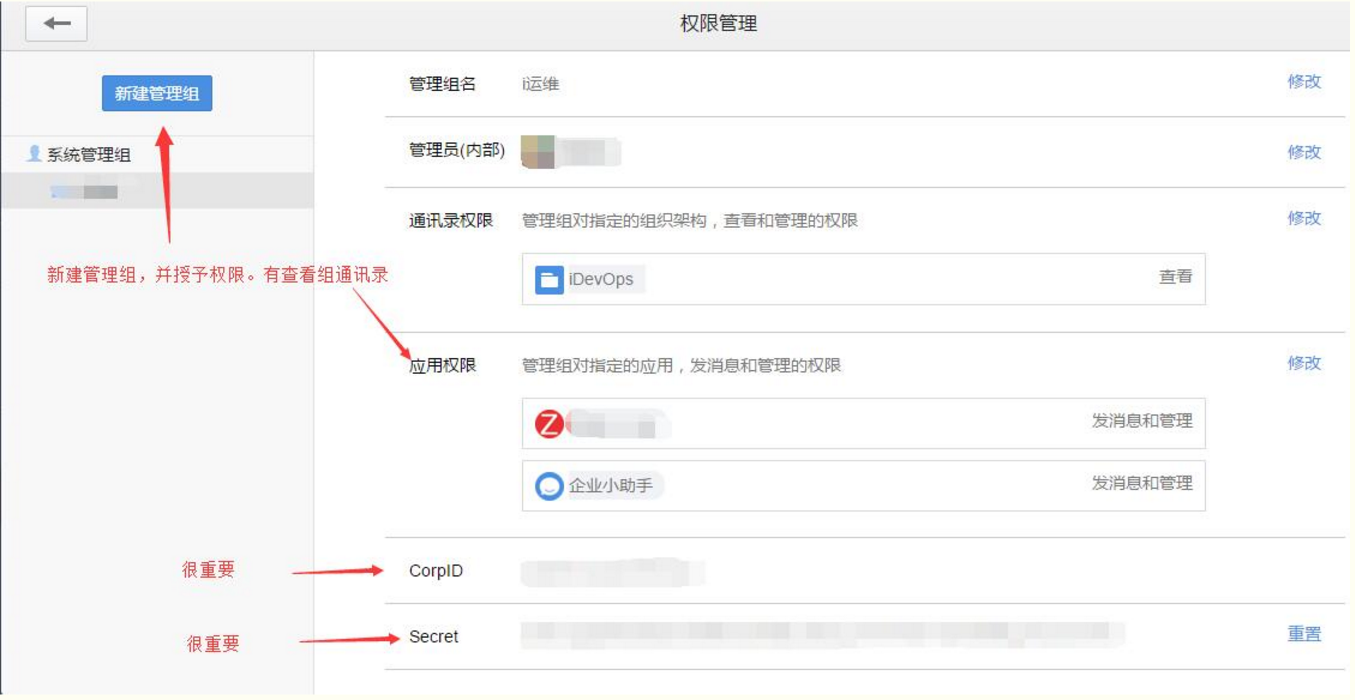
9. 下面是微信的脚本
将 weixin.py 放到 /usr/lib/zabbix/alertscripts 目录下
cd /usr/lib/zabbix/alertscripts/weixin.py
cat weixin.py
#!/usr/bin/env python
# -*- coding: utf-8 -*-
import urllib,urllib2,json
import sys
reload(sys)
sys.setdefaultencoding(“utf-8”)
class WeChat(object):
__token_id = ”
# init attribute
def __init__(self,url):
self.__url = url.rstrip(‘/’)
self.__corpid = ‘wxd48c194d03788447’
self.__secret = ‘uFwN-C6lgkA131mlQn96TF28dq5DzH2QpKvT1gEZvogTZQCmEP8VSWAyTXI3iYlT’
# Get TokenID
def authID(self):
params = {‘corpid’:self.__corpid, ‘corpsecret’:self.__secret}
data = urllib.urlencode(params)
content = self.getToken(data)
try:
self.__token_id = content[‘access_token’]
# print content[‘access_token’]
except KeyError:
raise KeyError
# Establish a connection
def getToken(self,data,url_prefix=’/’):
url = self.__url + url_prefix + ‘gettoken?’
try:
response = urllib2.Request(url + data)
except KeyError:
raise KeyError
result = urllib2.urlopen(response)
content = json.loads(result.read())
return content
# Get sendmessage url
def postData(self,data,url_prefix=’/’):
url = self.__url + url_prefix + ‘message/send?access_token=%s’ % self.__token_id
request = urllib2.Request(url,data)
try:
result = urllib2.urlopen(request)
except urllib2.HTTPError as e:
if hasattr(e,’reason’):
print ‘reason’,e.reason
elif hasattr(e,’code’):
print ‘code’,e.code
return 0
else:
content = json.loads(result.read())
result.close()
return content
# send message
def sendMessage(self,touser,message):
self.authID()
data = json.dumps({
‘touser’:touser,
‘toparty’:”2″,
‘msgtype’:”text”,
‘agentid’:”1″,
‘text’:{
‘content’:message
},
‘safe’:”0″
},ensure_ascii=False)
response = self.postData(data)
print response
if __name__ == ‘__main__’:
a = WeChat(‘https://qyapi.weixin.qq.com/cgi-bin’)
a.sendMessage(sys.argv[1],sys.argv[3])
注意:需要修改 4 处:
1.14 行、15 行
2.65 行、67 行
说明下,67 行是你的组部门 id 号,agentid 是你应用 id 号。。。。记得修改脚本权限,属主,放到和 /usr/local/zabbix/scripts/ 目录下。
记得增加脚本执行权限,并修改所属组
chmod +x /usr/lib/zabbix/alertscripts/weixin.py
chown zabbix.zabbix /usr/lib/zabbix/alertscripts/weixin.py
测试,如果正常微信会收到 test 的提醒消息
./weixin.py hanyifeng test test
{u’errcode’: 0, u’errmsg’: u’ok’}
四、配置微信报警
脚本编辑好后,在 zabbix 登陆界面进行设置。
注意:zabbix 3.0 需要在为 alert 脚本定义参数,以前的版本参数都固定的,现在用户可以自己定义命令行的参数了。添加的参数也就是脚本中的 $1、$2、$3 等。
添加方法:Administration–>Media types, 增加如下参数,添加媒介:
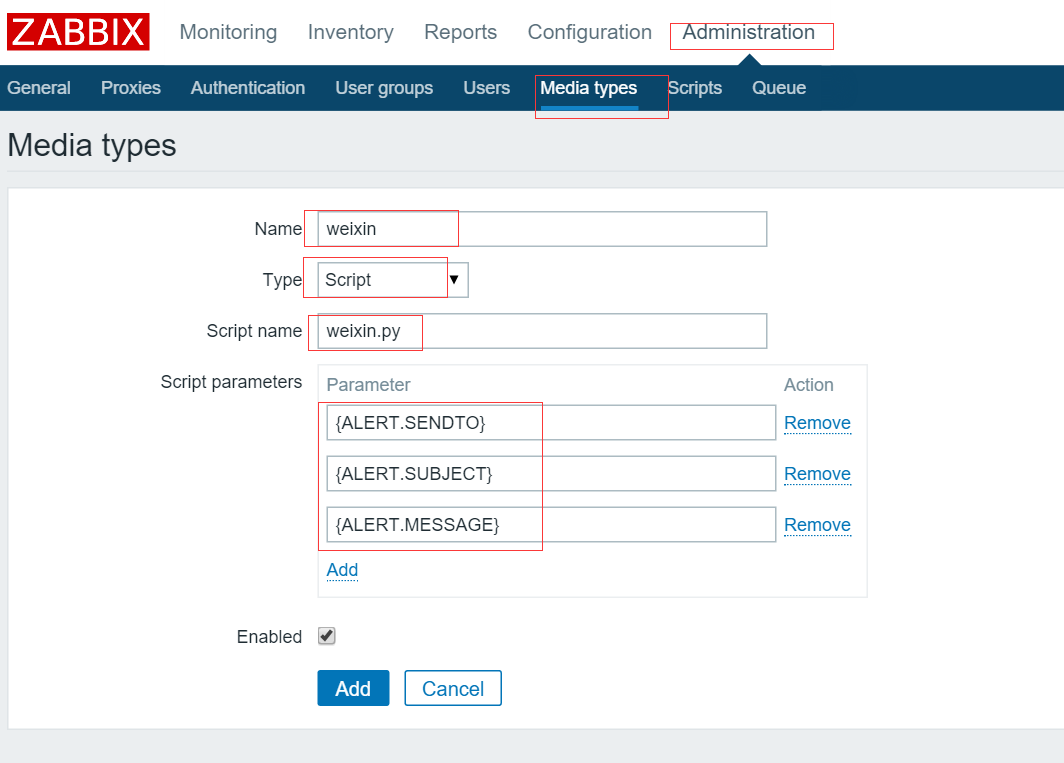
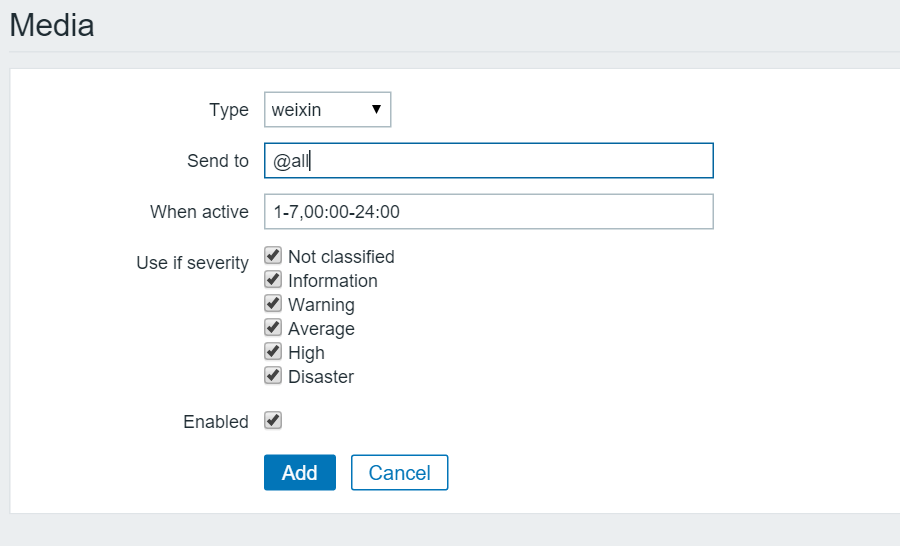
添加完成后,需要关联到报警用户 Administration–>Users–>Media–>add

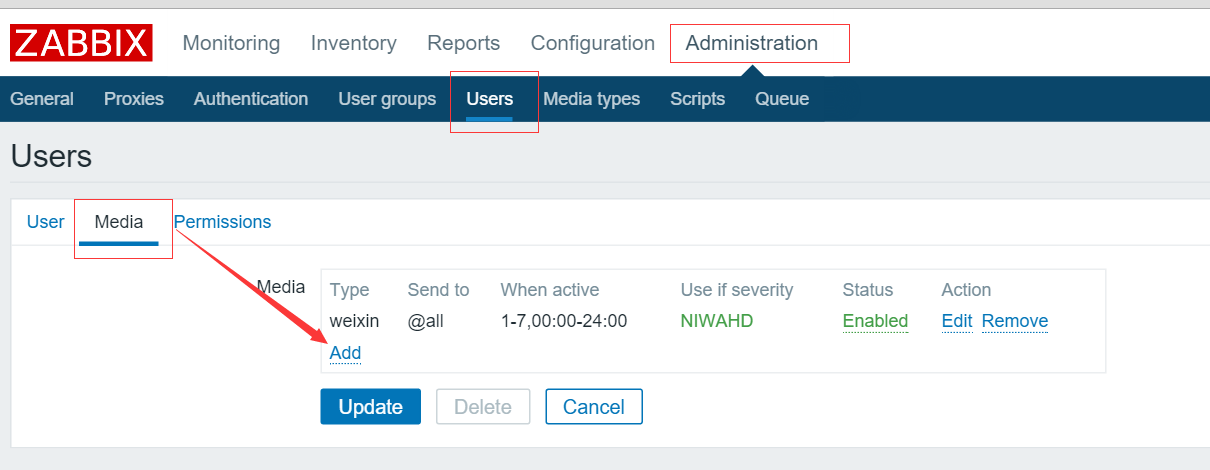
添加动作,触发条件后报警后发送微信消息。Configuration–>Actions-Event source(Triggers)-Create action-

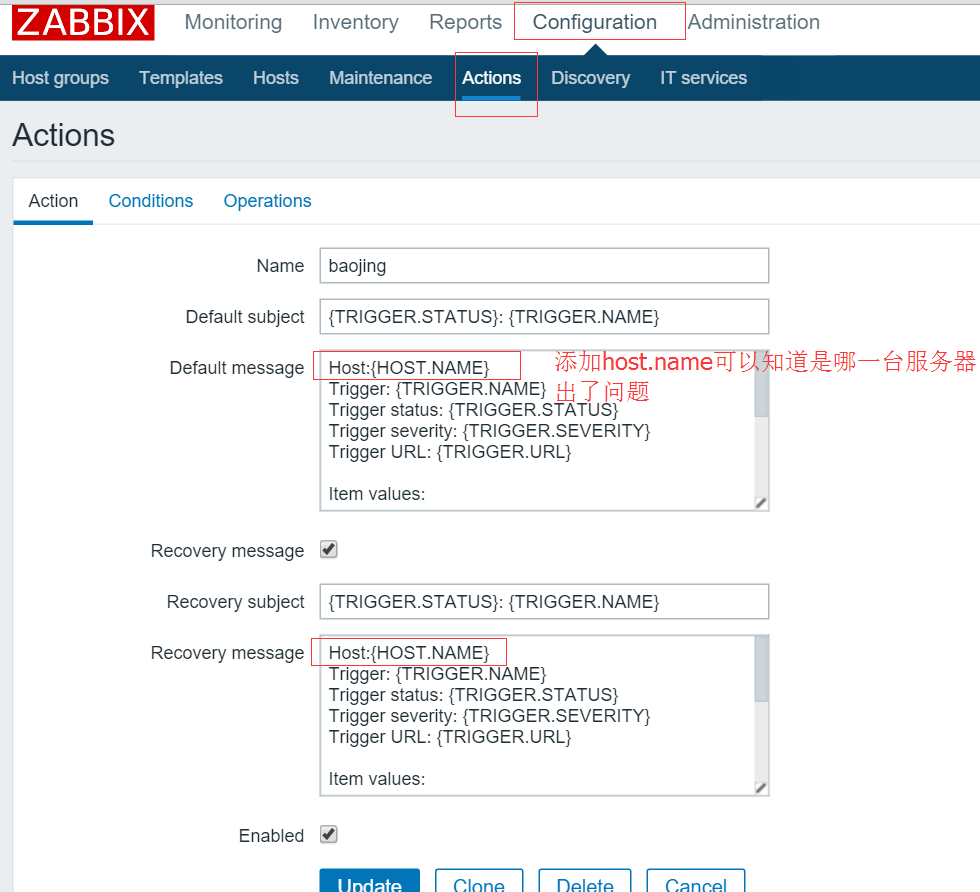
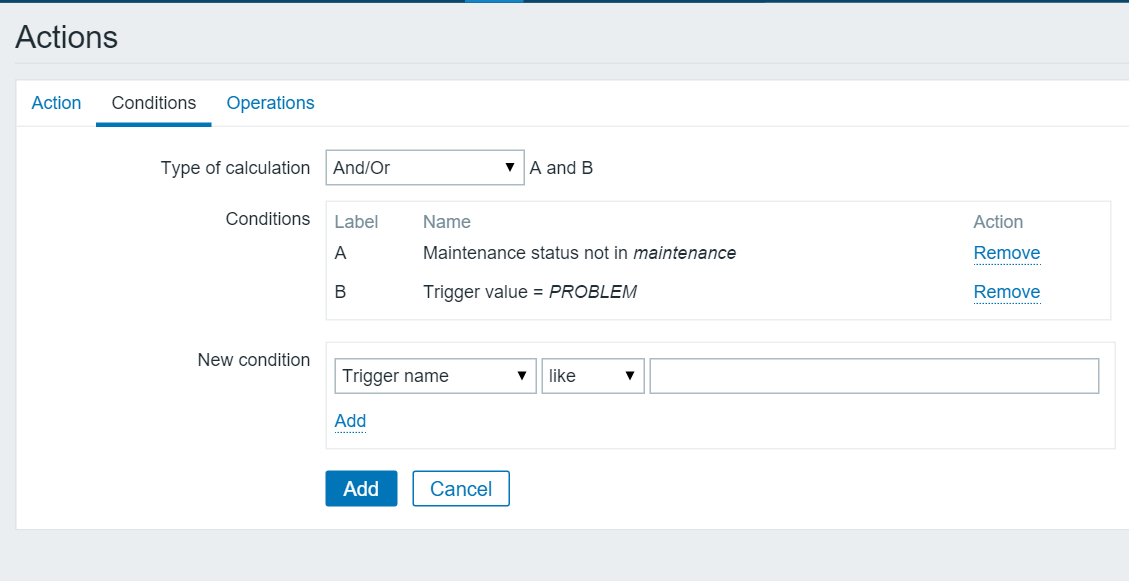
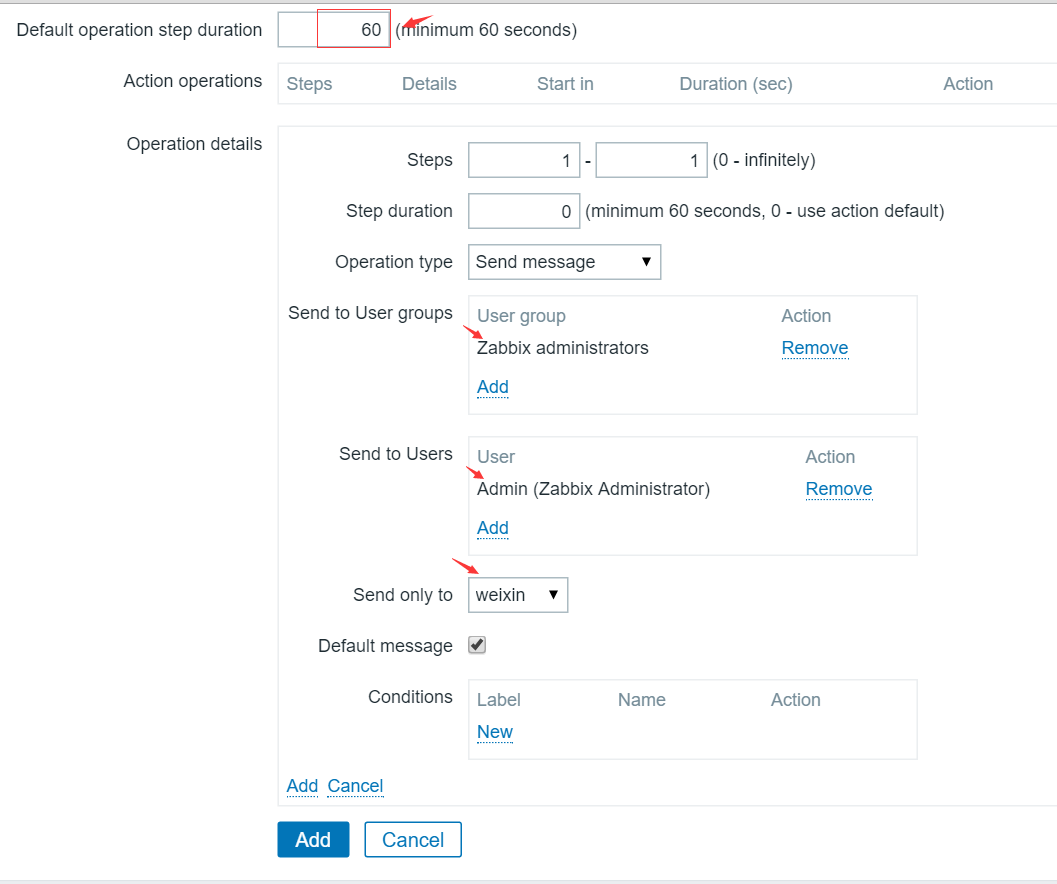
也可以对消息适当精简,如下
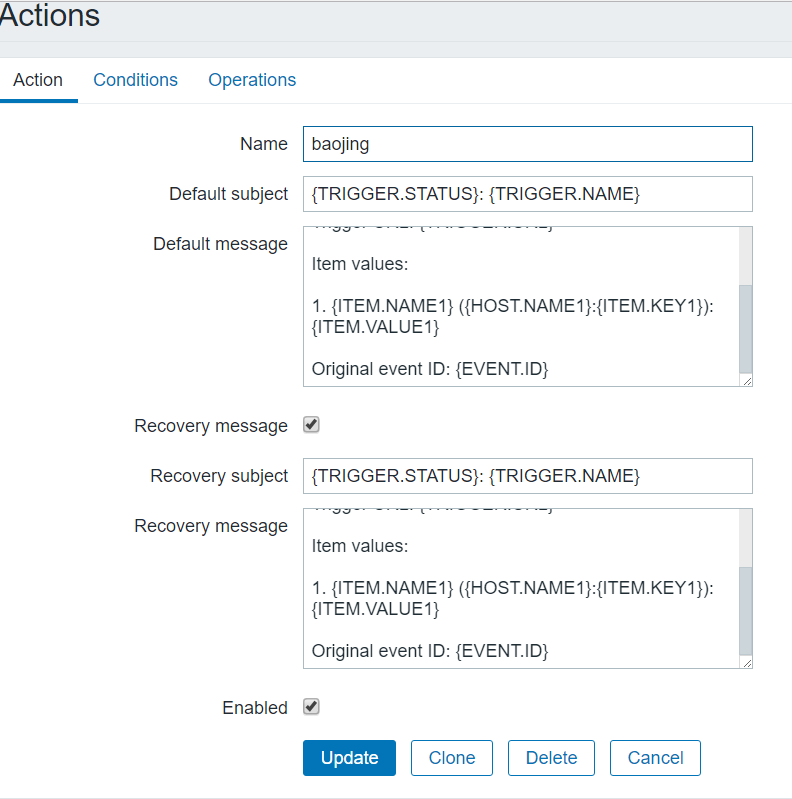
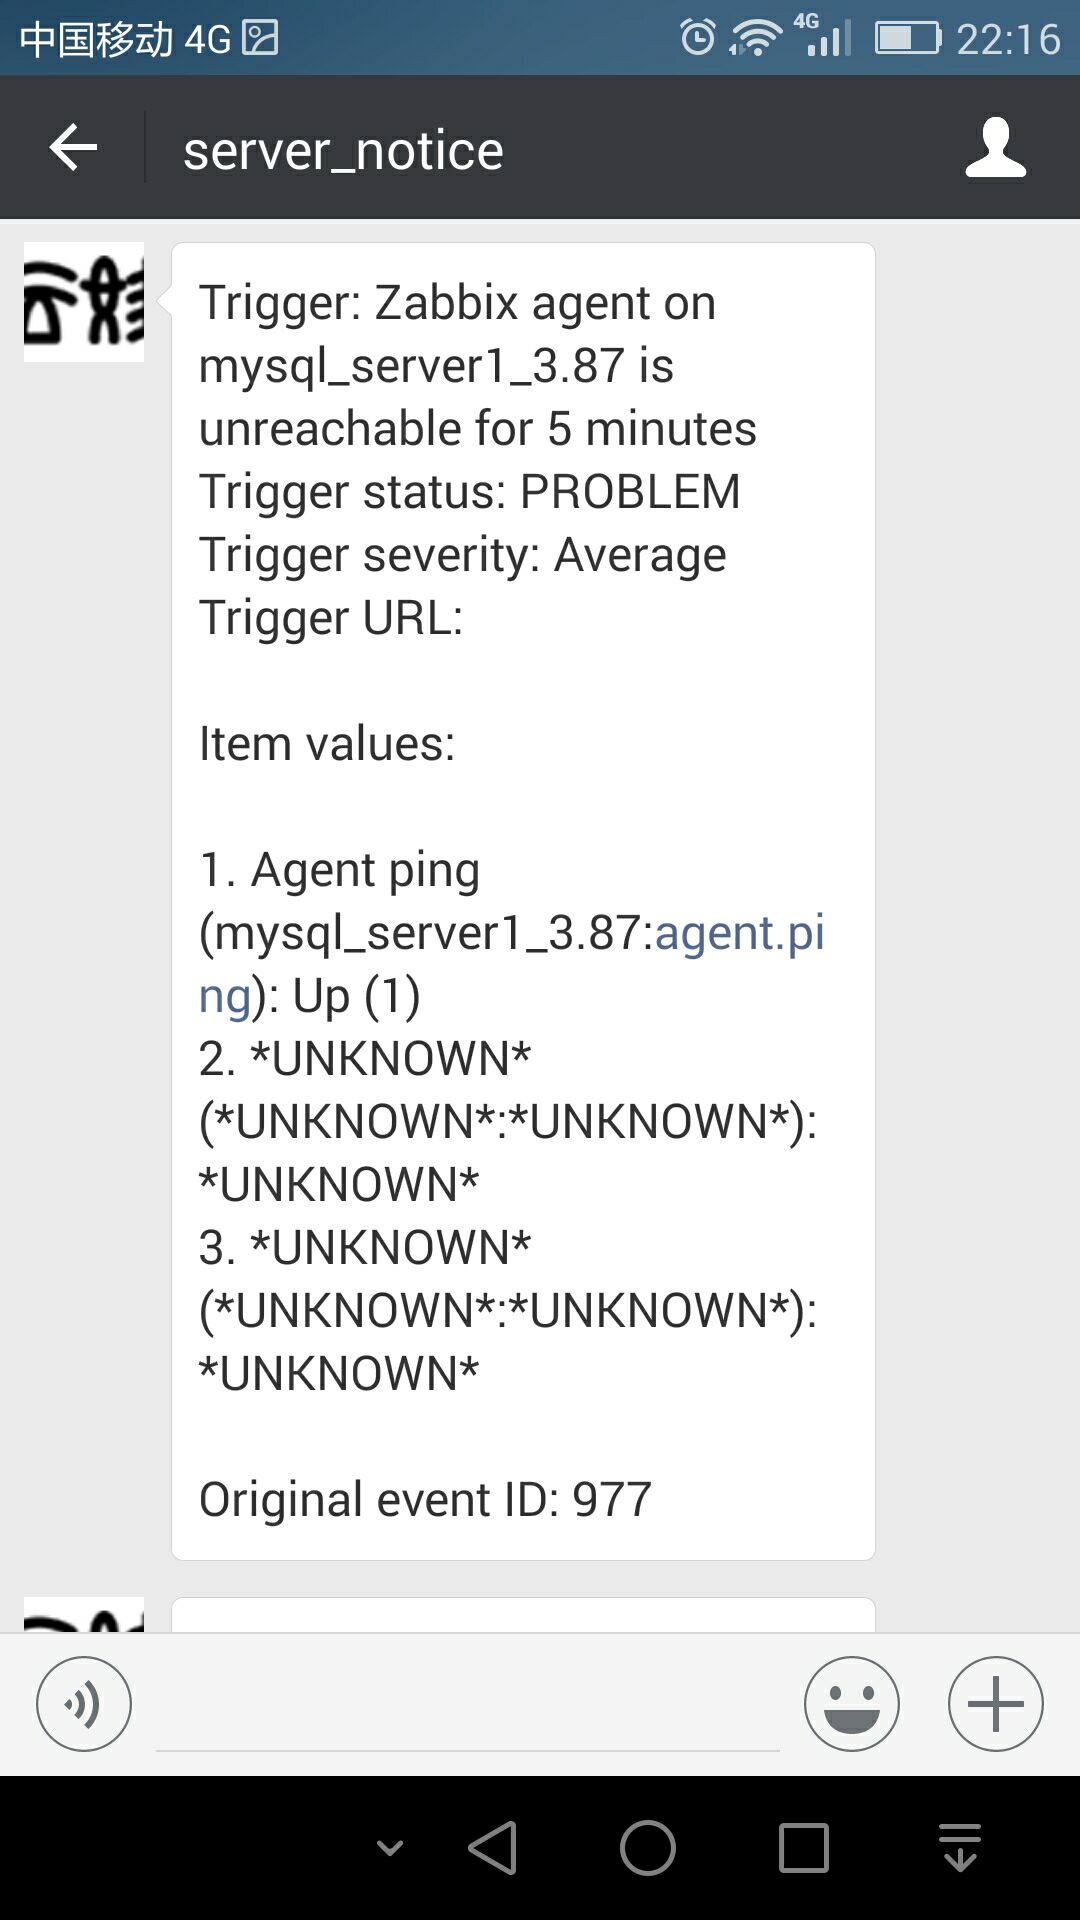
下面把 192.168.3.87 这台主机的 zabbix-agent 服务关掉:servier zabbix-agent stop。看下你的微信吧
Zabbix3.0.4 添加对 Nginx 服务的监控
通过 Nginx 的 http_stub_status_module 模块提供的状态信息来监控,所以在 Agent 端需要配置 Nginx 状态获取的脚本,和添加 key 信息等,然后在 Server 端配置 Nginx 的监控模板等。请根据自己情况调整,这里只做简单的参照。
主要是使用 Github 这个项目的代码 zabbix-templates
zabbix-server 端:192.168.3.108
系统是 CentOS7.2 zabbix-server 是 3.0.4 版本
Agent 端:192.168.386
系统是 Centos6.x, Zabbix-agent 是 3.0 版本, Nginx1.11.3 官方最新版本
1. 检查 Nginx 是否安装了 http_stub_status_module 模块,通过下面的命令可以看到编译参数。
nginx -V
nginx version: yaya
built by gcc 4.4.7 20120313 (Red Hat 4.4.7-17) (GCC)
built with OpenSSL 1.0.1e-fips 11 Feb 2013
TLS SNI support enabled
configure arguments: –sbin-path=/usr/sbin/nginx –conf-path=/etc/nginx/nginx.conf –with-debug –pid-path=/var/run/nginx/nginx.pid –with-pcre –with-http_gzip_static_module –with-http_ssl_module –with-http_realip_module –with-http_geoip_module –add-module=../nginx_upstream_check_module-master –add-module=../ngx_cache_purge-2.3 –add-module=../ngx_devel_kit-master/ –add-module=../lua-nginx-module-master/ –with-http_stub_status_module
如果没有这个模块,还需要重新编译 Nginx.
2. 配置 Nginx
Nginx 80 端口的 server 配置增加如下的片段
/etc/nginx/nginx.conf
server{
listen *:80 default_server;
location /nginx_status {
stub_status on;
access_log off;
allow 127.0.0.1;
allow 192.168.3.108; # zabbix 服务端 IP
deny all;
}
}
配置完成之后,redload nginx,然后用简单测试下
curl http://127.0.0.1/nginx_status
Active connections: 2
server accepts handled requests
528924 528924 528953
Reading: 0 Writing: 1 Waiting: 1
3.zabbix-agent 配置
有 3 个步骤,首先是编写获取 Nginx 信息脚本,接着配置中增加 key 信息,然后重启 agent 服务。
①编写 Nginx 监控脚本,记住路径,后面配置需要用到,注意脚本权限问题,agent 运行用户要能执行。
mkdir -p /usr/local/zabbix-agent/scripts
cd /usr/local/zabbix-agent/scripts
vim nginx-check.sh
cat nginx-check.sh
#!/bin/bash
##################################
# Zabbix monitoring script
#
# nginx:
# – anything available via nginx stub-status module
#
##################################
# Contact:
# vincent.viallet@gmail.com
# Zabbix requested parameter
ZBX_REQ_DATA=”$1″
ZBX_REQ_DATA_URL=”$2″
# Nginx defaults
NGINX_STATUS_DEFAULT_URL=”http://127.0.0.1/nginx_status”
WGET_BIN=”/usr/bin/wget”
#
# Error handling:
# – need to be displayable in Zabbix (avoid NOT_SUPPORTED)
# – items need to be of type “float” (allow negative + float)
#
ERROR_NO_ACCESS_FILE=”-0.9900″
ERROR_NO_ACCESS=”-0.9901″
ERROR_WRONG_PARAM=”-0.9902″
ERROR_DATA=”-0.9903″ # either can not connect / bad host / bad port
# Handle host and port if non-default
if [! -z “$ZBX_REQ_DATA_URL”]; then
URL=”$ZBX_REQ_DATA_URL”
else
URL=”$NGINX_STATUS_DEFAULT_URL”
fi
# save the nginx stats in a variable for future parsing
NGINX_STATS=$($WGET_BIN -q $URL -O – 2> /dev/null)
# error during retrieve
if [$? -ne 0 -o -z “$NGINX_STATS”]; then
echo $ERROR_DATA
exit 1
fi
#
# Extract data from nginx stats
#
case $ZBX_REQ_DATA in
active_connections) echo “$NGINX_STATS” | head -1 | cut -f3 -d’ ‘;;
accepted_connections) echo “$NGINX_STATS” | grep -Ev ‘[a-zA-Z]’ | cut -f2 -d’ ‘;;
handled_connections) echo “$NGINX_STATS” | grep -Ev ‘[a-zA-Z]’ | cut -f3 -d’ ‘;;
handled_requests) echo “$NGINX_STATS” | grep -Ev ‘[a-zA-Z]’ | cut -f4 -d’ ‘;;
reading) echo “$NGINX_STATS” | tail -1 | cut -f2 -d’ ‘;;
writing) echo “$NGINX_STATS” | tail -1 | cut -f4 -d’ ‘;;
waiting) echo “$NGINX_STATS” | tail -1 | cut -f6 -d’ ‘;;
*) echo $ERROR_WRONG_PARAM; exit 1;;
esac
exit 0
赋予脚本执行权限
chmod o+x /usr/local/zabbix-agent/scripts/nginx-check.sh
②agent 的配置文件 /etc/zabbix/zabbix_agentd.conf 中定义了其他 key 的包含目录 Include=/etc/zabbix/zabbix_agentd.d/, 如果没有这个配置请自己添加下。接着在 /etc/zabbix/zabbix_agentd.d/ 目录新建一个文件 nginx-params.conf, 内容如下
cat /etc/zabbix/zabbix_agentd.d/nginx-params.conf
UserParameter=nginx[*],/usr/local/zabbix-agent/scripts/nginx-check.sh “$1”
③重启 agent
service zabbix-agent restart
Server 的 Web 端
首先命令行测试下刚才 agent 好使不,确认好用之后在 web 端导入模板,之后就可以给对应主机添加监控喽。
zabbix_get -s 192.168.3.86 -p 10050 -k “nginx[reading]”
0
登录 Zabbix3.0 的 web 界面,一次选择 Configuration > Templates,在主界面的右上角有个 Import 按钮,用来导入模板。

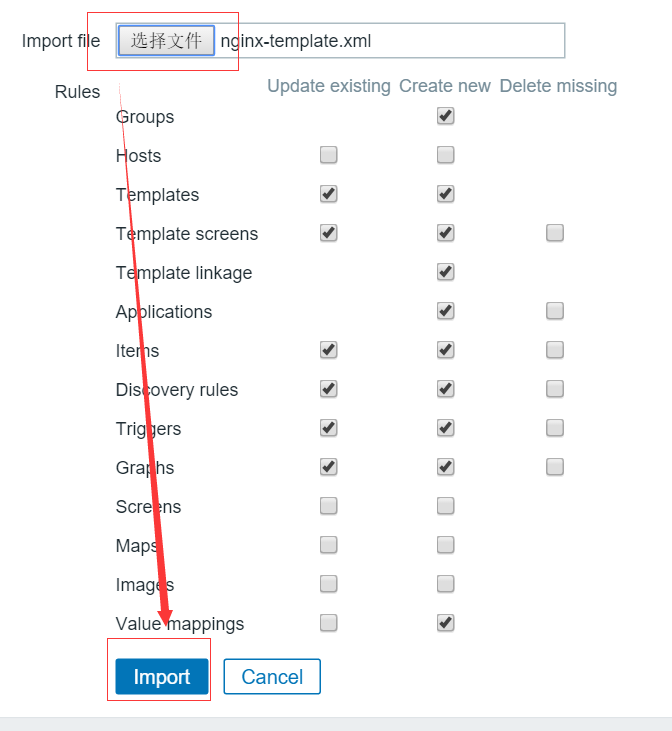
模板文件比较长留一个下载地址 https://github.com/jizhang/zabbix-templates/blob/master/nginx/nginx-template.xml
导入之后就可以给主机添加监控啦。
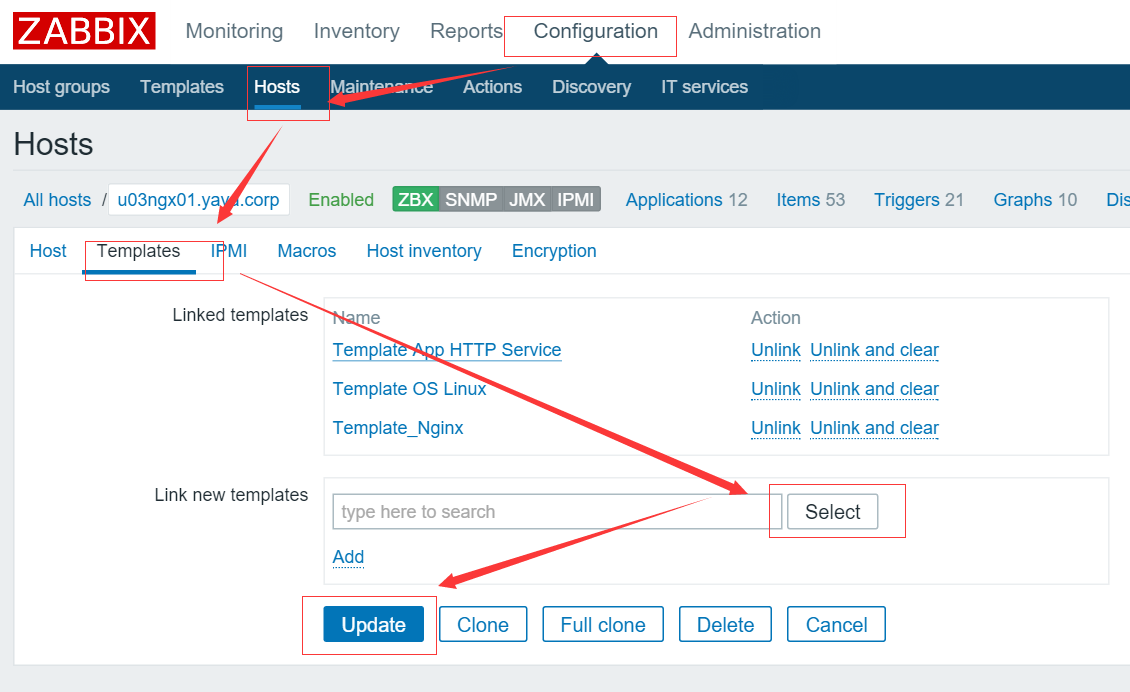
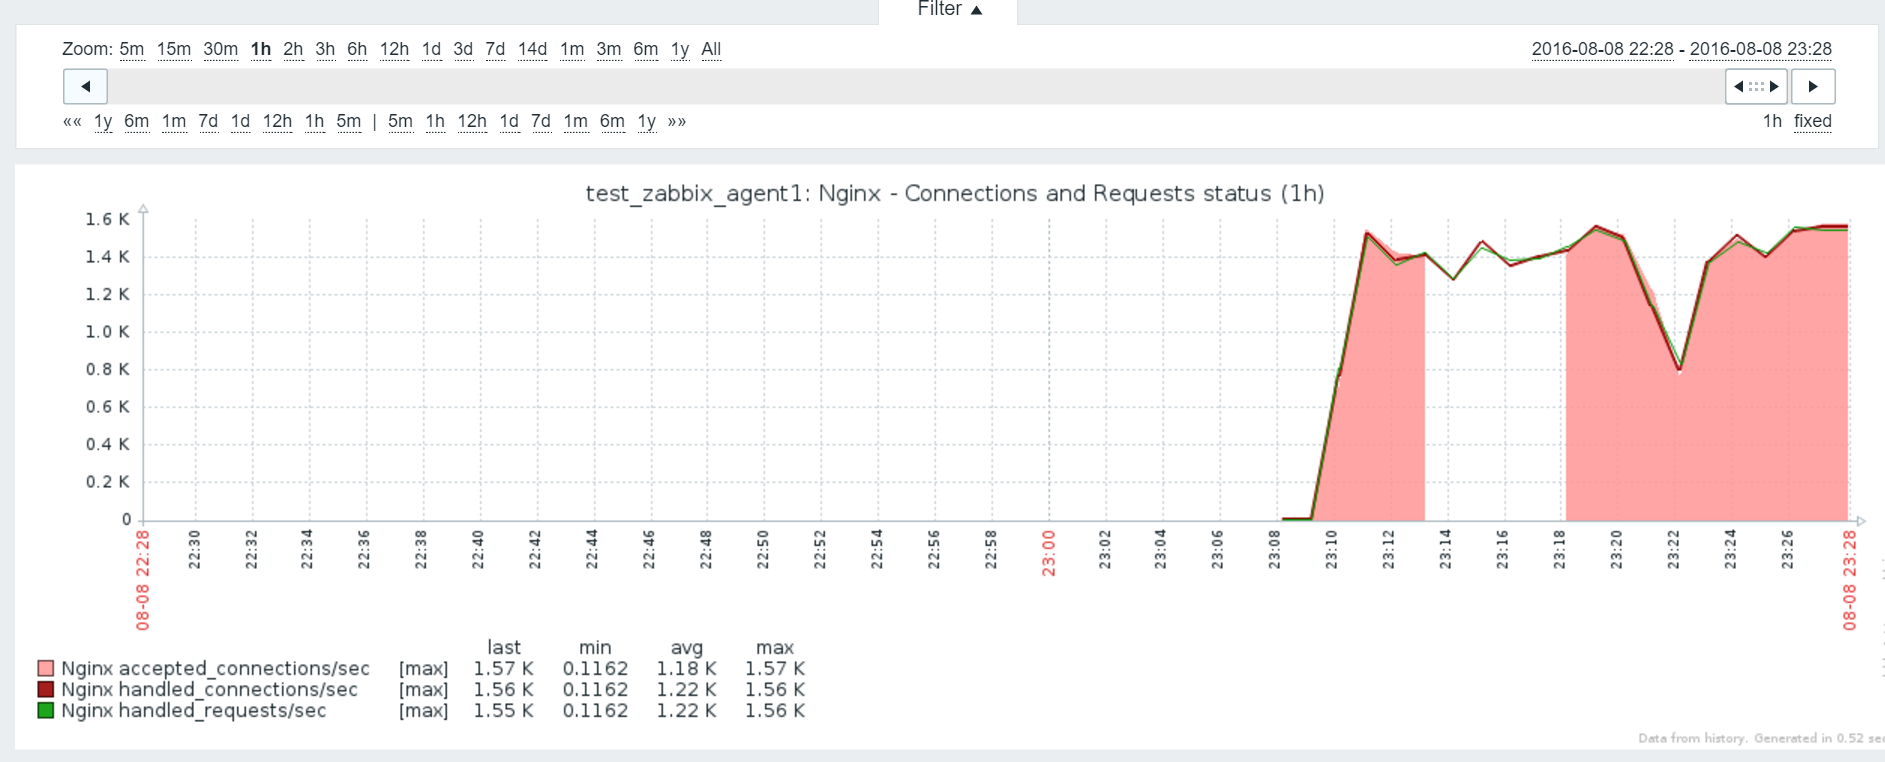
为了能快速出图,可以配合压力测试
ab -c 10 -n 100000 http://192.168.3.86:80/
Zabbix 自动发现(Discovery)功能使用
随着监控主机不断增多,有的时候需要添加一批机器,特别是刚用 zabbix 的运维人员需要将公司的所有服务器添加到 zabbix,如果使用传统办法去单个添加设备、分组、项目、图像….. 结果应该是让人吐的结果。
鉴于这个问题我们可以好好利用下 Zabbix 的一个发现 (Discovery) 模块,进而来实现自动刚发现主机、自动将主机添加到主机组、自动加载模板、自动创建项目(item)、自动创建图像,下面我们来看看这个模块如何使用。
一、Zabbix 创建发现规则创建发现规则 Configuration —- discovery —- Create discovery rule

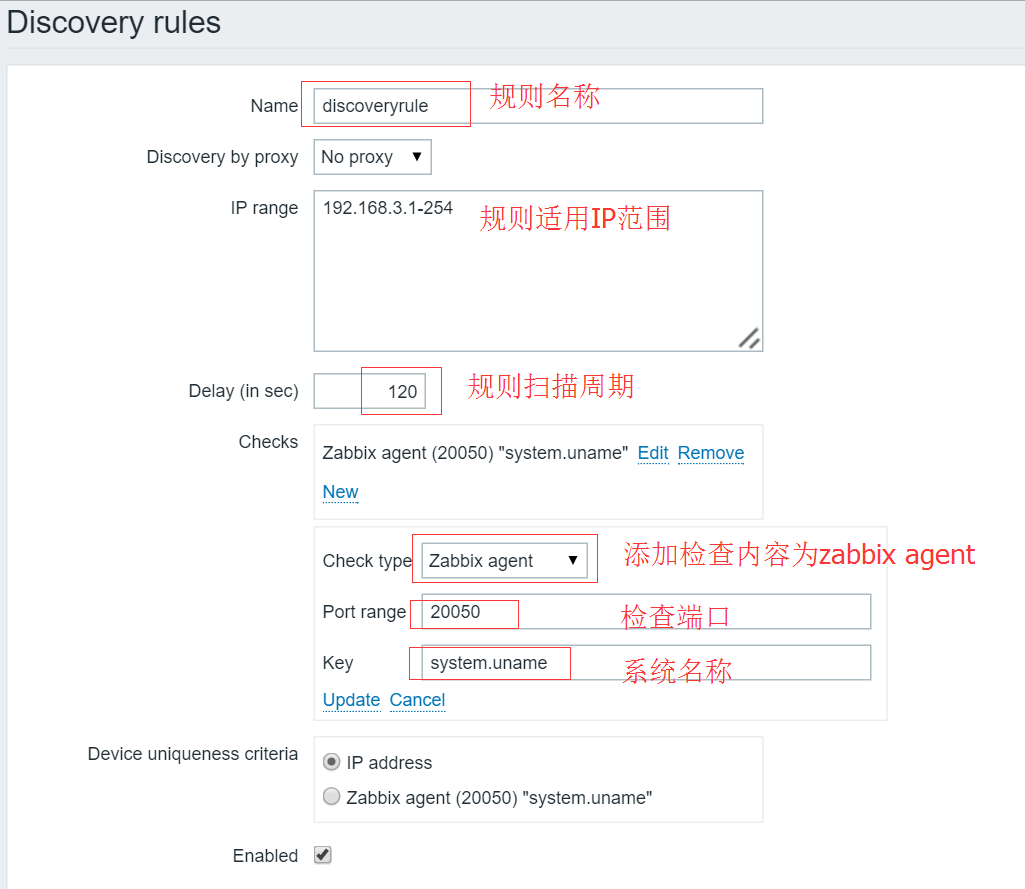
配置基本信息 配置 Checks 添加完 checks 之后 点击最下面的 add 添加保存即可
OK 规则已经创建完毕了
下面开始让他自动加入到组自动创建图形吧
二、主机自动加入主机组并关联模板
上面我们了解了如何自动发现主机,那么发现主机之后我们要做什么呢?
将主机加入主机组、并关联相应的模板!这样一整个流程就完善了,那么如何做呢?我们上面已经发现了主机 接下来要对主机做操作
所以需要一个 action(动作)来执行一些列的操作,下面我们来看具体操作。
2.1、为 discovery(发现)创建 action(动作)Configuration —- Actions —- Event source(选择 Discovery) —- Create action

2.1.1、输入 Action 名字
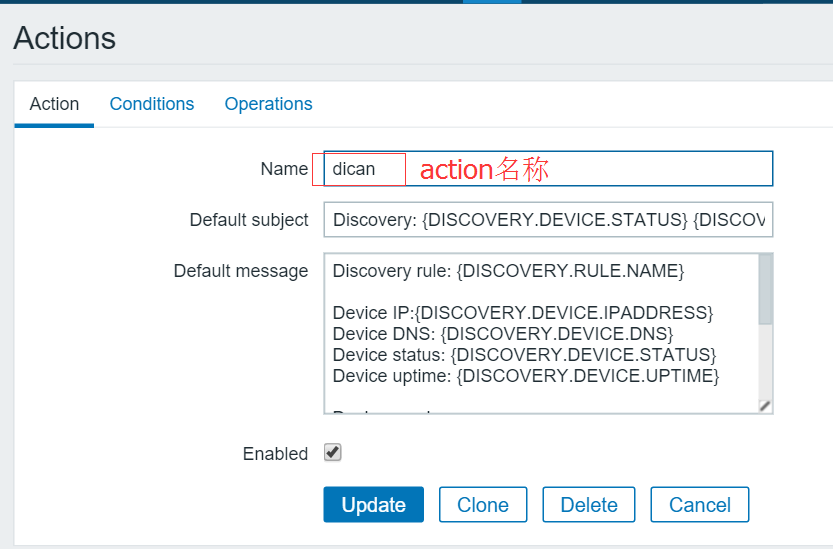
2.1.2、添加触发 Action 的条件 这里添加了三个条件 分别是“ip 地址范围”、“服务类型”和“Discovery 状态”
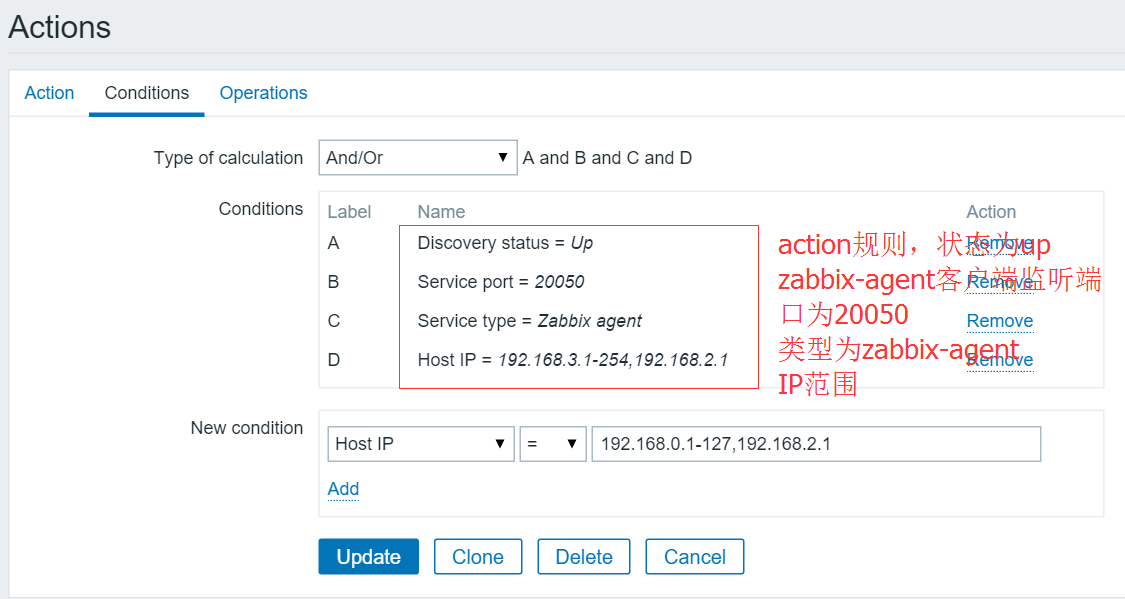
2.2、创建操作 2.2.1、“Add host”添加主机
“Add to host group”将主机添加到主机组、选择要添加到的主机组
“Link to template”链接到模板、选择相应的模板 这里我定义了 发现主机就“添加主机(Add host)”并“添加到主机组(Add to host groups)”、“链接到相应的模板(Link to template)”
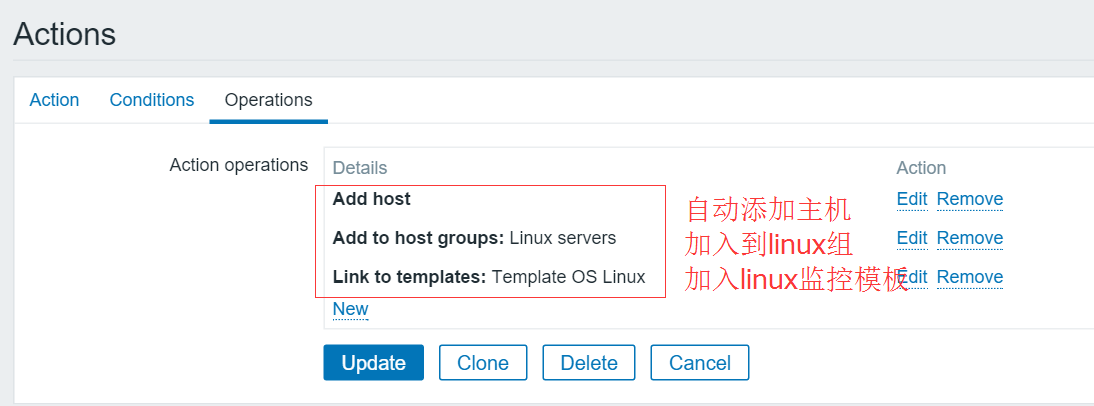
点击“Add”添加 添加完成之后效果如下 Ok 至此发现主机、添加主机并将主机添加到主机组 链接模板 全部完毕看看效果吧 Monitoring —- Discovery —- 选择 自定义的发现规则下面是我定义的一个发现规则的效果 如图是发现的主机 查看主机以及主机相关的图像

自动发现规则还可以针对网段:
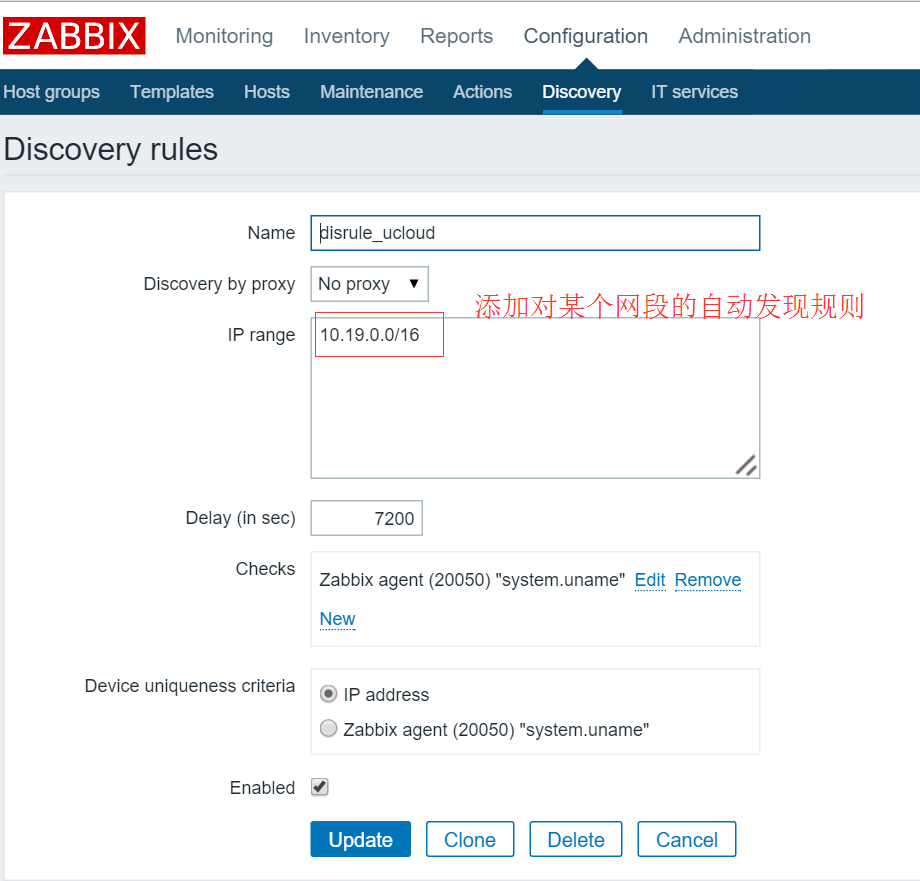
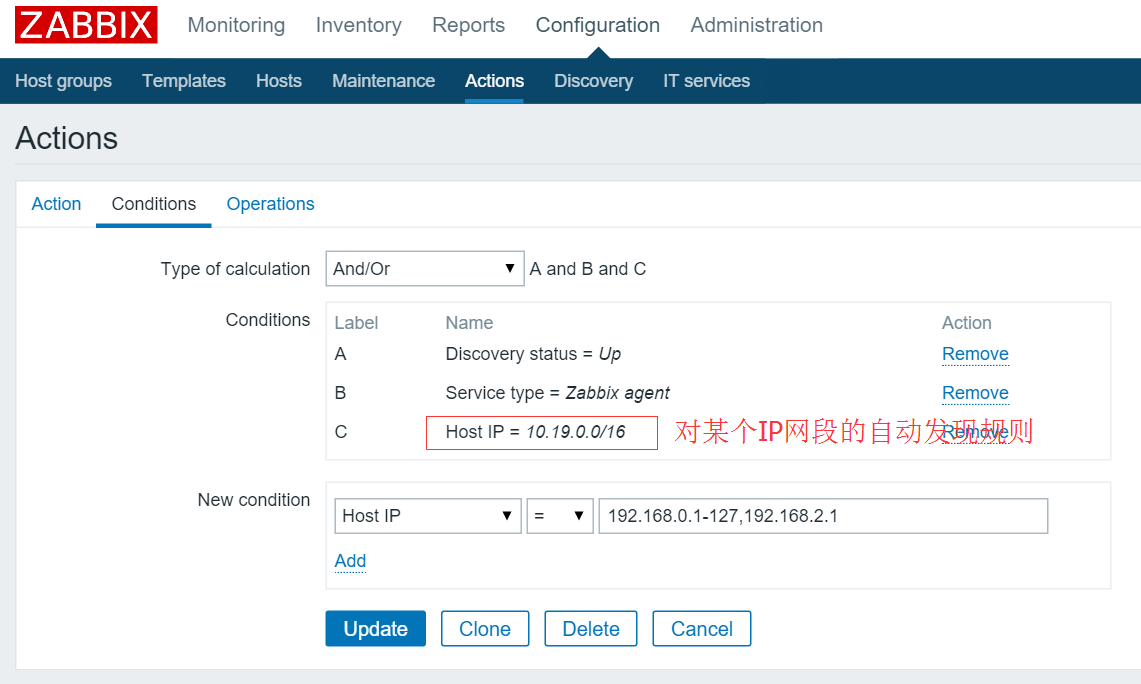
在 Ubuntu os 上安装 agent,使用如下命令:
wget http://mirrors.aliyun.com/zabbix/zabbix/3.0/ubuntu/pool/main/z/zabbix-release/zabbix-release_3.0-1%2btrusty_all.deb
dpkg -i zabbix-release_3.0-1+trusty_all.deb
sudo apt-get -y install zabbix-agent
修改配置,可以直接在命令行执行:
# 定义服务器地址
ZABBIX_SERVERIP=zabbix.chinasoft.com
# 修改服务器地址
sed -i “s#Server=127.0.0.1#Server=$ZABBIX_SERVERIP#g” /etc/zabbix/zabbix_agentd.conf
sed -i “s#ServerActive=127.0.0.1#ServerActive=$ZABBIX_SERVERIP#g” /etc/zabbix/zabbix_agentd.conf
# 修改本机 hostname
sed -i “s#Hostname=Zabbix server#Hostname=`hostname`#g” /etc/zabbix/zabbix_agentd.conf
# 修改本机 zabbix-agent 监听端口
sed -i “s/# ListenPort=10050/ListenPort=20050/g” /etc/zabbix/zabbix_agentd.conf
重启服务
sudo service zabbix-agent restart
原理:
netstat -an|awk ‘/^tcp/{++S[$NF]}END{for(a in S) print a,S[a]}’
TIME_WAIT 79
ESTABLISHED 6
LISTEN 3
可以使用 man netstat 查看 TCP 的各种状态信息描述
ESTABLISHED socket 已经建立连接
CLOSED socket 没有被使用,无连接
CLOSING 服务器端和客户端都同时关闭连接
CLOSE_WAIT 等待关闭连接
TIME_WAIT 表示收到了对方的 FIN 报文,并发送出了 ACK 报文,等待 2MSL 后就可回到 CLOSED 状态
LAST_ACK 远端关闭,当前 socket 被动关闭后发送 FIN 报文,等待对方 ACK 报文
LISTEN 监听状态
SYN_RECV 接收到 SYN 报文
SYN_SENT 已经发送 SYN 报文
FIN_WAIT1 The socket is closed, and the connection is shutting down
FIN_WAIT2 Connection is closed, and the socket is waiting for a shutdown from the remote end.
2. 在需要被监控的 zabbix-agent 端添加脚本编写
创建文件夹
mkdir -p /usr/local/zabbix-agent/scripts/
mkdir -p /etc/zabbix/zabbix_agentd.d/
vim /usr/local/zabbix-agent/scripts/tcp_conn_status.sh
#!/bin/bash
#this script is used to get tcp and udp connetion status
#tcp status
metric=$1
tmp_file=/tmp/tcp_status.txt
/bin/netstat -an|awk ‘/^tcp/{++S[$NF]}END{for(a in S) print a,S[a]}’ > $tmp_file
case $metric in
closed)
output=$(awk ‘/CLOSED/{print $2}’ $tmp_file)
if [“$output” == “”];then
echo 0
else
echo $output
fi
;;
listen)
output=$(awk ‘/LISTEN/{print $2}’ $tmp_file)
if [“$output” == “”];then
echo 0
else
echo $output
fi
;;
synrecv)
output=$(awk ‘/SYN_RECV/{print $2}’ $tmp_file)
if [“$output” == “”];then
echo 0
else
echo $output
fi
;;
synsent)
output=$(awk ‘/SYN_SENT/{print $2}’ $tmp_file)
if [“$output” == “”];then
echo 0
else
echo $output
fi
;;
established)
output=$(awk ‘/ESTABLISHED/{print $2}’ $tmp_file)
if [“$output” == “”];then
echo 0
else
echo $output
fi
;;
timewait)
output=$(awk ‘/TIME_WAIT/{print $2}’ $tmp_file)
if [“$output” == “”];then
echo 0
else
echo $output
fi
;;
closing)
output=$(awk ‘/CLOSING/{print $2}’ $tmp_file)
if [“$output” == “”];then
echo 0
else
echo $output
fi
;;
closewait)
output=$(awk ‘/CLOSE_WAIT/{print $2}’ $tmp_file)
if [“$output” == “”];then
echo 0
else
echo $output
fi
;;
lastack)
output=$(awk ‘/LAST_ACK/{print $2}’ $tmp_file)
if [“$output” == “”];then
echo 0
else
echo $output
fi
;;
finwait1)
output=$(awk ‘/FIN_WAIT1/{print $2}’ $tmp_file)
if [“$output” == “”];then
echo 0
else
echo $output
fi
;;
finwait2)
output=$(awk ‘/FIN_WAIT2/{print $2}’ $tmp_file)
if [“$output” == “”];then
echo 0
else
echo $output
fi
;;
*)
echo -e “\e[033mUsage: sh $0 [closed|closing|closewait|synrecv|synsent|finwait1|finwait2|listen|established|lastack|timewait]\e[0m”
esac
赋予脚本执行权限
chmod o+x /usr/local/zabbix-agent/scripts/tcp_conn_status.sh
3.agent 的配置文件 /etc/zabbix/zabbix_agentd.conf 中定义了其他 key 的包含目录 Include=/etc/zabbix/zabbix_agentd.d/, 接着在 /etc/zabbix/zabbix_agentd.d/ 目录新建一个文件 tcp-status-params.conf, 内容如下
vim /etc/zabbix/zabbix_agentd.d/tcp-status-params.conf
UserParameter=tcp.status[*],/usr/local/zabbix-agent/scripts/tcp_conn_status.sh $1
重启 agent
service zabbix-agent restart
4.zabbix-master 服务端测试
zabbix_get -s 192.168.3.86 -p 10050 -k “tcp.status[listen]”
13
5.zabbix web 端配置:
登录 Zabbix3.0 的 web 界面,一次选择 Configuration > Templates,在主界面的右上角有个 Import 按钮,用来导入模板

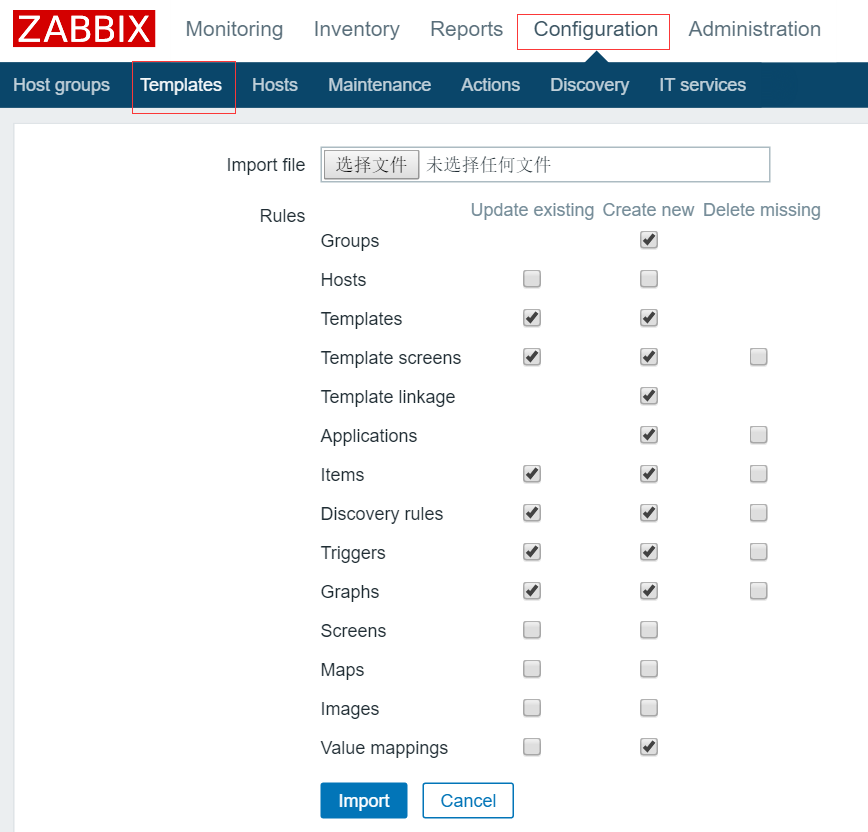
zabbix-tcp-status.xml
| <zabbix_export> | |
| <version>2.0</version> | |
| <date>2014-12-04T09:41:57Z</date> | |
| <groups> | |
| <group> | |
| <name>Templates</name> | |
| </group> | |
| </groups> | |
| <templates> | |
| <template> | |
| <template>Template TCP Connection Status</template> | |
| <name>Template TCP Connection Status</name> | |
| <groups> | |
| <group> | |
| <name>Templates</name> | |
| </group> | |
| </groups> | |
| <applications> | |
| <application> | |
| <name>TCP Status</name> | |
| </application> | |
| </applications> | |
| <items> | |
| <item> | |
| <name>CLOSED</name> | |
| <type>0</type> | |
| <snmp_community/> | |
| <multiplier>0</multiplier> | |
| <snmp_oid/> | |
| <key>tcp.status[closed]</key> | |
| <delay>60</delay> | |
| <history>90</history> | |
| <trends>365</trends> | |
| <status>0</status> | |
| <value_type>3</value_type> | |
| <allowed_hosts/> | |
| <units/> | |
| <delta>0</delta> | |
| <snmpv3_contextname/> | |
| <snmpv3_securityname/> | |
| <snmpv3_securitylevel>0</snmpv3_securitylevel> | |
| <snmpv3_authprotocol>0</snmpv3_authprotocol> | |
| <snmpv3_authpassphrase/> | |
| <snmpv3_privprotocol>0</snmpv3_privprotocol> | |
| <snmpv3_privpassphrase/> | |
| <formula>1</formula> | |
| <delay_flex/> | |
| <params/> | |
| <ipmi_sensor/> | |
| <data_type>0</data_type> | |
| <authtype>0</authtype> | |
| <username/> | |
| <password/> | |
| <publickey/> | |
| <privatekey/> | |
| <port/> | |
| <description/> | |
| <inventory_link>0</inventory_link> | |
| <applications> | |
| <application> | |
| <name>TCP Status</name> | |
| </application> | |
| </applications> | |
| <valuemap/> | |
| </item> | |
| <item> | |
| <name>CLOSE_WAIT</name> | |
| <type>0</type> | |
| <snmp_community/> | |
| <multiplier>0</multiplier> | |
| <snmp_oid/> | |
| <key>tcp.status[closewait]</key> | |
| <delay>60</delay> | |
| <history>90</history> | |
| <trends>365</trends> | |
| <status>0</status> | |
| <value_type>3</value_type> | |
| <allowed_hosts/> | |
| <units/> | |
| <delta>0</delta> | |
| <snmpv3_contextname/> | |
| <snmpv3_securityname/> | |
| <snmpv3_securitylevel>0</snmpv3_securitylevel> | |
| <snmpv3_authprotocol>0</snmpv3_authprotocol> | |
| <snmpv3_authpassphrase/> | |
| <snmpv3_privprotocol>0</snmpv3_privprotocol> | |
| <snmpv3_privpassphrase/> | |
| <formula>1</formula> | |
| <delay_flex/> | |
| <params/> | |
| <ipmi_sensor/> | |
| <data_type>0</data_type> | |
| <authtype>0</authtype> | |
| <username/> | |
| <password/> | |
| <publickey/> | |
| <privatekey/> | |
| <port/> | |
| <description/> | |
| <inventory_link>0</inventory_link> | |
| <applications> | |
| <application> | |
| <name>TCP Status</name> | |
| </application> | |
| </applications> | |
| <valuemap/> | |
| </item> | |
| <item> | |
| <name>CLOSING</name> | |
| <type>0</type> | |
| <snmp_community/> | |
| <multiplier>0</multiplier> | |
| <snmp_oid/> | |
| <key>tcp.status[closing]</key> | |
| <delay>60</delay> | |
| <history>90</history> | |
| <trends>365</trends> | |
| <status>0</status> | |
| <value_type>3</value_type> | |
| <allowed_hosts/> | |
| <units/> | |
| <delta>0</delta> | |
| <snmpv3_contextname/> | |
| <snmpv3_securityname/> | |
| <snmpv3_securitylevel>0</snmpv3_securitylevel> | |
| <snmpv3_authprotocol>0</snmpv3_authprotocol> | |
| <snmpv3_authpassphrase/> | |
| <snmpv3_privprotocol>0</snmpv3_privprotocol> | |
| <snmpv3_privpassphrase/> | |
| <formula>1</formula> | |
| <delay_flex/> | |
| <params/> | |
| <ipmi_sensor/> | |
| <data_type>0</data_type> | |
| <authtype>0</authtype> | |
| <username/> | |
| <password/> | |
| <publickey/> | |
| <privatekey/> | |
| <port/> | |
| <description/> | |
| <inventory_link>0</inventory_link> | |
| <applications> | |
| <application> | |
| <name>TCP Status</name> | |
| </application> | |
| </applications> | |
| <valuemap/> | |
| </item> | |
| <item> | |
| <name>ESTABLISHED</name> | |
| <type>0</type> | |
| <snmp_community/> | |
| <multiplier>0</multiplier> | |
| <snmp_oid/> | |
| <key>tcp.status[established]</key> | |
| <delay>60</delay> | |
| <history>90</history> | |
| <trends>365</trends> | |
| <status>0</status> | |
| <value_type>3</value_type> | |
| <allowed_hosts/> | |
| <units/> | |
| <delta>0</delta> | |
| <snmpv3_contextname/> | |
| <snmpv3_securityname/> | |
| <snmpv3_securitylevel>0</snmpv3_securitylevel> | |
| <snmpv3_authprotocol>0</snmpv3_authprotocol> | |
| <snmpv3_authpassphrase/> | |
| <snmpv3_privprotocol>0</snmpv3_privprotocol> | |
| <snmpv3_privpassphrase/> | |
| <formula>1</formula> | |
| <delay_flex/> | |
| <params/> | |
| <ipmi_sensor/> | |
| <data_type>0</data_type> | |
| <authtype>0</authtype> | |
| <username/> | |
| <password/> | |
| <publickey/> | |
| <privatekey/> | |
| <port/> | |
| <description/> | |
| <inventory_link>0</inventory_link> | |
| <applications> | |
| <application> | |
| <name>TCP Status</name> | |
| </application> | |
| </applications> | |
| <valuemap/> | |
| </item> | |
| <item> | |
| <name>FIN_WAIT1</name> | |
| <type>0</type> | |
| <snmp_community/> | |
| <multiplier>0</multiplier> | |
| <snmp_oid/> | |
| <key>tcp.status[finwait1]</key> | |
| <delay>60</delay> | |
| <history>90</history> | |
| <trends>365</trends> | |
| <status>0</status> | |
| <value_type>3</value_type> | |
| <allowed_hosts/> | |
| <units/> | |
| <delta>0</delta> | |
| <snmpv3_contextname/> | |
| <snmpv3_securityname/> | |
| <snmpv3_securitylevel>0</snmpv3_securitylevel> | |
| <snmpv3_authprotocol>0</snmpv3_authprotocol> | |
| <snmpv3_authpassphrase/> | |
| <snmpv3_privprotocol>0</snmpv3_privprotocol> | |
| <snmpv3_privpassphrase/> | |
| <formula>1</formula> | |
| <delay_flex/> | |
| <params/> | |
| <ipmi_sensor/> | |
| <data_type>0</data_type> | |
| <authtype>0</authtype> | |
| <username/> | |
| <password/> | |
| <publickey/> | |
| <privatekey/> | |
| <port/> | |
| <description/> | |
| <inventory_link>0</inventory_link> | |
| <applications> | |
| <application> | |
| <name>TCP Status</name> | |
| </application> | |
| </applications> | |
| <valuemap/> | |
| </item> | |
| <item> | |
| <name>FIN_WAIT2</name> | |
| <type>0</type> | |
| <snmp_community/> | |
| <multiplier>0</multiplier> | |
| <snmp_oid/> | |
| <key>tcp.status[finwait2]</key> | |
| <delay>60</delay> | |
| <history>90</history> | |
| <trends>365</trends> | |
| <status>0</status> | |
| <value_type>3</value_type> | |
| <allowed_hosts/> | |
| <units/> | |
| <delta>0</delta> | |
| <snmpv3_contextname/> | |
| <snmpv3_securityname/> | |
| <snmpv3_securitylevel>0</snmpv3_securitylevel> | |
| <snmpv3_authprotocol>0</snmpv3_authprotocol> | |
| <snmpv3_authpassphrase/> | |
| <snmpv3_privprotocol>0</snmpv3_privprotocol> | |
| <snmpv3_privpassphrase/> | |
| <formula>1</formula> | |
| <delay_flex/> | |
| <params/> | |
| <ipmi_sensor/> | |
| <data_type>0</data_type> | |
| <authtype>0</authtype> | |
| <username/> | |
| <password/> | |
| <publickey/> | |
| <privatekey/> | |
| <port/> | |
| <description/> | |
| <inventory_link>0</inventory_link> | |
| <applications> | |
| <application> | |
| <name>TCP Status</name> | |
| </application> | |
| </applications> | |
| <valuemap/> | |
| </item> | |
| <item> | |
| <name>LAST_ACK</name> | |
| <type>0</type> | |
| <snmp_community/> | |
| <multiplier>0</multiplier> | |
| <snmp_oid/> | |
| <key>tcp.status[lastack]</key> | |
| <delay>60</delay> | |
| <history>90</history> | |
| <trends>365</trends> | |
| <status>0</status> | |
| <value_type>3</value_type> | |
| <allowed_hosts/> | |
| <units/> | |
| <delta>0</delta> | |
| <snmpv3_contextname/> | |
| <snmpv3_securityname/> | |
| <snmpv3_securitylevel>0</snmpv3_securitylevel> | |
| <snmpv3_authprotocol>0</snmpv3_authprotocol> | |
| <snmpv3_authpassphrase/> | |
| <snmpv3_privprotocol>0</snmpv3_privprotocol> | |
| <snmpv3_privpassphrase/> | |
| <formula>1</formula> | |
| <delay_flex/> | |
| <params/> | |
| <ipmi_sensor/> | |
| <data_type>0</data_type> | |
| <authtype>0</authtype> | |
| <username/> | |
| <password/> | |
| <publickey/> | |
| <privatekey/> | |
| <port/> | |
| <description/> | |
| <inventory_link>0</inventory_link> | |
| <applications> | |
| <application> | |
| <name>TCP Status</name> | |
| </application> | |
| </applications> | |
| <valuemap/> | |
| </item> | |
| <item> | |
| <name>LISTEN</name> | |
| <type>0</type> | |
| <snmp_community/> | |
| <multiplier>0</multiplier> | |
| <snmp_oid/> | |
| <key>tcp.status[listen]</key> | |
| <delay>60</delay> | |
| <history>90</history> | |
| <trends>365</trends> | |
| <status>0</status> | |
| <value_type>3</value_type> | |
| <allowed_hosts/> | |
| <units/> | |
| <delta>0</delta> | |
| <snmpv3_contextname/> | |
| <snmpv3_securityname/> | |
| <snmpv3_securitylevel>0</snmpv3_securitylevel> | |
| <snmpv3_authprotocol>0</snmpv3_authprotocol> | |
| <snmpv3_authpassphrase/> | |
| <snmpv3_privprotocol>0</snmpv3_privprotocol> | |
| <snmpv3_privpassphrase/> | |
| <formula>1</formula> | |
| <delay_flex/> | |
| <params/> | |
| <ipmi_sensor/> | |
| <data_type>0</data_type> | |
| <authtype>0</authtype> | |
| <username/> | |
| <password/> | |
| <publickey/> | |
| <privatekey/> | |
| <port/> | |
| <description/> | |
| <inventory_link>0</inventory_link> | |
| <applications> | |
| <application> | |
| <name>TCP Status</name> | |
| </application> | |
| </applications> | |
| <valuemap/> | |
| </item> | |
| <item> | |
| <name>SYN_RECV</name> | |
| <type>0</type> | |
| <snmp_community/> | |
| <multiplier>0</multiplier> | |
| <snmp_oid/> | |
| <key>tcp.status[synrecv]</key> | |
| <delay>60</delay> | |
| <history>90</history> | |
| <trends>365</trends> | |
| <status>0</status> | |
| <value_type>3</value_type> | |
| <allowed_hosts/> | |
| <units/> | |
| <delta>0</delta> | |
| <snmpv3_contextname/> | |
| <snmpv3_securityname/> | |
| <snmpv3_securitylevel>0</snmpv3_securitylevel> | |
| <snmpv3_authprotocol>0</snmpv3_authprotocol> | |
| <snmpv3_authpassphrase/> | |
| <snmpv3_privprotocol>0</snmpv3_privprotocol> | |
| <snmpv3_privpassphrase/> | |
| <formula>1</formula> | |
| <delay_flex/> | |
| <params/> | |
| <ipmi_sensor/> | |
| <data_type>0</data_type> | |
| <authtype>0</authtype> | |
| <username/> | |
| <password/> | |
| <publickey/> | |
| <privatekey/> | |
| <port/> | |
| <description/> | |
| <inventory_link>0</inventory_link> | |
| <applications> | |
| <application> | |
| <name>TCP Status</name> | |
| </application> | |
| </applications> | |
| <valuemap/> | |
| </item> | |
| <item> | |
| <name>SYN_SENT</name> | |
| <type>0</type> | |
| <snmp_community/> | |
| <multiplier>0</multiplier> | |
| <snmp_oid/> | |
| <key>tcp.status[synsent]</key> | |
| <delay>60</delay> | |
| <history>90</history> | |
| <trends>365</trends> | |
| <status>0</status> | |
| <value_type>3</value_type> | |
| <allowed_hosts/> | |
| <units/> | |
| <delta>0</delta> | |
| <snmpv3_contextname/> | |
| <snmpv3_securityname/> | |
| <snmpv3_securitylevel>0</snmpv3_securitylevel> | |
| <snmpv3_authprotocol>0</snmpv3_authprotocol> | |
| <snmpv3_authpassphrase/> | |
| <snmpv3_privprotocol>0</snmpv3_privprotocol> | |
| <snmpv3_privpassphrase/> | |
| <formula>1</formula> | |
| <delay_flex/> | |
| <params/> | |
| <ipmi_sensor/> | |
| <data_type>0</data_type> | |
| <authtype>0</authtype> | |
| <username/> | |
| <password/> | |
| <publickey/> | |
| <privatekey/> | |
| <port/> | |
| <description/> | |
| <inventory_link>0</inventory_link> | |
| <applications> | |
| <application> | |
| <name>TCP Status</name> | |
| </application> | |
| </applications> | |
| <valuemap/> | |
| </item> | |
| <item> | |
| <name>TIME_WAIT</name> | |
| <type>0</type> | |
| <snmp_community/> | |
| <multiplier>0</multiplier> | |
| <snmp_oid/> | |
| <key>tcp.status[timewait]</key> | |
| <delay>60</delay> | |
| <history>90</history> | |
| <trends>365</trends> | |
| <status>0</status> | |
| <value_type>3</value_type> | |
| <allowed_hosts/> | |
| <units/> | |
| <delta>0</delta> | |
| <snmpv3_contextname/> | |
| <snmpv3_securityname/> | |
| <snmpv3_securitylevel>0</snmpv3_securitylevel> | |
| <snmpv3_authprotocol>0</snmpv3_authprotocol> | |
| <snmpv3_authpassphrase/> | |
| <snmpv3_privprotocol>0</snmpv3_privprotocol> | |
| <snmpv3_privpassphrase/> | |
| <formula>1</formula> | |
| <delay_flex/> | |
| <params/> | |
| <ipmi_sensor/> | |
| <data_type>0</data_type> | |
| <authtype>0</authtype> | |
| <username/> | |
| <password/> | |
| <publickey/> | |
| <privatekey/> | |
| <port/> | |
| <description/> | |
| <inventory_link>0</inventory_link> | |
| <applications> | |
| <application> | |
| <name>TCP Status</name> | |
| </application> | |
| </applications> | |
| <valuemap/> | |
| </item> | |
| </items> | |
| <discovery_rules/> | |
| <macros/> | |
| <templates/> | |
| <screens/> | |
| </template> | |
| </templates> | |
| <triggers> | |
| <trigger> | |
| <expression>{Template TCP Connection Status:tcp.status[timewait].last()}>10000</expression> | |
| <name>There are too many TCP TIME_WAIT status</name> | |
| <url/> | |
| <status>0</status> | |
| <priority>4</priority> | |
| <description/> | |
| <type>0</type> | |
| <dependencies/> | |
| </trigger> | |
| </triggers> | |
| <graphs> | |
| <graph> | |
| <name>TCP Status</name> | |
| <width>900</width> | |
| <height>200</height> | |
| <yaxismin>0.0000</yaxismin> | |
| <yaxismax>100.0000</yaxismax> | |
| <show_work_period>1</show_work_period> | |
| <show_triggers>1</show_triggers> | |
| <type>0</type> | |
| <show_legend>1</show_legend> | |
| <show_3d>0</show_3d> | |
| <percent_left>0.0000</percent_left> | |
| <percent_right>0.0000</percent_right> | |
| <ymin_type_1>0</ymin_type_1> | |
| <ymax_type_1>0</ymax_type_1> | |
| <ymin_item_1>0</ymin_item_1> | |
| <ymax_item_1>0</ymax_item_1> | |
| <graph_items> | |
| <graph_item> | |
| <sortorder>0</sortorder> | |
| <drawtype>0</drawtype> | |
| <color>C80000</color> | |
| <yaxisside>0</yaxisside> | |
| <calc_fnc>2</calc_fnc> | |
| <type>0</type> | |
| <item> | |
| <host>Template TCP Connection Status</host> | |
| <key>tcp.status[closed]</key> | |
| </item> | |
| </graph_item> | |
| <graph_item> | |
| <sortorder>1</sortorder> | |
| <drawtype>0</drawtype> | |
| <color>00C800</color> | |
| <yaxisside>0</yaxisside> | |
| <calc_fnc>2</calc_fnc> | |
| <type>0</type> | |
| <item> | |
| <host>Template TCP Connection Status</host> | |
| <key>tcp.status[closewait]</key> | |
| </item> | |
| </graph_item> | |
| <graph_item> | |
| <sortorder>2</sortorder> | |
| <drawtype>0</drawtype> | |
| <color>0000C8</color> | |
| <yaxisside>0</yaxisside> | |
| <calc_fnc>2</calc_fnc> | |
| <type>0</type> | |
| <item> | |
| <host>Template TCP Connection Status</host> | |
| <key>tcp.status[closing]</key> | |
| </item> | |
| </graph_item> | |
| <graph_item> | |
| <sortorder>3</sortorder> | |
| <drawtype>0</drawtype> | |
| <color>C800C8</color> | |
| <yaxisside>0</yaxisside> | |
| <calc_fnc>2</calc_fnc> | |
| <type>0</type> | |
| <item> | |
| <host>Template TCP Connection Status</host> | |
| <key>tcp.status[established]</key> | |
| </item> | |
| </graph_item> | |
| <graph_item> | |
| <sortorder>4</sortorder> | |
| <drawtype>0</drawtype> | |
| <color>00C8C8</color> | |
| <yaxisside>0</yaxisside> | |
| <calc_fnc>2</calc_fnc> | |
| <type>0</type> | |
| <item> | |
| <host>Template TCP Connection Status</host> | |
| <key>tcp.status[finwait1]</key> | |
| </item> | |
| </graph_item> | |
| <graph_item> | |
| <sortorder>5</sortorder> | |
| <drawtype>0</drawtype> | |
| <color>C8C800</color> | |
| <yaxisside>0</yaxisside> | |
| <calc_fnc>2</calc_fnc> | |
| <type>0</type> | |
| <item> | |
| <host>Template TCP Connection Status</host> | |
| <key>tcp.status[finwait2]</key> | |
| </item> | |
| </graph_item> | |
| <graph_item> | |
| <sortorder>6</sortorder> | |
| <drawtype>0</drawtype> | |
| <color>C8C8C8</color> | |
| <yaxisside>0</yaxisside> | |
| <calc_fnc>2</calc_fnc> | |
| <type>0</type> | |
| <item> | |
| <host>Template TCP Connection Status</host> | |
| <key>tcp.status[lastack]</key> | |
| </item> | |
| </graph_item> | |
| <graph_item> | |
| <sortorder>7</sortorder> | |
| <drawtype>0</drawtype> | |
| <color>960000</color> | |
| <yaxisside>0</yaxisside> | |
| <calc_fnc>2</calc_fnc> | |
| <type>0</type> | |
| <item> | |
| <host>Template TCP Connection Status</host> | |
| <key>tcp.status[listen]</key> | |
| </item> | |
| </graph_item> | |
| <graph_item> | |
| <sortorder>8</sortorder> | |
| <drawtype>0</drawtype> | |
| <color>009600</color> | |
| <yaxisside>0</yaxisside> | |
| <calc_fnc>2</calc_fnc> | |
| <type>0</type> | |
| <item> | |
| <host>Template TCP Connection Status</host> | |
| <key>tcp.status[synrecv]</key> | |
| </item> | |
| </graph_item> | |
| <graph_item> | |
| <sortorder>9</sortorder> | |
| <drawtype>0</drawtype> | |
| <color>000096</color> | |
| <yaxisside>0</yaxisside> | |
| <calc_fnc>2</calc_fnc> | |
| <type>0</type> | |
| <item> | |
| <host>Template TCP Connection Status</host> | |
| <key>tcp.status[synsent]</key> | |
| </item> | |
| </graph_item> | |
| <graph_item> | |
| <sortorder>10</sortorder> | |
| <drawtype>0</drawtype> | |
| <color>960096</color> | |
| <yaxisside>0</yaxisside> | |
| <calc_fnc>2</calc_fnc> | |
| <type>0</type> | |
| <item> | |
| <host>Template TCP Connection Status</host> | |
| <key>tcp.status[timewait]</key> | |
| </item> | |
| </graph_item> | |
| </graph_items> | |
| </graph> | |
| </graphs> | |
| </zabbix_export> |
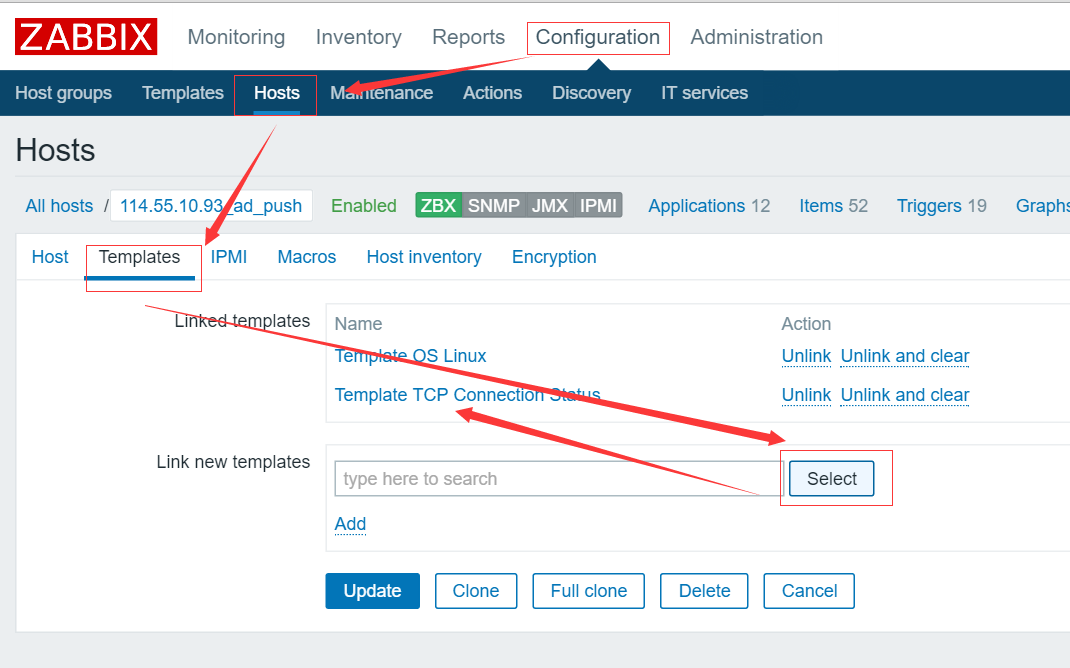
在对应主机上添加 tcp 的监控:
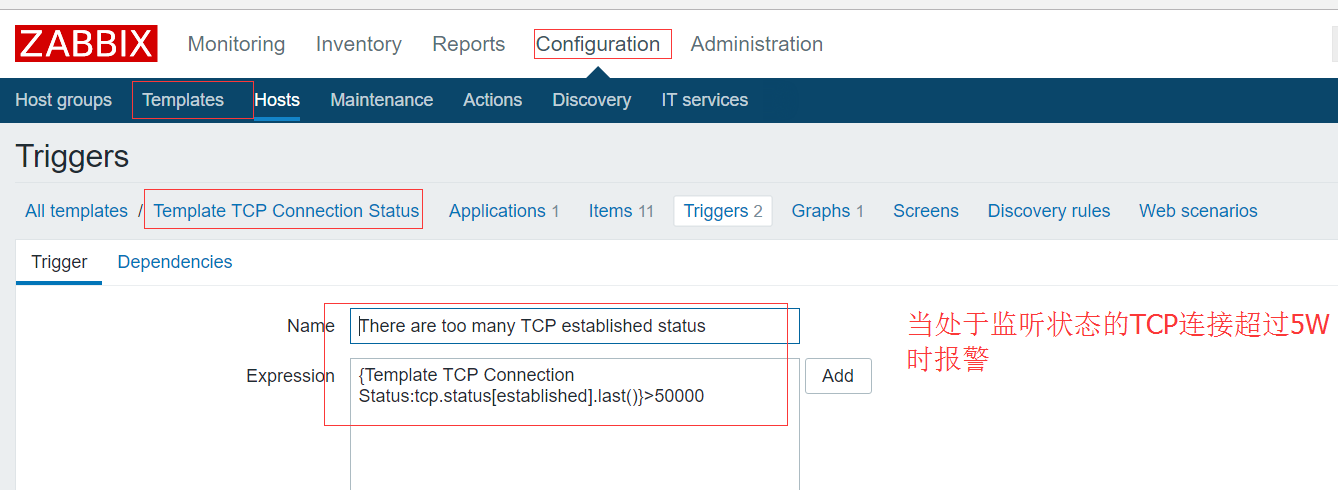
添加报警,当 tcp 连接数超过 5W 报警:
{Template TCP Connection Status:tcp.status[established].last()}>50000
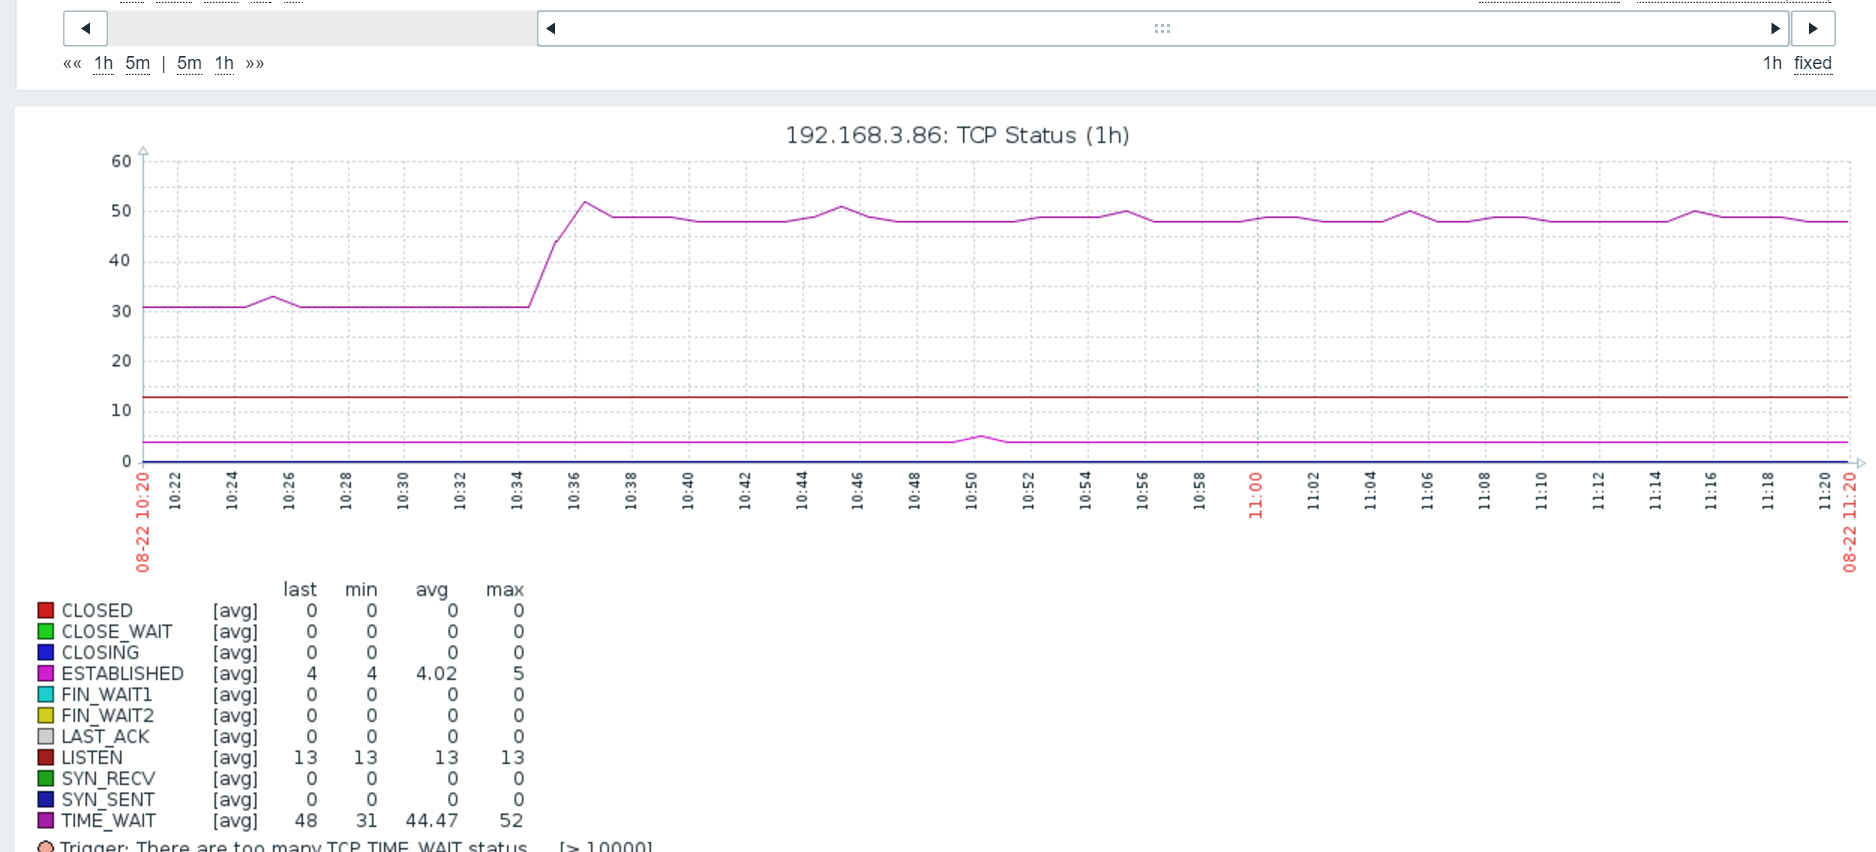
最终效果图:
后记:发现通过 netstat 监控服务器的 tcp 等连接数效率比较低,netstat 统计占用大量 cpu 带来服务器额外的压力,通过 ss 命令会更加合适,详情请看:
zabbix3.0 对 tcp 连接数和状态的监控优化 http://www.linuxidc.com/Linux/2016-11/137639.htm
通过 zabbi 做 web 监控不仅仅可以监控到站点的响应时间,还可以根据站点返回的状态码,或者响应时间做报警
1、对需要监控的主机添加 web 监控
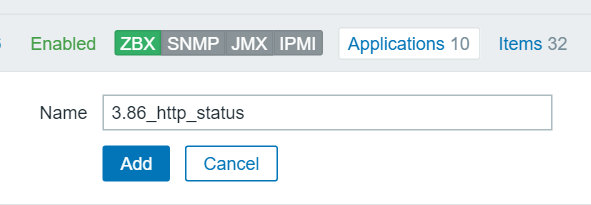
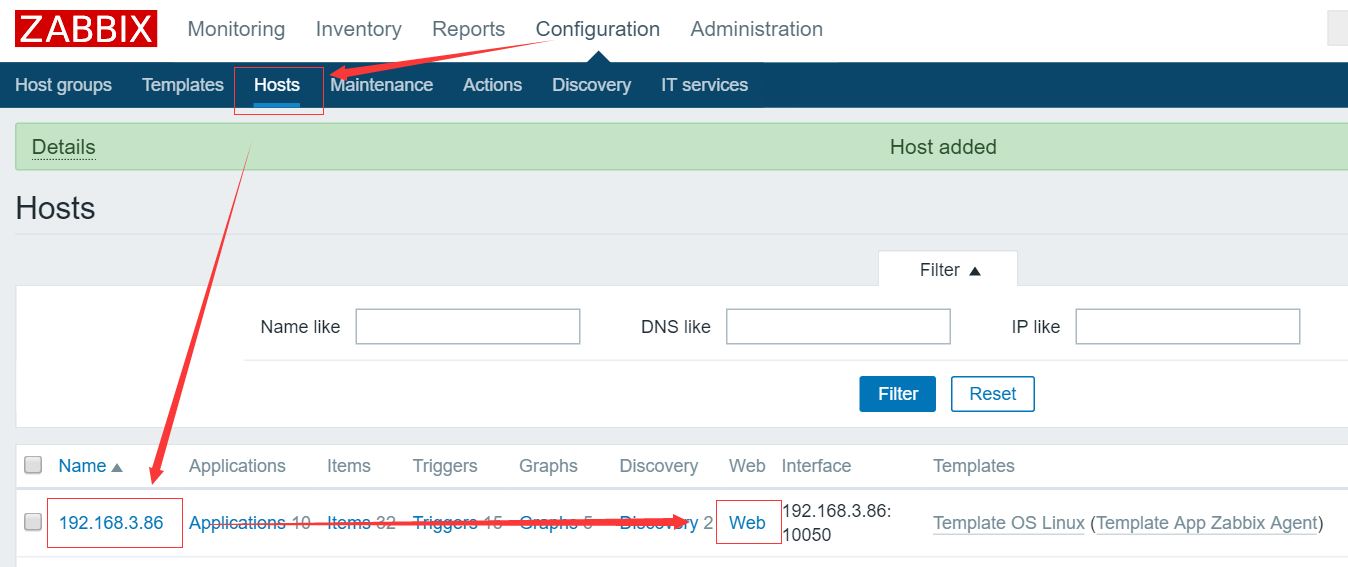
在 configuration—hosts 中打开主机列表,选择需要添加监控主机的 web,创建 application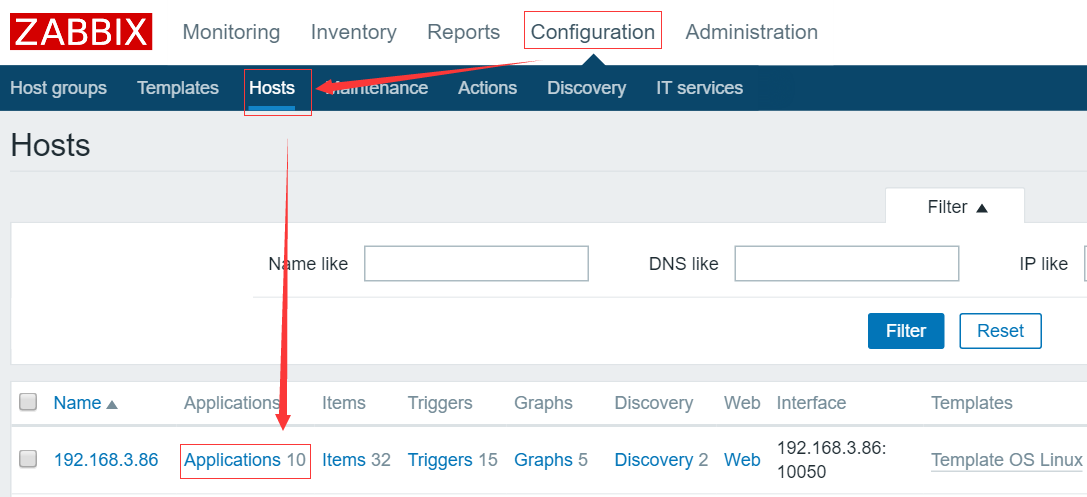
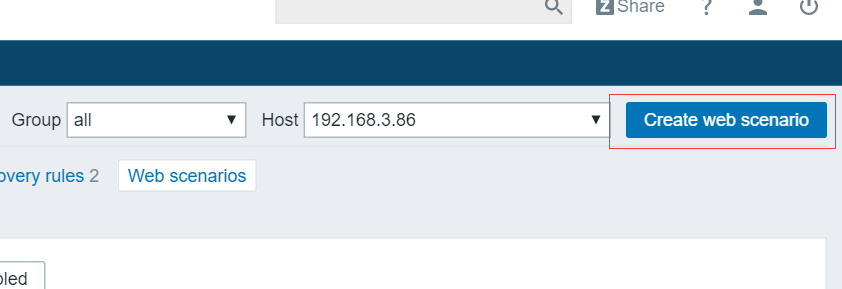
选择 web 项,再单击右上角的 Create web scenario
在 Name 中输入监控的名称,Agent 是选择测试站点的浏览器类型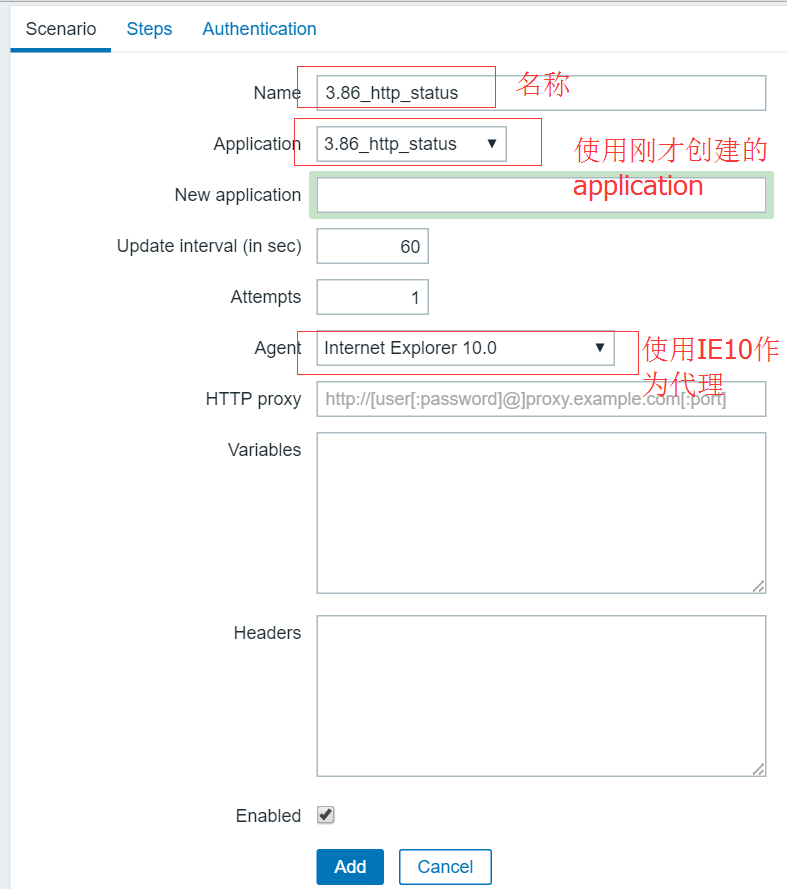
在 Steps 选项卡添加测试步骤
Name 是测试步骤的名称,URL 监控站点的真实 url,Required status colder 是监控时要求页面返回的状态码,通常设置 200
添加完成后可以在 monitor—web 看到刚才添加的监控
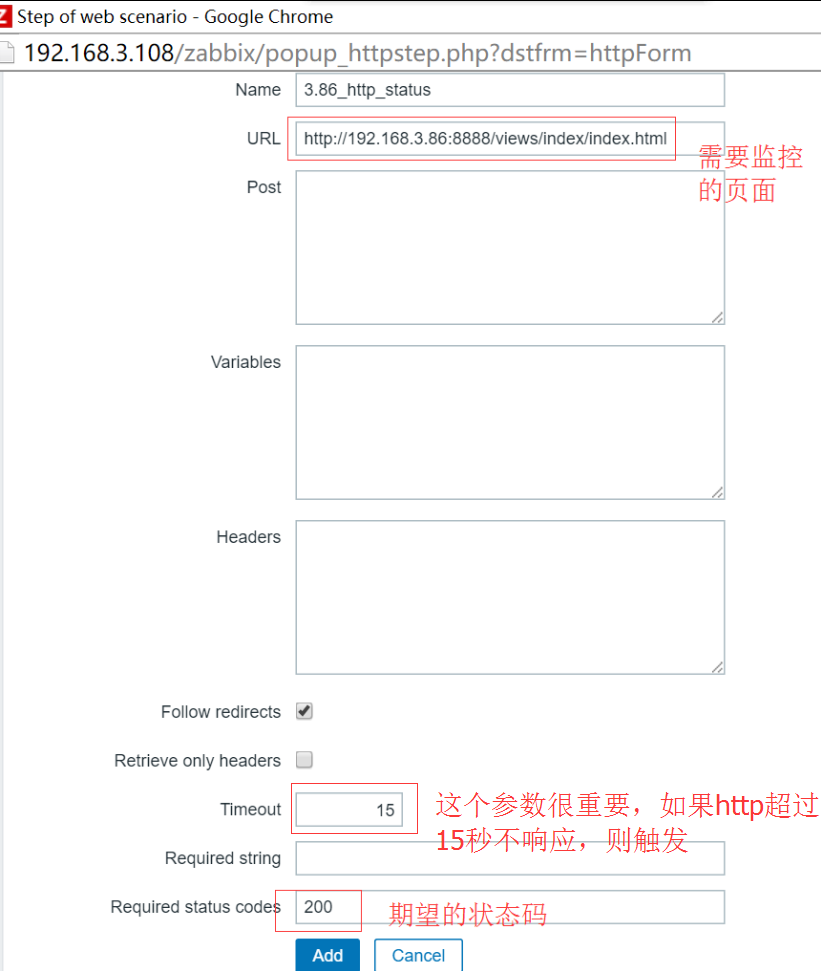

2、报警设置
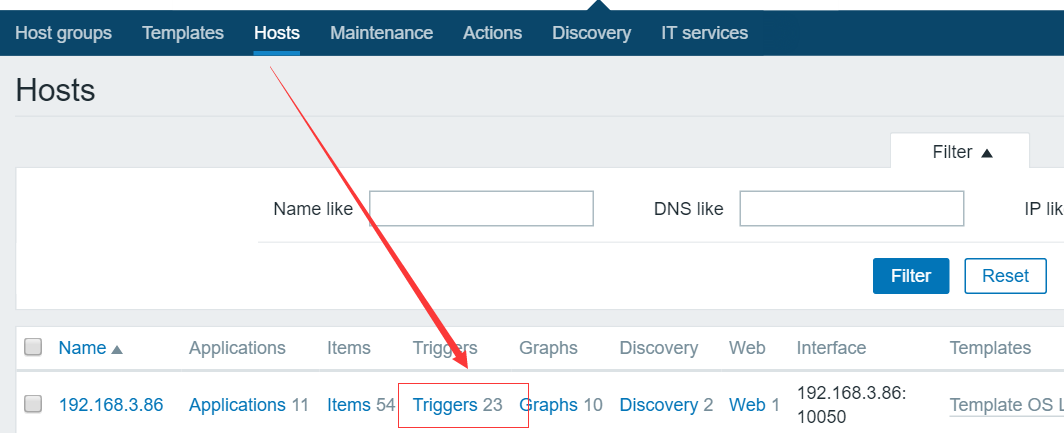
添加完 web 监控后再次打开 configuration—hosts 主机列表,选择 Triggers
点击 右上角的 create triggers
在 Name 中输入 Triggers 的名称
点击 Add
点击 Item 上的 select
在添加完 web 监控后回自动创建相应的 Keys,在添加完 web 监控后回自动创建相应的 Keys,但是要选择已经定义 web 的相应主机
在 Function 中 选择相应的表达式,这里是设置返回的状态码不等于变量 N 时触发报警,N 的值在下面设置成 200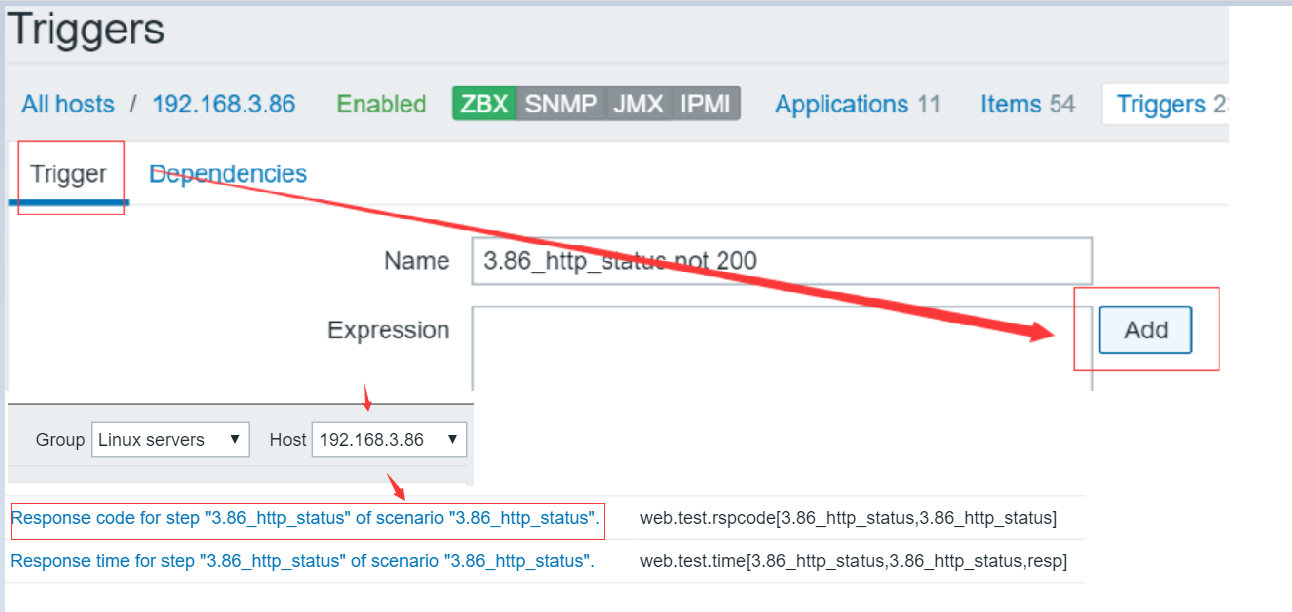
表达式:如果最近连续 4 次取到的 response_code 值不是 200,则触发报警
{192.168.3.86:web.test.rspcode[3.86_http_status,3.86_http_status].last(0)}<>200 and {192.168.3.86:web.test.rspcode[3.86_http_status,3.86_http_status].last(1)}<>200 and {192.168.3.86:web.test.rspcode[3.86_http_status,3.86_http_status].last(2)}<>200 and {192.168.3.86:web.test.rspcode[3.86_http_status,3.86_http_status].last(3)}<>200
测试,将目标机器 3.86 上的 index.html 改名为 index,即可看到触发的报警,当报警后,我们可以对目标机器进行操作,报警、触发重新启动脚本等,详见:
Zabbix3.0 实现自动触发 zabbix-agent 端 shell 脚本任务
http://www.linuxidc.com/Linux/2016-11/137638p9.htm

备注: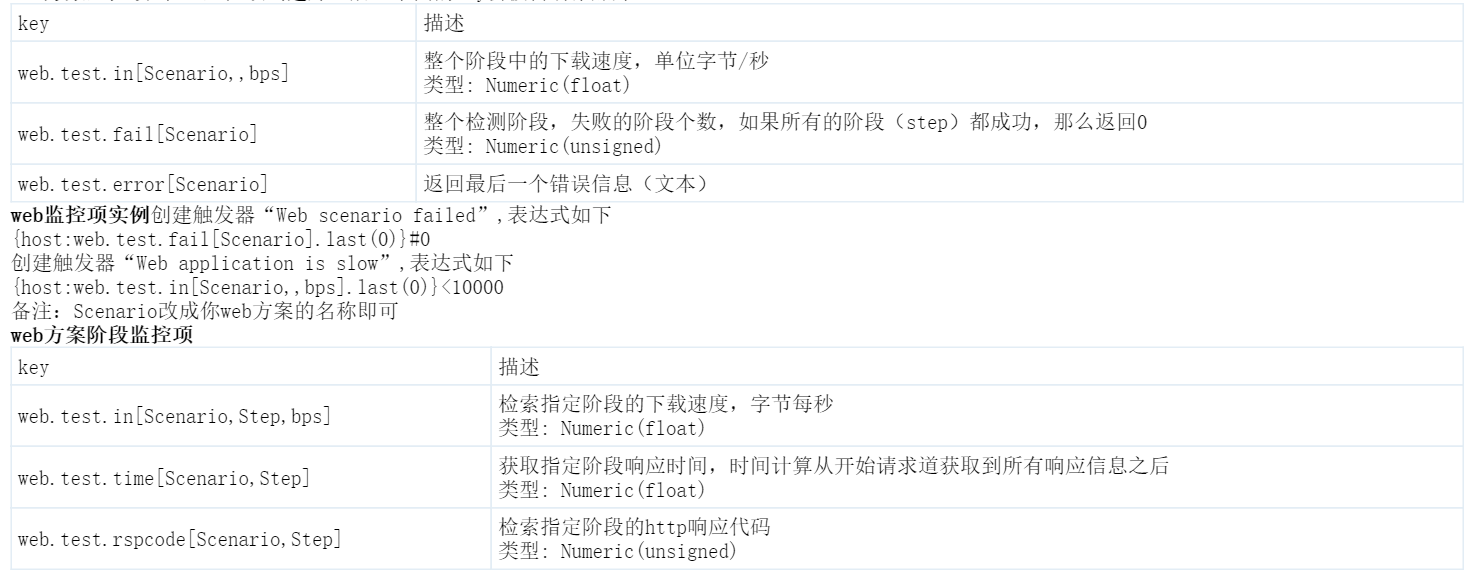
一旦我们创建好 web 监控之后,我们便可以查看 web 站点的性能状况。zabbix 一共给我们提供了 6 个 item key,实际上就三个,分别针对单个阶段和整个阶段,三个 item 分别为 web.test.in、web.test.fail、web.test.error,下面看看它的具体用法。
web 方案监控项当 web 监控项创建好之后,下面的 key 会被自动添加好
key 描述
web.test.in[Scenario,,bps] 整个阶段中的下载速度,单位字节 / 秒
类型: Numeric(float)
web.test.fail[Scenario]整个检测阶段,失败的阶段个数,如果所有的阶段(step)都成功,那么返回 0
类型: Numeric(unsigned)
web.test.error[Scenario]返回最后一个错误信息(文本)
web 监控项实例创建触发器“Web scenario failed”, 表达式如下
{host:web.test.fail[Scenario].last(0)}#0
创建触发器“Web application is slow”, 表达式如下
{host:web.test.in[Scenario,,bps].last(0)}<10000
备注:Scenario 改成你 web 方案的名称即可
web 方案阶段监控项
key 描述
web.test.in[Scenario,Step,bps] 检索指定阶段的下载速度,字节每秒
类型: Numeric(float)
web.test.time[Scenario,Step]获取指定阶段响应时间,时间计算从开始请求道获取到所有响应信息之后
类型: Numeric(float)
web.test.rspcode[Scenario,Step]检索指定阶段的 http 响应代码
类型: Numeric(unsigned)
step item 使用实例创建触发器“Zabbix GUI login is too slow”trigger, 触发器表达式如下
{zabbix:web.test.time[ZABBIX GUI,Login].last(0)}>3
说明:ZABBIX GUI 是 web 方案的名称,Login 为阶段(step)名称
web 监控项数据保留时间 web 监控历史数据数据保存 30 天,趋势数据保存 90 天,老数据将被清除
zabbix 实现自动触发远程脚本执行命令
Zabbix 触发器 (trigger) 达到阀值后会有动作 (action) 执行:发送告警信息或执行远程命令
环境
Server:基于 CentOS6.5 final x86_64
Zabbix:zabbix-3.0.4 server/agent
注意事项
1. 远程执行命令是 server 端向 agent 端执行,不支持主动模式的 agent;
2. 不支持代理模式;
3.zabbix 用户必须对命令具有执行权限,可以使用 sudo 赋予 root 权限(配置 sudo 无密码方式);
4. 远程命令只是执行,执行成功与否并不检测并确认,可在”Monitoring–>Events”中查看 action 执行时,或在”Reports–>Action log”中查看远程命令是否执行成功(成功为”Executed”)。
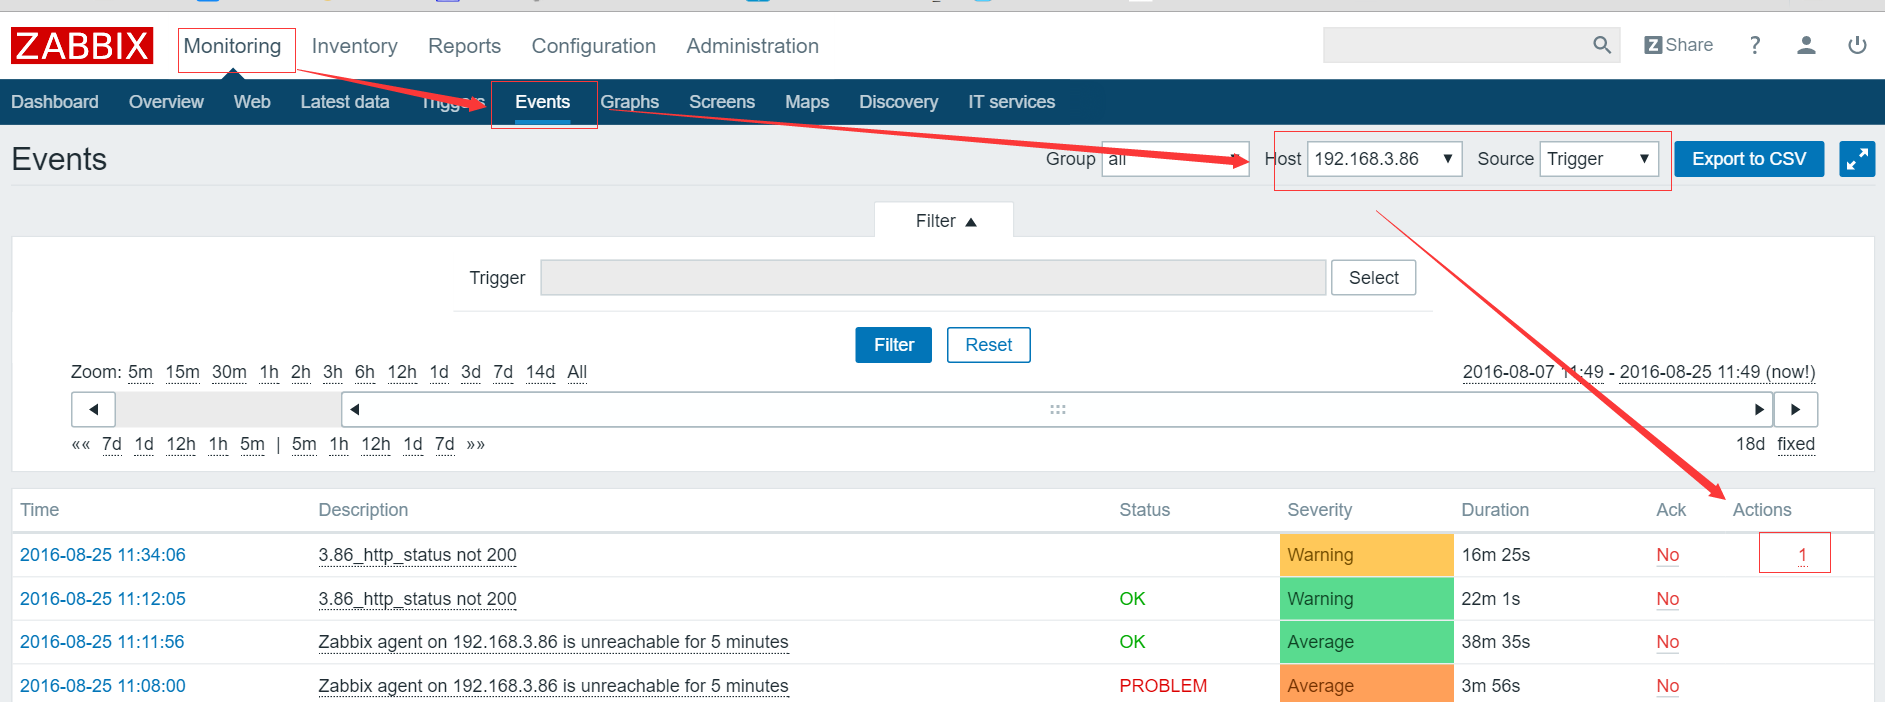
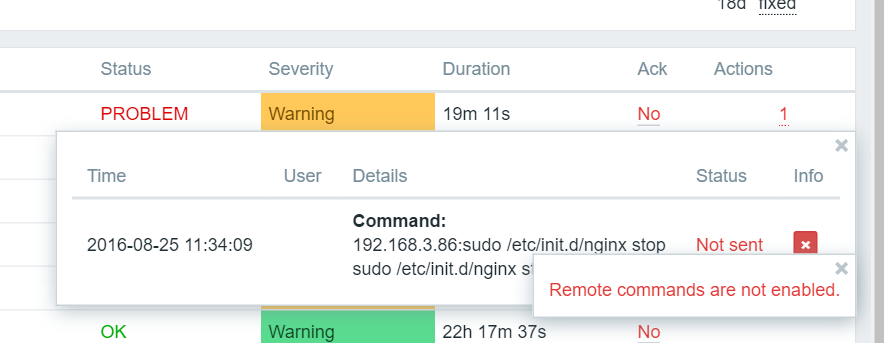
zabbix-agent 端的操作:
场景:监控某个服务器的 web 页面 http 相应码如果连续 4 次不为 200 则触发重启相关服务 action
1. 打开客户端远程执行命令的开关,记得重启 zabbix-agent 服务
vim /etc/zabbix/zabbix_agentd.conf
EnableRemoteCommands = 1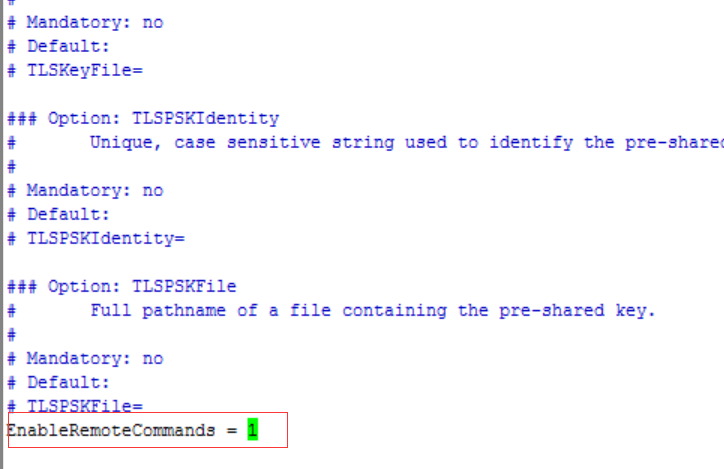
2.visudo 打开关于 zabbix 操作的命令
①添加如下内容
# allows ‘zabbix’ user to run all commands without password.
zabbix ALL=NOPASSWD: ALL
# allows ‘zabbix’ user to restart apache without password.
zabbix ALL=NOPASSWD: /bin/bash /usr/local/zabbix-agent/scripts/restart_ad_server.sh
②注释掉如下一行,否则命令无法执行:
# Default requiretty
添加相关的脚本:
vim /usr/local/zabbix-agent/scripts/restart_ad_server.sh
#!/bin/bash
# kill ad-server process 关闭 ad-server 这个 java 进程
ps -ef|grep ad-server-1.0.0.jar|/bin/kill `awk ‘{print $2}’`
sleep 3
# start ad-server 重新启动 ad-server 这个 java 脚本
cd /home/ad-push/ && /bin/bash start.sh start
添加执行权限
chmod +x /usr/local/zabbix-agent/scripts/restart_ad_server.sh
zabbix-server 端操作
设置 Action
Configuration–>Actions–>Create action
Action
在 Action 选项中,
定义 Name:adpush_not_200_restart_ad_server
#action name 自定义即可,action 选项的其余部分可采用默认值,如下:
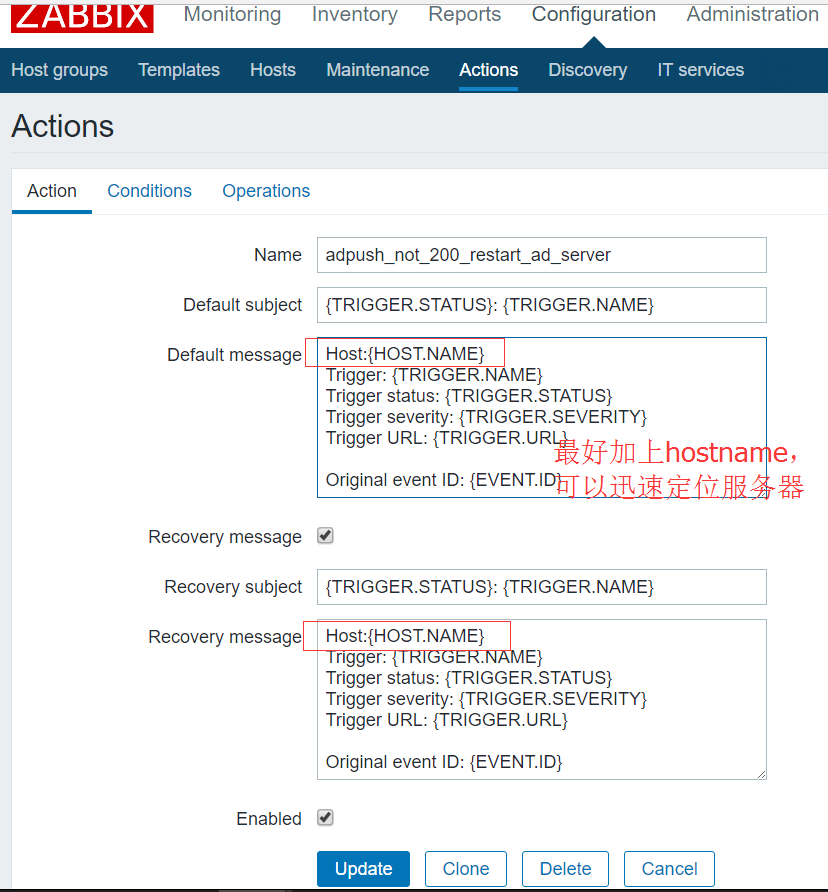
Conditions
在 Conditions 选项中添加新的条件判断,以使判断更有针对性,如
New condition:Trigger severity = Warning
New condition:Trigger name like ads_9010_status_not 200
#trigger name 对应步骤 1 中定义的 trigger name,如下: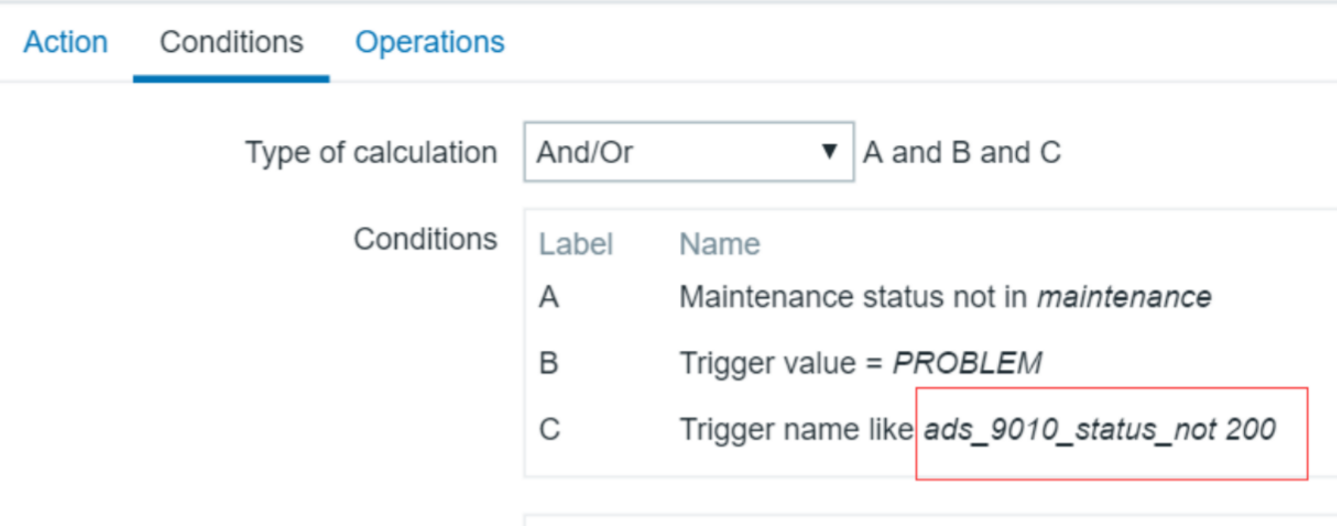
Operations
在 Operations 选项中,添加新的”Action operation”,点击”New”,
Operation type:选择”Remote Command”
Target list:添加 target 为”Current host”
#agent 在本机
Type:选择”Custom script”
Execute on:选择”Zabbix agent”,命令为 “sudo /bin/bash /usr/local/zabbix-agent/scripts/restart_ad_server.sh”
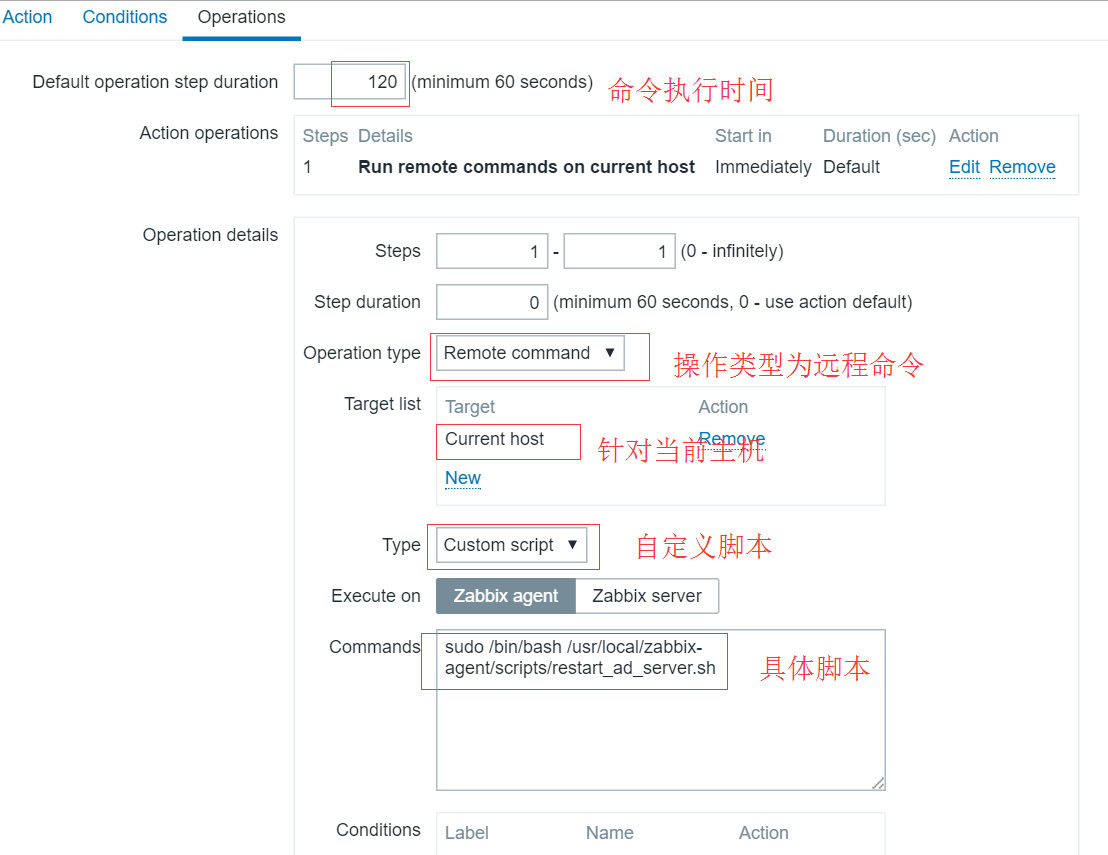
执行远程命令重新启动 nginx 服务举例: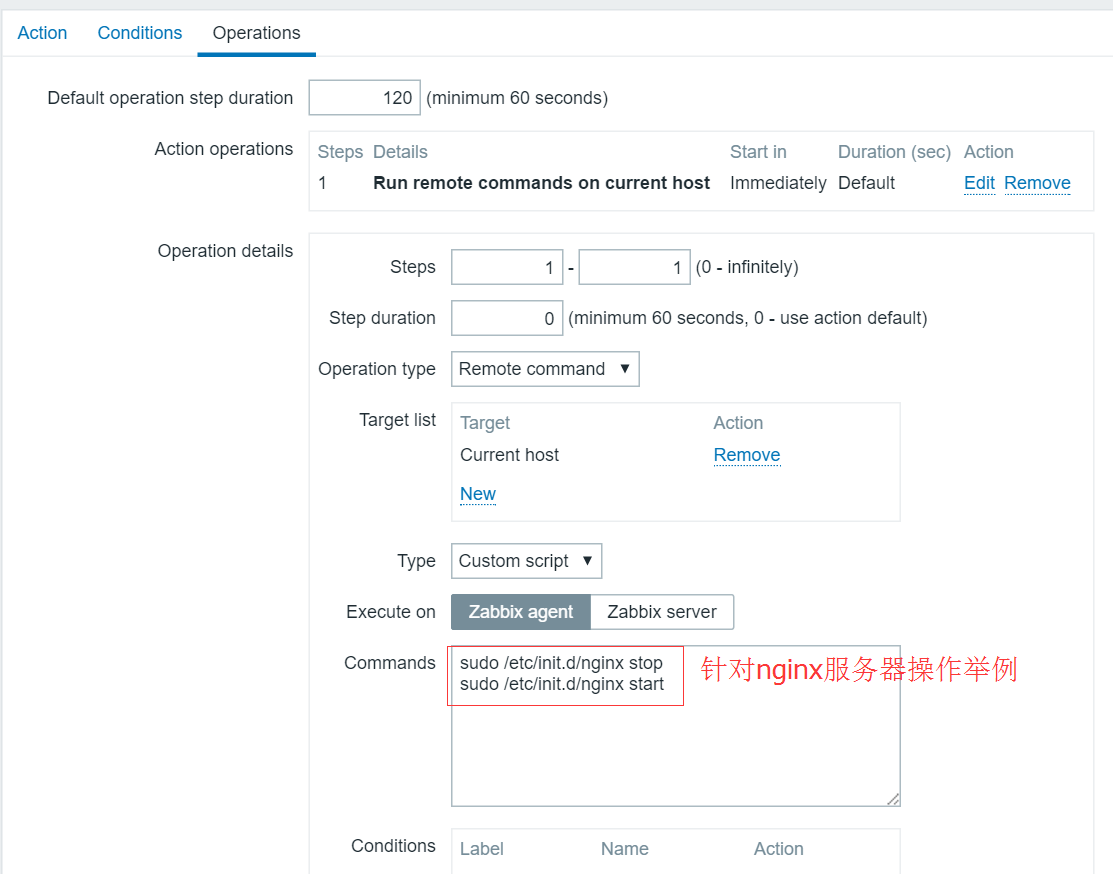
# 执行命令的账号是 zabbix 账号,非 root 账号,不采用 sudo 命令会导致命令执行后不生效
# 另外需要说明是,尝试过使用具体的命令而非脚本,结果是命令执行了但不生效,因为没有具体的失败日志,也分析不出原因
# 其余部分采用默认值,点击”Add”即可,如下:
问题:
但是执行命令失败,无法自动重启服务:于是授予 zabbix 所有用户权限
# allows ‘zabbix’ user to restart apache without password.
zabbix ALL=(ALL) NOPASSWD: ALL
修改 restart_ad_server.sh
/usr/local/zabbix-agent/scripts/restart_ad_server.sh
#!/bin/bash
# kill ad-server process
ps -ef|grep ad-server-1.0.0.jar|/bin/kill `awk ‘{print $2}’`
sleep 2
# start ad-server
# start.sh 使用绝对路径
cd /home/ad-push/ && /bin/bash /home/ad-push/start.sh start
| # kill ad-server process | |
| ps -ef|grep ad-server-1.0.0.jar|/bin/kill `awk '{print $2}'` | |
| sleep 2 | |
| ps -ef|grep ad-server-1.1.0.jar|/bin/kill `awk '{print $2}'` | |
| sleep 2 | |
| # start ad-server | |
| cd /data/ad-push/ && /bin/bash /data/ad-push/start.sh start | |
| cd /data/ad-push2/ && /bin/bash /data/ad-push2/start.sh start |
修改 start.sh 脚本如下:
java 也使用绝对路径:
/home/java/jdk1.8.0_40/bin/java
| LANG="zh_CN.UTF-8" | |
| APP_HOME=$(echo `pwd` | sed 's/bin//') | |
| APPPIDFILE=$APP_HOME/app.pid | |
| case $1 in | |
| start) | |
| echo "Starting server..." | |
| HEAP_MEMORY=1024m | |
| PERM_MEMORY=64m | |
| JMX_PORT=1111 | |
| JMX_HOST=1.1.1.1 | |
| JAVA_OPTS="-server -XX:+UseConcMarkSweepGC -XX:+HeapDumpOnOutOfMemoryError -XX:HeapDumpPath=jvm.log -Dcom.sun.management.jmxremote.authenticate=false -Dcom.sun.management.jmxremote.ssl=false -Dsun.net.inetaddr.ttl=15" | |
| shift | |
| ARGS=($*) | |
| for ((i=0; i<${#ARGS[@]}; i++)); do | |
| case "${ARGS[$i]}" in | |
| -D*) JAVA_OPTS="${JAVA_OPTS} ${ARGS[$i]}" ;; | |
| -Heap*) HEAP_MEMORY="${ARGS[$i+1]}" ;; | |
| -Perm*) PERM_MEMORY="${ARGS[$i+1]}" ;; | |
| -JmxPort*) JMX_PORT="${ARGS[$i+1]}" ;; | |
| -JmxHost*) JMX_HOST = "${ARGS[$i+1]}" ;; | |
| esac | |
| done | |
| JAVA_OPTS="${JAVA_OPTS} -Xms${HEAP_MEMORY} -Xmx${HEAP_MEMORY} -XX:PermSize=${PERM_MEMORY} -XX:MaxPermSize=${PERM_MEMORY} -XX:MaxDirectMemorySize=128m -Dcom.sun.management.jmxremote.port=${JMX_PORT} -Djava.rmi.server.hostname=${JMX_HOST} -Dapp.home=${APP_HOME}" | |
| echo "start jvm args ${JAVA_OPTS}" | |
| nohup <span style="color:#ff0000;">/home/java/jdk1.8.0_40/bin/java</span> $JAVA_OPTS -cp .:./ad-server-1.0.0.jar org.springframework.boot.loader.JarLauncher > /dev/null & | |
| echo $! > $APPPIDFILE | |
| echo STARTED | |
| ;; | |
| stop) | |
| echo "Stopping server ..." | |
| if [! -f $APPPIDFILE] | |
| then | |
| echo "error: count not find file $APPPIDFILE" | |
| exit 1 | |
| else | |
| kill -9 $(cat $APPPIDFILE) | |
| rm $APPPIDFILE | |
| echo STOPPED | |
| fi | |
| ;; | |
| *) | |
| echo "Please enter start|stop ..." | |
| ;; | |
| esac | |
| exit 0 |
1. 应用场景描述
在目前公司的业务中,有部分 ESB 架构用 ZooKeeper 作为协同服务的场景,做好 ZooKeeper 的监控很重要。
2.ZooKeeper 监控要点
系统监控
内存使用量 ZooKeeper 应当完全运行在内存中,不能使用到 SWAP。Java Heap 大小不能超过可用内存。
Swap 使用量 使用 Swap 会降低 ZooKeeper 的性能,设置 vm.swappiness = 0
网络带宽占用 如果发现 ZooKeeper 性能降低关注下网络带宽占用情况和丢包情况,通常情况下 ZooKeeper 是 20% 写入 80% 读入
磁盘使用量 ZooKeeper 数据目录使用情况需要注意
磁盘 I /O ZooKeeper 的磁盘写入是异步的,所以不会存在很大的 I / O 请求,如果 ZooKeeper 和其他 I / O 密集型服务公用应该关注下磁盘 I / O 情况
ZooKeeper 监控
zk_avg/min/max_latency 响应一个客户端请求的时间,建议这个时间大于 10 个 Tick 就报警
zk_outstanding_requests 排队请求的数量,当 ZooKeeper 超过了它的处理能力时,这个值会增大,建议设置报警阀值为 10
zk_packets_received 接收到客户端请求的包数量
zk_packets_sent 发送给客户单的包数量,主要是响应和通知
zk_max_file_descriptor_count 最大允许打开的文件数,由 ulimit 控制
zk_open_file_descriptor_count 打开文件数量,当这个值大于允许值得 85% 时报警
Mode 运行的角色,如果没有加入集群就是 standalone, 加入集群式 follower 或者 leader
zk_followers leader 角色才会有这个输出, 集合中 follower 的个数。正常的值应该是集合成员的数量减 1
zk_pending_syncs leader 角色才会有这个输出,pending syncs 的数量
zk_znode_count znodes 的数量
zk_watch_count watches 的数量
Java Heap Size ZooKeeper Java 进程的
3. 在各节点包括 leader 和 follower 上配置
zook 集群的配置请参考 centos6.5 环境下 zookeeper-3.4.6 集群环境部署及单机部署详解:
http://blog.csdn.net/reblue520/article/details/52279486
监控原理描述
安装依赖包
yum install -y nc
yum install -y zabbix-sender
echo ruok|nc 127.0.0.1 2181
imok
echo mntr|nc 127.0.0.1 2181
zk_version3.4.6-1569965, built on 02/20/2014 09:09 GMT
zk_avg_latency0
zk_max_latency6
zk_min_latency0
zk_packets_received93114
zk_packets_sent93113
zk_num_alive_connections4
zk_outstanding_requests0
zk_server_stateleader
zk_znode_count29
zk_watch_count0
zk_ephemerals_count14
zk_approximate_data_size1087
zk_open_file_descriptor_count39
zk_max_file_descriptor_count1000000
zk_followers4
zk_synced_followers4
zk_pending_syncs0
echo srvr|nc 127.0.0.1 2181
Zookeeper version: 3.4.6-1569965, built on 02/20/2014 09:09 GMT
Latency min/avg/max: 0/0/6
Received: 93121
Sent: 93120
Connections: 4
Outstanding: 0
Zxid: 0x900000020
Mode: leader
Node count: 29
4. 编写 Zabbix 监控 ZooKeeper 的脚本和配置文件
要让 Zabbix 收集到这些监控数据,有两种方法一种是每个监控项目通过 zabbix agent 单独获取,主动监控和被动监控都可以。还有一种方法就是将这些监控数据一次性使用 zabbix_sender 全部发送给 zabbix。这里我们选择第二种方式。那么采用 zabbix_sender 一次性发送全部监控数据的脚本就不能像通过 zabbix agent 这样逐个获取监控项目来编写脚本。
首先想办法将监控项目汇集成一个字典,然后遍历这个字典,将字典中的 key:value 对通过 zabbix_sender 的 - k 和 - o 参数指定发送出去
echo mntr|nc 127.0.0.1 2181
这条命令可以使用 Python 的 subprocess 模块调用,也可以使用 socket 模块去访问 2181 端口然后发送命令获取数据,获取到 mntr 执行的数据后还需要将其转化成为字典数据
即需要将这种样式的数据
zk_version3.4.6-1569965, built on 02/20/2014 09:09 GMT
zk_avg_latency0
zk_max_latency0
zk_min_latency0
zk_packets_received5
zk_packets_sent4
zk_num_alive_connections1
zk_outstanding_requests0
zk_server_statestandalone
zk_znode_count4
zk_watch_count0
zk_ephemerals_count0
zk_approximate_data_size27
zk_open_file_descriptor_count23
zk_max_file_descriptor_count4096
详细代码如下:
vim /usr/local/zabbix-agent/scripts/check_zookeeper.py
| #!/usr/bin/python | |
| """ Check Zookeeper Cluster | |
| zookeeper version should be newer than 3.4.x | |
| # echo mntr|nc 127.0.0.1 2181 | |
| zk_version 3.4.6-1569965, built on 02/20/2014 09:09 GMT | |
| zk_avg_latency 0 | |
| zk_max_latency 4 | |
| zk_min_latency 0 | |
| zk_packets_received 84467 | |
| zk_packets_sent 84466 | |
| zk_num_alive_connections 3 | |
| zk_outstanding_requests 0 | |
| zk_server_state follower | |
| zk_znode_count 17159 | |
| zk_watch_count 2 | |
| zk_ephemerals_count 1 | |
| zk_approximate_data_size 6666471 | |
| zk_open_file_descriptor_count 29 | |
| zk_max_file_descriptor_count 102400 | |
| # echo ruok|nc 127.0.0.1 2181 | |
| imok | |
| """ | |
| import sys | |
| import socket | |
| import re | |
| import subprocess | |
| from StringIO import StringIO | |
| import os | |
| zabbix_sender = '/usr/bin/zabbix_sender' | |
| zabbix_conf = '/etc/zabbix/zabbix_agentd.conf' | |
| send_to_zabbix = 1 | |
| ############# get zookeeper server status | |
| class ZooKeeperServer(object): | |
| def __init__(self, host='localhost', port='2181', timeout=1): | |
| self._address = (host, int(port)) | |
| self._timeout = timeout | |
| self._result = {} | |
| def _create_socket(self): | |
| return socket.socket() | |
| def _send_cmd(self, cmd): | |
| """Send a 4letter word command to the server""" | |
| s = self._create_socket() | |
| s.settimeout(self._timeout) | |
| s.connect(self._address) | |
| s.send(cmd) | |
| data = s.recv(2048) | |
| s.close() | |
| return data | |
| def get_stats(self): | |
| """Get ZooKeeper server stats as a map""" | |
| data_mntr = self._send_cmd('mntr') | |
| data_ruok = self._send_cmd('ruok') | |
| if data_mntr: | |
| result_mntr = self._parse(data_mntr) | |
| if data_ruok: | |
| result_ruok = self._parse_ruok(data_ruok) | |
| self._result = dict(result_mntr.items() + result_ruok.items()) | |
| if not self._result.has_key('zk_followers') and not self._result.has_key('zk_synced_followers') and not self._result.has_key('zk_pending_syncs'): | |
| ##### the tree metrics only exposed on leader role zookeeper server, we just set the followers' to 0 | |
| leader_only = {'zk_followers':0,'zk_synced_followers':0,'zk_pending_syncs':0} | |
| self._result = dict(result_mntr.items() + result_ruok.items() + leader_only.items() ) | |
| return self._result | |
| def _parse(self, data): | |
| """Parse the output from the'mntr'4letter word command""" | |
| h = StringIO(data) | |
| result = {} | |
| for line in h.readlines(): | |
| try: | |
| key, value = self._parse_line(line) | |
| result[key] = value | |
| except ValueError: | |
| pass # ignore broken lines | |
| return result | |
| def _parse_ruok(self, data): | |
| """Parse the output from the'ruok'4letter word command""" | |
| h = StringIO(data) | |
| result = {} | |
| ruok = h.readline() | |
| if ruok: | |
| result['zk_server_ruok'] = ruok | |
| return result | |
| def _parse_line(self, line): | |
| try: | |
| key, value = map(str.strip, line.split('\t')) | |
| except ValueError: | |
| raise ValueError('Found invalid line: %s' % line) | |
| if not key: | |
| raise ValueError('The key is mandatory and should not be empty') | |
| try: | |
| value = int(value) | |
| except (TypeError, ValueError): | |
| pass | |
| return key, value | |
| def get_pid(self): | |
| # ps -ef|grep java|grep zookeeper|awk '{print $2}' | |
| pidarg = '''ps -ef|grep java|grep zookeeper|grep -v grep|awk'{print $2}'''' | |
| pidout = subprocess.Popen(pidarg,shell=True,stdout=subprocess.PIPE) | |
| pid = pidout.stdout.readline().strip('\n') | |
| return pid | |
| def send_to_zabbix(self, metric): | |
| key = "zookeeper.status[" + metric + "]" | |
| if send_to_zabbix > 0: | |
| #print key + ":" + str(self._result[metric]) | |
| try: | |
| subprocess.call([zabbix_sender, "-c", zabbix_conf, "-k", key, "-o", str(self._result[metric]) ], stdout=FNULL, stderr=FNULL, shell=False) | |
| except OSError, detail: | |
| print "Something went wrong while exectuting zabbix_sender :", detail | |
| else: | |
| print "Simulation: the following command would be execucted :\n", zabbix_sender, "-c", zabbix_conf, "-k", key, "-o", self._result[metric], "\n" | |
| def usage(): | |
| """Display program usage""" | |
| print "\nUsage :", sys.argv[0], "alive|all" | |
| print "Modes : \n\talive : Return pid of running zookeeper\n\tall : Send zookeeper stats as well" | |
| sys.exit(1) | |
| accepted_modes = ['alive', 'all'] | |
| if len(sys.argv) == 2 and sys.argv[1] in accepted_modes: | |
| mode = sys.argv[1] | |
| else: | |
| usage() | |
| zk = ZooKeeperServer() | |
| # print zk.get_stats() | |
| pid = zk.get_pid() | |
| if pid != ""and mode =='all': | |
| zk.get_stats() | |
| # print zk._result | |
| FNULL = open(os.devnull, 'w') | |
| for key in zk._result: | |
| zk.send_to_zabbix(key) | |
| FNULL.close() | |
| print pid | |
| elif pid != ""and mode =="alive": | |
| print pid | |
| else: | |
| print 0 |
增加脚本可执行权限
chmod +x /usr/local/zabbix-agent/scripts/check_zookeeper.py
zabbix 配置文件
vim /etc/zabbix/zabbix_agentd.d/check_zookeeper.conf
UserParameter=zookeeper.status[*],/usr/bin/python /usr/local/zabbix-agent/scripts/check_zookeeper.py $1
重新启动 zabbix-agent 服务
service zabbix-agent restart
4. 制作 Zabbix 监控 ZooKeeper 的模板并设置报警阀值
zookeeper.xml
| <zabbix_export> | |
| <version>2.0</version> | |
| <date>2016-02-27T15:15:09Z</date> | |
| <groups> | |
| <group> | |
| <name>Templates</name> | |
| </group> | |
| </groups> | |
| <templates> | |
| <template> | |
| <template>Template ZooKeeper</template> | |
| <name>Template ZooKeeper</name> | |
| <description/> | |
| <groups> | |
| <group> | |
| <name>Templates</name> | |
| </group> | |
| </groups> | |
| <applications> | |
| <application> | |
| <name>ZooKeeper Status</name> | |
| </application> | |
| </applications> | |
| <items> | |
| <item> | |
| <name>zookeeper alive connections</name> | |
| <type>2</type> | |
| <snmp_community/> | |
| <multiplier>0</multiplier> | |
| <snmp_oid/> | |
| <key>zookeeper.status[zk_num_alive_connections]</key> | |
| <delay>0</delay> | |
| <history>90</history> | |
| <trends>365</trends> | |
| <status>0</status> | |
| <value_type>3</value_type> | |
| <allowed_hosts/> | |
| <units/> | |
| <delta>0</delta> | |
| <snmpv3_contextname/> | |
| <snmpv3_securityname/> | |
| <snmpv3_securitylevel>0</snmpv3_securitylevel> | |
| <snmpv3_authprotocol>0</snmpv3_authprotocol> | |
| <snmpv3_authpassphrase/> | |
| <snmpv3_privprotocol>0</snmpv3_privprotocol> | |
| <snmpv3_privpassphrase/> | |
| <formula>1</formula> | |
| <delay_flex/> | |
| <params/> | |
| <ipmi_sensor/> | |
| <data_type>0</data_type> | |
| <authtype>0</authtype> | |
| <username/> | |
| <password/> | |
| <publickey/> | |
| <privatekey/> | |
| <port/> | |
| <description/> | |
| <inventory_link>0</inventory_link> | |
| <applications> | |
| <application> | |
| <name>ZooKeeper Status</name> | |
| </application> | |
| </applications> | |
| <valuemap/> | |
| <logtimefmt/> | |
| </item> | |
| <item> | |
| <name>zookeeper approximate data size</name> | |
| <type>2</type> | |
| <snmp_community/> | |
| <multiplier>0</multiplier> | |
| <snmp_oid/> | |
| <key>zookeeper.status[zk_approximate_data_size]</key> | |
| <delay>0</delay> | |
| <history>90</history> | |
| <trends>365</trends> | |
| <status>0</status> | |
| <value_type>3</value_type> | |
| <allowed_hosts/> | |
| <units>B</units> | |
| <delta>0</delta> | |
| <snmpv3_contextname/> | |
| <snmpv3_securityname/> | |
| <snmpv3_securitylevel>0</snmpv3_securitylevel> | |
| <snmpv3_authprotocol>0</snmpv3_authprotocol> | |
| <snmpv3_authpassphrase/> | |
| <snmpv3_privprotocol>0</snmpv3_privprotocol> | |
| <snmpv3_privpassphrase/> | |
| <formula>1</formula> | |
| <delay_flex/> | |
| <params/> | |
| <ipmi_sensor/> | |
| <data_type>0</data_type> | |
| <authtype>0</authtype> | |
| <username/> | |
| <password/> | |
| <publickey/> | |
| <privatekey/> | |
| <port/> | |
| <description/> | |
| <inventory_link>0</inventory_link> | |
| <applications> | |
| <application> | |
| <name>ZooKeeper Status</name> | |
| </application> | |
| </applications> | |
| <valuemap/> | |
| <logtimefmt/> | |
| </item> | |
| <item> | |
| <name>zookeeper average latency</name> | |
| <type>2</type> | |
| <snmp_community/> | |
| <multiplier>0</multiplier> | |
| <snmp_oid/> | |
| <key>zookeeper.status[zk_avg_latency]</key> | |
| <delay>0</delay> | |
| <history>90</history> | |
| <trends>365</trends> | |
| <status>0</status> | |
| <value_type>3</value_type> | |
| <allowed_hosts/> | |
| <units>tick</units> | |
| <delta>0</delta> | |
| <snmpv3_contextname/> | |
| <snmpv3_securityname/> | |
| <snmpv3_securitylevel>0</snmpv3_securitylevel> | |
| <snmpv3_authprotocol>0</snmpv3_authprotocol> | |
| <snmpv3_authpassphrase/> | |
| <snmpv3_privprotocol>0</snmpv3_privprotocol> | |
| <snmpv3_privpassphrase/> | |
| <formula>1</formula> | |
| <delay_flex/> | |
| <params/> | |
| <ipmi_sensor/> | |
| <data_type>0</data_type> | |
| <authtype>0</authtype> | |
| <username/> | |
| <password/> | |
| <publickey/> | |
| <privatekey/> | |
| <port/> | |
| <description/> | |
| <inventory_link>0</inventory_link> | |
| <applications> | |
| <application> | |
| <name>ZooKeeper Status</name> | |
| </application> | |
| </applications> | |
| <valuemap/> | |
| <logtimefmt/> | |
| </item> | |
| <item> | |
| <name>zookeeper ephemerals count</name> | |
| <type>2</type> | |
| <snmp_community/> | |
| <multiplier>0</multiplier> | |
| <snmp_oid/> | |
| <key>zookeeper.status[zk_ephemerals_count]</key> | |
| <delay>0</delay> | |
| <history>90</history> | |
| <trends>365</trends> | |
| <status>0</status> | |
| <value_type>3</value_type> | |
| <allowed_hosts/> | |
| <units/> | |
| <delta>0</delta> | |
| <snmpv3_contextname/> | |
| <snmpv3_securityname/> | |
| <snmpv3_securitylevel>0</snmpv3_securitylevel> | |
| <snmpv3_authprotocol>0</snmpv3_authprotocol> | |
| <snmpv3_authpassphrase/> | |
| <snmpv3_privprotocol>0</snmpv3_privprotocol> | |
| <snmpv3_privpassphrase/> | |
| <formula>1</formula> | |
| <delay_flex/> | |
| <params/> | |
| <ipmi_sensor/> | |
| <data_type>0</data_type> | |
| <authtype>0</authtype> | |
| <username/> | |
| <password/> | |
| <publickey/> | |
| <privatekey/> | |
| <port/> | |
| <description/> | |
| <inventory_link>0</inventory_link> | |
| <applications> | |
| <application> | |
| <name>ZooKeeper Status</name> | |
| </application> | |
| </applications> | |
| <valuemap/> | |
| <logtimefmt/> | |
| </item> | |
| <item> | |
| <name>zookeeper leader's followers</name> | |
| <type>2</type> | |
| <snmp_community/> | |
| <multiplier>0</multiplier> | |
| <snmp_oid/> | |
| <key>zookeeper.status[zk_followers]</key> | |
| <delay>0</delay> | |
| <history>90</history> | |
| <trends>365</trends> | |
| <status>0</status> | |
| <value_type>3</value_type> | |
| <allowed_hosts/> | |
| <units/> | |
| <delta>0</delta> | |
| <snmpv3_contextname/> | |
| <snmpv3_securityname/> | |
| <snmpv3_securitylevel>0</snmpv3_securitylevel> | |
| <snmpv3_authprotocol>0</snmpv3_authprotocol> | |
| <snmpv3_authpassphrase/> | |
| <snmpv3_privprotocol>0</snmpv3_privprotocol> | |
| <snmpv3_privpassphrase/> | |
| <formula>1</formula> | |
| <delay_flex/> | |
| <params/> | |
| <ipmi_sensor/> | |
| <data_type>0</data_type> | |
| <authtype>0</authtype> | |
| <username/> | |
| <password/> | |
| <publickey/> | |
| <privatekey/> | |
| <port/> | |
| <description/> | |
| <inventory_link>0</inventory_link> | |
| <applications> | |
| <application> | |
| <name>ZooKeeper Status</name> | |
| </application> | |
| </applications> | |
| <valuemap/> | |
| <logtimefmt/> | |
| </item> | |
| <item> | |
| <name>zookeeper leader's pending syncs</name> | |
| <type>2</type> | |
| <snmp_community/> | |
| <multiplier>0</multiplier> | |
| <snmp_oid/> | |
| <key>zookeeper.status[zk_pending_syncs]</key> | |
| <delay>0</delay> | |
| <history>90</history> | |
| <trends>365</trends> | |
| <status>0</status> | |
| <value_type>3</value_type> | |
| <allowed_hosts/> | |
| <units/> | |
| <delta>0</delta> | |
| <snmpv3_contextname/> | |
| <snmpv3_securityname/> | |
| <snmpv3_securitylevel>0</snmpv3_securitylevel> | |
| <snmpv3_authprotocol>0</snmpv3_authprotocol> | |
| <snmpv3_authpassphrase/> | |
| <snmpv3_privprotocol>0</snmpv3_privprotocol> | |
| <snmpv3_privpassphrase/> | |
| <formula>1</formula> | |
| <delay_flex/> | |
| <params/> | |
| <ipmi_sensor/> | |
| <data_type>0</data_type> | |
| <authtype>0</authtype> | |
| <username/> | |
| <password/> | |
| <publickey/> | |
| <privatekey/> | |
| <port/> | |
| <description/> | |
| <inventory_link>0</inventory_link> | |
| <applications> | |
| <application> | |
| <name>ZooKeeper Status</name> | |
| </application> | |
| </applications> | |
| <valuemap/> | |
| <logtimefmt/> | |
| </item> | |
| <item> | |
| <name>zookeeper leader's synced followers</name> | |
| <type>2</type> | |
| <snmp_community/> | |
| <multiplier>0</multiplier> | |
| <snmp_oid/> | |
| <key>zookeeper.status[zk_synced_followers]</key> | |
| <delay>0</delay> | |
| <history>90</history> | |
| <trends>365</trends> | |
| <status>0</status> | |
| <value_type>3</value_type> | |
| <allowed_hosts/> | |
| <units/> | |
| <delta>0</delta> | |
| <snmpv3_contextname/> | |
| <snmpv3_securityname/> | |
| <snmpv3_securitylevel>0</snmpv3_securitylevel> | |
| <snmpv3_authprotocol>0</snmpv3_authprotocol> | |
| <snmpv3_authpassphrase/> | |
| <snmpv3_privprotocol>0</snmpv3_privprotocol> | |
| <snmpv3_privpassphrase/> | |
| <formula>1</formula> | |
| <delay_flex/> | |
| <params/> | |
| <ipmi_sensor/> | |
| <data_type>0</data_type> | |
| <authtype>0</authtype> | |
| <username/> | |
| <password/> | |
| <publickey/> | |
| <privatekey/> | |
| <port/> | |
| <description/> | |
| <inventory_link>0</inventory_link> | |
| <applications> | |
| <application> | |
| <name>ZooKeeper Status</name> | |
| </application> | |
| </applications> | |
| <valuemap/> | |
| <logtimefmt/> | |
| </item> | |
| <item> | |
| <name>zookeeper max file descriptor count</name> | |
| <type>2</type> | |
| <snmp_community/> | |
| <multiplier>0</multiplier> | |
| <snmp_oid/> | |
| <key>zookeeper.status[zk_max_file_descriptor_count]</key> | |
| <delay>0</delay> | |
| <history>90</history> | |
| <trends>365</trends> | |
| <status>0</status> | |
| <value_type>3</value_type> | |
| <allowed_hosts/> | |
| <units/> | |
| <delta>0</delta> | |
| <snmpv3_contextname/> | |
| <snmpv3_securityname/> | |
| <snmpv3_securitylevel>0</snmpv3_securitylevel> | |
| <snmpv3_authprotocol>0</snmpv3_authprotocol> | |
| <snmpv3_authpassphrase/> | |
| <snmpv3_privprotocol>0</snmpv3_privprotocol> | |
| <snmpv3_privpassphrase/> | |
| <formula>1</formula> | |
| <delay_flex/> | |
| <params/> | |
| <ipmi_sensor/> | |
| <data_type>0</data_type> | |
| <authtype>0</authtype> | |
| <username/> | |
| <password/> | |
| <publickey/> | |
| <privatekey/> | |
| <port/> | |
| <description/> | |
| <inventory_link>0</inventory_link> | |
| <applications> | |
| <application> | |
| <name>ZooKeeper Status</name> | |
| </application> | |
| </applications> | |
| <valuemap/> | |
| <logtimefmt/> | |
| </item> | |
| <item> | |
| <name>zookeeper max latency</name> | |
| <type>2</type> | |
| <snmp_community/> | |
| <multiplier>0</multiplier> | |
| <snmp_oid/> | |
| <key>zookeeper.status[zk_max_latency]</key> | |
| <delay>0</delay> | |
| <history>90</history> | |
| <trends>365</trends> | |
| <status>0</status> | |
| <value_type>3</value_type> | |
| <allowed_hosts/> | |
| <units>tick</units> | |
| <delta>0</delta> | |
| <snmpv3_contextname/> | |
| <snmpv3_securityname/> | |
| <snmpv3_securitylevel>0</snmpv3_securitylevel> | |
| <snmpv3_authprotocol>0</snmpv3_authprotocol> | |
| <snmpv3_authpassphrase/> | |
| <snmpv3_privprotocol>0</snmpv3_privprotocol> | |
| <snmpv3_privpassphrase/> | |
| <formula>1</formula> | |
| <delay_flex/> | |
| <params/> | |
| <ipmi_sensor/> | |
| <data_type>0</data_type> | |
| <authtype>0</authtype> | |
| <username/> | |
| <password/> | |
| <publickey/> | |
| <privatekey/> | |
| <port/> | |
| <description/> | |
| <inventory_link>0</inventory_link> | |
| <applications> | |
| <application> | |
| <name>ZooKeeper Status</name> | |
| </application> | |
| </applications> | |
| <valuemap/> | |
| <logtimefmt/> | |
| </item> | |
| <item> | |
| <name>zookeeper min latency</name> | |
| <type>2</type> | |
| <snmp_community/> | |
| <multiplier>0</multiplier> | |
| <snmp_oid/> | |
| <key>zookeeper.status[zk_min_latency]</key> | |
| <delay>0</delay> | |
| <history>90</history> | |
| <trends>365</trends> | |
| <status>0</status> | |
| <value_type>3</value_type> | |
| <allowed_hosts/> | |
| <units>tick</units> | |
| <delta>0</delta> | |
| <snmpv3_contextname/> | |
| <snmpv3_securityname/> | |
| <snmpv3_securitylevel>0</snmpv3_securitylevel> | |
| <snmpv3_authprotocol>0</snmpv3_authprotocol> | |
| <snmpv3_authpassphrase/> | |
| <snmpv3_privprotocol>0</snmpv3_privprotocol> | |
| <snmpv3_privpassphrase/> | |
| <formula>1</formula> | |
| <delay_flex/> | |
| <params/> | |
| <ipmi_sensor/> | |
| <data_type>0</data_type> | |
| <authtype>0</authtype> | |
| <username/> | |
| <password/> | |
| <publickey/> | |
| <privatekey/> | |
| <port/> | |
| <description/> | |
| <inventory_link>0</inventory_link> | |
| <applications> | |
| <application> | |
| <name>ZooKeeper Status</name> | |
| </application> | |
| </applications> | |
| <valuemap/> | |
| <logtimefmt/> | |
| </item> | |
| <item> | |
| <name>zookeeper opened file descriptor count</name> | |
| <type>2</type> | |
| <snmp_community/> | |
| <multiplier>0</multiplier> | |
| <snmp_oid/> | |
| <key>zookeeper.status[zk_open_file_descriptor_count]</key> | |
| <delay>0</delay> | |
| <history>90</history> | |
| <trends>365</trends> | |
| <status>0</status> | |
| <value_type>3</value_type> | |
| <allowed_hosts/> | |
| <units/> | |
| <delta>0</delta> | |
| <snmpv3_contextname/> | |
| <snmpv3_securityname/> | |
| <snmpv3_securitylevel>0</snmpv3_securitylevel> | |
| <snmpv3_authprotocol>0</snmpv3_authprotocol> | |
| <snmpv3_authpassphrase/> | |
| <snmpv3_privprotocol>0</snmpv3_privprotocol> | |
| <snmpv3_privpassphrase/> | |
| <formula>1</formula> | |
| <delay_flex/> | |
| <params/> | |
| <ipmi_sensor/> | |
| <data_type>0</data_type> | |
| <authtype>0</authtype> | |
| <username/> | |
| <password/> | |
| <publickey/> | |
| <privatekey/> | |
| <port/> | |
| <description/> | |
| <inventory_link>0</inventory_link> | |
| <applications> | |
| <application> | |
| <name>ZooKeeper Status</name> | |
| </application> | |
| </applications> | |
| <valuemap/> | |
| <logtimefmt/> | |
| </item> | |
| <item> | |
| <name>zookeeper outstanding requests</name> | |
| <type>2</type> | |
| <snmp_community/> | |
| <multiplier>0</multiplier> | |
| <snmp_oid/> | |
| <key>zookeeper.status[zk_outstanding_requests]</key> | |
| <delay>0</delay> | |
| <history>90</history> | |
| <trends>365</trends> | |
| <status>0</status> | |
| <value_type>3</value_type> | |
| <allowed_hosts/> | |
| <units/> | |
| <delta>0</delta> | |
| <snmpv3_contextname/> | |
| <snmpv3_securityname/> | |
| <snmpv3_securitylevel>0</snmpv3_securitylevel> | |
| <snmpv3_authprotocol>0</snmpv3_authprotocol> | |
| <snmpv3_authpassphrase/> | |
| <snmpv3_privprotocol>0</snmpv3_privprotocol> | |
| <snmpv3_privpassphrase/> | |
| <formula>1</formula> | |
| <delay_flex/> | |
| <params/> | |
| <ipmi_sensor/> | |
| <data_type>0</data_type> | |
| <authtype>0</authtype> | |
| <username/> | |
| <password/> | |
| <publickey/> | |
| <privatekey/> | |
| <port/> | |
| <description/> | |
| <inventory_link>0</inventory_link> | |
| <applications> | |
| <application> | |
| <name>ZooKeeper Status</name> | |
| </application> | |
| </applications> | |
| <valuemap/> | |
| <logtimefmt/> | |
| </item> | |
| <item> | |
| <name>zookeeper packages received</name> | |
| <type>2</type> | |
| <snmp_community/> | |
| <multiplier>0</multiplier> | |
| <snmp_oid/> | |
| <key>zookeeper.status[zk_packets_received]</key> | |
| <delay>0</delay> | |
| <history>90</history> | |
| <trends>365</trends> | |
| <status>0</status> | |
| <value_type>3</value_type> | |
| <allowed_hosts/> | |
| <units/> | |
| <delta>0</delta> | |
| <snmpv3_contextname/> | |
| <snmpv3_securityname/> | |
| <snmpv3_securitylevel>0</snmpv3_securitylevel> | |
| <snmpv3_authprotocol>0</snmpv3_authprotocol> | |
| <snmpv3_authpassphrase/> | |
| <snmpv3_privprotocol>0</snmpv3_privprotocol> | |
| <snmpv3_privpassphrase/> | |
| <formula>1</formula> | |
| <delay_flex/> | |
| <params/> | |
| <ipmi_sensor/> | |
| <data_type>0</data_type> | |
| <authtype>0</authtype> | |
| <username/> | |
| <password/> | |
| <publickey/> | |
| <privatekey/> | |
| <port/> | |
| <description/> | |
| <inventory_link>0</inventory_link> | |
| <applications> | |
| <application> | |
| <name>ZooKeeper Status</name> | |
| </application> | |
| </applications> | |
| <valuemap/> | |
| <logtimefmt/> | |
| </item> | |
| <item> | |
| <name>zookeeper packages sent</name> | |
| <type>2</type> | |
| <snmp_community/> | |
| <multiplier>0</multiplier> | |
| <snmp_oid/> | |
| <key>zookeeper.status[zk_packets_sent]</key> | |
| <delay>0</delay> | |
| <history>90</history> | |
| <trends>365</trends> | |
| <status>0</status> | |
| <value_type>3</value_type> | |
| <allowed_hosts/> | |
| <units/> | |
| <delta>0</delta> | |
| <snmpv3_contextname/> | |
| <snmpv3_securityname/> | |
| <snmpv3_securitylevel>0</snmpv3_securitylevel> | |
| <snmpv3_authprotocol>0</snmpv3_authprotocol> | |
| <snmpv3_authpassphrase/> | |
| <snmpv3_privprotocol>0</snmpv3_privprotocol> | |
| <snmpv3_privpassphrase/> | |
| <formula>1</formula> | |
| <delay_flex/> | |
| <params/> | |
| <ipmi_sensor/> | |
| <data_type>0</data_type> | |
| <authtype>0</authtype> | |
| <username/> | |
| <password/> | |
| <publickey/> | |
| <privatekey/> | |
| <port/> | |
| <description/> | |
| <inventory_link>0</inventory_link> | |
| <applications> | |
| <application> | |
| <name>ZooKeeper Status</name> | |
| </application> | |
| </applications> | |
| <valuemap/> | |
| <logtimefmt/> | |
| </item> | |
| <item> | |
| <name>zookeeper pid</name> | |
| <type>0</type> | |
| <snmp_community/> | |
| <multiplier>0</multiplier> | |
| <snmp_oid/> | |
| <key>zookeeper.status[all]</key> | |
| <delay>30</delay> | |
| <history>90</history> | |
| <trends>365</trends> | |
| <status>0</status> | |
| <value_type>3</value_type> | |
| <allowed_hosts/> | |
| <units/> | |
| <delta>0</delta> | |
| <snmpv3_contextname/> | |
| <snmpv3_securityname/> | |
| <snmpv3_securitylevel>0</snmpv3_securitylevel> | |
| <snmpv3_authprotocol>0</snmpv3_authprotocol> | |
| <snmpv3_authpassphrase/> | |
| <snmpv3_privprotocol>0</snmpv3_privprotocol> | |
| <snmpv3_privpassphrase/> | |
| <formula>1</formula> | |
| <delay_flex/> | |
| <params/> | |
| <ipmi_sensor/> | |
| <data_type>0</data_type> | |
| <authtype>0</authtype> | |
| <username/> | |
| <password/> | |
| <publickey/> | |
| <privatekey/> | |
| <port/> | |
| <description/> | |
| <inventory_link>0</inventory_link> | |
| <applications> | |
| <application> | |
| <name>ZooKeeper Status</name> | |
| </application> | |
| </applications> | |
| <valuemap/> | |
| <logtimefmt/> | |
| </item> | |
| <item> | |
| <name>zookeeper response checking</name> | |
| <type>2</type> | |
| <snmp_community/> | |
| <multiplier>0</multiplier> | |
| <snmp_oid/> | |
| <key>zookeeper.status[zk_server_ruok]</key> | |
| <delay>0</delay> | |
| <history>90</history> | |
| <trends>365</trends> | |
| <status>0</status> | |
| <value_type>1</value_type> | |
| <allowed_hosts/> | |
| <units/> | |
| <delta>0</delta> | |
| <snmpv3_contextname/> | |
| <snmpv3_securityname/> | |
| <snmpv3_securitylevel>0</snmpv3_securitylevel> | |
| <snmpv3_authprotocol>0</snmpv3_authprotocol> | |
| <snmpv3_authpassphrase/> | |
| <snmpv3_privprotocol>0</snmpv3_privprotocol> | |
| <snmpv3_privpassphrase/> | |
| <formula>1</formula> | |
| <delay_flex/> | |
| <params/> | |
| <ipmi_sensor/> | |
| <data_type>0</data_type> | |
| <authtype>0</authtype> | |
| <username/> | |
| <password/> | |
| <publickey/> | |
| <privatekey/> | |
| <port/> | |
| <description/> | |
| <inventory_link>0</inventory_link> | |
| <applications> | |
| <application> | |
| <name>ZooKeeper Status</name> | |
| </application> | |
| </applications> | |
| <valuemap/> | |
| <logtimefmt/> | |
| </item> | |
| <item> | |
| <name>zookeeper state role</name> | |
| <type>2</type> | |
| <snmp_community/> | |
| <multiplier>0</multiplier> | |
| <snmp_oid/> | |
| <key>zookeeper.status[zk_server_state]</key> | |
| <delay>0</delay> | |
| <history>90</history> | |
| <trends>365</trends> | |
| <status>0</status> | |
| <value_type>1</value_type> | |
| <allowed_hosts/> | |
| <units/> | |
| <delta>0</delta> | |
| <snmpv3_contextname/> | |
| <snmpv3_securityname/> | |
| <snmpv3_securitylevel>0</snmpv3_securitylevel> | |
| <snmpv3_authprotocol>0</snmpv3_authprotocol> | |
| <snmpv3_authpassphrase/> | |
| <snmpv3_privprotocol>0</snmpv3_privprotocol> | |
| <snmpv3_privpassphrase/> | |
| <formula>1</formula> | |
| <delay_flex/> | |
| <params/> | |
| <ipmi_sensor/> | |
| <data_type>0</data_type> | |
| <authtype>0</authtype> | |
| <username/> | |
| <password/> | |
| <publickey/> | |
| <privatekey/> | |
| <port/> | |
| <description/> | |
| <inventory_link>0</inventory_link> | |
| <applications> | |
| <application> | |
| <name>ZooKeeper Status</name> | |
| </application> | |
| </applications> | |
| <valuemap/> | |
| <logtimefmt/> | |
| </item> | |
| <item> | |
| <name>zookeeper version</name> | |
| <type>2</type> | |
| <snmp_community/> | |
| <multiplier>0</multiplier> | |
| <snmp_oid/> | |
| <key>zookeeper.status[zk_version]</key> | |
| <delay>0</delay> | |
| <history>90</history> | |
| <trends>365</trends> | |
| <status>0</status> | |
| <value_type>1</value_type> | |
| <allowed_hosts/> | |
| <units/> | |
| <delta>0</delta> | |
| <snmpv3_contextname/> | |
| <snmpv3_securityname/> | |
| <snmpv3_securitylevel>0</snmpv3_securitylevel> | |
| <snmpv3_authprotocol>0</snmpv3_authprotocol> | |
| <snmpv3_authpassphrase/> | |
| <snmpv3_privprotocol>0</snmpv3_privprotocol> | |
| <snmpv3_privpassphrase/> | |
| <formula>1</formula> | |
| <delay_flex/> | |
| <params/> | |
| <ipmi_sensor/> | |
| <data_type>0</data_type> | |
| <authtype>0</authtype> | |
| <username/> | |
| <password/> | |
| <publickey/> | |
| <privatekey/> | |
| <port/> | |
| <description/> | |
| <inventory_link>0</inventory_link> | |
| <applications> | |
| <application> | |
| <name>ZooKeeper Status</name> | |
| </application> | |
| </applications> | |
| <valuemap/> | |
| <logtimefmt/> | |
| </item> | |
| <item> | |
| <name>zookeeper watches count</name> | |
| <type>2</type> | |
| <snmp_community/> | |
| <multiplier>0</multiplier> | |
| <snmp_oid/> | |
| <key>zookeeper.status[zk_watch_count]</key> | |
| <delay>0</delay> | |
| <history>90</history> | |
| <trends>365</trends> | |
| <status>0</status> | |
| <value_type>3</value_type> | |
| <allowed_hosts/> | |
| <units/> | |
| <delta>0</delta> | |
| <snmpv3_contextname/> | |
| <snmpv3_securityname/> | |
| <snmpv3_securitylevel>0</snmpv3_securitylevel> | |
| <snmpv3_authprotocol>0</snmpv3_authprotocol> | |
| <snmpv3_authpassphrase/> | |
| <snmpv3_privprotocol>0</snmpv3_privprotocol> | |
| <snmpv3_privpassphrase/> | |
| <formula>1</formula> | |
| <delay_flex/> | |
| <params/> | |
| <ipmi_sensor/> | |
| <data_type>0</data_type> | |
| <authtype>0</authtype> | |
| <username/> | |
| <password/> | |
| <publickey/> | |
| <privatekey/> | |
| <port/> | |
| <description/> | |
| <inventory_link>0</inventory_link> | |
| <applications> | |
| <application> | |
| <name>ZooKeeper Status</name> | |
| </application> | |
| </applications> | |
| <valuemap/> | |
| <logtimefmt/> | |
| </item> | |
| <item> | |
| <name>zookeeper znodes count</name> | |
| <type>2</type> | |
| <snmp_community/> | |
| <multiplier>0</multiplier> | |
| <snmp_oid/> | |
| <key>zookeeper.status[zk_znode_count]</key> | |
| <delay>0</delay> | |
| <history>90</history> | |
| <trends>365</trends> | |
| <status>0</status> | |
| <value_type>3</value_type> | |
| <allowed_hosts/> | |
| <units/> | |
| <delta>0</delta> | |
| <snmpv3_contextname/> | |
| <snmpv3_securityname/> | |
| <snmpv3_securitylevel>0</snmpv3_securitylevel> | |
| <snmpv3_authprotocol>0</snmpv3_authprotocol> | |
| <snmpv3_authpassphrase/> | |
| <snmpv3_privprotocol>0</snmpv3_privprotocol> | |
| <snmpv3_privpassphrase/> | |
| <formula>1</formula> | |
| <delay_flex/> | |
| <params/> | |
| <ipmi_sensor/> | |
| <data_type>0</data_type> | |
| <authtype>0</authtype> | |
| <username/> | |
| <password/> | |
| <publickey/> | |
| <privatekey/> | |
| <port/> | |
| <description/> | |
| <inventory_link>0</inventory_link> | |
| <applications> | |
| <application> | |
| <name>ZooKeeper Status</name> | |
| </application> | |
| </applications> | |
| <valuemap/> | |
| <logtimefmt/> | |
| </item> | |
| </items> | |
| <discovery_rules/> | |
| <macros/> | |
| <templates/> | |
| <screens/> | |
| </template> | |
| </templates> | |
| <triggers> | |
| <trigger> | |
| <expression>{Template ZooKeeper:zookeeper.status[zk_outstanding_requests].last()}>10</expression> | |
| <name>big outstanding requests number</name> | |
| <url/> | |
| <status>0</status> | |
| <priority>4</priority> | |
| <description/> | |
| <type>0</type> | |
| <dependencies/> | |
| </trigger> | |
| <trigger> | |
| <expression>{Template ZooKeeper:zookeeper.status[zk_pending_syncs].last()}>10</expression> | |
| <name>big pending syncs</name> | |
| <url/> | |
| <status>0</status> | |
| <priority>4</priority> | |
| <description/> | |
| <type>0</type> | |
| <dependencies/> | |
| </trigger> | |
| <trigger> | |
| <expression>{Template ZooKeeper:zookeeper.status[zk_avg_latency].last()}>10</expression> | |
| <name>large average latency</name> | |
| <url/> | |
| <status>0</status> | |
| <priority>4</priority> | |
| <description/> | |
| <type>0</type> | |
| <dependencies/> | |
| </trigger> | |
| <trigger> | |
| <expression>{Template ZooKeeper:zookeeper.status[zk_open_file_descriptor_count].last()} > {Template ZooKeeper:zookeeper.status[zk_max_file_descriptor_count].last()}*0.85</expression> | |
| <name>large file descriptor used</name> | |
| <url/> | |
| <status>0</status> | |
| <priority>4</priority> | |
| <description/> | |
| <type>0</type> | |
| <dependencies/> | |
| </trigger> | |
| <trigger> | |
| <expression>{Template ZooKeeper:zookeeper.status[zk_server_ruok].str(imok)}<>1</expression> | |
| <name>zookeeper is abnormal</name> | |
| <url/> | |
| <status>0</status> | |
| <priority>4</priority> | |
| <description/> | |
| <type>0</type> | |
| <dependencies/> | |
| </trigger> | |
| <trigger> | |
| <expression>{Template ZooKeeper:zookeeper.status[all].last()}=0</expression> | |
| <name>zookeeper is not running</name> | |
| <url/> | |
| <status>0</status> | |
| <priority>4</priority> | |
| <description/> | |
| <type>0</type> | |
| <dependencies/> | |
| </trigger> | |
| <trigger> | |
| <expression>{Template ZooKeeper:zookeeper.status[zk_server_state].abschange()}>0</expression> | |
| <name>zookeeper state role has been changed</name> | |
| <url/> | |
| <status>0</status> | |
| <priority>2</priority> | |
| <description/> | |
| <type>0</type> | |
| <dependencies/> | |
| </trigger> | |
| </triggers> | |
| <graphs> | |
| <graph> | |
| <name>ZooKeeper Alive Connections</name> | |
| <width>900</width> | |
| <height>200</height> | |
| <yaxismin>0.0000</yaxismin> | |
| <yaxismax>100.0000</yaxismax> | |
| <show_work_period>1</show_work_period> | |
| <show_triggers>1</show_triggers> | |
| <type>1</type> | |
| <show_legend>1</show_legend> | |
| <show_3d>0</show_3d> | |
| <percent_left>0.0000</percent_left> | |
| <percent_right>0.0000</percent_right> | |
| <ymin_type_1>0</ymin_type_1> | |
| <ymax_type_1>0</ymax_type_1> | |
| <ymin_item_1>0</ymin_item_1> | |
| <ymax_item_1>0</ymax_item_1> | |
| <graph_items> | |
| <graph_item> | |
| <sortorder>0</sortorder> | |
| <drawtype>0</drawtype> | |
| <color>00DDDD</color> | |
| <yaxisside>0</yaxisside> | |
| <calc_fnc>2</calc_fnc> | |
| <type>0</type> | |
| <item> | |
| <host>Template ZooKeeper</host> | |
| <key>zookeeper.status[zk_num_alive_connections]</key> | |
| </item> | |
| </graph_item> | |
| </graph_items> | |
| </graph> | |
| <graph> | |
| <name>ZooKeeper Data Size</name> | |
| <width>900</width> | |
| <height>200</height> | |
| <yaxismin>0.0000</yaxismin> | |
| <yaxismax>100.0000</yaxismax> | |
| <show_work_period>1</show_work_period> | |
| <show_triggers>1</show_triggers> | |
| <type>1</type> | |
| <show_legend>1</show_legend> | |
| <show_3d>0</show_3d> | |
| <percent_left>0.0000</percent_left> | |
| <percent_right>0.0000</percent_right> | |
| <ymin_type_1>0</ymin_type_1> | |
| <ymax_type_1>0</ymax_type_1> | |
| <ymin_item_1>0</ymin_item_1> | |
| <ymax_item_1>0</ymax_item_1> | |
| <graph_items> | |
| <graph_item> | |
| <sortorder>0</sortorder> | |
| <drawtype>0</drawtype> | |
| <color>00C800</color> | |
| <yaxisside>0</yaxisside> | |
| <calc_fnc>2</calc_fnc> | |
| <type>0</type> | |
| <item> | |
| <host>Template ZooKeeper</host> | |
| <key>zookeeper.status[zk_approximate_data_size]</key> | |
| </item> | |
| </graph_item> | |
| </graph_items> | |
| </graph> | |
| <graph> | |
| <name>ZooKeeper Latency</name> | |
| <width>900</width> | |
| <height>200</height> | |
| <yaxismin>0.0000</yaxismin> | |
| <yaxismax>100.0000</yaxismax> | |
| <show_work_period>1</show_work_period> | |
| <show_triggers>1</show_triggers> | |
| <type>0</type> | |
| <show_legend>1</show_legend> | |
| <show_3d>0</show_3d> | |
| <percent_left>0.0000</percent_left> | |
| <percent_right>0.0000</percent_right> | |
| <ymin_type_1>0</ymin_type_1> | |
| <ymax_type_1>0</ymax_type_1> | |
| <ymin_item_1>0</ymin_item_1> | |
| <ymax_item_1>0</ymax_item_1> | |
| <graph_items> | |
| <graph_item> | |
| <sortorder>0</sortorder> | |
| <drawtype>2</drawtype> | |
| <color>00C800</color> | |
| <yaxisside>0</yaxisside> | |
| <calc_fnc>2</calc_fnc> | |
| <type>0</type> | |
| <item> | |
| <host>Template ZooKeeper</host> | |
| <key>zookeeper.status[zk_avg_latency]</key> | |
| </item> | |
| </graph_item> | |
| <graph_item> | |
| <sortorder>1</sortorder> | |
| <drawtype>2</drawtype> | |
| <color>C80000</color> | |
| <yaxisside>0</yaxisside> | |
| <calc_fnc>2</calc_fnc> | |
| <type>0</type> | |
| <item> | |
| <host>Template ZooKeeper</host> | |
| <key>zookeeper.status[zk_min_latency]</key> | |
| </item> | |
| </graph_item> | |
| <graph_item> | |
| <sortorder>2</sortorder> | |
| <drawtype>2</drawtype> | |
| <color>0000C8</color> | |
| <yaxisside>0</yaxisside> | |
| <calc_fnc>2</calc_fnc> | |
| <type>0</type> | |
| <item> | |
| <host>Template ZooKeeper</host> | |
| <key>zookeeper.status[zk_max_latency]</key> | |
| </item> | |
| </graph_item> | |
| </graph_items> | |
| </graph> | |
| <graph> | |
| <name>ZooKeeper Packages Received/Sent</name> | |
| <width>900</width> | |
| <height>200</height> | |
| <yaxismin>0.0000</yaxismin> | |
| <yaxismax>100.0000</yaxismax> | |
| <show_work_period>1</show_work_period> | |
| <show_triggers>1</show_triggers> | |
| <type>1</type> | |
| <show_legend>1</show_legend> | |
| <show_3d>0</show_3d> | |
| <percent_left>0.0000</percent_left> | |
| <percent_right>0.0000</percent_right> | |
| <ymin_type_1>0</ymin_type_1> | |
| <ymax_type_1>0</ymax_type_1> | |
| <ymin_item_1>0</ymin_item_1> | |
| <ymax_item_1>0</ymax_item_1> | |
| <graph_items> | |
| <graph_item> | |
| <sortorder>1</sortorder> | |
| <drawtype>0</drawtype> | |
| <color>00C800</color> | |
| <yaxisside>0</yaxisside> | |
| <calc_fnc>2</calc_fnc> | |
| <type>0</type> | |
| <item> | |
| <host>Template ZooKeeper</host> | |
| <key>zookeeper.status[zk_packets_received]</key> | |
| </item> | |
| </graph_item> | |
| <graph_item> | |
| <sortorder>0</sortorder> | |
| <drawtype>0</drawtype> | |
| <color>FF3333</color> | |
| <yaxisside>0</yaxisside> | |
| <calc_fnc>2</calc_fnc> | |
| <type>0</type> | |
| <item> | |
| <host>Template ZooKeeper</host> | |
| <key>zookeeper.status[zk_packets_sent]</key> | |
| </item> | |
| </graph_item> | |
| </graph_items> | |
| </graph> | |
| <graph> | |
| <name>ZooKeeper Watches Count</name> | |
| <width>900</width> | |
| <height>200</height> | |
| <yaxismin>0.0000</yaxismin> | |
| <yaxismax>100.0000</yaxismax> | |
| <show_work_period>1</show_work_period> | |
| <show_triggers>1</show_triggers> | |
| <type>1</type> | |
| <show_legend>1</show_legend> | |
| <show_3d>0</show_3d> | |
| <percent_left>0.0000</percent_left> | |
| <percent_right>0.0000</percent_right> | |
| <ymin_type_1>0</ymin_type_1> | |
| <ymax_type_1>0</ymax_type_1> | |
| <ymin_item_1>0</ymin_item_1> | |
| <ymax_item_1>0</ymax_item_1> | |
| <graph_items> | |
| <graph_item> | |
| <sortorder>0</sortorder> | |
| <drawtype>0</drawtype> | |
| <color>660066</color> | |
| <yaxisside>0</yaxisside> | |
| <calc_fnc>2</calc_fnc> | |
| <type>0</type> | |
| <item> | |
| <host>Template ZooKeeper</host> | |
| <key>zookeeper.status[zk_watch_count]</key> | |
| </item> | |
| </graph_item> | |
| </graph_items> | |
| </graph> | |
| <graph> | |
| <name>ZooKeeper Znodes Count</name> | |
| <width>900</width> | |
| <height>200</height> | |
| <yaxismin>0.0000</yaxismin> | |
| <yaxismax>100.0000</yaxismax> | |
| <show_work_period>1</show_work_period> | |
| <show_triggers>1</show_triggers> | |
| <type>0</type> | |
| <show_legend>1</show_legend> | |
| <show_3d>0</show_3d> | |
| <percent_left>0.0000</percent_left> | |
| <percent_right>0.0000</percent_right> | |
| <ymin_type_1>0</ymin_type_1> | |
| <ymax_type_1>0</ymax_type_1> | |
| <ymin_item_1>0</ymin_item_1> | |
| <ymax_item_1>0</ymax_item_1> | |
| <graph_items> | |
| <graph_item> | |
| <sortorder>0</sortorder> | |
| <drawtype>1</drawtype> | |
| <color>FFCCFF</color> | |
| <yaxisside>0</yaxisside> | |
| <calc_fnc>2</calc_fnc> | |
| <type>0</type> | |
| <item> | |
| <host>Template ZooKeeper</host> | |
| <key>zookeeper.status[zk_znode_count]</key> | |
| </item> | |
| </graph_item> | |
| </graph_items> | |
| </graph> | |
| </graphs> | |
| </zabbix_export> |
问题:
部署上去后发现不出图,查看 zoo.cfg 文件,发现服务器是通过内外 dns 解析域名访问的,于是将 /usr/local/zabbix-agent/scripts/check_zookeeper.py 中监听的 localhost 改为对应的域名
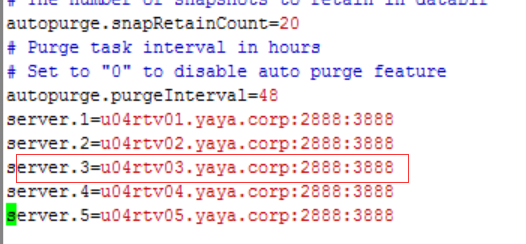

并且将 zabbix-server 端监听方式改为 dns,重启客户端后,终于出图了
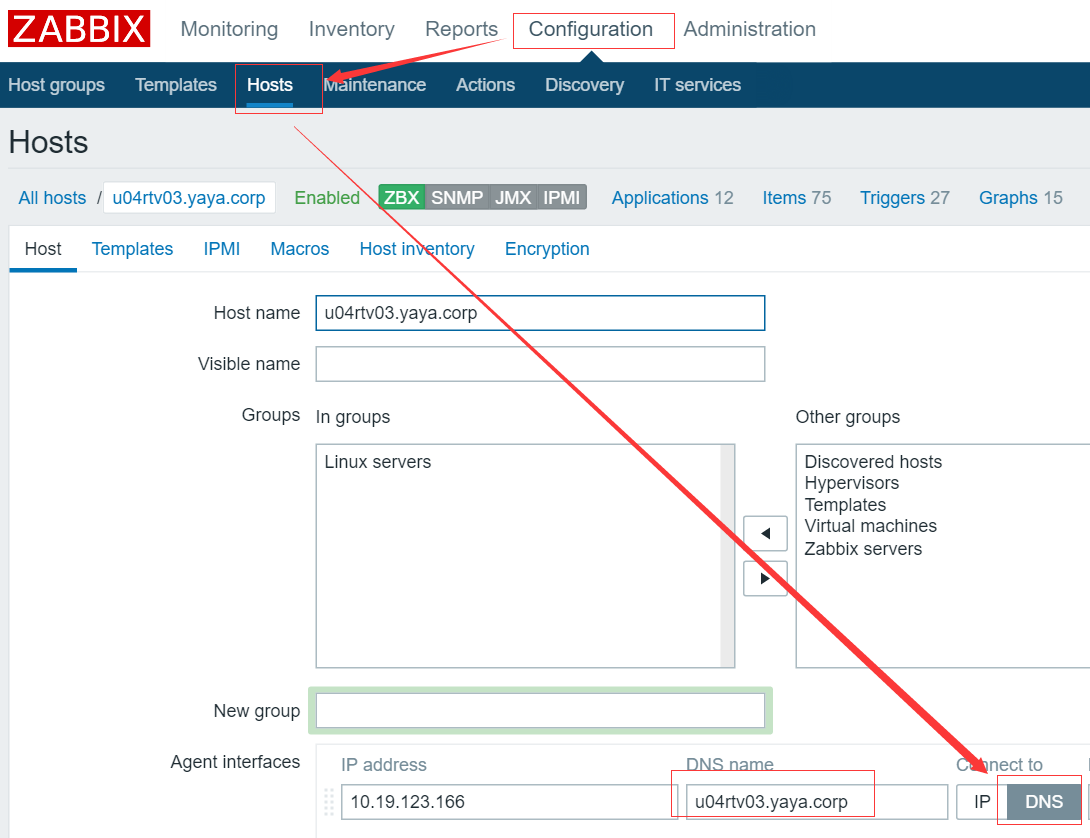
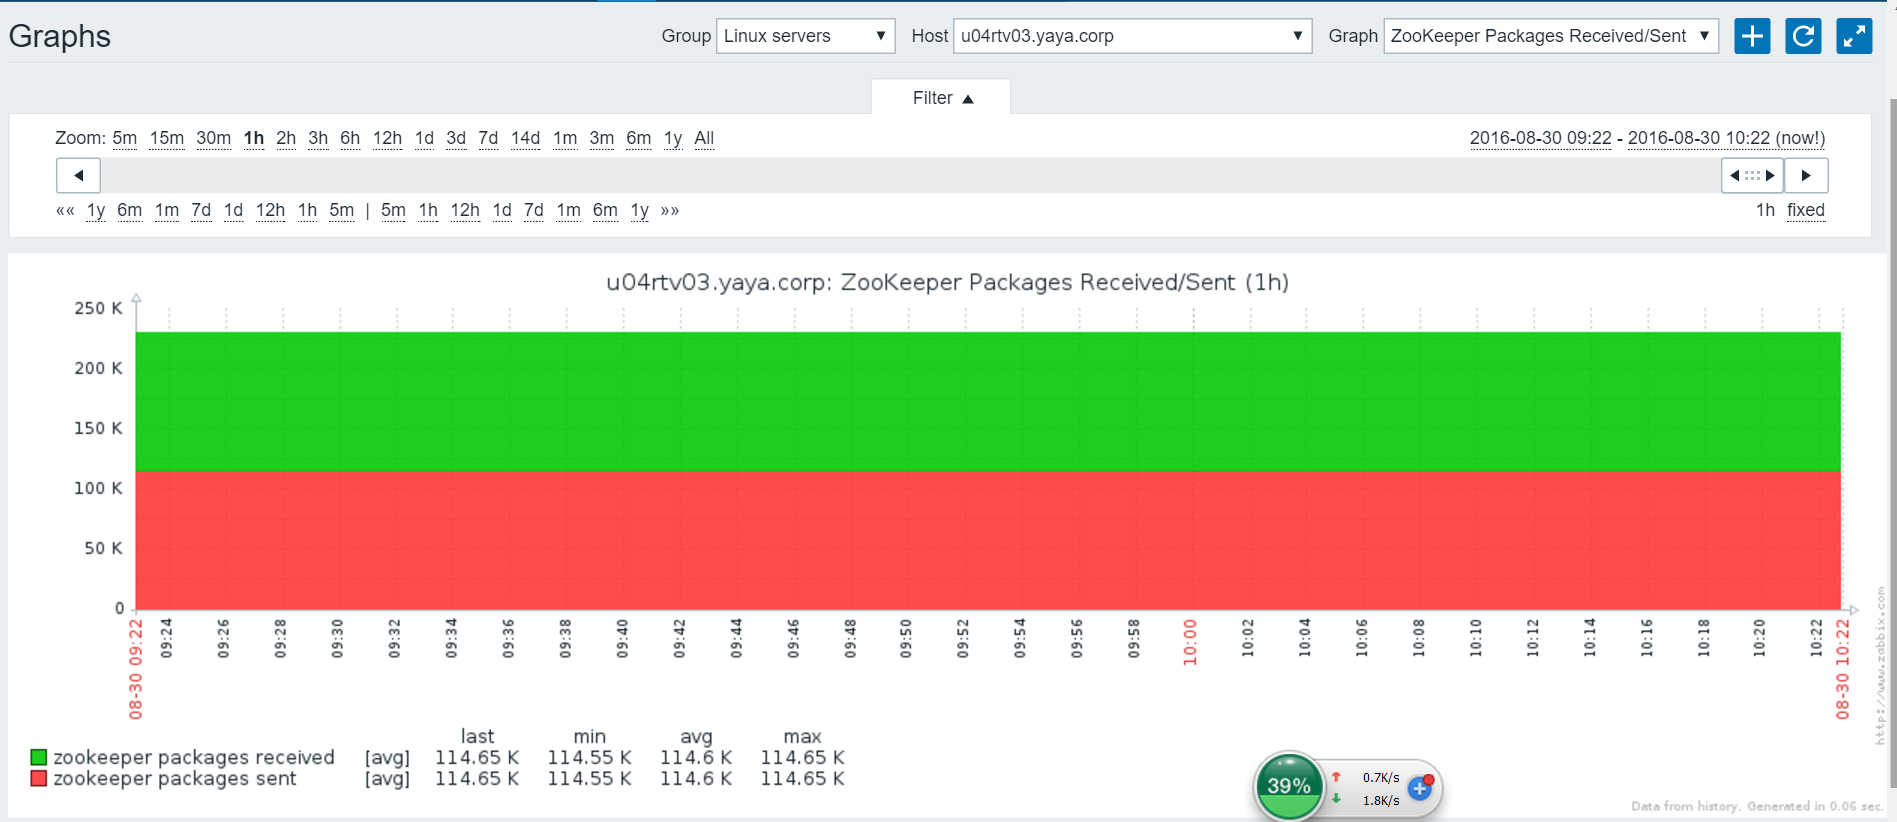
本文永久更新链接地址:http://www.linuxidc.com/Linux/2016-11/137638.htm


