共计 10349 个字符,预计需要花费 26 分钟才能阅读完成。
SVN 服务器搭建步骤及使用实战
一、实验环境:
[root@node02 ~]# uname -a
Linux node02 2.6.32-504.el6.x86_64 #1 SMP Wed Oct 15 04:27:16 UTC 2014 x86_64 x86_64 x86_64 GNU/Linux
[root@node02 ~]# cat /etc/RedHat-release
CentOS release 6.6 (Final)
[root@node02 ~]#
[root@node02 ~]# ifconfig eth0
eth0 Link encap:Ethernet HWaddr 00:0C:29:DF:59:C7
inet addr:192.168.112.129 Bcast:192.168.112.255 Mask:255.255.255.0
inet6 addr: fe80::20c:29ff:fedf:59c7/64 Scope:Link
UP BROADCAST RUNNING MULTICAST MTU:1500 Metric:1
RX packets:37078 errors:0 dropped:0 overruns:0 frame:0
TX packets:21925 errors:0 dropped:0 overruns:0 carrier:0
collisions:0 txqueuelen:1000
RX bytes:26850825 (25.6 MiB) TX bytes:3241796 (3.0 MiB)
[root@node02 ~]#
二、SVN Apache 安装
这里我直接用 yum 安装
[root@node02 ~]# yum install subversion apr apr-util mod_dav_svn httpd
[root@node02 ~]#
[root@node02 ~]# rpm -qa subversion apr apr-util mod_dav_svn httpd
apr-util-1.3.9-3.el6_0.1.x86_64
subversion-1.6.11-15.el6_7.x86_64
apr-1.3.9-5.el6_2.x86_64
httpd-2.2.15-55.el6.centos.2.x86_64
mod_dav_svn-1.6.11-15.el6_7.x86_64
[root@node02 ~]#
查看目录结构:
[root@node02 ~]# tree /etc/httpd/
/etc/httpd/
├── conf
│ ├── httpd.conf
│ └── magic
├── conf.d
│ ├── passwd
│ ├── README
│ ├── subversion.conf
│ ├── subversion.conf.bak
│ └── welcome.conf
├── logs -> ../../var/log/httpd
├── modules -> ../../usr/lib64/httpd/modules
└── run -> ../../var/run/httpd
5 directories, 7 files
[root@node02 ~]#
目录配置:
(1)svn 目录配置
[root@node02 ~]# mkdir -p /application/svn/svndata
[root@node02 ~]# mkdir -p /application/svn/svndata/svnpasswd/
[root@node02 ~]#
注意: 这里的 /application/svn/svndata 是 SVN 的项目目录,该目录下就是我们平常的项目存放位置
目录 /application/svn/svndata/svnpasswd/ 是用用户认证和权限文件存放路径,结构如下:
[root@node02 ~]# tree /application/svn/svndata/svnpasswd/
/application/svn/svndata/svnpasswd/
├── authz
└── passwd
0 directories, 2 files
[root@node02 ~]#
(2)启动 SVN
[root@node02 ~]# svnserve -d -r /application/svn/svndata/
[root@node02 ~]# ps -ef|grep svn
root 13512 1 0 18:48 ? 00:00:00 svnserve -d -r /application/svn/svndata/
root 14068 1977 0 22:49 pts/0 00:00:00 grep svn
[root@node02 ~]# netstat -lnput|grep svn
tcp 0 0 0.0.0.0:3690 0.0.0.0:* LISTEN 13512/svnserve
[root@node02 ~]#
(3)创建项目
[root@node02 ~]# svnadmin create /application/svn/svndata/project001
[root@node02 ~]# tree /application/svn/svndata/project001/
/application/svn/svndata/project001/
├── conf
│ ├── authz
│ ├── passwd
│ └── svnserve.conf
├── db
│ ├── current
│ ├── format
│ ├── fsfs.conf
│ ├── fs-type
│ ├── min-unpacked-rev
│ ├── rep-cache.db
│ ├── revprops
│ │ └── 0
│ │ └── 0
│ ├── revs
│ │ └── 0
│ │ └── 0
│ ├── transactions
│ ├── txn-current
│ ├── txn-current-lock
│ ├── txn-protorevs
│ ├── uuid
│ └── write-lock
├── format
├── hooks
│ ├── post-commit.tmpl
│ ├── post-lock.tmpl
│ ├── post-revprop-change.tmpl
│ ├── post-unlock.tmpl
│ ├── pre-commit.tmpl
│ ├── pre-lock.tmpl
│ ├── pre-revprop-change.tmpl
│ ├── pre-unlock.tmpl
│ └── start-commit.tmpl
├── locks
│ ├── db.lock
│ └── db-logs.lock
└── README.txt
10 directories, 28 files
[root@node02 ~]#
(3)修改项目配置文件
[root@node02 ~]# cd /application/svn/svndata/project001
[root@node02 project001]# ls
conf db format hooks locks README.txt
[root@node02 project001]#
[root@node02 project001]# cd conf/
[root@node02 conf]# ll
total 12
-rw-r–r– 1 root root 1080 Dec 31 22:53 authz
-rw-r–r– 1 root root 309 Dec 31 22:53 passwd
-rw-r–r– 1 root root 2279 Dec 31 22:53 svnserve.conf
[root@node02 conf]#
[root@node02 conf]# vim svnserve.conf
anon-access = none ——————->12 行去掉注释
auth-access = write ——————->13 行去掉注释
password-db = /application/svn/svndata/svnpasswd/passwd ————>18 行去掉注释
authz-db = /application/svn/svndata/svnpasswd/authz —————->25 行去掉注释
[root@node02 conf]#
提示:svnserve.conf 中每个参数都要定格写,开头不能有空格
或者执行如下命令修改:
[root@node02 conf]# sed -i ‘s/# anon-access = read/anon-access = none/g’ svnserve.conf
[root@node02 conf]# sed -i ‘s/# auth-access = write/auth-access = write/g’ svnserve.conf
[root@node02 conf]# sed -i ‘s%# password-db = passwd%password-db = /application/svn/svndata/svnpasswd/passwd%g’ svnserve.conf
[root@node02 conf]# sed -i ‘s%# authz-db = authz%authz-db = /application/svn/svndata/svnpasswd/authz%g’ svnserve.conf
修改完之后可以运行如下命令进行检查
[root@node02 conf]# egrep “\-access|\-db =” svnserve.conf
anon-access = none
auth-access = write
password-db = /application/svn/svndata/svnpasswd/passwd
authz-db = /application/svn/svndata/svnpasswd/authz
[root@node02 conf]#
确认配置修改无误后,拷贝用户认证文件 passwd 和权限管理文件 authz 到刚才创建的目录下:
[root@node02 conf]# cp authz passwd /application/svn/svndata/svnpasswd/
[root@node02 conf]# tree /application/svn/svndata/svnpasswd/
/application/svn/svndata/svnpasswd/
├── authz
└── passwd
0 directories, 2 files
[root@node02 conf]#
(4)创建用户 admin、user001 并设置密码,格式: 用户名 = 密码
[root@node02 svnpasswd]# cat passwd
### This file is an example password file for svnserve.
### Its format is similar to that of svnserve.conf. As shown in the
### example below it contains one section labelled [users].
### The name and password for each user follow, one account per line.
[users]
# harry = harryssecret
# sally = sallyssecret
admin = admin
user001 = 123456
[root@node02 svnpasswd]#
访问权限:
[root@node02 svnpasswd]# cat authz
—– 省略部分 ————-
[aliases]
# joe = /C=XZ/ST=Dessert/L=Snake City/O=Snake Oil, Ltd./OU=Research Institute/CN=Joe Average
[groups]
# harry_and_sally = harry,sally
# harry_sally_and_joe = harry,sally,&joe
users = admin,user001
# [/foo/bar]
# harry = rw
# &joe = r
# * =
# [repository:/baz/fuz]
# @harry_and_sally = rw
# * = r
[/]
@users = rw
[root@node02 svnpasswd]#
说明:users= admin,user001 将 admin、user001 两个用户赋值用户组 users,@user = rw 是让用户组对跟目录有读写权限,也就是说用户 admin、user001 这两个用户对根目录有读写的权限。
到这里 svn 服务器算搭建完成。
(5)客户端安装
下面进行客户端的安装和操作
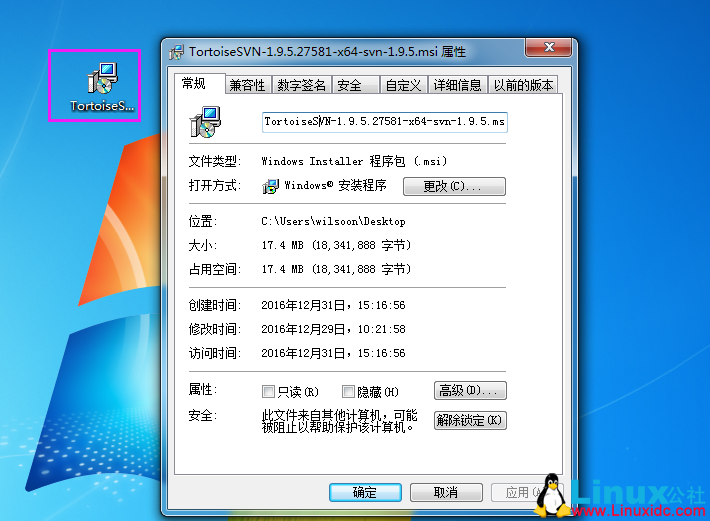
这里介绍安装过程,windows 下安装客户端直接双击,然后下一步下一步即可。
(6)SVN 的常用操作,提交、更新、删除文件
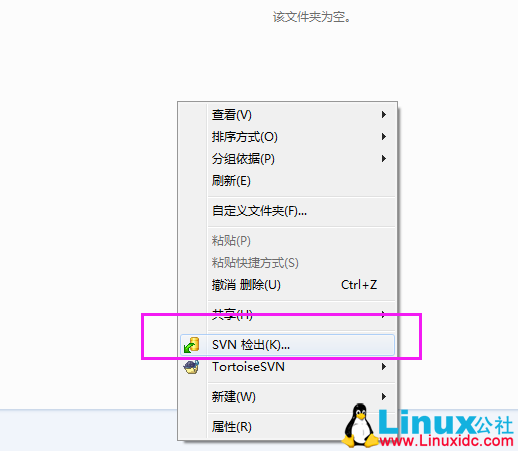
安装好之后,鼠标置于桌面右键会有如下图标出现 SVN Checkout 和 TortoiseSVN 两个标签
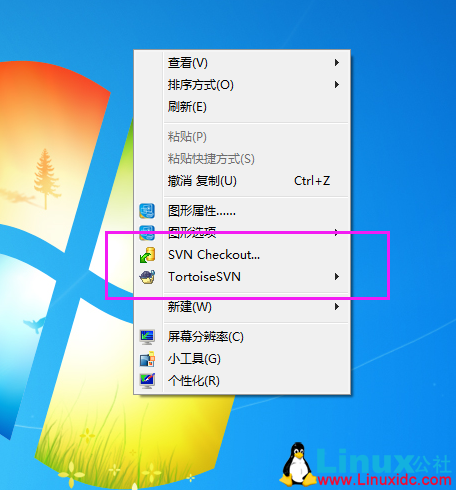
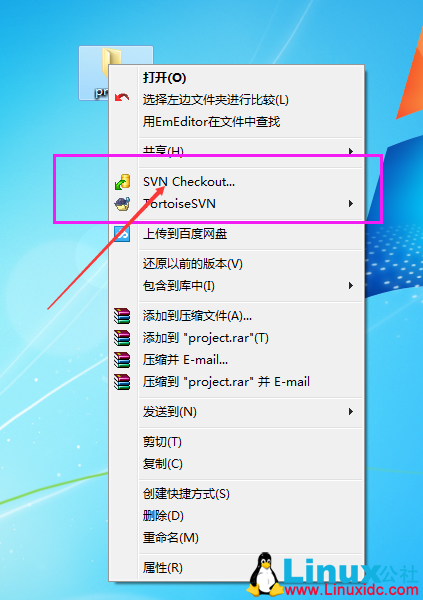
这里我在桌面创建一个文件夹,输入写入一个文件,然后提交 SVN Checkout,
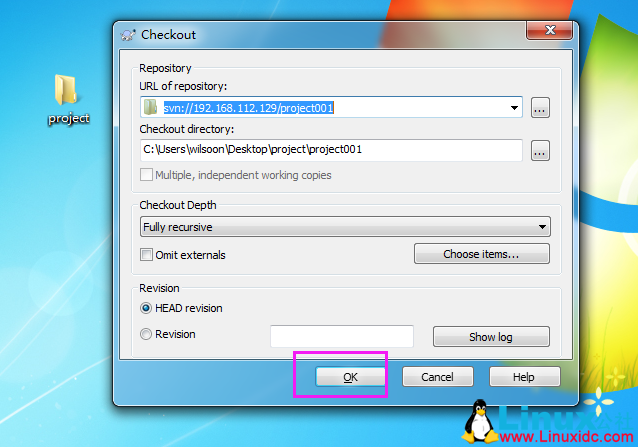
会弹出一个登录对话框,此时点击 OK
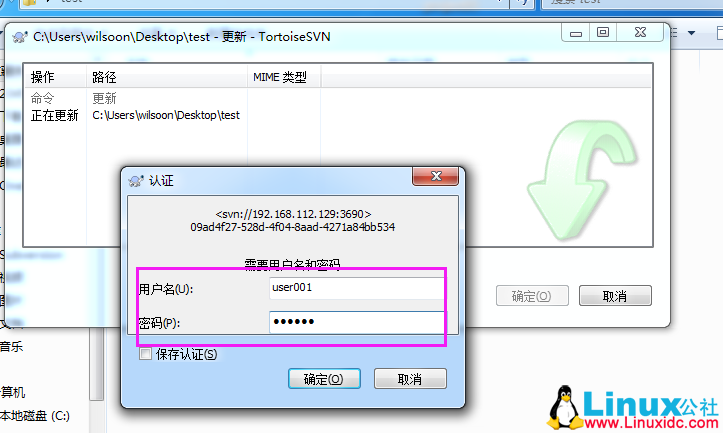
此时会提示输入用户名和密码:
输入刚才创建的用户 admin 或者 user001 登录即可,这里用 user001 登录即可。如果有文件要提交,这里直接把文件放入 project001 里,在文件夹上右击,弹出如下对话框,然后选择文件点击 ” 确定 ” 即可

提交后的结果为:
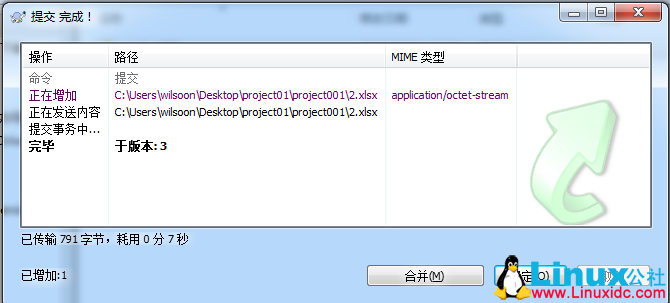
这里,就将本地的文件提价到 svn 上,如果有意外操作。比如不小心把本地文件删除了,可以在从 svn 上再拉取一份即可。

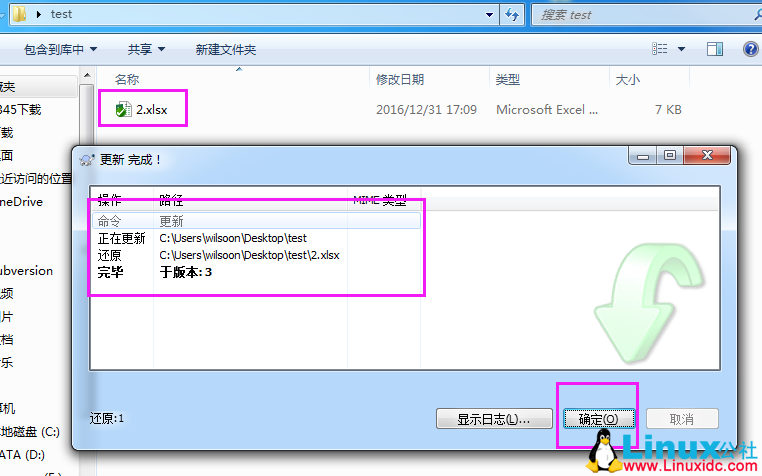
删除 2.xlsx 文件,然后再从 svn 上拉取一次,
输入用户名和密码
确定后,就从 svn 上拉取了一份 2.xlsx 文件
如果要删除 SVN 上的某个文件,需要将本地的文件删除,然后再执行 cmmit(提交)
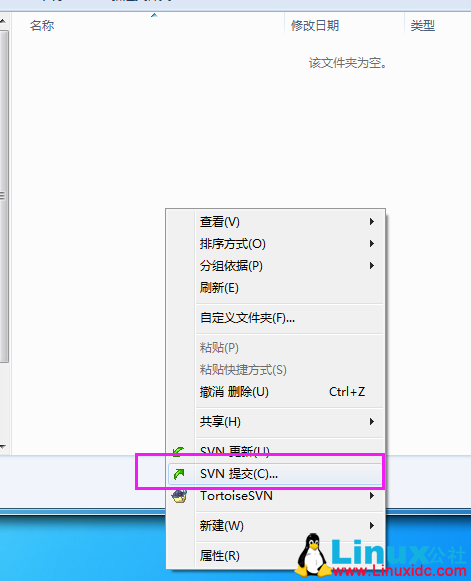
弹出如下对话框

确定后,即可完成 SVN 服务器上的 2.xlsx 文件的删除

(7)导入 SVN 原始的目录树
[root@node02 ~]# cd /application/tools/
[root@node02 tools]# mkdir -p branch tags trunk/
[root@node02 tools]# ll
total 12
drwxr-xr-x 2 root root 4096 Dec 31 21:02 branch
drwxr-xr-x 2 root root 4096 Dec 31 21:02 tags
drwxr-xr-x 2 root root 4096 Dec 31 21:02 trunk
[root@node02 tools]#
[root@node02 tools]# svn import /application/tools/ file:///application/svn/svndata/project001/
svn: Could not use external editor to fetch log message; consider setting the $SVN_EDITOR environment variable or using the –message (-m) or –file (-F) options
svn: None of the environment variables SVN_EDITOR, VISUAL or EDITOR are set, and no ‘editor-cmd’ run-time configuration option was found
[root@node02 tools]#
报错,提示加参数 -m “xxxxx”
[root@node02 tools]# svn import /application/tools/ file:///application/svn/svndata/project001/ -m “import messages”
Adding /application/tools/trunk
Adding /application/tools/branch
Adding /application/tools/tags
Committed revision 5.
[root@node02 tools]#
导入成功,客户端检查一下

点击“版本库浏览器”
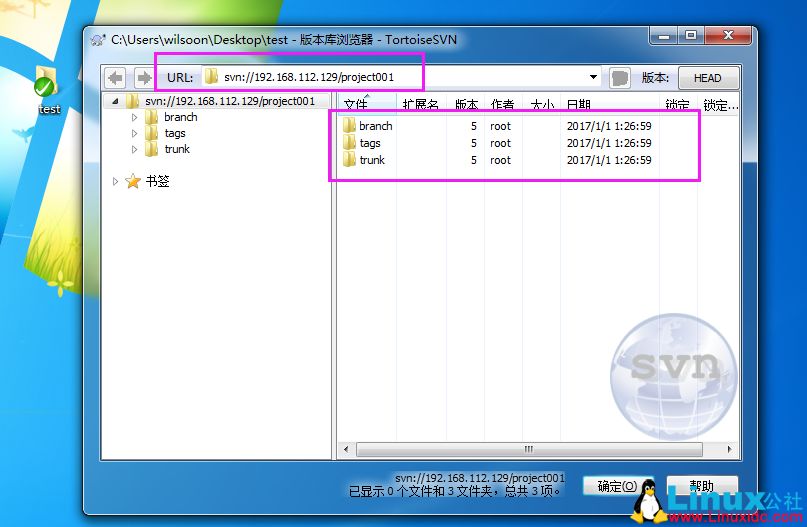 至此 SVN 原始目录树导入成功。
(8)打 tags 版本
如果我们有一个项目为 ucode, 开发完所有的基本功能之后,的版本问 1.0,如下图所示:
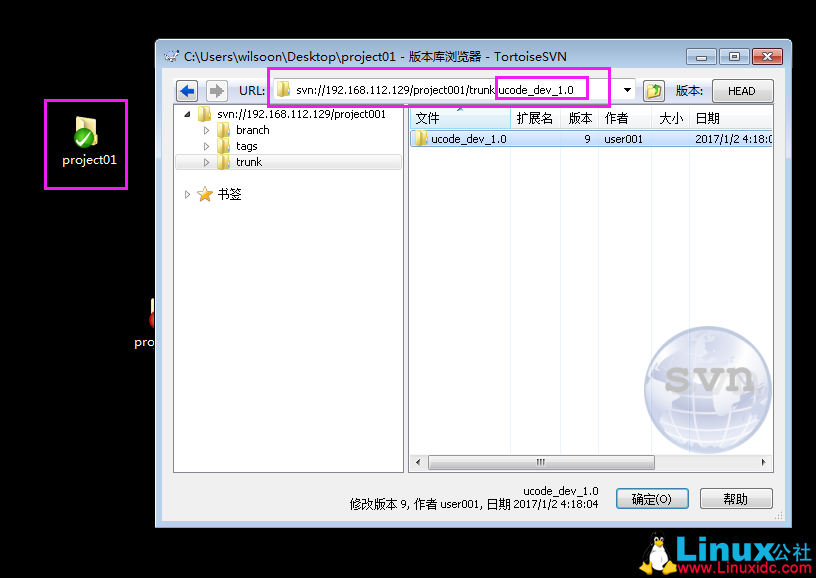
以后的开发都是基于这个版本的开发,那么可以把这个版本锁定,然后定义为一个新的版本,操作如下:
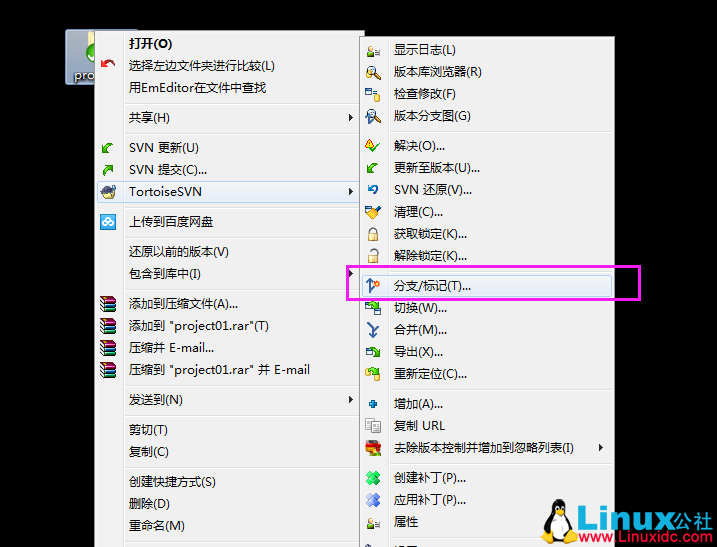
选择 ” 分支 / 标记(T)” 弹出如下对话框,输入 ”ucode_dev_1.0_release_v0001″, 如下图:
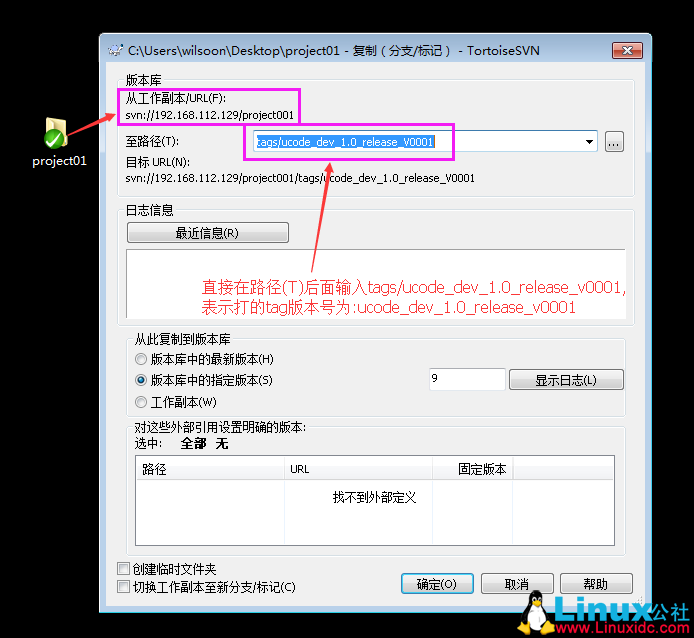
然后 ” 确定 ” 即可。
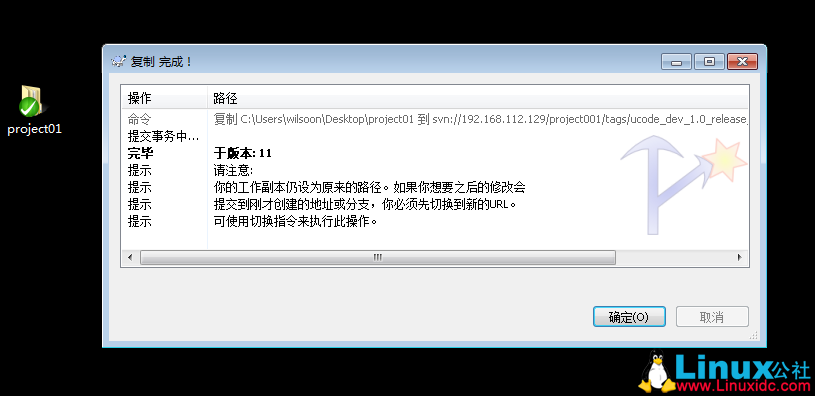
接下来可以在 tags 目录下看到刚才打的版本号:
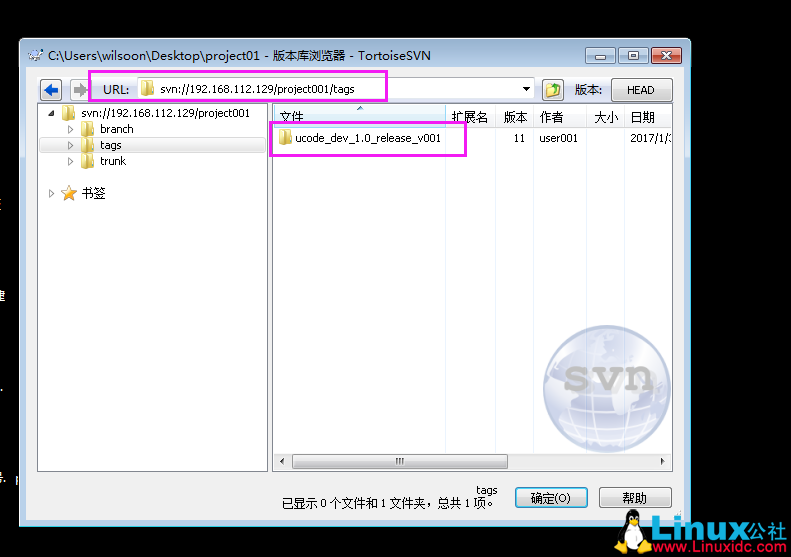
(9) 配置 Apache,让 svn 支持 http 协议访问
[root@node02 conf.d]# pwd
/etc/httpd/conf.d
[root@node02 conf.d]# ll
total 20
-rw-r–r– 1 root root 46 Dec 31 18:25 passwd
-rw-r–r– 1 root root 392 Nov 19 07:49 README
-rw-r–r– 1 root root 1049 Dec 31 18:35 subversion.conf
-rw-r–r– 1 root root 1042 Dec 31 18:23 subversion.conf.bak
-rw-r–r– 1 root root 299 Nov 3 22:33 welcome.conf
[root@node02 conf.d]#
[root@node02 conf.d]# cat subversion.conf
LoadModule dav_svn_module modules/mod_dav_svn.so
LoadModule authz_svn_module modules/mod_authz_svn.so
#
# Example configuration to enable HTTP access for a directory
# containing Subversion repositories, “/var/www/svn”. Each repository
# must be both:
#
# a) readable and writable by the ‘apache’ user, and
#
# b) labelled with the ‘httpd_sys_content_t’ context if using
# SELinux
#
#
# To create a new repository “http://localhost/repos/stuff” using
# this configuration, run as root:
#
# # cd /var/www/svn
# # svnadmin create stuff
# # chown -R apache.apache stuff
# # chcon -R -t httpd_sys_content_t stuff
#
<Location /repos>
DAV svn
SVNParentPath /application/svn/svndata
AuthType Basic
AuthName “Authorization Realm”
AuthUserFile /etc/httpd/conf.d/passwd
Require valid-user
</Location>
[root@node02 conf.d]#
生成认证用户和密码
[root@node02 conf.d]# htpasswd /etc/httpd/conf.d/passwd user001
New password:
Re-type new password:
Updating password for user user001
[root@node02 conf.d]#
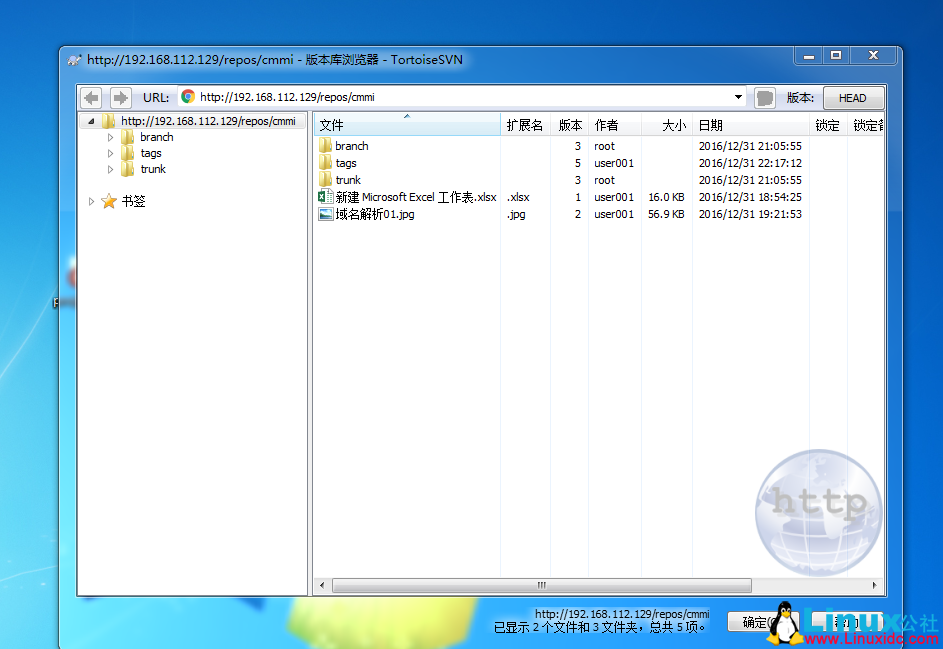
另外在配置多个项目时,务必要统一配置文件,比如这里的项目是 project001,则 project001 的配置文件必须跟其他项目文件保持同一份文件否则认证失败:
[root@node02 conf]# pwd
/application/svn/svndata/project001/conf
[root@node02 conf]# egrep -v “^#” svnserve.conf
[general]
anon-access = read
auth-access = write
password-db = /application/svn/svndata/svnpasswd/passwd
authz-db = /application/svn/svndata/svnpasswd/authz
[sasl]
[root@node02 conf]#
http 访问 svn 时所用的认证配置文件为:
[root@node02 conf]# pwd
/application/svn/svndata/project001/conf
[root@node02 conf]# cd /etc/httpd/conf.d/
[root@node02 conf.d]# pwd
/etc/httpd/conf.d
[root@node02 conf.d]# ll
total 20
-rw-r–r– 1 root root 22 Jan 5 01:01 passwd
-rw-r–r– 1 root root 392 Nov 19 07:49 README
-rw-r–r– 1 root root 1049 Dec 31 18:35 subversion.conf
-rw-r–r– 1 root root 1042 Dec 31 18:23 subversion.conf.bak
-rw-r–r– 1 root root 299 Nov 3 22:33 welcome.conf
[root@node02 conf.d]# cat passwd
user001:vQWeaqcB4YzpU
[root@node02 conf.d]# ll passwd
-rw-r–r– 1 root root 22 Jan 5 01:01 passwd
[root@node02 conf.d]#
此时 passwd 文件中的用户名和密码要与 svn 的 passwd 中的用户名和密码保持相同
[root@node02 svnpasswd]# cat passwd
### This file is an example password file for svnserve.
### Its format is similar to that of svnserve.conf. As shown in the
### example below it contains one section labelled [users].
### The name and password for each user follow, one account per line.
[users]
# harry = harryssecret
# sally = sallyssecret
admin = admin
user001 = 123456
[root@node02 svnpasswd]#
即:passwd 中的 user001 密码 123456 要与 /etc/httpd/conf.d/passwd 中的是完全相同,然后重启 Apache,访问即可,如果出现访问权限问题,可以在 Apache 的主配置文件中 httpd.conf 中的最后面添加如下内容:
<Directory “/application/svn/svndata”>
Options Indexes FollowSymLinks
AllowOverride None
Order allow,deny
Allow from all
</Directory>
Ubuntu 14.04 下搭建 SVN 服务器 SVN:// http://www.linuxidc.com/Linux/2015-01/111956.htm
CentOS 7 下安装 iF.svnadmin 实现 Web 方式管理 SVN(源码安装)http://www.linuxidc.com/Linux/2016-08/134214.htm
CentOS 6.5 部署 Apache+SVN http://www.linuxidc.com/Linux/2013-12/94315.htm
Apache+SVN 搭建 SVN 服务器 http://www.linuxidc.com/Linux/2013-03/81379.htm
Windows 下 SVN 服务器搭建和使用 + 客户端重新设置密码 http://www.linuxidc.com/Linux/2013-05/85189p5.htm
CentOS 6.6 搭建 SVN 服务器 http://www.linuxidc.com/Linux/2016-12/137864.htm
CentOS 7.2 下 Nginx+MySQL+PHP-FPM+SVN 配置 Walle 自动化部署系统详解 http://www.linuxidc.com/Linux/2016-11/137703.htm
CentOS 7.1 下 SVN 安装与配置 http://www.linuxidc.com/Linux/2016-12/138637.htm
Subversion (SVN) 的详细介绍 :请点这里
Subversion (SVN) 的下载地址 :请点这里
本文永久更新链接地址 :http://www.linuxidc.com/Linux/2017-01/139282.htm


