共计 9946 个字符,预计需要花费 25 分钟才能阅读完成。
Zabbix 是一个基于 WEB 界面的提供分布式系统监视以及网络监视功能的企业级的开源解决方案,由一个国外的团队持续维护更新,软件可以自由下载使用,运作团队靠提供收费的技术支持赢利, 官方网站:点击这里。官方文档:点击这里。Zabbix 通过 C / S 模式采集数据,通过 B / S 模式在 web 端展示和配置。zabbix server 可以通过 SNMP,zabbix agent,ping,端口监视等方法提供对远程服务器 / 网络状态的监视,数据收集等功能。zabbix agent 需要安装在被监视的目标服务器上,它主要完成对硬件信息或与操作系统有关的内存,CPU 等信息的收集。zabbix server 可以单独监视远程服务器的服务状态;同时也可以与 zabbix agent 配合,可以轮询 zabbix agent 主动接收监视数据(trapping 方式),同时还可被动接收 zabbix agent 发送的数据(trapping 方式)。另外 zabbix server 还支持 SNMP (v1,v2),可以与 SNMP 软件 (例如:net-snmp) 等配合使用。

Zabbix 的主要特点:
– 安装与配置简单,学习成本低
– 支持多语言(包括中文)
– 免费开源
– 自动发现服务器与网络设备
– 分布式监视以及 WEB 集中管理功能
– 可以无 agent 监视
– 用户安全认证和柔软的授权方式
– 通过 WEB 界面设置或查看监视结果
– email 等通知功能等等
Zabbix 主要功能:
– CPU 负荷
– 内存使用
– 磁盘使用
– 网络状况
– 端口监视
– 日志监视
一. 安装 LNMP 环境
参考:http://www.linuxidc.com/Linux/2017-01/139086.htm
二.Zabbix 服务端安装
[root@Zabbix_Server Tools]# tar zxvf zabbix-3.0.4.tar.gz
[root@Zabbix_Server Tools]# cd zabbix-3.0.4/database/mysql/
[root@Zabbix_Server mysql]# ls
data.sql images.sql schema.sql
[root@Zabbix_Server mysql]# mysql -u root -pZabbix
mysql> create database zabbix character set utf8; #创建数据库 zabbix,并且数据库编码使用 utf8
Query OK, 1 row affected (0.00 sec)
mysql> insert into mysql.user(Host,User,Password) values(‘localhost’,’zabbix’,password(‘zabbix’));
ERROR 1364 (HY000): Field ‘ssl_cipher’ doesn’t have a default value
mysql> quit;
[root@Zabbix_Server mysql]# vim /app/mysql/my.cnf
#sql_mode=NO_ENGINE_SUBSTITUTION,STRICT_TRANS_TABLES 指定了严格模式,为了安全,严格模式禁止通过 insert 这种形式直接修改 mysql 库中的 user 表进行添加新用户
sql_mode=NO_ENGINE_SUBSTITUTION #将配置文件中的 STRICT_TRANS_TABLES 删掉
[root@Zabbix_Server mysql]# service mysqld restart
[root@Zabbix_Server mysql]# mysql -u root -pZabbix
mysql> insert into mysql.user(Host,User,Password) values(‘localhost’,’zabbix’,password(‘zabbix’)); #新建账户 zabbix,密码 zabbix
Query OK, 1 row affected, 3 warnings (0.00 sec)
mysql> flush privileges; #刷新系统授权表
Query OK, 0 rows affected (0.00 sec)
mysql> grant all on zabbix.* to ‘zabbix’@’localhost’ identified by ‘zabbix’ with grant option; #允许账户 zabbix 能从本机连接到数据库 zabbix
Query OK, 0 rows affected (0.00 sec)
mysql> flush privileges;
Query OK, 0 rows affected (0.00 sec)
mysql> use zabbix; #进入数据库,按照顺序进行导入,否则会出错。
Database changed
mysql> source /usr/local/Tools/zabbix-3.0.4/database/mysql/schema.sql
…
Query OK, 0 rows affected (0.05 sec)
Records: 0 Duplicates: 0 Warnings: 0
mysql> source /usr/local/Tools/zabbix-3.0.4/database/mysql/images.sql
…
Query OK, 1 row affected (0.01 sec)
mysql> source /usr/local/Tools/zabbix-3.0.4/database/mysql/data.sql
…
Query OK, 1 row affected (0.00 sec)
Query OK, 0 rows affected (0.01 sec)
mysql> exit;
Bye
[root@Zabbix_Server mysql]# ln -s /usr/lib64/mysql/libmysqlclient.so.16.0.0 /usr/lib64/mysql/libmysqlclient.so #32 位系统为 /usr/lib/mysql,注意系统版本同,文件版本可能不一样,这里是 16.0.0
[root@Zabbix_Server mysql]# ln -s /usr/lib64/mysql/libmysqlclient_r.so.16.0.0 /usr/lib64/mysql/libmysqlclient_r.so
[root@Zabbix_Server mysql]# cd /usr/local/Tools/zabbix-3.0.4
[root@Zabbix_Server zabbix-3.0.4]# groupadd zabbix
[root@Zabbix_Server zabbix-3.0.4]# useradd -g zabbix zabbix -s /sbin/nologin
[root@Zabbix_Server zabbix-3.0.4]# yum -y install mysql-devel mysql-community-devel unixODBC-devel libssh2-devel OpenIPMI-devel net-snmp-devel curl-devel net-snmp-libs net-snmp-utils
[root@Zabbix_Server zabbix-3.0.4]# chkconfig snmpd on
[root@Zabbix_Server zabbix-3.0.4]# ./configure –prefix=/app/zabbix –enable-server –enable-agent –with-mysql –enable-ipv6 –with-net-snmp –with-libcurl –with-libxml2 –with-unixodbc –with-ssh2 –with-openipmi –with-openssl
[root@Zabbix_Server zabbix-3.0.4]# make && make install
[root@Zabbix_Server zabbix-3.0.4]# cp /usr/local/Tools/zabbix-3.0.4/misc/init.d/Fedora/core/zabbix_server /etc/rc.d/init.d/zabbix_server
[root@Zabbix_Server zabbix-3.0.4]# cp /usr/local/Tools/zabbix-3.0.4/misc/init.d/fedora/core/zabbix_agentd /etc/rc.d/init.d/zabbix_agentd
[root@Zabbix_Server zabbix-3.0.4]# chmod +x /etc/rc.d/init.d/zabbix_*
[root@Zabbix_Server zabbix-3.0.4]# chkconfig zabbix_server on
[root@Zabbix_Server zabbix-3.0.4]# chkconfig zabbix_agentd on
[root@Zabbix_Server zabbix-3.0.4]# vim /etc/rc.d/init.d/zabbix_server
BASEDIR=/app/zabbix
[root@Zabbix_Server zabbix-3.0.4]# vim /etc/rc.d/init.d/zabbix_agentd
BASEDIR=/app/zabbix
[root@Zabbix_Server zabbix-3.0.4]# cp /app/zabbix/etc/zabbix_server.conf{,bak}
[root@Zabbix_Server zabbix-3.0.4]# ln -s /app/zabbix/sbin/* /usr/local/sbin/
[root@Zabbix_Server zabbix-3.0.4]# ln -s /app/zabbix/bin/* /usr/local/bin/
[root@Zabbix_Server zabbix-3.0.4]# vim /app/zabbix/etc/zabbix_server.conf
LogFile=/app/zabbix/logs/zabbix_server.log
PidFile=/app/zabbix/pid/zabbix_server.pid
DBName=zabbix
DBUser=zabbix
DBPassword=zabbix
ListenIP=localhost
CacheSize=1024M #根据服务器性能修改,太小后面会报 out of memory
AlertScriptsPath=/app/zabbix/alertscripts #zabbix 运行脚本存放目录
[root@Zabbix_Server zabbix-3.0.4]# cp /app/zabbix/etc/zabbix_agentd.conf{,bak}
[root@Zabbix_Server zabbix-3.0.4]# vim /app/zabbix/etc/zabbix_agentd.conf
LogFile=/app/zabbix/logs/zabbix_agentd.log
Include=/app/zabbix/etc/zabbix_agentd.conf.d/
UnsafeUserParameters=1 #启用自定义 key
[root@Zabbix_Server zabbix-3.0.4]# mkdir -p /app/zabbix/logs
[root@Zabbix_Server zabbix-3.0.4]# touch /app/zabbix/logs/zabbix_agentd.log
[root@Zabbix_Server zabbix-3.0.4]# touch /app/zabbix/logs/zabbix_server.log
[root@Zabbix_Server zabbix-3.0.4]# mkdir /app/zabbix/pid
[root@Zabbix_Server zabbix-3.0.4]# touch /app/zabbix/pid/zabbix_server.pid
[root@Zabbix_Server zabbix-3.0.4]# chmod 766 /app/zabbix/pid/*
[root@Zabbix_Server zabbix-3.0.4]# chmod 766 /app/zabbix/logs/*
–with-libxml2 用来解析调用 SOAP 接口返回的 XML,
–with-libcurl 用来调用 vcenter 的 SOAP 接口。
如果没有 mysql_config,需要安装 yum install mysql-devel
配置 web 站点
[root@Zabbix_Server zabbix-3.0.4]# rm -rf /app/nginx/html/*
[root@Zabbix_Server zabbix-3.0.4]# cp -r /usr/local/Tools/zabbix-3.0.4/frontends/php/* /app/nginx/html/
[root@Zabbix_Server zabbix-3.0.4]# chown www.www -R /app/nginx/html/
[root@Zabbix_Server zabbix-3.0.4]# service zabbix_agentd start
[root@Zabbix_Server zabbix-3.0.4]# service zabbix_agentd start
[root@Zabbix_Server zabbix-3.0.4]# tail /app/zabbix/logs/zabbix_server.log
21858:20160906:072015.723 Ez Texting notifications: YES
21858:20160906:072015.724 ODBC: YES
21858:20160906:072015.724 SSH2 support: YES
21858:20160906:072015.724 IPv6 support: YES
21858:20160906:072015.724 TLS support: YES
21858:20160906:072015.724 ******************************
21858:20160906:072015.724 using configuration file: /app/zabbix/etc/zabbix_server.conf
21858:20160906:072015.730 current database version (mandatory/optional): 03000000/03000000
21858:20160906:072015.730 required mandatory version: 03000000
21858:20160906:072015.735 listener failed: cannot resolve address [[localhost]:10051]: [-2] Name or service not known
[root@Zabbix_Server zabbix-3.0.4]# vim /app/zabbix/etc/zabbix_server.conf
#ListenIP=localhost
ListenIP=127.0.0.1
[root@Zabbix_Server logs]# service zabbix_server start
[root@Zabbix_Server logs]# netstat -ntlp |grep zabbix
tcp 0 0 0.0.0.0:10050 0.0.0.0:* LISTEN 22490/zabbix_agentd
tcp 0 0 127.0.0.1:10051 0.0.0.0:* LISTEN 22419/zabbix_server
tcp 0 0 :::10050 :::* LISTEN 22490/zabbix_agentd
[root@Zabbix_Server logs]#
修改 php 配置文件参数
[root@Zabbix_Server zabbix-3.0.4]# cp /app/php/etc/php.ini{,bak}
[root@Zabbix_Server zabbix-3.0.4]# vim /app/php/etc/php.ini
post_max_size = 16M
max_execution_time = 300
max_input_time = 300
[root@Zabbix_Server zabbix-3.0.4]# cp /app/php/etc/php-fpm.conf{,bak}
[root@Zabbix_Server zabbix-3.0.4]# vim /app/php/etc/php-fpm.conf
request_terminate_timeout = 300
[root@Zabbix_Server zabbix-3.0.4]# service php-fpm restart
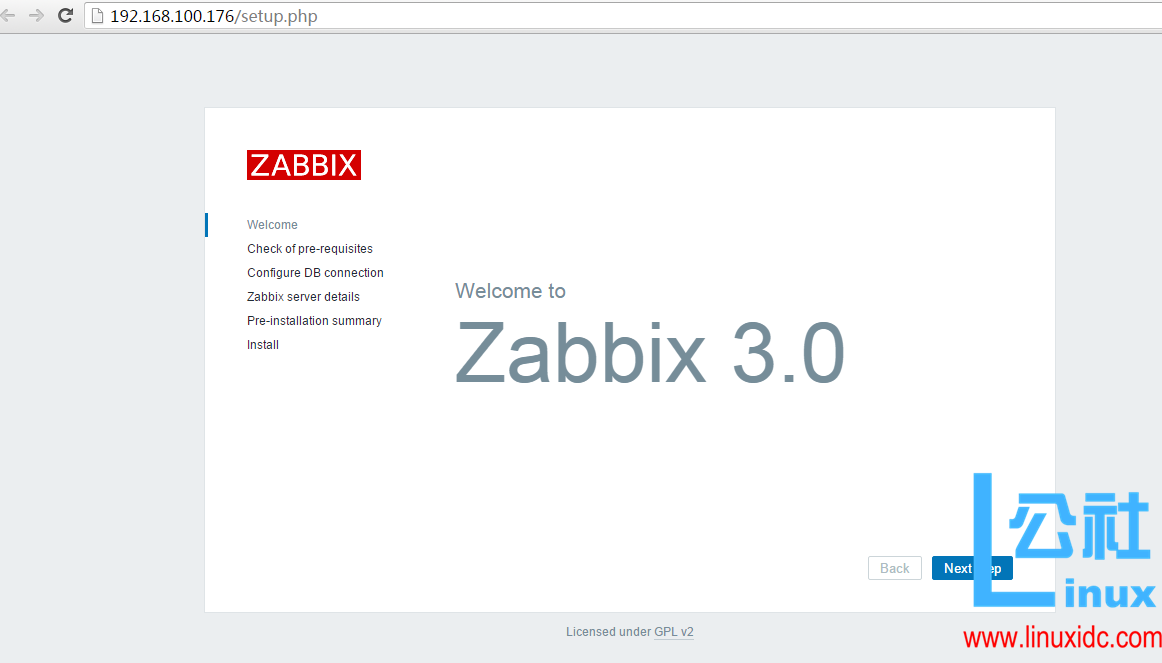
安装 web
在浏览器里直接输入 IP 地址 http://192.168.100.176 安装

下一步,提示:PHP option “always_populate_raw_post_data” must be set to “-1”
修改 php.ini 中 always_populate_raw_post_data = -1
[root@Zabbix_Server conf]# vim /app/php/etc/php.ini
always_populate_raw_post_data = -1
[root@Zabbix_Server conf]# service php-fpm restart
刷新页面,下一步

配置 MySQL 数据库信息
Database:MySQL
Database host:localhost
Database port:0 use default port 3306
Database name:zabbix
User:zabbix
Password:zabbix

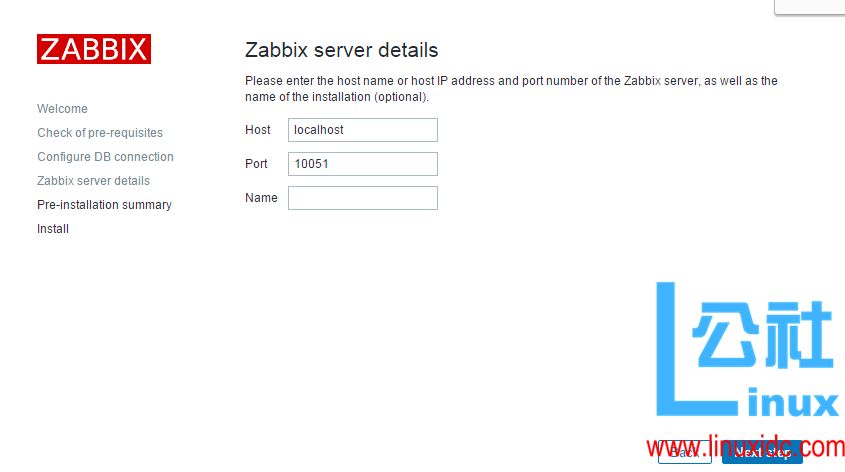
直接下一步

检查一下设置情况,没问题直接 Next


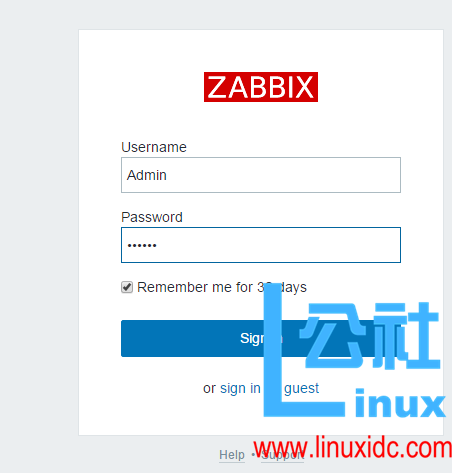
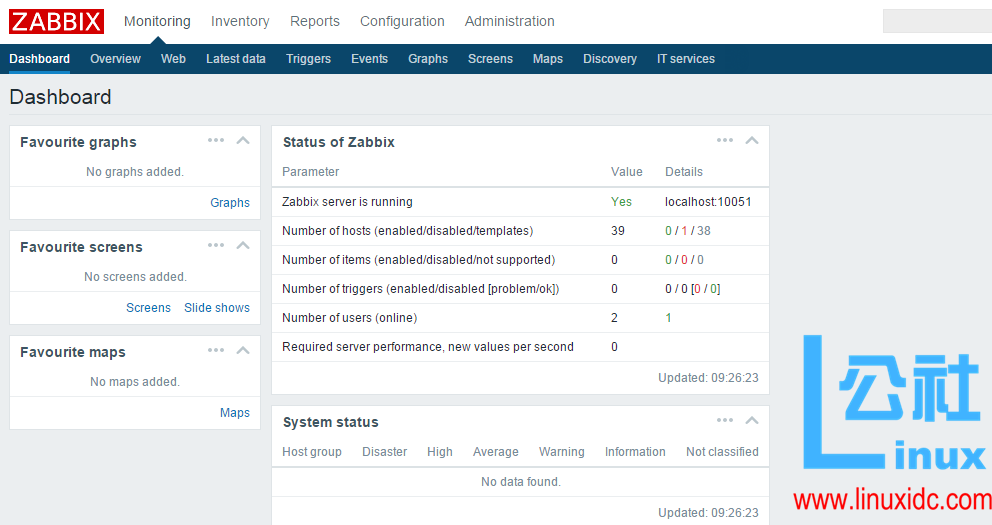
默认 Username: Admin、Password: zabbix

Zabbix 主要的配置文件两个:“zabbix_server.conf”负责服务器端的设定;“zabbix_agent.conf”用来设置客户端代理参数;“zabbix_proxy.conf”用来设定分布式的部署。Zabbix_server.conf 参数除了保证服务正常运行外还涉及该服务器的性能,如果参数设定不合理可能会导致 zabbix 添加主机不正常、代理端数据无法正常收集或是 zabbix 服务器性能严重下降,经常报告 CPU 占用过高或是 IO 占用过高等问题。
zabbix_server.conf
DBName=zabbix zabbix 所属数据库名称
DBUser=zabbix zabbix 所属数据库用户
DBPassword=www.xxxxxx.com zabbix 数据库密码
StartPollers=30 轮询的初始值(0-1000)
StartIPMIPollers=4 IPMI 轮询的初始值(0-1000)
StartPollersUnreachable=30 轮询不可达的主机数(包括 IPMI 0-1000)
StartTrappers=8 捕获的初始值(0-1000)
StartPingers=4 ping 的初始值(0-1000)
StartDiscoverers=0 自动发现的初始值(0-250)
CacheSize=384M 缓存大小
CacheUpdateFrequency=300 缓存更新的频率
StartDBSyncers=8 数据库同步时间
TrendCacheSize=128M 总趋势缓存大小
AlertScriptsPath=/usr/bin 脚本的存放位置
LogSlowQueries=1000 日志慢查询设定
查看 Zabbix 版本号:
[root@Zabbix_Server ~]# /app/zabbix/bin/zabbix_get -V
zabbix_get (Zabbix) 3.0.4
Revision 61185 15 July 2016, compilation time: Sep 5 2016 14:28:41
Copyright (C) 2016 Zabbix SIA
License GPLv2+: GNU GPL version 2 or later <http://gnu.org/licenses/gpl.html>.
This is free software: you are free to change and redistribute it according to
the license. There is NO WARRANTY, to the extent permitted by law.
[root@Zabbix_Server ~]#
CentOS 下 Zabbix 3.0.4 安装部署 PDF 版到 Linux 公社资源站下载:
—————————————— 分割线 ——————————————
免费下载地址在 http://linux.linuxidc.com/
用户名与密码都是www.linuxidc.com
具体下载目录在 /2017 年资料 / 1 月 / 2 日 /CentOS 下 Zabbix 3.0.4 安装部署 /
下载方法见 http://www.linuxidc.com/Linux/2013-07/87684.htm
—————————————— 分割线 ——————————————
一些 Zabbix 相关教程集合:
CentOS 7.2 安装部署 Zabbix 3.0.4 详解 http://www.linuxidc.com/Linux/2016-11/137671.htm
Ubuntu 14.04 下 Zabbix2.4.5 源码编译安装 http://www.linuxidc.com/Linux/2015-05/117657.htm
安装部署分布式监控系统 Zabbix 2.06 http://www.linuxidc.com/Linux/2013-07/86942.htm
Zabbix 基本配置及监控主机 http://www.linuxidc.com/Linux/2016-12/138504.htm
CentOS 7.0 x64 下 Zabbix 3.0 安装笔记 http://www.linuxidc.com/Linux/2016-11/137044.htm
Zabbix 分布式监控系统实践 http://www.linuxidc.com/Linux/2013-06/85758.htm
CentOS 6.3 下 Zabbix 监控 apache server-status http://www.linuxidc.com/Linux/2013-05/84740.htm
CentOS 6.3 下 Zabbix 监控 MySQL 数据库参数 http://www.linuxidc.com/Linux/2013-05/84800.htm
64 位 CentOS 6.2 下安装 Zabbix 2.0.6 http://www.linuxidc.com/Linux/2014-11/109541.htm
本文永久更新链接地址:http://www.linuxidc.com/Linux/2017-01/139087.htm


