共计 9341 个字符,预计需要花费 24 分钟才能阅读完成。
1.CentOS 6.4 安装 samba 服务软件, 创建共享的目录
[root@localhost ~]# yum install samba-client samba-command samba
[root@localhost ~]# mkdir /home/samba
[root@localhost ~]# chmod o+w /home/samba/ – 目录允许其它用户有写入权限
2. 配置文件详细介绍
[root@localhost ~]# vim /etc/samba/smb.conf
workgroup = MYGROUP – 服务器工作组
server string = Samba Server Version %v – 服务的描述符
interfaces = lo eth0 192.168.12.2/24 192.168.13.2/24 – 绑定哪块网卡
hosts allow = 127. 192.168.12. 192.168.13. – 允许哪个 IP 段访问
log file = /var/log/samba/log.%m – 日志文件
max log size = 50 – 最大日志文件的大小
security = user – 安全级别 (user,server,domain)
passdb backend = tdbsam – 密码是否加密
comment = All Printers – 目录的描述符
path = /var/spool/samba – 共享目录路径
browseable = no – 是否可以浏览
guest ok = no – 匿名用户访问权限
writable = no – 是否可写
printable = yes – 打印输出
valid users = %S – 指定用户登陆
max connections = 10 – 最大连接数
create mask = 0777 – 创建文件的权限
3. 案例: 允许匿名用户访问, 并有读写权限
[root@localhost ~]# vim /etc/samba/smb.conf
security = share – 修改这一行
[share] – 添加以下行
comment=samba is server
path=/home/samba
guest ok=yes
4. 重启服务和测试:
[root@node1 ~]# /etc/init.d/smb restart
Shutting down SMB services: [OK]
Starting SMB services: [OK]
[root@node1 ~]# /etc/init.d/nmb restart
Shutting down NMB services: [OK]
Starting NMB services: [OK]
[root@node1 ~]# iptables -I INPUT -p udp –dport 137 -j ACCEPT – 包过滤打开
[root@node1 ~]# iptables -I INPUT -p udp –dport 138 -j ACCEPT
[root@node1 ~]# iptables -I INPUT -p tcp –dport 139 -j ACCEPT
[root@node1 ~]# iptables -I INPUT -p tcp –dport 445 -j ACCEPT
[root@node1 ~]# setenforce 0 – 关闭安全上下文
[root@node1 ~]# smbclient -L localhost – 查看 samba 的共享目录
WARNING: The security=share option is deprecated
Enter root’s password:
Domain=[MYGROUP] OS=[Unix] Server=[Samba 3.6.9-151.el6]
Sharename Type Comment
——— —- ——-
share Disk samba is server
IPC$ IPC IPC Service (Samba Server Version 3.6.9-151.el6)
Domain=[MYGROUP] OS=[Unix] Server=[Samba 3.6.9-151.el6]
Server Comment
——— ——-
NODE1 Samba Server Version 3.6.9-151.el6
Workgroup Master
——— ——-
MYGROUP
[root@node1 ~]#
在 Windosw 中登陆

在 Linux 系统中登陆
[root@centos ~]# smbclient -L 2.2.2.27
Password:
Anonymous login successful
Domain=[MYGROUP] OS=[Unix] Server=[Samba 3.6.9-151.el6]
Sharename Type Comment
——— —- ——-
share Disk samba is server
IPC$ IPC IPC Service (Samba Server Version 3.6.9-151.el6)
Anonymous login successful
Domain=[MYGROUP] OS=[Unix] Server=[Samba 3.6.9-151.el6]
Server Comment
——— ——-
NODE1 Samba Server Version 3.6.9-151.el6
Workgroup Master
——— ——-
MSHOME C4J3I3H6LB28VW4
MYGROUP NODE1
WORKGROUP PPM-SERVER
[root@centos ~]# mount -t cifs //2.2.2.27/share /mnt/
[root@centos ~]# df -TH
Filesystem Type Size Used Avail Use% Mounted on
/dev/sda2 ext3 11G 3.5G 6.2G 37% /
/dev/sda1 ext3 510M 17M 467M 4% /boot
tmpfs tmpfs 264M 0 264M 0% /dev/shm
//2.2.2.27/share
cifs 6.9G 6.5G 39M 100% /mnt
Samba 的详细介绍 :请点这里
Samba 的下载地址 :请点这里
相关阅读:
Samba 文件共享 - 实现异构通信 http://www.linuxidc.com/Linux/2013-03/81152.htm
VMWare 虚拟机 Ubuntu 双网卡 访问 samba 速度 翻倍 http://www.linuxidc.com/Linux/2013-06/85445.htm
Samba 文件共享服务器加入 Windows Server 2003 域 http://www.linuxidc.com/Linux/2013-06/86391.htm
Samba 安装配置 http://www.linuxidc.com/Linux/2013-06/86101.htm
CentOS 6.2 下 Samba 服务的配置 http://www.linuxidc.com/Linux/2013-01/78390.htm
Win7+VMware+Fedora18 Samba 服务器的搭建图解 http://www.linuxidc.com/Linux/2013-01/78234.htm
5. 案例: 只允许本地用户访问,并有读写权限
[root@node1 ~]# useradd tong
[root@node1 ~]# passwd tong
Changing password for user tong.
New password:
BAD PASSWORD: it is based on a dictionary word
BAD PASSWORD: is too simple
Retype new password:
passwd: all authentication tokens updated successfully.
[root@node1 ~]# smbpasswd -a tong – 将本地用户加入到 samba 用户
New SMB password:
Retype new SMB password:
Added user tong.
[root@node1 ~]# vim /etc/samba/smb.conf
security = user – 修改这一行
[share] – 添加以下行
comment=samba is server
path=/home/samba
browseable = yes
writable=yes
valid user=tong
6. 重启服务和测试
[root@node1 ~]# /etc/init.d/smb restart
Shutting down SMB services: [OK]
Starting SMB services: [OK]
[root@node1 ~]# /etc/init.d/nmb restart
Shutting down NMB services: [OK]
Starting NMB services: [OK]
[root@node1 ~]#
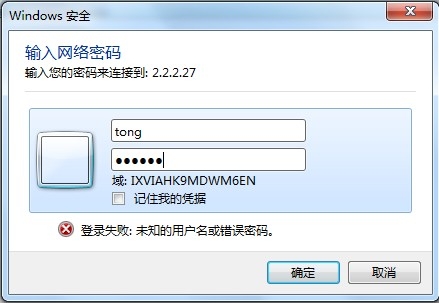
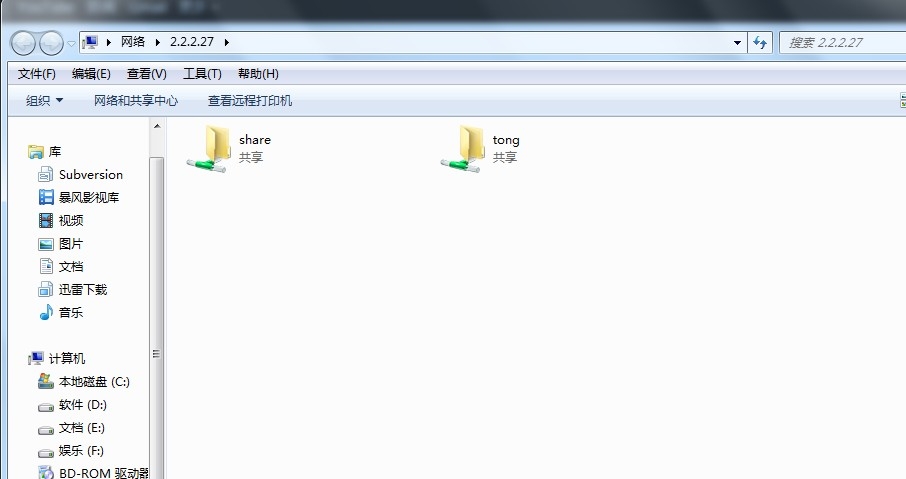
在 Windows 中登陆


在 Linux 系统中登陆
[root@CentOS ~]# smbclient -L 2.2.2.27 -U tong –tong 是用户
Password:
Anonymous login successful
Domain=[MYGROUP] OS=[Unix] Server=[Samba 3.6.9-151.el6]
Sharename Type Comment
——— —- ——-
share Disk samba is server
IPC$ IPC IPC Service (Samba Server Version 3.6.9-151.el6)
Anonymous login successful
Domain=[MYGROUP] OS=[Unix] Server=[Samba 3.6.9-151.el6]
Server Comment
——— ——-
NODE1 Samba Server Version 3.6.9-151.el6
Workgroup Master
——— ——-
MSHOME C4J3I3H6LB28VW4
MYGROUP NODE1
WORKGROUP PPM-SERVER
[root@centos ~]# mount -t cifs //2.2.2.27/share /mnt/ -o username=tong%system
[root@centos ~]# df -TH
Filesystem Type Size Used Avail Use% Mounted on
/dev/sda2 ext3 11G 3.5G 6.2G 37% /
/dev/sda1 ext3 510M 17M 467M 4% /boot
tmpfs tmpfs 264M 0 264M 0% /dev/shm
//2.2.2.27/share
cifs 6.9G 6.5G 39M 100% /mnt
[root@centos ~]#
7.samba 服务的自动挂载
[root@centos ~]# yum install autofs
[root@centos ~]# vim /etc/auto.master
/mnt/samba /etc/auto1.smb –timeout=60 – 添加以下行
[root@centos ~]# cp -a /etc/auto.misc /etc/auto1.smb
[root@centos ~]# vim /etc/auto1.smb
samba1 -fstype=cifs,username=tong%system ://2.2.2.27/share – 添加这行 (tong 是用户名,system 是密码)
[root@centos ~]# /etc/init.d/autofs restart
Stopping automount: [OK]
Starting automount: [OK]
[root@centos ~]# cd /mnt/samba/
[root@centos samba]# ll
total 0
[root@centos samba]# cd samba1 – 进入目录挂载成功
[root@centos samba1]# ll
total 16
-rwxr–r– 1 nobody nobody 0 Jan 13 13:45 12.txt
-rwxr–r– 1 nobody nobody 15872 Jan 13 13:50 新建 Microsoft Excel 工作表.xls
[root@centos samba1]#
8. 开机挂载
[root@centos ~]# vim /etc/fstab
//2.2.2.27/share /mnt/samba/samba1 cifs defaults,credentials=/etc/1.txt 0 0 – 添加这一行
[root@centos ~]# vim /etc/1.txt
username=tong – 写入用户名和密码
password=system
[root@centos ~]# chmod 600 /etc/1.txt
[root@centos ~]# mount -a
[root@centos ~]# df -TH
Filesystem Type Size Used Avail Use% Mounted on
/dev/sda2 ext3 11G 3.5G 6.2G 37% /
/dev/sda1 ext3 510M 17M 467M 4% /boot
tmpfs tmpfs 264M 0 264M 0% /dev/shm
//2.2.2.27/share
cifs 6.9G 6.5G 39M 100% /mnt/samba/samba1
[root@centos ~]#
更多 CentOS 相关信息见 CentOS 专题页面 http://www.linuxidc.com/topicnews.aspx?tid=14
1.CentOS 6.4 安装 samba 服务软件, 创建共享的目录
[root@localhost ~]# yum install samba-client samba-command samba
[root@localhost ~]# mkdir /home/samba
[root@localhost ~]# chmod o+w /home/samba/ – 目录允许其它用户有写入权限
2. 配置文件详细介绍
[root@localhost ~]# vim /etc/samba/smb.conf
workgroup = MYGROUP – 服务器工作组
server string = Samba Server Version %v – 服务的描述符
interfaces = lo eth0 192.168.12.2/24 192.168.13.2/24 – 绑定哪块网卡
hosts allow = 127. 192.168.12. 192.168.13. – 允许哪个 IP 段访问
log file = /var/log/samba/log.%m – 日志文件
max log size = 50 – 最大日志文件的大小
security = user – 安全级别 (user,server,domain)
passdb backend = tdbsam – 密码是否加密
comment = All Printers – 目录的描述符
path = /var/spool/samba – 共享目录路径
browseable = no – 是否可以浏览
guest ok = no – 匿名用户访问权限
writable = no – 是否可写
printable = yes – 打印输出
valid users = %S – 指定用户登陆
max connections = 10 – 最大连接数
create mask = 0777 – 创建文件的权限
3. 案例: 允许匿名用户访问, 并有读写权限
[root@localhost ~]# vim /etc/samba/smb.conf
security = share – 修改这一行
[share] – 添加以下行
comment=samba is server
path=/home/samba
guest ok=yes
4. 重启服务和测试:
[root@node1 ~]# /etc/init.d/smb restart
Shutting down SMB services: [OK]
Starting SMB services: [OK]
[root@node1 ~]# /etc/init.d/nmb restart
Shutting down NMB services: [OK]
Starting NMB services: [OK]
[root@node1 ~]# iptables -I INPUT -p udp –dport 137 -j ACCEPT – 包过滤打开
[root@node1 ~]# iptables -I INPUT -p udp –dport 138 -j ACCEPT
[root@node1 ~]# iptables -I INPUT -p tcp –dport 139 -j ACCEPT
[root@node1 ~]# iptables -I INPUT -p tcp –dport 445 -j ACCEPT
[root@node1 ~]# setenforce 0 – 关闭安全上下文
[root@node1 ~]# smbclient -L localhost – 查看 samba 的共享目录
WARNING: The security=share option is deprecated
Enter root’s password:
Domain=[MYGROUP] OS=[Unix] Server=[Samba 3.6.9-151.el6]
Sharename Type Comment
——— —- ——-
share Disk samba is server
IPC$ IPC IPC Service (Samba Server Version 3.6.9-151.el6)
Domain=[MYGROUP] OS=[Unix] Server=[Samba 3.6.9-151.el6]
Server Comment
——— ——-
NODE1 Samba Server Version 3.6.9-151.el6
Workgroup Master
——— ——-
MYGROUP
[root@node1 ~]#
在 Windosw 中登陆

在 Linux 系统中登陆
[root@centos ~]# smbclient -L 2.2.2.27
Password:
Anonymous login successful
Domain=[MYGROUP] OS=[Unix] Server=[Samba 3.6.9-151.el6]
Sharename Type Comment
——— —- ——-
share Disk samba is server
IPC$ IPC IPC Service (Samba Server Version 3.6.9-151.el6)
Anonymous login successful
Domain=[MYGROUP] OS=[Unix] Server=[Samba 3.6.9-151.el6]
Server Comment
——— ——-
NODE1 Samba Server Version 3.6.9-151.el6
Workgroup Master
——— ——-
MSHOME C4J3I3H6LB28VW4
MYGROUP NODE1
WORKGROUP PPM-SERVER
[root@centos ~]# mount -t cifs //2.2.2.27/share /mnt/
[root@centos ~]# df -TH
Filesystem Type Size Used Avail Use% Mounted on
/dev/sda2 ext3 11G 3.5G 6.2G 37% /
/dev/sda1 ext3 510M 17M 467M 4% /boot
tmpfs tmpfs 264M 0 264M 0% /dev/shm
//2.2.2.27/share
cifs 6.9G 6.5G 39M 100% /mnt
Samba 的详细介绍 :请点这里
Samba 的下载地址 :请点这里
相关阅读:
Samba 文件共享 - 实现异构通信 http://www.linuxidc.com/Linux/2013-03/81152.htm
VMWare 虚拟机 Ubuntu 双网卡 访问 samba 速度 翻倍 http://www.linuxidc.com/Linux/2013-06/85445.htm
Samba 文件共享服务器加入 Windows Server 2003 域 http://www.linuxidc.com/Linux/2013-06/86391.htm
Samba 安装配置 http://www.linuxidc.com/Linux/2013-06/86101.htm
CentOS 6.2 下 Samba 服务的配置 http://www.linuxidc.com/Linux/2013-01/78390.htm
Win7+VMware+Fedora18 Samba 服务器的搭建图解 http://www.linuxidc.com/Linux/2013-01/78234.htm


