共计 7255 个字符,预计需要花费 19 分钟才能阅读完成。
1 背景
转到 Linux 有段时间了,vim 操作还不能应对工程代码,之前一直都是 Gnome 桌面 + Clion 作开发环境,无奈在服务器上没有这样的环境,
看同事是(Windows)Source Insight + WinSCP + Linux 开发,来回同步文件有点麻烦,所以想尝试搭个 Samba 服务器做共享文件。
不过希望以后还是要转到 vim 上来。
2 环境
CentOS 系统
[root@linuxidc.com ~]# cat /etc/RedHat-release
CentOS Linux release 7.2.1511 (Core)
Samba 服务器
[root@linuxidc.com ~]# rpm -qi samba
Name        : samba
Epoch       : 0
Version     : 4.4.4
Release     : 9.el7
Architecture: x86_64
Install Date: Sun 18 Dec 2016 11:59:56 PM CST
Group       : System Environment/Daemons
Size        : 1869290
License     : GPLv3+ and LGPLv3+
Signature   : RSA/SHA256, Mon 21 Nov 2016 04:38:30 AM CST, Key ID 24c6a8a7f4a80eb5
Source RPM  : samba-4.4.4-9.el7.src.rpm
Build Date  : Mon 07 Nov 2016 06:31:03 PM CST
Build Host  : worker1.bsys.centos.org
Relocations : (not relocatable)
Packager    : CentOS BuildSystem <http://bugs.centos.org>
Vendor      : CentOS
URL         : http://www.samba.org/
Summary     : Server and Client software to interoperate with Windows machines
Description :
Samba is the standard Windows interoperability suite of programs for Linux and
Unix.
3 安装
[root@base ~]# yum -y install samba samba-client4 配置
进入 samba 配置目录
[root@base ~]# cd /etc/samba/备份 smb.conf
[root@base samba]# mv smb.conf smb.conf.origin新建 smb.conf
[root@base samba]# vim smb.conf内容如下,保存并退出
[global]
        workgroup = WORKGROUP
        server string = Ted Samba Server %v
        netbios name = TedSamba
        security = user
        map to guest = Bad User
        passdb backend = tdbsam

[FileShare]
        comment = share some files
        path = /smb/fileshare
        public = yes
        writeable = yes
        create mask = 0644
        directory mask = 0755

[WebDev]
        comment = project development directory
        path = /smb/webdev
        valid users = ted
        write list = ted
        printable = no
        create mask = 0644
        directory mask = 0755
注释:
workgroup 项应与 Windows 主机保持一致,这里是 WORKGROUP
security、map to guest 项设置为允许匿名用户访问
再下面有两个 section,实际为两个目录,section 名就是目录名(映射到 Windows 上可以看见)。
第一个目录名是 FileShare,匿名、公开、可写
第二个目录吗是 WebDev,限定 ted 用户访问
默认文件属性 644/755(不然的话,Windows 上在这个目录下新建的文件会有“可执行”属性)
创建用户
[root@base samba]# groupadd co3
[root@base samba]# useradd ted -g co3 -s /sbin/nologin
[root@base samba]# smbpasswd -a ted
New SMB password:
Retype new SMB password:
Added user ted.
[root@base samba]#
注意这里 smbpasswd 将使用系统用户。设置密码为 1
创建共享目录
[root@base samba]# mkdir -p /smb/{fileshare,webdev}
[root@base samba]# chown nobody:nobody /smb/fileshare/
[root@base samba]# chown ted:co3 /smb/webdev/
注意设置属性,不然访问不了。
启动 Samba 服务,设置开机启动
[root@base samba]# systemctl start smb
[root@base samba]# systemctl enable smb
Created symlink from /etc/systemd/system/multi-user.target.wants/smb.service to /usr/lib/systemd/system/smb.service.
[root@base samba]#
开放端口
[root@base samba]# firewall-cmd --permanent --add-port=139/tcp
success
[root@base samba]# firewall-cmd --permanent --add-port=445/tcp
success
[root@base samba]# systemctl restart firewalld[root@base samba]# 或者直接把防火墙关了也行。
5 使用
本机测试
可以使用 testparm 测试 samba 配置是否正确
[root@base samba]# testparm
Load smb config files from /etc/samba/smb.conf
rlimit_max: increasing rlimit_max (1024) to minimum Windows limit (16384)
Processing section "[FileShare]"
Processing section "[WebDev]"
Loaded services file OK.
Server role: ROLE_STANDALONE

Press enter to see a dump of your service definitions

# Global parameters
[global]
    netbios name = TEDSAMBA
    server string = Ted Samba Server %v
    map to guest = Bad User
    security = USER
    idmap config * : backend = tdb


[FileShare]
    comment = share some files
    path = /smb/fileshare
    guest ok = Yes
    read only = No


[WebDev]
    comment = project development directory
    path = /smb/webdev
    create mask = 0644


    valid users = ted
    write list = ted
[root@base samba]#
root 用户的话,不用密码可直接查看 samba 服务器情况
[root@base samba]# smbclient -L localhost
Enter root's password:
Domain=[WORKGROUP] OS=[Windows 6.1] Server=[Samba 4.4.4]

    Sharename       Type      Comment
    ---------       ----      -------
    FileShare       Disk      share some files
    WebDev          Disk      project development directory
    IPC$            IPC       IPC Service (Ted Samba Server 4.4.4)
Domain=[WORKGROUP] OS=[Windows 6.1] Server=[Samba 4.4.4]

    Server               Comment
    ---------            -------

    Workgroup            Master
    ---------            -------
[root@base samba]#
Linux 访问
Samba 服务端配置
[root@linuxidc.com webdev]# vim /etc/samba/smb.conf内容如下
[global]
        workgroup = WORKGROUP
        server string = Samba Server Version %v
        netbios name = MYSERVER
        security = user
        passdb backend = tdbsam

[tvms]
        path = /root/tvms-test
        public = yes
        valid user = root
        writeable = yes
        printable = no
        create mask = 0644
        directory mask = 0755
在局域网内另外一台机器上,
挂载目录
安装 cifs
[root@linuxidc.com ~]# yum -y install cifs-utils挂载 smb 目录
[root@linuxidc.com ~]# mkdir /mnt/tvms
[root@linuxidc.com ~]# mount //192.168.118.133/tvms /mnt/tvms
Password for root@//192.168.118.133/tvms:  *
[root@linuxidc.com ~]# df -Th
Filesystem              Type      Size  Used Avail Use% Mounted on
/dev/mapper/centos-root xfs        18G  988M   17G   6% /
devtmpfs                devtmpfs  479M     0  479M   0% /dev
tmpfs                   tmpfs     489M     0  489M   0% /dev/shm
tmpfs                   tmpfs     489M  6.7M  483M   2% /run
tmpfs                   tmpfs     489M     0  489M   0% /sys/fs/cgroup
/dev/sda1               xfs       497M  117M  381M  24% /boot
tmpfs                   tmpfs      98M     0   98M   0% /run/user/0
//192.168.118.133/tvms  cifs       18G  8.5G  9.1G  49% /mnt/tvms
[root@linuxidc.com ~]# ll /mnt/tvms/
total 3952
drwxr-xr-x. 10 root root       0 Dec 21 03:40 suricata-3.1.2
-rw-r--r--.  1 root root 4042824 Dec 21 03:22 suricata-3.1.2.zip
[root@linuxidc.com ~]#
输入密码:1
卸载目录
[root@linuxidc.com mnt]# umount /mnt/tvms/如果出现
umount: /mnt/tvms: target is busy.
        (In some cases useful info about processes that use
         the device is found by lsof(8) or fuser(1))
可以使用 fuser 卸载
[root@linuxidc.com ~]# yum -y install psmisc
[root@linuxidc.com ~]# fuser -m -v -i -k /mnt/tvms
                          USER        PID ACCESS COMMAND
/mnt/tvms:                root     kernel mount /mnt/tvms
                          root       2760 ..c.. bash
Kill process 2760 ? (y/N) y

Connection closed by foreign host.

Disconnected from remote host(192.168.118.132) at 19:46:12.

Type `help' to learn how to use Xshell prompt.
[c:\~]$

Connecting to 192.168.118.132:22...
Connection established.
To escape to local shell, press 'Ctrl+Alt+]'.

WARNING! The remote SSH server rejected X11 forwarding request.
Last login: Wed Dec 21 03:27:53 2016 from 192.168.118.1
[root@linuxidc.com ~]# umount /mnt
[root@linuxidc.com ~]# df
Filesystem              1K-blocks    Used Available Use% Mounted on
/dev/mapper/centos-root  18307072 1011444  17295628   6% /
devtmpfs                   490236       0    490236   0% /dev
tmpfs                      500680       0    500680   0% /dev/shm
tmpfs                      500680    6836    493844   2% /run
tmpfs                      500680       0    500680   0% /sys/fs/cgroup
/dev/sda1                  508588  118860    389728  24% /boot
tmpfs                      100136       0    100136   0% /run/user/0
自动挂载目录
[root@linuxidc.com ~]# vi /etc/fstab添加如下内容
//192.168.118.133/tvms /mnt/tvms cifs defaults,username=root,password=1 0 0重新挂载
[root@linuxidc.com ~]# mount -a
[root@linuxidc.com ~]# df
Filesystem              1K-blocks    Used Available Use% Mounted on
/dev/mapper/centos-root  18307072 1012316  17294756   6% /
devtmpfs                   490236       0    490236   0% /dev
tmpfs                      500680       0    500680   0% /dev/shm
tmpfs                      500680    6836    493844   2% /run
tmpfs                      500680       0    500680   0% /sys/fs/cgroup
/dev/sda1                  508588  118860    389728  24% /boot
tmpfs                      100136       0    100136   0% /run/user/0
//192.168.118.133/tvms   18307072 8819380   9487692  49% /mnt/tvms
[root@linuxidc.com ~]#
Windows 访问
1)在 Windwos 资源管理器访问
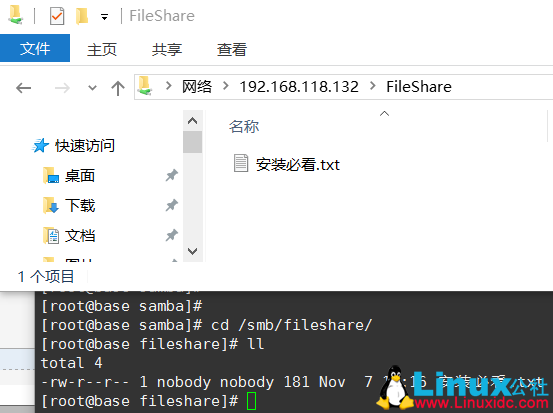
访问路径里填上: \\${Samba 服务器的 IP},然后回车,可以看见共享的目录。

FileShare 是可以匿名访问的,可以访问、新建、删除文件。
这里拖进去一个 txt 文件,可以在 Linux 上看见该文件。
2)映射网络驱动器
右边的 WebDev 目录是需要密码访问的
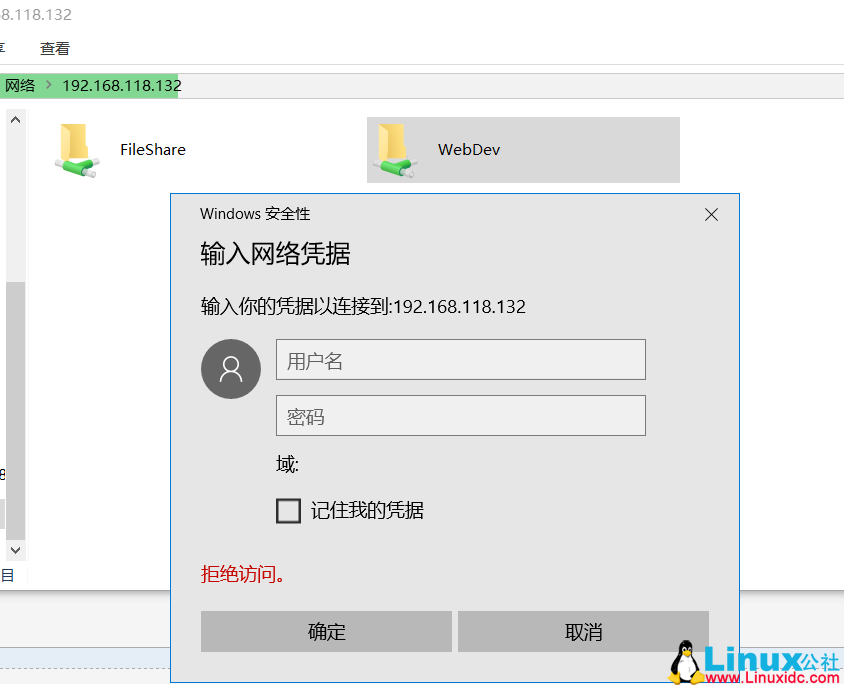
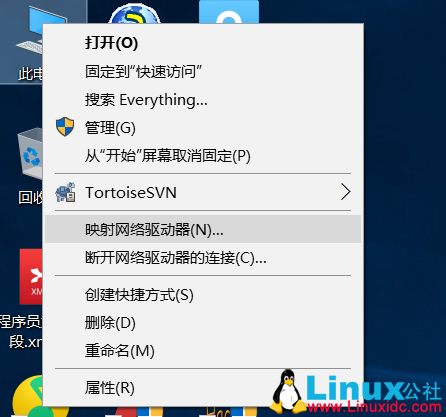
这里演示一下映射该目录为网络驱动器。
“桌面”右键单击“此电脑”,选择“映射网络驱动器”
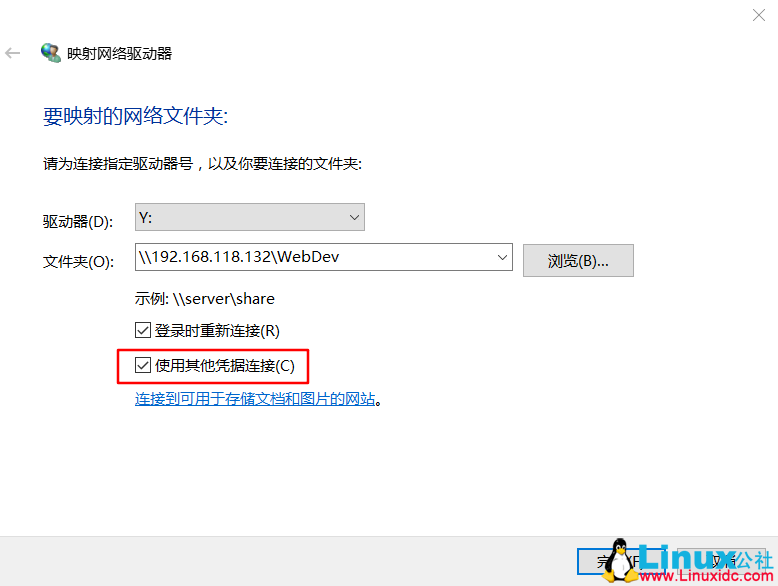
在文件夹位置填写该共享文件的网络路径,这里是 \\192.168.118.132\WebDev
勾选“使用其他凭据连接”,点“完成”。
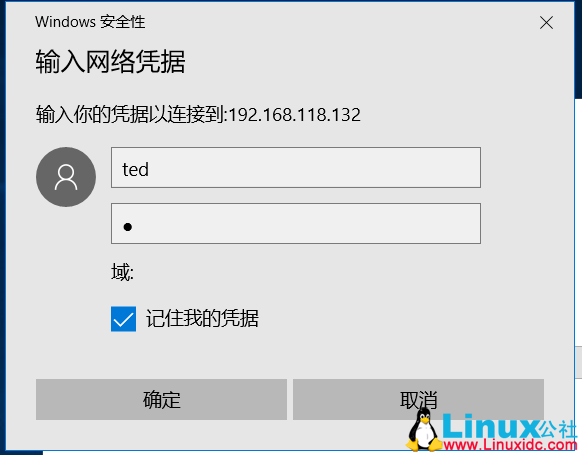
填写用户密码
在我的电脑可以看见该网络驱动器(Y)
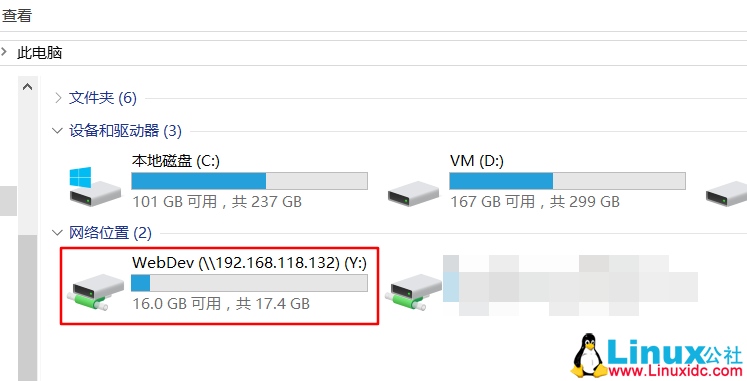
这里可以放源码工程,然后用 Windows 下的 IDE 打开、编辑,再在 Linux 编译、运行。
enjoy it~
以后有需求再补充 Linux 挂载 samba 共享目录、权限配置等等。
———————————— 分割线 ————————————
如何在 Ubuntu 14.04 中使用 Samba 共享文件 http://www.linuxidc.com/Linux/2014-07/104894.htm
VMWare 虚拟机 Ubuntu 双网卡 访问 samba 速度 翻倍 http://www.linuxidc.com/Linux/2013-06/85445.htm
Ubuntu 15.04 安装 Samba 服务 http://www.linuxidc.com/Linux/2016-03/129201.htm
samba 安装使用图解 http://www.linuxidc.com/Linux/2017-03/141254.htm
Samba 服务器安装和配置 http://www.linuxidc.com/Linux/2014-12/110459.htm
CentOS 部署 Samba 企业文件共享服务 http://www.linuxidc.com/Linux/2016-06/132609.htm
怎样设置 Samba 文件服务器以使用 Windows 客户端 http://www.linuxidc.com/Linux/2014-08/105786.htm
CentOS 6.7 下 Samba 服务器的搭建与配置(share 共享模式)http://www.linuxidc.com/Linux/2016-12/138220.htm
Ubuntu 16.04 下 Samba 相关配置 http://www.linuxidc.com/Linux/2016-12/138498.htm
———————————— 分割线 ————————————
Samba 的详细介绍 :请点这里
Samba 的下载地址 :请点这里
本文永久更新链接地址 :http://www.linuxidc.com/Linux/2017-03/141390.htm


