共计 3742 个字符,预计需要花费 10 分钟才能阅读完成。
上一节中使用代理工厂 JaxWsProxyFactoryBean 来发布 WebService, 这种方式必须指定运行的端口,如果端口被占用,就会发布失败。
cxf 的 WebService 也可利用 Tomcat 来发布,并且使用 8080 端口。方法如下:
maven 配置:
<properties>
        <project.build.sourceEncoding>UTF-8</project.build.sourceEncoding>
        <spring.version>4.3.0.RELEASE</spring.version>
        <cxf.version>3.0.3</cxf.version>
    </properties>

    <dependencies>
        <!--Spring 框架核心库 -->
        <dependency>
            <groupId>org.springframework</groupId>
            <artifactId>spring-context</artifactId>
            <version>${spring.version}</version>
        </dependency>
        <!-- Spring Web -->
        <dependency>
            <groupId>org.springframework</groupId>
            <artifactId>spring-web</artifactId>
            <version>${spring.version}</version>
        </dependency>

        <dependency>
            <groupId>javax.servlet</groupId>
            <artifactId>javax.servlet-api</artifactId>
            <version>3.0.1</version>
        </dependency>

        <!-- cxf -->
        <dependency>
            <groupId>org.apache.cxf</groupId>
            <artifactId>cxf-rt-frontend-jaxws</artifactId>
            <version>${cxf.version}</version>
        </dependency>
        <dependency>
            <groupId>org.apache.cxf</groupId>
            <artifactId>cxf-rt-transports-http</artifactId>
            <version>${cxf.version}</version>
        </dependency>
        <dependency>
            <groupId>org.apache.cxf</groupId>
            <artifactId>cxf-rt-frontend-jaxrs</artifactId>
            <version>${cxf.version}</version>
        </dependency>
        <!-- 客户端调用 restFul 服务需要导入的包 -->
        <dependency>
            <groupId>org.apache.cxf</groupId>
            <artifactId>cxf-rt-rs-client</artifactId>
            <version>${cxf.version}</version>
        </dependency>
—
在 web.xml 中加入以下配置 (spring 监听器和 cxf 的 servlet):
<listener>
        <description>SpringListener</description>
        <listener-class>org.springframework.web.context.ContextLoaderListener</listener-class>
    </listener>
    <context-param>
        <param-name>contextConfigLocation</param-name>
        <param-value>classpath*:applicationContext.xml</param-value>
    </context-param>
    <!--cxf 的 Servlet-->
    <servlet>
        <servlet-name>CXFServlet</servlet-name>
        <servlet-class>org.apache.cxf.transport.servlet.CXFServlet</servlet-class>
    </servlet>
    <servlet-mapping>
        <servlet-name>CXFServlet</servlet-name>
        <url-pattern>/ws/*</url-pattern>
    </servlet-mapping>
—
接口:
@WebService
public interface HelloService{public String helloCxf();

    public String hello(String name);

    public User getUser(int id);

    public void saveUser(User user);
}
实现类:
@WebService(serviceName = "helloService",
        endpointInterface = "cn.lg.ws.hellocxf.HelloService"
)
public class HelloServiceImpl implements HelloService{

    @Override
    public String helloCxf(){return "Hello CXF!";
    }

    @Override
    public String hello(String name)
    {return "Hello" + name;
    }

    @Override
    public User getUser(int id) {User user = new User();
        user.setId(id);
        user.setName("lg");
        user.setEmail("QQ");
        user.setAddress("hahaha");
        return user;
    }

    @Override
    public void saveUser(User user) {System.out.println(user.toString());
    }

}
cxf-bean.xml
<?xml version="1.0" encoding="UTF-8"?>
<beans xmlns="http://www.springframework.org/schema/beans"
       xmlns:xsi="http://www.w3.org/2001/XMLSchema-instance"
       xmlns:jaxws="http://cxf.apache.org/jaxws"
       xsi:schemaLocation="http://www.springframework.org/schema/beans
        http://www.springframework.org/schema/beans/spring-beans-4.3.xsd
        http://cxf.apache.org/jaxws
        http://cxf.apache.org/schemas/jaxws.xsd">

    <bean id="helloServiceBean" class="cn.lg.ws.hellocxf.HelloServiceImpl" />

    <jaxws:server id="helloServicej" serviceClass="cn.lg.ws.hellocxf.HelloService"
                  address="/hello">
        <jaxws:serviceBean>
            <ref bean="helloServiceBean" />
        </jaxws:serviceBean>
    </jaxws:server>
</beans>
该文件需添加到 spring 配置文件中:<import resource=”cxf-bean.xml” />
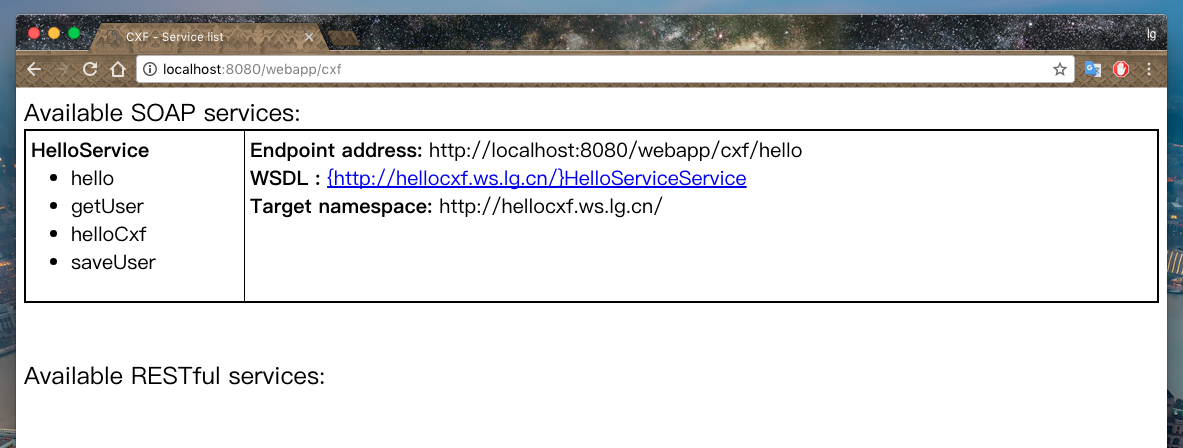
浏览器访问 http://localhost:8080/webapp/cxf,若出现以下界面则表示发布成功:

使用 Spring 和 Tomcat 发布 CXF WebService 见 http://www.linuxidc.com/Linux/2017-03/141982.htm
Apache CXF 快速入门基础教程 http://www.linuxidc.com/Linux/2014-05/101383.htm
Apache CXF 实战 http://www.linuxidc.com/Linux/2012-05/59887.htm
Apache CXF 快速入门基础教程 http://www.linuxidc.com/Linux/2014-05/101383.htm
Apache CXF 拦截器 Interceptor 实现 WebServices 用户验证 http://www.linuxidc.com/Linux/2016-12/138291.htm
Apache CXF 的详细介绍 :请点这里
Apache CXF 的下载地址 :请点这里
本文永久更新链接地址 :http://www.linuxidc.com/Linux/2017-03/141982.htm


