共计 12852 个字符,预计需要花费 33 分钟才能阅读完成。
简要:
有关于 Coreseek 的介绍、在 LAMP 上的安装及简单的测试可以参考我的另一篇文章 CentOS 7 下安装 Coreseek 中文检索引擎 http://www.linuxidc.com/Linux/2017-05/143599.htm
一、安装 PHP 的 sphinx 扩展:
=====================1、安装 libsphinxclient================

#linsphinxclient 在解压缩出来的 coreseek-3.2.14 里面

cd /usr/local/src/coreseek/csft-3.2.14/api/libsphinxclient

# 安装在 /usr/local/sphinxclient
./configure  --prefix=/usr/local/sphinxclient

make && make install

====================2、安装 sphinx 的 PHP 扩展 ===================

cd /usr/local/src

wget http://pecl.php.net/get/sphinx-1.1.0.tgz

tar -zxvf sphinx-1.1.0.tgz

cd sphinx-1.1.0

# 使用安装 php 时生成的 phpize 来生成 configure 配置文件
/usr/local/php/bin/phpize   (或 /usr/bin/phpize)
# 具体用哪个要取决于你的 phpize 文件所在的目录,这时你应该用 whereis phpize 来查看路径

./configure --with-php-config=/usr/bin/php-config --with-sphinx=/usr/local/sphinxclient
# 其中 php-config 和 phpize 所在的目录是相同的,比如上面我用 /usr/bin/phpize,则在这一步我用 ./configure –with-php-config=/usr/bin/php-config。而 /usr/local/sphinxclient 就是上面的 libsphinxclient 的安装目录

make && make install

# 注意,如果你的 php 版本是 5.4,那么在这一步中会出现错误,提示在 sphinx.c:105:2,可以按下面方式修改:

#vim sphinx.c,找到 105 行

# 把 retval = std_hnd->read_property(object, member, type TSRMLS_CC); 修改成 retval = std_hnd->read_property(object, member, type TSRMLS_CC, NULL);

# 重新编译安装

#./configure --with-php-config=/usr/bin/php-config --with-sphinx=/usr/local/sphinxclient

#make && make install
安装完之后我们还要修改 PHP.ini 文件:
vim /etc/php.ini    # 具体 php.ini 的位置自己查哈

# 在 php.ini 文件的最后一行添加:
extension="sphinx.so"

# 重启 apache 服务器
systemctl restart httpd.service
重启之后,在某个 php 文件里面添加 echo phpinfo();,在详情页面中假如有:
则说明安装 sphinx 的 PHP 扩展成功啦!
二、sphinx 配置文件和测试表
一开始是没有 sphinx 配置文件的,我们要首先建立 sphinx.conf 配置文件:
cd /usr/local/coreseek/etc

cp sphinx.conf.dist sphinx.conf     #sphinx 配置文件的默认名就是 sphinx.conf
在这里先介绍一些 sphinx.conf 配置文件的结构:
# 主数据源
source main{
{# 增量数据源
source delta:main{
}
# 主数据索引
index main{
}
# 增量数据索引
index delta:main{
}
# 分布式索引
index dist1{
}
# 索引器
indexer{
}
# 服务进程
searchd{}
由于初始的配置文件有很多注释,我们为了简单起见,可以将那些注释都删除了,以后要用到注释的时候可以参照 sphinx.conf.dist,下面我贴出我的简化后的配置文件:
# 主数据源(命名为 main)
source main
{
    type                    = mysql

    sql_host                = localhost
    sql_user                = root
    sql_pass                = zhongjin
    sql_db                  = test
    sql_port                = 3306  # optional, default is 3306
    #sql_sock               = /var/lib/mysql/mysql.sock
    sql_query_pre           = SET NAMES UTF8    #mysql 检索字符集
    sql_query_pre           = SET SESSION query_cache_type=OFF  #关闭缓存
    sql_query               = \
        SELECT id, group_id, UNIX_TIMESTAMP(date_added) AS date_added, title, content \
        FROM documents  #获取数据的 SQL 语句
    #sql_attr_timestamp     = date_added    #排序字段
    sql_ranged_throttle = 0
    sql_query_info      = SELECT * FROM documents WHERE id=$id  #这里的 id 对应于数据表的主键
}

# 增量数据源 (暂时用不到,先注释了)
#source src1throttled : main
#{
#   sql_ranged_throttle         = 100
#}

# 主数据索引
index main
{
    source          = main  #指定主数据源
    path            = /usr/local/coreseek/var/data/main     #索引数据存放路径
    docinfo         = extern
    mlock           = 0
    morphology      = none


    #stopwords          = G:\data\stopwords.txt

    #wordforms          = G:\data\wordforms.txt
    #exceptions     = /data/exceptions.txt

    min_word_len        = 1
    charset_type        = utf-8
    html_strip              = 0
    #charset_table     = 0..9, A..Z->a..z, _, a..z, U+410..U+42F->U+430..U+44F, U+430..U+44    F
}

# 增量数据索引(暂时用不到)
#index test1stemmed : test1
#{
#   path            = /usr/local/coreseek/var/data/test1stemmed
#   morphology      = stem_en
#}

# 分布式索引(暂时用不到)
#index dist1
#{
#   type                = distributed
#
#   local               = test1
#   local               = test1stemmed
#   agent               = localhost:9313:remote1
#   agent               = localhost:9314:remote2,remote3
#   agent_connect_timeout   = 1000
#
#   agent_query_timeout     = 3000
#}

# 索引器(基本不用改)
indexer
{mem_limit           = 128M
}

# 服务进程(不用修改)
searchd
{log                 = /usr/local/coreseek/var/log/searchd.log
    query_log           = /usr/local/coreseek/var/log/query.log
    read_timeout        = 5
    client_timeout      = 300

    max_children        = 30

    pid_file            = /usr/local/coreseek/var/log/searchd.pid

    max_matches         = 1000

    seamless_rotate     = 1

    preopen_indexes     = 0
    unlink_old          = 1

    mva_updates_pool    = 1M
    max_packet_size     = 8M

    max_filters         = 256
    max_filter_values   = 4096
}
在主数据源的设置中,sql_query 和 sql_query_info 字段都是 From document,这里用的是 安装 coreseek 时提供的测试表,位于 /usr/local/coreseek/etc/example.sql,根据设置,我们创建数据库和导入测试数据表:
mysql -uroot -pzhongjin

CREATE DATABASE test;

USE test;

# 导入数据
SOURCE /usr/local/coreseek/etc/example.sql;

SHOW TABLES;

#+----------------+
#| Tables_in_test |
#+----------------+
#| documents      |
#| tags           |
#+----------------+

SELECT * FROM documents;
现在该表里面有四条数据,待会我们就是用该表来测试 sphinx。
现在配置文件有了,测试数据也有了,下面就是测试了。
三、sphinx 搜索测试:
1、先创建索引:在新增数据之后,都得重新索引一次
创建索引命令:indexer,
-c 指定配置文件
–all 对所有索引重新编制索引
–rotate 用于轮换索引,主要是在不停止服务的时候增加索引
–merge 合并索引
针对 test:documents 创建索引
# 基本所有的命令都在该目录下
cd /usr/local/coreseek/bin

./indexer -c /usr/local/coreseek/etc/sphinx.conf --all
可以看到,我们的配置文件,还有就是我们索引的是 main 主数据源,总共有四个文档,正好对应数据表。
2、查询关键字
查询命令:search
-c 指定配置文件
查关键字 test:
cd /usr/local/coreseek/bin

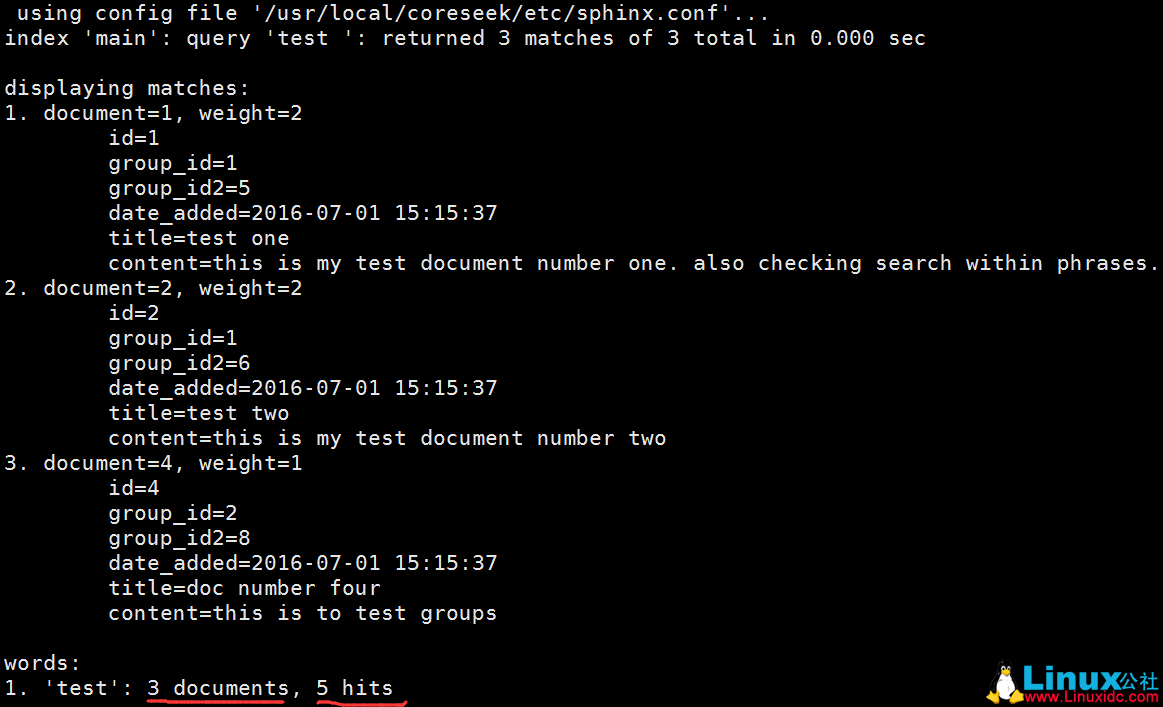
./search -c /usr/local/coreseek/etc/sphinx.conf test
查询的结果如上图所示,图中的结果表明,test 在第一篇文档中出现两次,在第二篇文档中出现两次,在第三篇文档中出现一次,总共在三个文档中出现,总共出现 5 次。
查关键字 group:
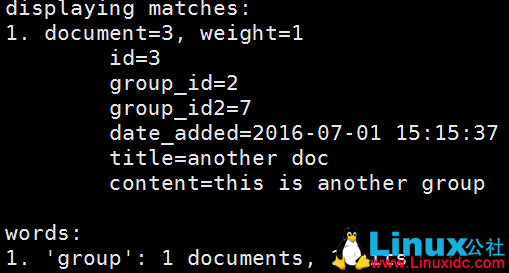
./search -c /usr/local/coreseek/etc/sphinx.conf group
从结果中可以发现,group 只在一个文档中出现一次,但是查表发现,数据表中有 group 和 groups,为什么 groups 没有被匹配出来?因为在英文分词中是以空格进行分词的,因此 group 和 groups 是两个不同的单词。
现在我们插入一条数据,看看能不能查询出来:
mysql -uroot -pzhongjin test

INSERT INTO documents(group_id,group_id2,date_added,title,content) VALUES(3,9,NOW(),'zhongjin','zhongjin is a student');
查关键字 zhongjin
./search -c /usr/local/coreseek/etc/sphinx.conf zhongjin;结果是 zhongjin 关键字在 0 个文档中出现 0 次,为什么?
因为我们没有索引该条记录呀,前面不是说了嘛,新增数据之后,都得重新进行索引(这个有解决方案,后面有机会再说)
./indexer -c /usr/local/coreseek/etc/sphinx.conf --all

./search -c /usr/local/coreseek/etc/sphinx.conf zhongjin;
这回出来了吧。
3、试试中文?
mysql -uroot -pzhongjin test

INSERT INTO documents(group_id,group_id2,date_added,title,content) VALUES(3,9,NOW(),'LSGO 实验室','华北电力大学 LSGO 实验室');

./indexer -c /usr/local/coreseek/etc/sphinx.conf --all

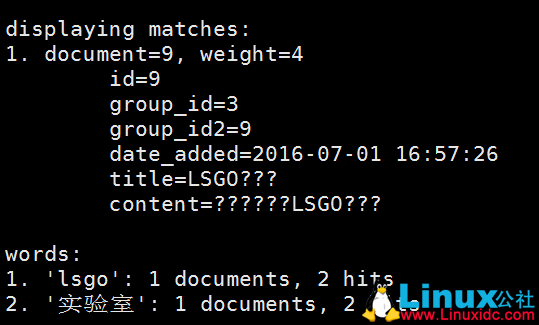
./search -c /usr/local/coreseek/etc/sphinx.conf LSGO 实验室;
从结果来看,sphinx 将‘LSGO 实验室’分成了‘LSGO’和‘实验室’,而且‘lsgo’被匹配出来了,但是‘LSGO 实验室’没出来!为什么?
因为我这里测试的是 sphinx,仅仅对英文起作用,对中文不起作用。
下面我讲对中文检索引擎进行搜索测试
更多详情见请继续阅读下一页的精彩内容 :http://www.linuxidc.com/Linux/2017-05/143600p2.htm
四、coreseek 搜索测试
一开始是没有 coreseek 配置文件的,我们要首先建立 csft.conf 配置文件:
由于 csft.conf 配置文件中的大部分内容跟 sphinx.conf 的内容是一样的,我们仅仅要修改只是很小一部分
cd /usr/local/coreseek/etc

cp sphinx.conf csft.conf        #coreseek 配置文件的默认名就是 csft.conf
修改 csft.conf:1、修改字符集,将 charset_type = utf-8 换成 charset_type = zh_cn.utf-8(换成中文的 utf-8),2、添加中文字典的绝对路径(直接在 charset_type 下面添加就可以),charset_dictpath = /usr/local/mmseg3/etc/(就是你编译安装 mmseg3 的时候的目录下的 /etc/ 目录)
就是上面的两点不同,其他的设置跟 sphinx.conf 是一模一样的。
前面我们试图搜索关键字‘LSGO 实验室’,发现搜索不了,那么现在我们再用那条数据测试,看看能不能搜索出来:
cd /usr/local/coreseek/bin

# 重新生成索引
./indexer -c /usr/local/coreseek/etc/csft.conf --all

# 搜索关键字 'LSGO 实验室'
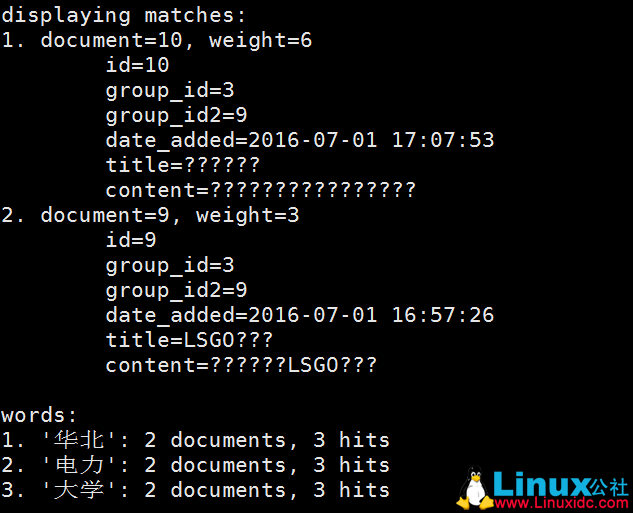
./search -c /usr/local/coreseek/etc/csft.conf LSGO 实验室 
结果发现关键字‘实验室’被搜索出来了!
我们添加一条数据再试试?
mysql -uroot -pzhongjin test

INSERT INTO documents(group_id,group_id2,date_added,title,content) VALUES(3,9,NOW(),'华北电力大学','我在华北电力大学保定校区上学呢!');

#重新生成索引
./indexer -c /usr/local/coreseek/etc/csft.conf --all

#搜索关键字 'LSGO 实验室'
./search -c /usr/local/coreseek/etc/csft.conf 华北电力大学 
结果证明了一切。。。。。(奇怪,’华北电力大学‘竟然不在字典里面!)
PS:如果搜索不出来,很有可能是数据表的编码的影响,因为这个测试的数据表的默认编码是 latin1,要改成 utf8。(这里我确实改了)
五、在 PHP 中使用 sphinx 技术
啊哈,终于到了最关键的一步了。假如我们要在 PHP 中使用 sphinx 技术,就要做到以下几点:
- 首先得有数据;
- 建立 sphinx 配置文件
- 生成索引
- 启动 sphinx 服务进程(searchd),并开启端口 9312
- 安装 PHP 的 sphinx 扩展
- 用 PHP 客户端去连接 sphinx 服务器
目前为止,我们就差 4、6 还没完成,
启用 sphinx 服务命令:searchd
-c 指定配置文件
–stop 停止服务
–pidfile 显式指定一个 PID 文件
-p 指定端口
4、启动 sphinx 服务进程(searchd),并开启端口 9312:
cd /usr/local/coreseek/bin

./searchd (或 ./search -c /usr/local/coreseek/etc/csft.conf) # 这里默认加载 csft.conf 配置,如果你的配置文件不叫 csft.conf, 那么可以用 -c 添加另外的配置文件 
以上图片表示 searchd 服务开启成功,当然你可以使用:
ps aux | grep searchd
# 或
netstat -tunpl | grep 9312
查看 searchd 的状态
6、用 PHP 客户端去连接 sphinx 服务器
<?php
        $sphinx = new SphinxClient();

        // 设置主机名和端口号(默认 9312)
        $sphinx->SetServer("localhost",9312);

        // 设置匹配的方式 SPH_MATCH_ANY 表示所有的结果,SPH_MATCH_ALL 表示只包含关键词的结果,举例子:搜索关键词’LSGO 实验室‘,那么 SPH_MATCH_ANY 表示返回包含’LSGO‘的、’实验室‘的、’LSGO 实验室‘的结果,而 SPH_MATCH_ALL 只返回包含’LSGO 实验室‘的结果
        $sphinx->SetMatchMode(SPH_MATCH_ANY);

        //query('a','b');在 b 索引中搜索关键字 a,query('a','*');在所有的索引中搜索 a
        $result = $sphinx -> query("$keyword","main");

        echo "<pre>";
        print_r($result);
        echo "</pre>";


====================== 获取数据库中的详细信息 ====================
        $ids = join(',',array_keys($result['matches']));
        $mysql = new mysqli('localhost','root','zhongjin','test');
        $mysql->query("SET NAMES utf8");
        $sql = "SELECT * FROM documents WHERE id IN({$ids})";

        $res = $mysql->query($sql);
        while($ret = $res->fetch_assoc()){print_r($ret);
            echo "<br>";
        }
?>
前面部分只是为了演示在 sphinx 索引中存储的值,后半部分通过搜索获取到对应字段的 id,再通过这些 id 去数据库中找到它们的详细信息。
本文永久更新链接地址 :http://www.linuxidc.com/Linux/2017-05/143600.htm
简要:
有关于 Coreseek 的介绍、在 LAMP 上的安装及简单的测试可以参考我的另一篇文章 CentOS 7 下安装 Coreseek 中文检索引擎 http://www.linuxidc.com/Linux/2017-05/143599.htm
一、安装 PHP 的 sphinx 扩展:
=====================1、安装 libsphinxclient================

#linsphinxclient 在解压缩出来的 coreseek-3.2.14 里面

cd /usr/local/src/coreseek/csft-3.2.14/api/libsphinxclient

# 安装在 /usr/local/sphinxclient
./configure  --prefix=/usr/local/sphinxclient

make && make install

====================2、安装 sphinx 的 PHP 扩展 ===================

cd /usr/local/src

wget http://pecl.php.net/get/sphinx-1.1.0.tgz

tar -zxvf sphinx-1.1.0.tgz

cd sphinx-1.1.0

# 使用安装 php 时生成的 phpize 来生成 configure 配置文件
/usr/local/php/bin/phpize   (或 /usr/bin/phpize)
# 具体用哪个要取决于你的 phpize 文件所在的目录,这时你应该用 whereis phpize 来查看路径

./configure --with-php-config=/usr/bin/php-config --with-sphinx=/usr/local/sphinxclient
# 其中 php-config 和 phpize 所在的目录是相同的,比如上面我用 /usr/bin/phpize,则在这一步我用 ./configure –with-php-config=/usr/bin/php-config。而 /usr/local/sphinxclient 就是上面的 libsphinxclient 的安装目录

make && make install

# 注意,如果你的 php 版本是 5.4,那么在这一步中会出现错误,提示在 sphinx.c:105:2,可以按下面方式修改:

#vim sphinx.c,找到 105 行

# 把 retval = std_hnd->read_property(object, member, type TSRMLS_CC); 修改成 retval = std_hnd->read_property(object, member, type TSRMLS_CC, NULL);

# 重新编译安装

#./configure --with-php-config=/usr/bin/php-config --with-sphinx=/usr/local/sphinxclient

#make && make install
安装完之后我们还要修改 PHP.ini 文件:
vim /etc/php.ini    # 具体 php.ini 的位置自己查哈

# 在 php.ini 文件的最后一行添加:
extension="sphinx.so"

# 重启 apache 服务器
systemctl restart httpd.service
重启之后,在某个 php 文件里面添加 echo phpinfo();,在详情页面中假如有:
则说明安装 sphinx 的 PHP 扩展成功啦!
二、sphinx 配置文件和测试表
一开始是没有 sphinx 配置文件的,我们要首先建立 sphinx.conf 配置文件:
cd /usr/local/coreseek/etc

cp sphinx.conf.dist sphinx.conf     #sphinx 配置文件的默认名就是 sphinx.conf
在这里先介绍一些 sphinx.conf 配置文件的结构:
# 主数据源
source main{
{# 增量数据源
source delta:main{
}
# 主数据索引
index main{
}
# 增量数据索引
index delta:main{
}
# 分布式索引
index dist1{
}
# 索引器
indexer{
}
# 服务进程
searchd{}
由于初始的配置文件有很多注释,我们为了简单起见,可以将那些注释都删除了,以后要用到注释的时候可以参照 sphinx.conf.dist,下面我贴出我的简化后的配置文件:
# 主数据源(命名为 main)
source main
{
    type                    = mysql

    sql_host                = localhost
    sql_user                = root
    sql_pass                = zhongjin
    sql_db                  = test
    sql_port                = 3306  # optional, default is 3306
    #sql_sock               = /var/lib/mysql/mysql.sock
    sql_query_pre           = SET NAMES UTF8    #mysql 检索字符集
    sql_query_pre           = SET SESSION query_cache_type=OFF  #关闭缓存
    sql_query               = \
        SELECT id, group_id, UNIX_TIMESTAMP(date_added) AS date_added, title, content \
        FROM documents  #获取数据的 SQL 语句
    #sql_attr_timestamp     = date_added    #排序字段
    sql_ranged_throttle = 0
    sql_query_info      = SELECT * FROM documents WHERE id=$id  #这里的 id 对应于数据表的主键
}

# 增量数据源 (暂时用不到,先注释了)
#source src1throttled : main
#{
#   sql_ranged_throttle         = 100
#}

# 主数据索引
index main
{
    source          = main  #指定主数据源
    path            = /usr/local/coreseek/var/data/main     #索引数据存放路径
    docinfo         = extern
    mlock           = 0
    morphology      = none


    #stopwords          = G:\data\stopwords.txt

    #wordforms          = G:\data\wordforms.txt
    #exceptions     = /data/exceptions.txt

    min_word_len        = 1
    charset_type        = utf-8
    html_strip              = 0
    #charset_table     = 0..9, A..Z->a..z, _, a..z, U+410..U+42F->U+430..U+44F, U+430..U+44    F
}

# 增量数据索引(暂时用不到)
#index test1stemmed : test1
#{
#   path            = /usr/local/coreseek/var/data/test1stemmed
#   morphology      = stem_en
#}

# 分布式索引(暂时用不到)
#index dist1
#{
#   type                = distributed
#
#   local               = test1
#   local               = test1stemmed
#   agent               = localhost:9313:remote1
#   agent               = localhost:9314:remote2,remote3
#   agent_connect_timeout   = 1000
#
#   agent_query_timeout     = 3000
#}

# 索引器(基本不用改)
indexer
{mem_limit           = 128M
}

# 服务进程(不用修改)
searchd
{log                 = /usr/local/coreseek/var/log/searchd.log
    query_log           = /usr/local/coreseek/var/log/query.log
    read_timeout        = 5
    client_timeout      = 300

    max_children        = 30

    pid_file            = /usr/local/coreseek/var/log/searchd.pid

    max_matches         = 1000

    seamless_rotate     = 1

    preopen_indexes     = 0
    unlink_old          = 1

    mva_updates_pool    = 1M
    max_packet_size     = 8M

    max_filters         = 256
    max_filter_values   = 4096
}
在主数据源的设置中,sql_query 和 sql_query_info 字段都是 From document,这里用的是 安装 coreseek 时提供的测试表,位于 /usr/local/coreseek/etc/example.sql,根据设置,我们创建数据库和导入测试数据表:
mysql -uroot -pzhongjin

CREATE DATABASE test;

USE test;

# 导入数据
SOURCE /usr/local/coreseek/etc/example.sql;

SHOW TABLES;

#+----------------+
#| Tables_in_test |
#+----------------+
#| documents      |
#| tags           |
#+----------------+

SELECT * FROM documents;
现在该表里面有四条数据,待会我们就是用该表来测试 sphinx。
现在配置文件有了,测试数据也有了,下面就是测试了。
三、sphinx 搜索测试:
1、先创建索引:在新增数据之后,都得重新索引一次
创建索引命令:indexer,
-c 指定配置文件
–all 对所有索引重新编制索引
–rotate 用于轮换索引,主要是在不停止服务的时候增加索引
–merge 合并索引
针对 test:documents 创建索引
# 基本所有的命令都在该目录下
cd /usr/local/coreseek/bin

./indexer -c /usr/local/coreseek/etc/sphinx.conf --all
可以看到,我们的配置文件,还有就是我们索引的是 main 主数据源,总共有四个文档,正好对应数据表。
2、查询关键字
查询命令:search
-c 指定配置文件
查关键字 test:
cd /usr/local/coreseek/bin

./search -c /usr/local/coreseek/etc/sphinx.conf test
查询的结果如上图所示,图中的结果表明,test 在第一篇文档中出现两次,在第二篇文档中出现两次,在第三篇文档中出现一次,总共在三个文档中出现,总共出现 5 次。
查关键字 group:
./search -c /usr/local/coreseek/etc/sphinx.conf group
从结果中可以发现,group 只在一个文档中出现一次,但是查表发现,数据表中有 group 和 groups,为什么 groups 没有被匹配出来?因为在英文分词中是以空格进行分词的,因此 group 和 groups 是两个不同的单词。
现在我们插入一条数据,看看能不能查询出来:
mysql -uroot -pzhongjin test

INSERT INTO documents(group_id,group_id2,date_added,title,content) VALUES(3,9,NOW(),'zhongjin','zhongjin is a student');
查关键字 zhongjin
./search -c /usr/local/coreseek/etc/sphinx.conf zhongjin;结果是 zhongjin 关键字在 0 个文档中出现 0 次,为什么?
因为我们没有索引该条记录呀,前面不是说了嘛,新增数据之后,都得重新进行索引(这个有解决方案,后面有机会再说)
./indexer -c /usr/local/coreseek/etc/sphinx.conf --all

./search -c /usr/local/coreseek/etc/sphinx.conf zhongjin;
这回出来了吧。
3、试试中文?
mysql -uroot -pzhongjin test

INSERT INTO documents(group_id,group_id2,date_added,title,content) VALUES(3,9,NOW(),'LSGO 实验室','华北电力大学 LSGO 实验室');

./indexer -c /usr/local/coreseek/etc/sphinx.conf --all

./search -c /usr/local/coreseek/etc/sphinx.conf LSGO 实验室;
从结果来看,sphinx 将‘LSGO 实验室’分成了‘LSGO’和‘实验室’,而且‘lsgo’被匹配出来了,但是‘LSGO 实验室’没出来!为什么?
因为我这里测试的是 sphinx,仅仅对英文起作用,对中文不起作用。
下面我讲对中文检索引擎进行搜索测试
更多详情见请继续阅读下一页的精彩内容 :http://www.linuxidc.com/Linux/2017-05/143600p2.htm


