共计 14096 个字符,预计需要花费 36 分钟才能阅读完成。
一、概述
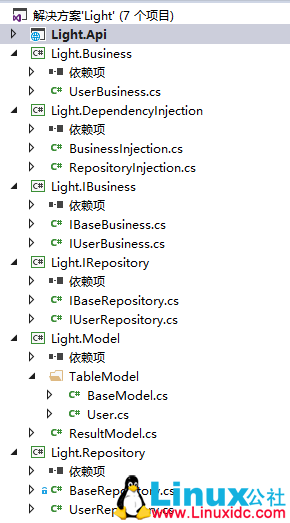
1、用 VS2017 创建如下图的几个.NET Standard 类库,默认版本为 1.4,你可以通过项目属性进行修改,最高支持到 1.6,大概五月份左右会更新至 2.0,API 会翻倍,很期待!
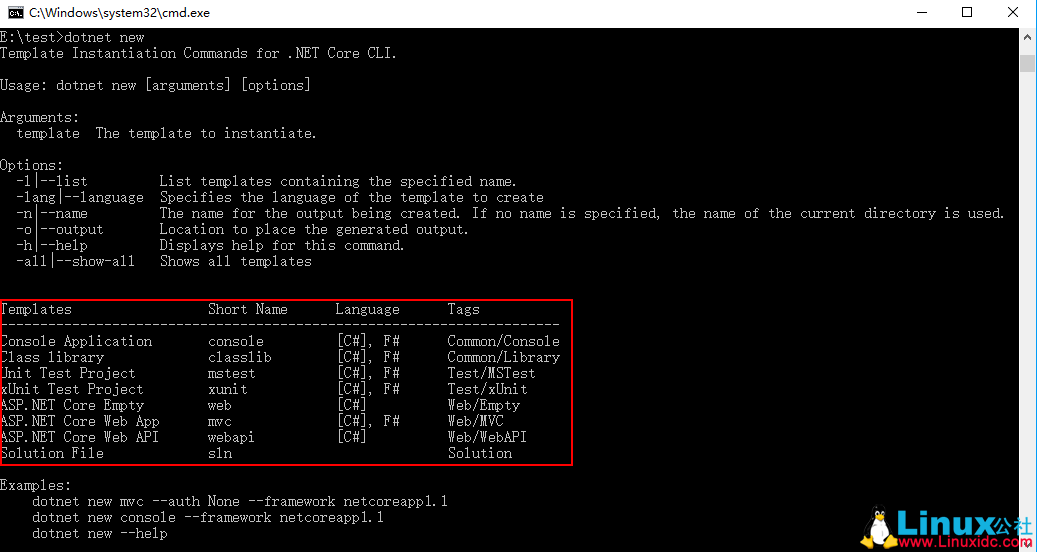
2、当然了,你还可以通过.NET Core Tool 的 cli 命令来创建,前提是你的电脑上安装了.NET Core SDK。
dotnet new classlib -n Light.Repository // 创建一个名字为 Light.Repository 的.NET Standard 类库
更多创建类型请键入如下命令进行查看
dotnet new -all

红框内自上而下依次表示:
- 控制台应用程序
- 类库
- 微软自带的单元测试项目
- 引入 XUnit 框架的单元测试项目
- 空的 ASP.NET Core
- ASP.NET Core MVC 项目
- ASP.NET Core WebAPI 项目
- 空的解决方案
二、引入 Dapper
1、准备创建用户表的 SQL 脚本

| 1 USE [Light] | |
| 2 GO | |
| 3 | |
| 4 /****** Object: Table [dbo].[User] Script Date: 2017/3/27 22:40:08 ******/ | |
| 5 SET ANSI_NULLS ON | |
| 6 GO | |
| 7 | |
| 8 SET QUOTED_IDENTIFIER ON | |
| 9 GO | |
| 10 | |
| 11 CREATE TABLE [dbo].[User](12 [Id] [int] IDENTITY(10000,1) NOT NULL, | |
| 13 [UserName] [nvarchar](50) NOT NULL, | |
| 14 [Password] [nvarchar](50) NOT NULL, | |
| 15 [Gender] [bit] NOT NULL, | |
| 16 [Birthday] [datetime] NOT NULL, | |
| 17 [CreateUserId] [int] NOT NULL, | |
| 18 [CreateDate] [datetime] NOT NULL, | |
| 19 [UpdateUserId] [int] NOT NULL, | |
| 20 [UpdateDate] [datetime] NOT NULL, | |
| 21 [IsDeleted] [bit] NOT NULL, | |
| 22 CONSTRAINT [PK_User] PRIMARY KEY CLUSTERED | |
| 23 (24 [Id] ASC | |
| 25 )WITH (PAD_INDEX = OFF, STATISTICS_NORECOMPUTE = OFF, IGNORE_DUP_KEY = OFF, ALLOW_ROW_LOCKS = ON, ALLOW_PAGE_LOCKS = ON) ON [PRIMARY] | |
| 26 ) ON [PRIMARY] | |
| 27 | |
| 28 GO | |
| 29 | |
| 30 ALTER TABLE [dbo].[User] ADD CONSTRAINT [DF_User_UserName] DEFAULT ('') FOR [UserName] | |
| 31 GO | |
| 32 | |
| 33 ALTER TABLE [dbo].[User] ADD CONSTRAINT [DF_User_Password] DEFAULT ('') FOR [Password] | |
| 34 GO | |
| 35 | |
| 36 ALTER TABLE [dbo].[User] ADD CONSTRAINT [DF_User_Gender] DEFAULT ((0)) FOR [Gender] | |
| 37 GO | |
| 38 | |
| 39 ALTER TABLE [dbo].[User] ADD CONSTRAINT [DF_User_Birthday] DEFAULT (getdate()) FOR [Birthday] | |
| 40 GO | |
| 41 | |
| 42 ALTER TABLE [dbo].[User] ADD CONSTRAINT [DF_User_CreateUserId] DEFAULT ((0)) FOR [CreateUserId] | |
| 43 GO | |
| 44 | |
| 45 ALTER TABLE [dbo].[User] ADD CONSTRAINT [DF_User_CreateDate] DEFAULT (getdate()) FOR [CreateDate] | |
| 46 GO | |
| 47 | |
| 48 ALTER TABLE [dbo].[User] ADD CONSTRAINT [DF_User_UpdateUserId] DEFAULT ((0)) FOR [UpdateUserId] | |
| 49 GO | |
| 50 | |
| 51 ALTER TABLE [dbo].[User] ADD CONSTRAINT [DF_User_UpdateDate] DEFAULT (getdate()) FOR [UpdateDate] | |
| 52 GO | |
| 53 | |
| 54 ALTER TABLE [dbo].[User] ADD CONSTRAINT [DF_User_IsDeleted] DEFAULT ((0)) FOR [IsDeleted] | |
| 55 GO | |
| 56 | |
| 57 EXEC sys.sp_addextendedproperty @name=N'MS_Description', @value=N' 主键 Id' , @level0type=N'SCHEMA',@level0name=N'dbo', @level1type=N'TABLE',@level1name=N'User', @level2type=N'COLUMN',@level2name=N'Id' | |
| 58 GO | |
| 59 | |
| 60 EXEC sys.sp_addextendedproperty @name=N'MS_Description', @value=N' 用户名 ' , @level0type=N'SCHEMA',@level0name=N'dbo', @level1type=N'TABLE',@level1name=N'User', @level2type=N'COLUMN',@level2name=N'UserName' | |
| 61 GO | |
| 62 | |
| 63 EXEC sys.sp_addextendedproperty @name=N'MS_Description', @value=N' 密码 ' , @level0type=N'SCHEMA',@level0name=N'dbo', @level1type=N'TABLE',@level1name=N'User', @level2type=N'COLUMN',@level2name=N'Password' | |
| 64 GO | |
| 65 | |
| 66 EXEC sys.sp_addextendedproperty @name=N'MS_Description', @value=N' 性别(0 女,1 男)' , @level0type=N'SCHEMA',@level0name=N'dbo', @level1type=N'TABLE',@level1name=N'User', @level2type=N'COLUMN',@level2name=N'Gender' | |
| 67 GO | |
| 68 | |
| 69 EXEC sys.sp_addextendedproperty @name=N'MS_Description', @value=N' 出生年月日 ' , @level0type=N'SCHEMA',@level0name=N'dbo', @level1type=N'TABLE',@level1name=N'User', @level2type=N'COLUMN',@level2name=N'Birthday' | |
| 70 GO | |
| 71 | |
| 72 EXEC sys.sp_addextendedproperty @name=N'MS_Description', @value=N' 创建人 ' , @level0type=N'SCHEMA',@level0name=N'dbo', @level1type=N'TABLE',@level1name=N'User', @level2type=N'COLUMN',@level2name=N'CreateUserId' | |
| 73 GO | |
| 74 | |
| 75 EXEC sys.sp_addextendedproperty @name=N'MS_Description', @value=N' 创建时间 ' , @level0type=N'SCHEMA',@level0name=N'dbo', @level1type=N'TABLE',@level1name=N'User', @level2type=N'COLUMN',@level2name=N'CreateDate' | |
| 76 GO | |
| 77 | |
| 78 EXEC sys.sp_addextendedproperty @name=N'MS_Description', @value=N' 更新人 ' , @level0type=N'SCHEMA',@level0name=N'dbo', @level1type=N'TABLE',@level1name=N'User', @level2type=N'COLUMN',@level2name=N'UpdateUserId' | |
| 79 GO | |
| 80 | |
| 81 EXEC sys.sp_addextendedproperty @name=N'MS_Description', @value=N' 更新时间 ' , @level0type=N'SCHEMA',@level0name=N'dbo', @level1type=N'TABLE',@level1name=N'User', @level2type=N'COLUMN',@level2name=N'UpdateDate' | |
| 82 GO | |
| 83 | |
| 84 EXEC sys.sp_addextendedproperty @name=N'MS_Description', @value=N' 标志是否删除(0 未删除,1 已删除)' , @level0type=N'SCHEMA',@level0name=N'dbo', @level1type=N'TABLE',@level1name=N'User', @level2type=N'COLUMN',@level2name=N'IsDeleted' | |
| 85 GO |
2、添加对应的 User 表实体

| 1 /// <summary> | |
| 2 /// 用户实体 | |
| 3 /// </summary> | |
| 4 public class User : BaseModel | |
| 5 { 6 /// <summary> | |
| 7 /// 用户名 | |
| 8 /// </summary> | |
| 9 public string UserName {get; set; } | |
| 10 | |
| 11 /// <summary> | |
| 12 /// 密码 | |
| 13 /// </summary> | |
| 14 public string Password {get; set; } | |
| 15 | |
| 16 /// <summary> | |
| 17 /// 性别(0 女,1 男)18 /// </summary> | |
| 19 public bool Gender {get; set; } | |
| 20 | |
| 21 /// <summary> | |
| 22 /// 出生年月日 | |
| 23 /// </summary> | |
| 24 public DateTime Birthday {get; set; } | |
| 25 } |
3、使用泛型针对每一个表定义基本的 CRUD 接口,然后 IUserRepository 继承它,如果需要其他的接口,后续往里边定义即可

| 1 /// <summary> | |
| 2 /// 基类业务接口定义 | |
| 3 /// </summary> | |
| 4 public interface IBaseBusiness<T> where T : class | |
| 5 { 6 /// <summary> | |
| 7 /// 添加一个实体 | |
| 8 /// </summary> | |
| 9 /// <param name="entity"> 要创建的实体 </param> | |
| 10 /// <param name="connectionString"> 链接字符串 </param> | |
| 11 /// <returns></returns> | |
| 12 bool CreateEntity(T entity, string connectionString = null); | |
| 13 | |
| 14 /// <summary> | |
| 15 /// 根据主键 Id 获取一个实体 | |
| 16 /// </summary> | |
| 17 /// <param name="id"> 主键 Id</param> | |
| 18 /// <param name="connectionString"> 链接字符串 </param> | |
| 19 /// <returns></returns> | |
| 20 T RetriveOneEntityById(int id, string connectionString = null); | |
| 21 | |
| 22 /// <summary> | |
| 23 /// 获取所有实体 | |
| 24 /// </summary> | |
| 25 /// <param name="connectionString"> 链接字符串 </param> | |
| 26 /// <returns></returns> | |
| 27 IEnumerable<T> RetriveAllEntity(string connectionString = null); | |
| 28 | |
| 29 /// <summary> | |
| 30 /// 修改一个实体 | |
| 31 /// </summary> | |
| 32 /// <param name="entity"> 要修改的实体 </param> | |
| 33 /// <param name="connectionString"> 链接字符串 </param> | |
| 34 /// <returns></returns> | |
| 35 bool UpdateEntity(T entity, string connectionString = null); | |
| 36 | |
| 37 /// <summary> | |
| 38 /// 根据主键 Id 删除一个实体 | |
| 39 /// </summary> | |
| 40 /// <param name="id"> 主键 Id</param> | |
| 41 /// <param name="connectionString"> 链接字符串 </param> | |
| 42 /// <returns></returns> | |
| 43 bool DeleteEntityById(int id, string connectionString = null); | |
| 44 } |
4、主角进场。通过 Nuget 引入 Dapper 到 Repository 中,目前的版本为 1.50.2
Install-Package Dapper
- Dapper 是目前一款简洁、高效并且开源的 ORM(实体对象关系映射) 框架之一。
传送门:https://github.com/StackExchange/Dapper - 它不仅支持 Sql Server,还适用于 MySql,SqlLite,Oracle,PostgreSql 等
- 默认使用参数化进行查询或者新增
- 支持存储过程
- 支持级联映射和多表映射
- 默认缓冲你所执行的 SQL
a)、设置你的链接字符串和 DbConnection
| 1 /// <summary> | |
| 2 /// 数据库配置 | |
| 3 /// </summary> | |
| 4 public class DataBaseConfig | |
| 5 { 6 #region SqlServer 链接配置 | |
| 7 /// <summary> | |
| 8 /// 默认的 Sql Server 的链接字符串 | |
| 9 /// </summary> | |
| 10 private static string DefaultSqlConnectionString = @"Data Source=.;Initial Catalog=Light;User ID=sa;Password=sa;"; | |
| 11 public static IDbConnection GetSqlConnection(string sqlConnectionString = null) | |
| 12 {13 if (string.IsNullOrWhiteSpace(sqlConnectionString)) | |
| 14 {15 sqlConnectionString = DefaultSqlConnectionString; | |
| 16 } | |
| 17 IDbConnection conn = new SqlConnection(sqlConnectionString); | |
| 18 conn.Open(); | |
| 19 return conn; | |
| 20 } | |
| 21 #endregion | |
| 22 } |
b)、实现 IUserRepository 定义的接口,使用 Dapper 进行操作数据
| 1 /// <summary> | |
| 2 /// 用户仓储 | |
| 3 /// </summary> | |
| 4 /// <typeparam name="User"></typeparam> | |
| 5 public class UserRepository : IUserRepository | |
| 6 { 7 /// <summary> | |
| 8 /// 创建一个用户 | |
| 9 /// </summary> | |
| 10 /// <param name="entity"> 用户 </param> | |
| 11 /// <param name="connectionString"> 链接字符串 </param> | |
| 12 /// <returns></returns> | |
| 13 public bool CreateEntity(User entity, string connectionString = null) | |
| 14 { 15 using (IDbConnection conn = DataBaseConfig.GetSqlConnection(connectionString)) | |
| 16 { 17 string insertSql = @"INSERT INTO [dbo].[User] | |
| 18 ([UserName] | |
| 19 ,[Password] | |
| 20 ,[Gender] | |
| 21 ,[Birthday] | |
| 22 ,[CreateUserId] | |
| 23 ,[CreateDate] | |
| 24 ,[UpdateUserId] | |
| 25 ,[UpdateDate] | |
| 26 ,[IsDeleted]) | |
| 27 VALUES | |
| 28 (@UserName | |
| 29 ,@Password | |
| 30 ,@Gender | |
| 31 ,@Birthday | |
| 32 ,@CreateUserId | |
| 33 ,@CreateDate | |
| 34 ,@UpdateUserId | |
| 35 ,@UpdateDate | |
| 36 ,@IsDeleted)"; | |
| 37 return conn.Execute(insertSql, entity) > 0; | |
| 38 } | |
| 39 } | |
| 40 | |
| 41 /// <summary> | |
| 42 /// 根据主键 Id 删除一个用户 | |
| 43 /// </summary> | |
| 44 /// <param name="id"> 主键 Id</param> | |
| 45 /// <param name="connectionString"> 链接字符串 </param> | |
| 46 /// <returns></returns> | |
| 47 public bool DeleteEntityById(int id, string connectionString = null) | |
| 48 { 49 using (IDbConnection conn = DataBaseConfig.GetSqlConnection(connectionString)) | |
| 50 { 51 string deleteSql = @"DELETE FROM [dbo].[User] | |
| 52 WHERE Id = @Id"; | |
| 53 return conn.Execute(deleteSql, new {Id = id}) > 0; | |
| 54 } | |
| 55 } | |
| 56 | |
| 57 /// <summary> | |
| 58 /// 获取所有用户 | |
| 59 /// </summary> | |
| 60 /// <param name="connectionString"> 链接字符串 </param> | |
| 61 /// <returns></returns> | |
| 62 public IEnumerable<User> RetriveAllEntity(string connectionString = null) | |
| 63 { 64 using (IDbConnection conn = DataBaseConfig.GetSqlConnection(connectionString)) | |
| 65 { 66 string querySql = @"SELECT [Id] | |
| 67 ,[UserName] | |
| 68 ,[Password] | |
| 69 ,[Gender] | |
| 70 ,[Birthday] | |
| 71 ,[CreateUserId] | |
| 72 ,[CreateDate] | |
| 73 ,[UpdateUserId] | |
| 74 ,[UpdateDate] | |
| 75 ,[IsDeleted] | |
| 76 FROM [dbo].[User]"; | |
| 77 return conn.Query<User>(querySql); | |
| 78 } | |
| 79 } | |
| 80 | |
| 81 /// <summary> | |
| 82 /// 根据主键 Id 获取一个用户 | |
| 83 /// </summary> | |
| 84 /// <param name="id"> 主键 Id</param> | |
| 85 /// <param name="connectionString"> 链接字符串 </param> | |
| 86 /// <returns></returns> | |
| 87 public User RetriveOneEntityById(int id, string connectionString = null) | |
| 88 { 89 using (IDbConnection conn = DataBaseConfig.GetSqlConnection(connectionString)) | |
| 90 { 91 string querySql = @"SELECT [Id] | |
| 92 ,[UserName] | |
| 93 ,[Password] | |
| 94 ,[Gender] | |
| 95 ,[Birthday] | |
| 96 ,[CreateUserId] | |
| 97 ,[CreateDate] | |
| 98 ,[UpdateUserId] | |
| 99 ,[UpdateDate] | |
| 100 ,[IsDeleted] | |
| 101 FROM [dbo].[User] | |
| 102 WHERE Id = @Id"; | |
| 103 return conn.QueryFirstOrDefault<User>(querySql, new {Id = id }); | |
| 104 } | |
| 105 } | |
| 106 | |
| 107 /// <summary> | |
| 108 /// 修改一个用户 | |
| 109 /// </summary> | |
| 110 /// <param name="entity"> 要修改的用户 </param> | |
| 111 /// <param name="connectionString"> 链接字符串 </param> | |
| 112 /// <returns></returns> | |
| 113 public bool UpdateEntity(User entity, string connectionString = null) | |
| 114 {115 using (IDbConnection conn = DataBaseConfig.GetSqlConnection(connectionString)) | |
| 116 {117 string updateSql = @"UPDATE [dbo].[User] | |
| 118 SET [UserName] = @UserName | |
| 119 ,[Password] = @Password | |
| 120 ,[Gender] = @Gender | |
| 121 ,[Birthday] = @Birthday | |
| 122 ,[UpdateUserId] = @UpdateUserId | |
| 123 ,[UpdateDate] = @UpdateDate | |
| 124 ,[IsDeleted] = @IsDeleted | |
| 125 WHERE Id = @Id"; | |
| 126 return conn.Execute(updateSql, entity) > 0; | |
| 127 } | |
| 128 } | |
| 129 } |
上面的代码所执行的方法 Execute,Query,QueryFirstOrDefault 其实都是 IDbConnection 的扩展方法,转到定义你也可以清楚的看到默认 buffered 缓存是开启的,并且都支持事务提交,同时还都对应各自的 async 异步方法
public static IEnumerable<T> Query<T>(this IDbConnection cnn, string sql, object param = null, IDbTransaction transaction = null, bool buffered = true, int? commandTimeout = default(int?), CommandType? commandType = default(CommandType?));
这样一来,再也不用 DataReader 去一个一个属性赋值了,也不用 SqlParameter 一个一个去参数化了,Dapper 全部帮你做了,你只需要关注你的业务 SQL 语句以及上下文的对象即可,是不是很清爽!
c)、接下来就是完成对上一部分仓储数据的调用。一方面是 IBusiness 的服务接口定义,另一方面则是 Business 的简单实现,因为暂时只是涉及到一个表的增查改删,所以具体的代码就不上了
d)、至于依赖注入模块,我直接使用的是 Microsoft.Extensions.DependencyInjection,所有的服务由 ServiceCollection 服务容器进行管理,我们只需要将接口和它的实现类进行注册就行了
| 1 /// <summary> | |
| 2 /// 注入业务逻辑层 | |
| 3 /// </summary> | |
| 4 public class BusinessInjection | |
| 5 { 6 public static void ConfigureBusiness(IServiceCollection services) | |
| 7 { 8 services.AddSingleton<IUserBusiness, UserBusiness>(); | |
| 9 } | |
| 10 } |
| 1 /// <summary> | |
| 2 /// 注入仓储层 | |
| 3 /// </summary> | |
| 4 public class RepositoryInjection | |
| 5 { 6 public static void ConfigureRepository(IServiceCollection services) | |
| 7 { 8 services.AddSingleton<IUserRepository, UserRepository>(); | |
| 9 } | |
| 10 } |
三、引入 SwaggerUI
简介:SwaggerUI 是一款针对 WebApi 的可视化工具,同样我也称它是一款全自动的接口描述文档,并且可以很方便的帮助你测试你的接口,接下来我们一步一步的来把它添加进去。
1、向 ASP.NET Core WebApi 项目中添加 Swashbuckle 组件,打开包管理控制台,输入:
Install-Package Swashbuckle -Pre
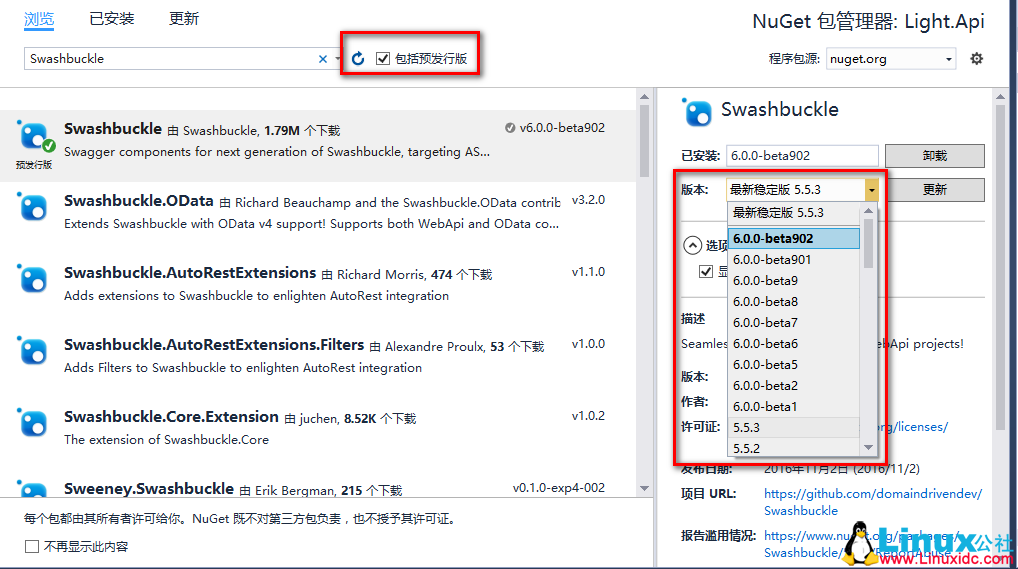
记得加上后边的 -Pre,表示安装最新版本,否则的话会默认下载稳定版本 5.5.3(不支持 Core)
当然了,你也可以包管理器进行安装,记得勾选“包括预发行版”,然后选择 6.0.0-beta902 进行安装

2、打开 Startup 文件,添加 Swagger 中间件并将他们注入到应用程序的管道中,同时也将我们自定义的服务加进去
| 1 /// <summary> | |
| 2 /// This method gets called by the runtime. Use this method to add services to the container. | |
| 3 /// </summary> | |
| 4 /// <param name="services"></param> | |
| 5 public void ConfigureServices(IServiceCollection services) | |
| 6 { 7 RepositoryInjection.ConfigureRepository(services); | |
| 8 BusinessInjection.ConfigureBusiness(services); | |
| 9 services.AddMvc(); | |
| 10 services.AddSwaggerGen(); | |
| 11 } | |
| 12 | |
| 13 /// <summary> | |
| 14 /// This method gets called by the runtime. Use this method to configure the HTTP request pipeline. | |
| 15 /// </summary> | |
| 16 /// <param name="app"></param> | |
| 17 /// <param name="env"></param> | |
| 18 /// <param name="loggerFactory"></param> | |
| 19 public void Configure(IApplicationBuilder app, IHostingEnvironment env, ILoggerFactory loggerFactory) | |
| 20 {21 loggerFactory.AddConsole(Configuration.GetSection("Logging")); | |
| 22 loggerFactory.AddDebug(); | |
| 23 | |
| 24 app.UseMvc(); | |
| 25 app.UseSwagger(); | |
| 26 app.UseSwaggerUi(); | |
| 27 } |
3、打开 launchSettings 文件,修改 launchUrl 为“swagger/ui”
| 1 "profiles": { 2 "IIS Express": { 3 "commandName": "IISExpress", | |
| 4 "launchBrowser": true, | |
| 5 "launchUrl": "swagger/ui", | |
| 6 "environmentVariables": { 7 "ASPNETCORE_ENVIRONMENT": "Development" | |
| 8 } | |
| 9 }, | |
| 10 "Light.Api": {11 "commandName": "Project", | |
| 12 "launchBrowser": true, | |
| 13 "launchUrl": "swagger/ui", | |
| 14 "environmentVariables": {15 "ASPNETCORE_ENVIRONMENT": "Development" | |
| 16 }, | |
| 17 "applicationUrl": "http://localhost:62116" | |
| 18 } | |
| 19 } |
4、添加一个 UserController,针对每一个服务增加一个 REST 风格的 API 接口。注意使用的 HttpMethod 方法。HttpGet 表示获取对象,HttpPost 表示创建对象,HttpPut 表示修改对象,HttpDelete 表示删除对象

| 1 /// <summary> | |
| 2 /// 用户控制器 | |
| 3 /// </summary> | |
| 4 [Route("api/[controller]")] | |
| 5 public class UserController : Controller | |
| 6 { 7 private readonly IUserBusiness iUserBusiness; | |
| 8 /// <summary> | |
| 9 /// 构造函数注入服务 | |
| 10 /// </summary> | |
| 11 /// <param name="userBusiness"></param> | |
| 12 public UserController(IUserBusiness userBusiness) | |
| 13 {14 iUserBusiness = userBusiness; | |
| 15 } | |
| 16 | |
| 17 /// <summary> | |
| 18 /// 获取所有用户 | |
| 19 /// </summary> | |
| 20 /// <returns></returns> | |
| 21 [HttpGet] | |
| 22 //[Route("AllUser")] | |
| 23 public IEnumerable<User> GetAllUser() | |
| 24 {25 return iUserBusiness.RetriveAllEntity(); | |
| 26 } | |
| 27 | |
| 28 /// <summary> | |
| 29 /// 根据主键 Id 获取一个用户 | |
| 30 /// </summary> | |
| 31 /// <param name="id"> 主键 Id</param> | |
| 32 /// <returns></returns> | |
| 33 [HttpGet("{id}")] | |
| 34 public User GetOneUser(int id) | |
| 35 {36 return iUserBusiness.RetriveOneEntityById(id); | |
| 37 } | |
| 38 | |
| 39 /// <summary> | |
| 40 /// 新增用户 | |
| 41 /// </summary> | |
| 42 /// <param name="user"> 用户实体 </param> | |
| 43 /// <returns></returns> | |
| 44 [HttpPost] | |
| 45 public bool CreateUser([FromBody]User user) | |
| 46 {47 return iUserBusiness.CreateEntity(user); | |
| 48 } | |
| 49 | |
| 50 /// <summary> | |
| 51 /// 修改用户 | |
| 52 /// </summary> | |
| 53 /// <param name="id"> 主键 Id</param> | |
| 54 /// <param name="user"> 用户实体 </param> | |
| 55 /// <returns></returns> | |
| 56 [HttpPut("{id}")] | |
| 57 public bool UpdateUser(int id, [FromBody]User user) | |
| 58 {59 user.Id = id; | |
| 60 return iUserBusiness.UpdateEntity(user); | |
| 61 } | |
| 62 | |
| 63 /// <summary> | |
| 64 /// 根据主键 Id 删除一个用户 | |
| 65 /// </summary> | |
| 66 /// <param name="id"> 主键 Id</param> | |
| 67 /// <returns></returns> | |
| 68 [HttpDelete("{id}")] | |
| 69 public bool DeleteUser(int id) | |
| 70 {71 return iUserBusiness.DeleteEntityById(id); | |
| 72 } | |
| 73 } |
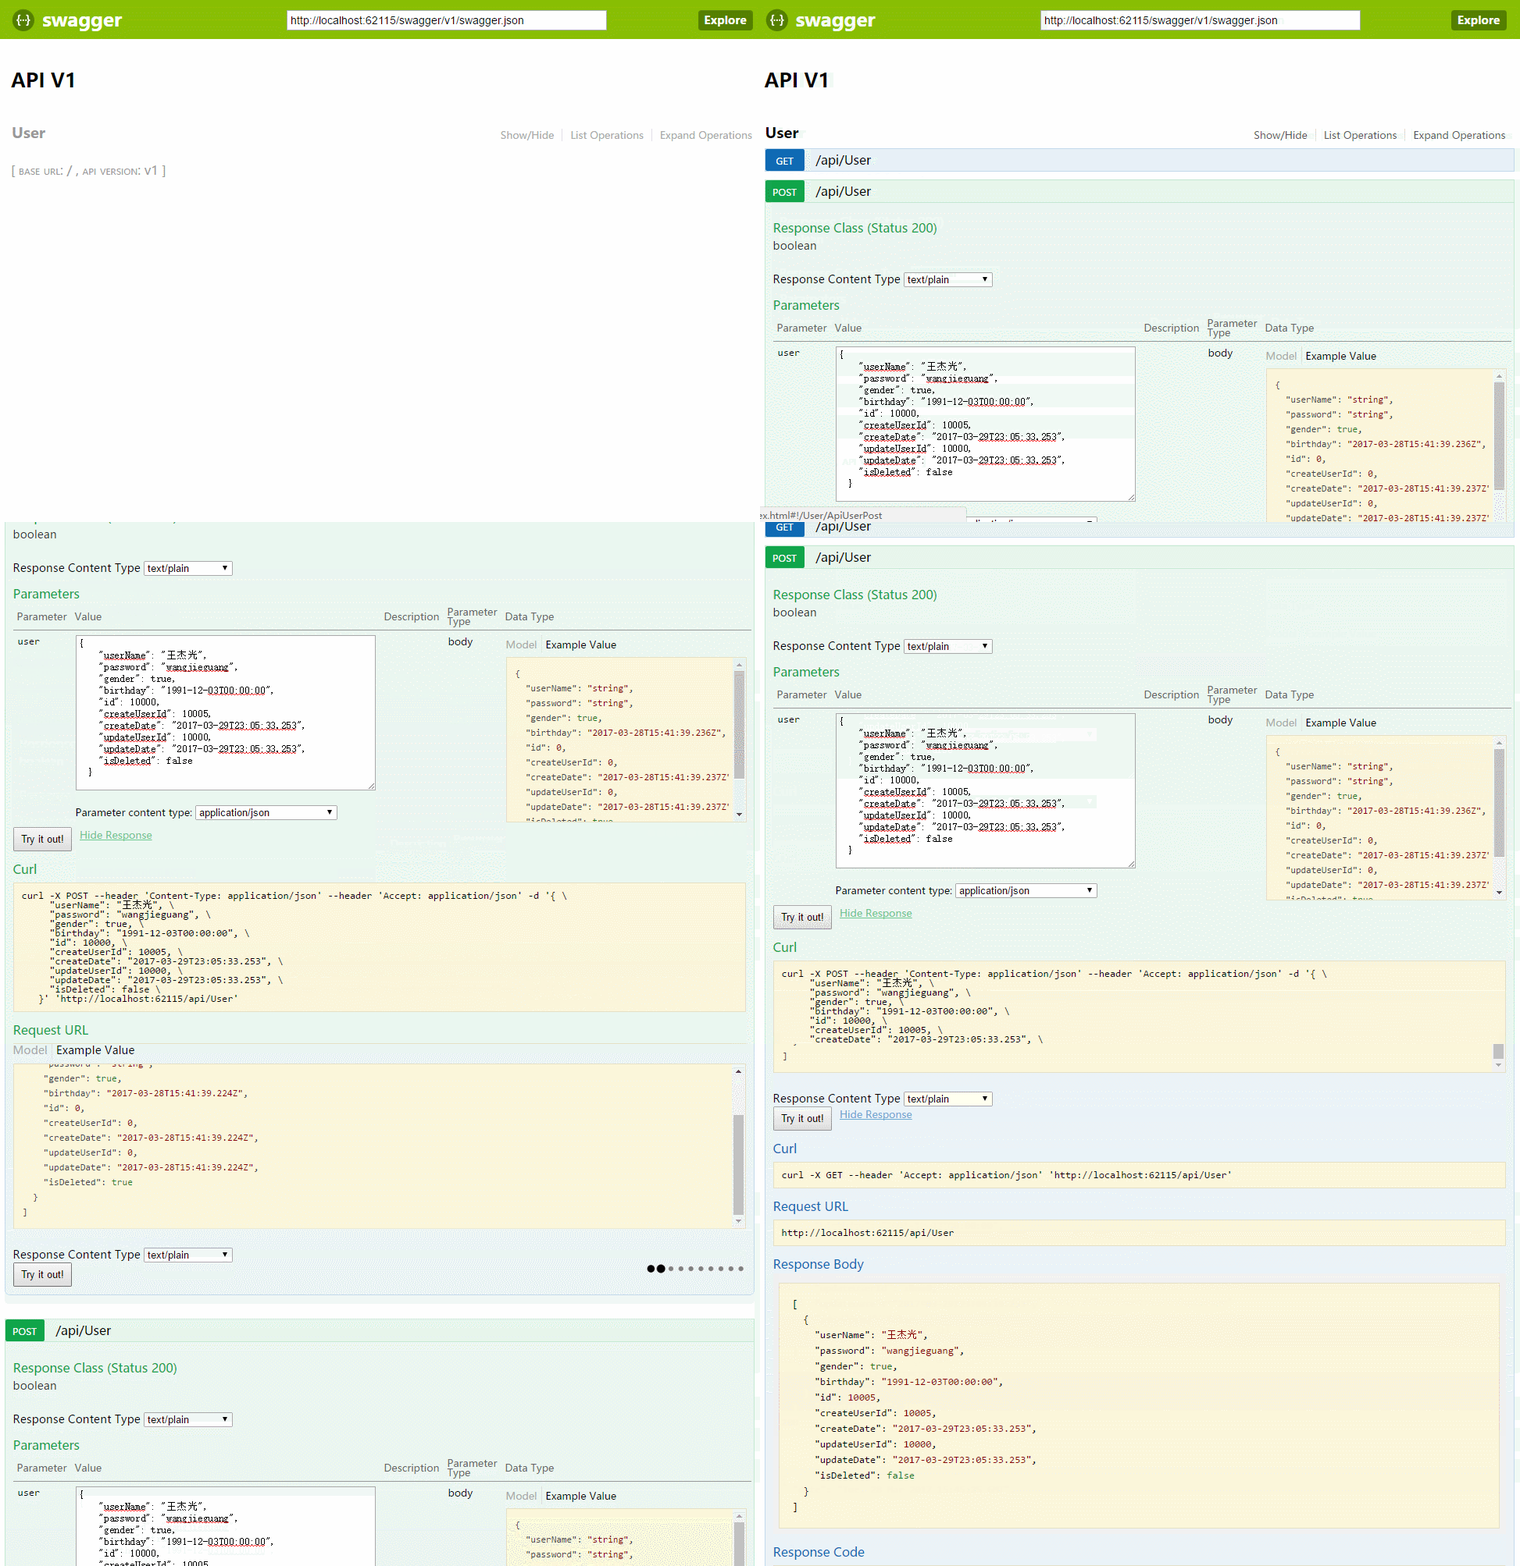
5、大功告成,Ctrl+F5 运行你的程序,并试着执行添加,修改和查询的 Api,体验 Swagger 带给你的方便之处。

写在最后:这篇文章只是介绍了它们俩最简单最基本的用法,如果其中说法有误的,还望各位前辈多多指点,更多的内容还需要后续的继续积累和学习,加油!
本文永久更新链接地址 :http://www.linuxidc.com/Linux/2017-05/143643.htm


