共计 4912 个字符,预计需要花费 13 分钟才能阅读完成。
说明
LAMP 组件是安装在服务器上的一组工具,用于托管动态网站和网络应用程序。首字母缩略词代表:Linux,Apache,MySQL,PHP。
在本教程中,我们将介绍如何在运行 Ubuntu 17.04 的服务器上安装该组件。
入门
首先,使用 ssh 连接到您的服务器(如果您没有物理访问机器):
$ ssh user@SERVER_IP
检查可用更新:
$ sudo apt-get update
如果提示有更新,请安装所有更新:
$ sudo apt-get upgrade
当然,我们已经有了 LAMP 组件的“L”部分,它就是运行的 GNU/Linux 系统(Ubuntu 17.04)。
安装 Apache
安装 Ubuntu 存储库中提供的 Apache Web 服务器:
$ sudo apt-get install apache2
启动 Apache 配置测试:
$ sudo apache2ctl configtest
| AH00558: apache2: Could not reliably determine the server's fully qualified domain name, using fe80::5054:ff:fe69:a3e0. Set the'ServerName' directive globally to suppress this message | |
| Syntax OK |
没有语法错误,但是测试返回一条警告消息,指出我们没有设置 FQDN(完全限定域名)。此警告消息是无害的,但是在检查您的 Apache 配置时会显示语法错误。
编辑 Apache 主配置:
$ sudo $EDITOR /etc/apache2/apache2.conf
在此文件的末尾,添加一个 ServerName 指令,指向服务器域或 IP。为了完成本教程的目的,我们这样设定:
ServerName 192.168.122.64
保存,关闭文件并检查配置中的语法错误:
$ sudo apache2ctl configtest
现在,结果将是:
Syntax OK
重启 Apache:
$ sudo systemctl restart apache2
打开 Web 浏览器并转到您的服务器 URL。如果看到以下页面,表示 Apache 正确运行:

安装 MySQL
此时,您还可以启动并运行 Web 服务器。下一步是安装数据库管理系统,MySQL。
MySQL 在 Ubuntu 存储库中可用,所以使用 apt 安装
$ sudo apt-get install mysql-server
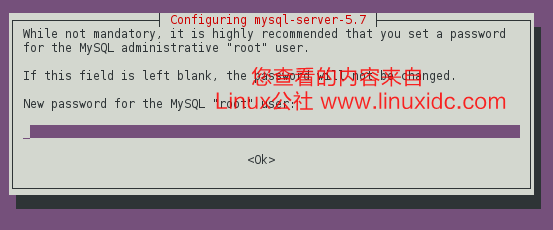
在安装过程中,系统将要求您输入 root 用户的密码

在此过程结束时,我们将更改一些默认配置,运行以下脚本:
$ mysql_secure_installation
| Securing the MySQL server deployment. | |
| Enter password for user root: | |
| VALIDATE PASSWORD PLUGIN can be used to test passwords | |
| and improve security. It checks the strength of password | |
| and allows the users to set only those passwords which are | |
| secure enough. Would you like to setup VALIDATE PASSWORD plugin? | |
| Press y|Y for Yes, any other key for No: N | |
| Using existing password for root. | |
| Change the password for root ? ((Press y|Y for Yes, any other key for No) : | |
| ... skipping. | |
| By default, a MySQL installation has an anonymous user, | |
| allowing anyone to log into MySQL without having to have | |
| a user account created for them. This is intended only for | |
| testing, and to make the installation go a bit smoother. | |
| You should remove them before moving into a production | |
| environment. | |
| Remove anonymous users? (Press y|Y for Yes, any other key for No) : y | |
| Success. | |
| Normally, root should only be allowed to connect from | |
| 'localhost'. This ensures that someone cannot guess at | |
| the root password from the network. | |
| Disallow root login remotely? (Press y|Y for Yes, any other key for No) : y | |
| Success. | |
| By default, MySQL comes with a database named 'test' that | |
| anyone can access. This is also intended only for testing, | |
| and should be removed before moving into a production | |
| environment. | |
| Remove test database and access to it? (Press y|Y for Yes, any other key for No) : y | |
| - Dropping test database... | |
| Success. | |
| - Removing privileges on test database... | |
| Success. | |
| Reloading the privilege tables will ensure that all changes | |
| made so far will take effect immediately. | |
| Reload privilege tables now? (Press y|Y for Yes, any other key for No) : y | |
| Success. | |
| All done! |
数据库系统现在设置好了!
安装 PHP
LAMP 组件的下一部分是 PHP 环境。这是处理代码以显示动态内容的部分。使用 apt 安装 PHP:
$ sudo apt-get install php libapache2-mod-php php-mcrypt php-mysql
PHP 有许多不同的模块可以轻松安装,以增强其功能。使用 apt 查找这些附加模块:
$ apt-cache search php- | less
| libnet-libidn-perl - Perl bindings for GNU Libidn | |
| php-all-dev - package depending on all supported PHP development packages | |
| php-cgi - server-side, HTML-embedded scripting language (CGI binary) (default) | |
| php-cli - command-line interpreter for the PHP scripting language (default) | |
| php-common - Common files for PHP packages | |
| php-curl - CURL module for PHP [default] | |
| php-dev - Files for PHP module development (default) | |
| php-gd - GD module for PHP [default] | |
| php-gmp - GMP module for PHP [default] | |
| php-ldap - LDAP module for PHP [default] | |
| php-mysql - MySQL module for PHP [default] | |
| php-odbc - ODBC module for PHP [default] | |
| php-pear - PEAR Base System | |
| php-pgsql - PostgreSQL module for PHP [default] | |
| php-pspell - pspell module for PHP [default] | |
| php-recode - recode module for PHP [default] | |
| php-snmp - SNMP module for PHP [default] | |
| php-sqlite3 - SQLite3 module for PHP [default] | |
| php-tidy - tidy module for PHP [default] | |
| php-xmlrpc - XMLRPC-EPI module for PHP [default] | |
| php7.0-cgi - server-side, HTML-embedded scripting language (CGI binary) | |
| php7.0-cli - command-line interpreter for the PHP scripting language | |
| php7.0-common - documentation, examples and common module for PHP | |
| ... |
测试 PHP
要测试 PHP,在 Apache Web 根目录中创建一个名为 info.php 的新基本文件,对于 Ubuntu 来说,它在这里 /var/www/html:
$ sudo $EDITOR /var/www/html/info.php
在此文件中,粘贴以下代码:
| phpinfo(); | |
保存并关闭此。接下来,使用 Web 浏览器,转到:http://your_domain_or_ip/info.php。如果一切顺利,应显示以下页面

总结
现在我们正确安装了 LAMP 堆栈。这是托管动态网站或网络应用程序的第一个基本步骤。
下面关于 LAMP 相关 的内容你可能也喜欢:
LAMP 平台安装 Xcache 和 Memcached 加速网站运行 http://www.linuxidc.com/Linux/2015-06/118835.htm
CentOS 7 下搭建 LAMP 平台环境 http://www.linuxidc.com/Linux/2015-06/118818.htm
CentOS 6.5 系统安装配置 LAMP(Apache+PHP5+MySQL)服务器环境 http://www.linuxidc.com/Linux/2014-12/111030.htm
CentOS 7.2 yum 安装 LAMP 环境 http://www.linuxidc.com/Linux/2016-11/136766.htm
Ubuntu 14.04 配置 LAMP+phpMyAdmin PHP(5.5.9)开发环境 http://www.linuxidc.com/Linux/2014-10/107924.htm
LAMP 结合 NFS 构建小型博客站点 http://www.linuxidc.com/Linux/2015-08/121029.htm
CentOS7 下安装部署 LAMP 环境 http://www.linuxidc.com/Linux/2016-04/130653.htm
CentOS 7 上安装(LAMP)服务 Linux,Apache,MySQL,PHP http://www.linuxidc.com/Linux/2017-05/143868.htm
Ubuntu Server 14.04 LTS 下搭建 LAMP 环境图文详解 http://www.linuxidc.com/Linux/2016-12/138758.htm
Ubuntu Server 16.04 下配置 LAMP 环境 http://www.linuxidc.com/Linux/2016-12/138757.htm
CentOS 6.7 编译安装 LAMP 详解 http://www.linuxidc.com/Linux/2017-03/141244.htm
Ubuntu 16.04 搭建 LAMP 开发环境 http://www.linuxidc.com/Linux/2016-10/136327.htm
更多 Ubuntu 相关信息见Ubuntu 专题页面 http://www.linuxidc.com/topicnews.aspx?tid=2
本文永久更新链接地址:http://www.linuxidc.com/Linux/2017-07/145644.htm


