共计 9070 个字符,预计需要花费 23 分钟才能阅读完成。
Gibbon 是一个免费的开源网络教育管理系统,可用于解决教师和学生日常问题。Gibbon 是非常灵活,可扩展和可应用的应用程序,具有许多功能,包括在线申请表,信使,计划员,外部评估等等。Gibbon 帮助教师轻松了解每个学生在每个学科中的起伏,并以一切可能的方式帮助学生。Gibbon 有许多模块用于扩展不同类型的学校通常需要的功能。您可以根据您的要求轻松打开或关闭每个模块。
在本教程中,我们将在 Ubuntu 16.04 服务器上逐步安装 Gibbon。
要求
- 您的服务器已经安装 Ubuntu 16.04 系统。
- 您的服务器上的静态 IP 地址设置为 192.168.15.189
- 您的服务器上具有 sudo 用户设置的非 root 用户。
更新基本系统
在安装 Gibbon 之前,建议使用最新的稳定版本来更新系统。您可以通过运行以下命令来执行此操作:
sudo apt-get update -y
sudo apt-get upgrade -y
一旦您的系统更新,请重新启动系统并使用 sudo 用户登录。
安装 Apache Web Server
Apache Web 服务器需要安装 Gibbon。 您可以通过运行以下命令轻松安装 Apache 和其他必需的库:
sudo apt-get install apache2 apache2-bin libapache2-mod-php7.0 -y
安装 Apache Web 服务器后,启动 Apache 服务,并使用以下命令启动使它在启动时启动:
sudo systemctl start apache2
sudo systemctl enable apache2
完成后,您可以继续安装 PHP。
安装 PHP
Gibbon 还需要 PHP 和其他 PHP 库。 您可以通过运行以下命令来安装它们:
sudo apt-get install php7.0 php7.0-mcrypt php7.0-curl php7.0-gd php7.0-json php7.0-mysql php7.0-xml php7.0-zip -y
安装 PHP 后,您将需要调整 PHP 设置。您可以通过编辑 php.ini 文件来执行此操作:
sudo nano /etc/php/7.0/cli/php.ini
进行以下更改:
| file_uploads = On | |
| allow_url_fopen = On | |
| dispaly_errors = Off | |
| error_reporting = E_ALL & ~E_NOTICE | |
| register_globals = off | |
| magic_quotes_gpc = Off | |
| set max_input_vars = 4000 |
完成后保存并关闭文件。
安装并配置 MariaDB
接下来,MariaDB 需要存储 Gibbon 的数据库。您可以通过运行以下命令来安装它:
sudo apt-get install mariadb-server mariadb-client -y
安装 MariaDB 之后,您需要先确保安全。您可以通过运行以下命令来保护它:
sudo mysql_secure_installation
回答以下所有问题:
| NOTE: RUNNING ALL PARTS OF THIS SCRIPT IS RECOMMENDED FOR ALL MariaDB | |
| SERVERS IN PRODUCTION USE! PLEASE READ EACH STEP CAREFULLY! | |
| In order to log into MariaDB to secure it, we'll need the current | |
| password for the root user. If you've just installed MariaDB, and | |
| you haven't set the root password yet, the password will be blank, | |
| so you should just press enter here. | |
| Enter current password for root (enter for none): | |
| OK, successfully used password, moving on... | |
| Setting the root password ensures that nobody can log into the MariaDB | |
| root user without the proper authorisation. | |
| You already have a root password set, so you can safely answer 'n'. | |
| Change the root password? [Y/n] n | |
| ... skipping. | |
| By default, a MariaDB installation has an anonymous user, allowing anyone | |
| to log into MariaDB without having to have a user account created for | |
| them. This is intended only for testing, and to make the installation | |
| go a bit smoother. You should remove them before moving into a | |
| production environment. | |
| Remove anonymous users? [Y/n] Y | |
| ... Success! | |
| Normally, root should only be allowed to connect from 'localhost'. This | |
| ensures that someone cannot guess at the root password from the network. | |
| Disallow root login remotely? [Y/n] Y | |
| ... Success! | |
| By default, MariaDB comes with a database named 'test' that anyone can | |
| access. This is also intended only for testing, and should be removed | |
| before moving into a production environment. | |
| Remove test database and access to it? [Y/n] Y | |
| - Dropping test database... | |
| ... Success! | |
| - Removing privileges on test database... | |
| ... Success! | |
| Reloading the privilege tables will ensure that all changes made so far | |
| will take effect immediately. | |
| Reload privilege tables now? [Y/n] Y | |
| ... Success! | |
| Cleaning up... | |
| All done! If you've completed all of the above steps, your MariaDB | |
| installation should now be secure. | |
| Thanks for using MariaDB! |
安装 MariaDB 后,使用以下命令登录到 MariaDB 控制台:
mysql -u root -p
输入您的 root 密码并使用以下命令为 Gibbon 创建数据库:
MariaDB [(none)]>CREATE DATABASE gibbon_db;
为 Gibbon 创建数据库后,使用以下命令创建用户名和密码:
MariaDB [(none)]>CREATE USER ‘gibbon’@’localhost’ IDENTIFIED BY ‘password’;
接下来,使用以下命令向 Gibbon 数据库授予权限:
MariaDB [(none)]>GRANT ALL PRIVILEGES ON gibbon_db.* TO ‘gibbon’@’localhost’;
接下来,运行 FLUSH PRIVILEGES 命令,以使权限表由 MariaDB 重新加载,我们可以使用新的证书:
MariaDB [(none)]>FLUSH PRIVILEGES;
最后,使用以下命令退出 MariaDB 控制台:
MariaDB [(none)]>\q
开始安装 Gibbon
您可以从他们的官方网站下载最新版本的 Gibbon。运行以下命令下载它:
wget https://github.com/GibbonEdu/core/archive/v14.0.00.zip
下载 Gibbon 后,使用以下命令解压缩下载的文件:
unzip v14.0.00.zip
接下来,将提取的目录移动到 Apache Web 根目录:
sudo mv core-14.0.00 /var/www/html/gibbon
接下来,您将需要更改 gibbon 目录的所有权,并给予必要的权限:
sudo chown -R www-data:www-data /var/www/html/gibbon
sudo chmod -R 777 /var/www/html/gibbon
接下来,您将需要为 Gibbon 创建一个 Apache 虚拟主机文件。您可以通过在 /etc/apache2/sites-available/ 目录中创建 gibbon.conf 文件:
sudo nano /etc/apache2/sites-available/gibbon.conf
添加以下行:
| <VirtualHost *:80> | |
| ServerAdmin admin@yourdomain.com | |
| DocumentRoot "/var/www/html/gibbon/" | |
| ServerName yourdomain.com | |
| ServerAlias www.yourdomain.com | |
| <<Directory "/var/www/html/gibbon/"> | |
| Options FollowSymLinks | |
| AllowOverride All | |
| Order allow,deny | |
| allow from all | |
| </Directory> | |
| ErrorLog /var/log/apache2/gibbon-error_log | |
| CustomLog /var/log/apache2/gibbon-access_log common | |
| </VirtualHost> |
完成后保存并关闭文件,然后使用以下命令启用虚拟主机文件:
sudo a2ensite gibbon
最后,重新启动 apache2 服务,以便它读取新的 virtualhost 配置:
sudo systemctl restart apache2
更多详情见请继续阅读下一页的精彩内容 :http://www.linuxidc.com/Linux/2017-07/145590p2.htm
访问 Gibbon Web 安装向导
Gibbon 在 80 端口上运行,因此在访问 Gibbon 之前,您将需要通过 UFW 防火墙允许端口 80。默认情况下,UFW 防火墙在 Ubuntu 16.04 中被禁用,因此您需要先启用它。
sudo ufw enable
然后,通过运行以下命令,通过 UFW 防火墙允许端口 80:
sudo ufw allow 80
配置防火墙后,打开 Web 浏览器并导航到 URL http://yourdomain.com,您将被重定向到 Gibbon Web 安装向导,如下图所示:
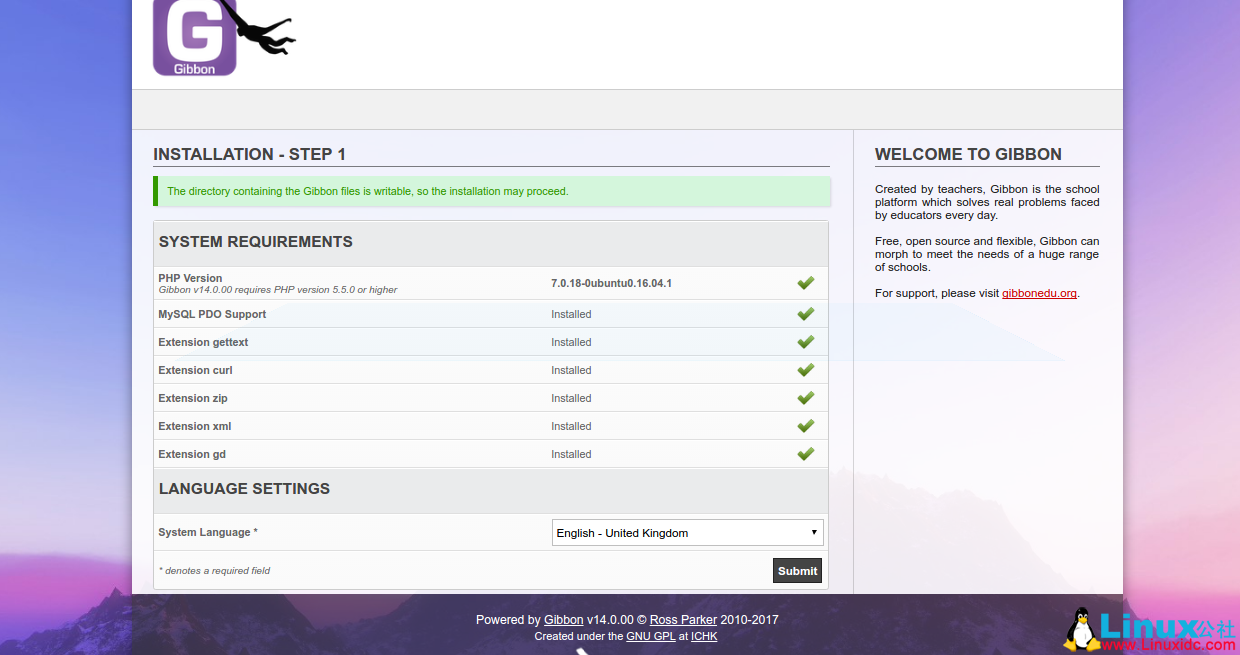
在这里,检查所有的系统要求,选择英文作为系统语言,然后点击提交按钮,你应该看到如下图像:
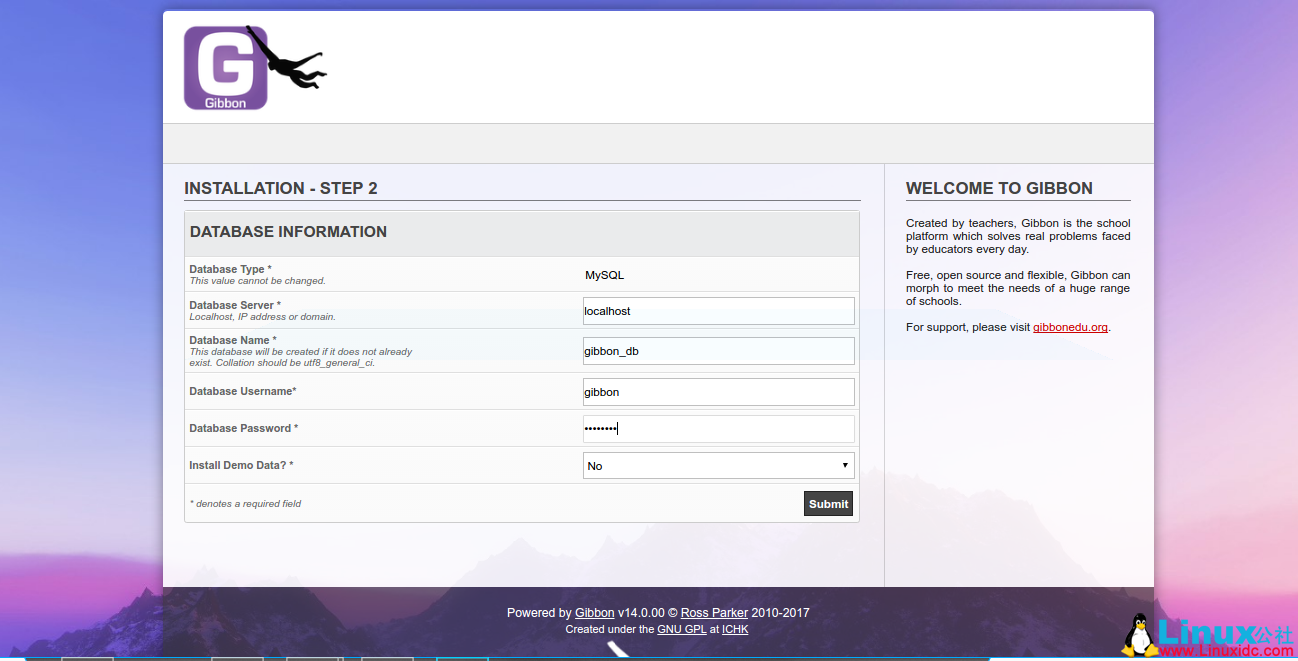
在数据库配置页面中,提供数据库名称,用户名和密码,然后单击提交按钮,您应该看到以下页面:
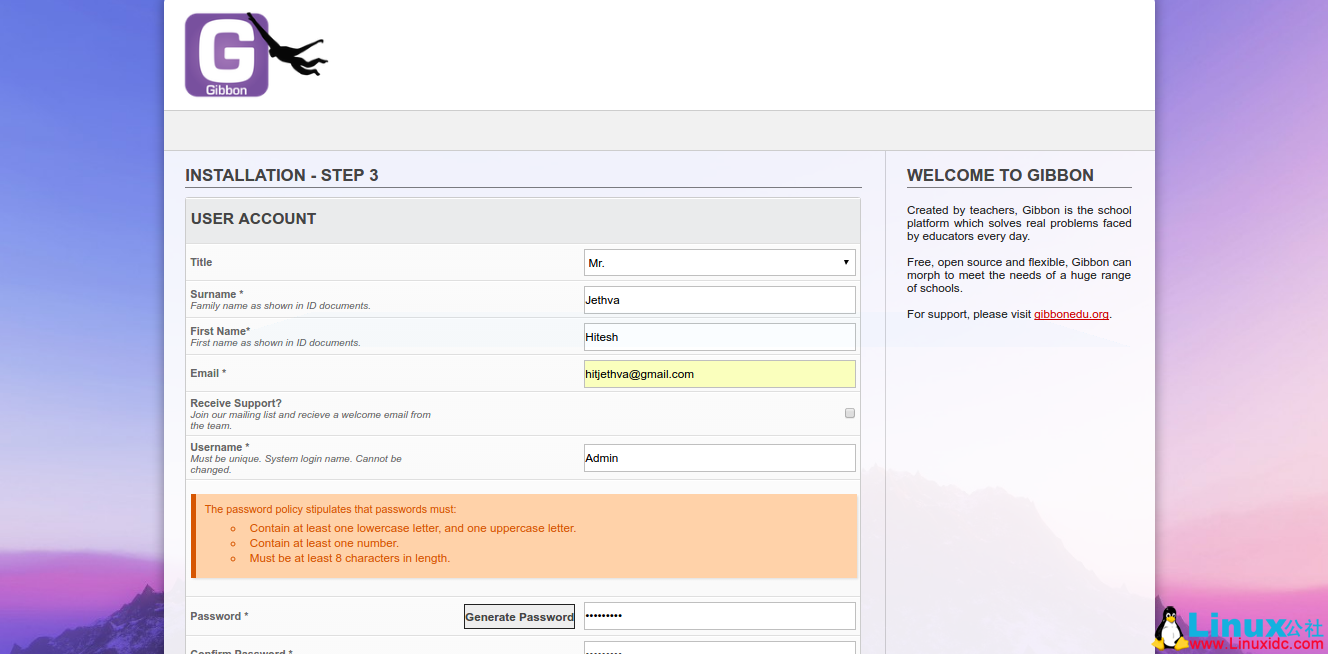

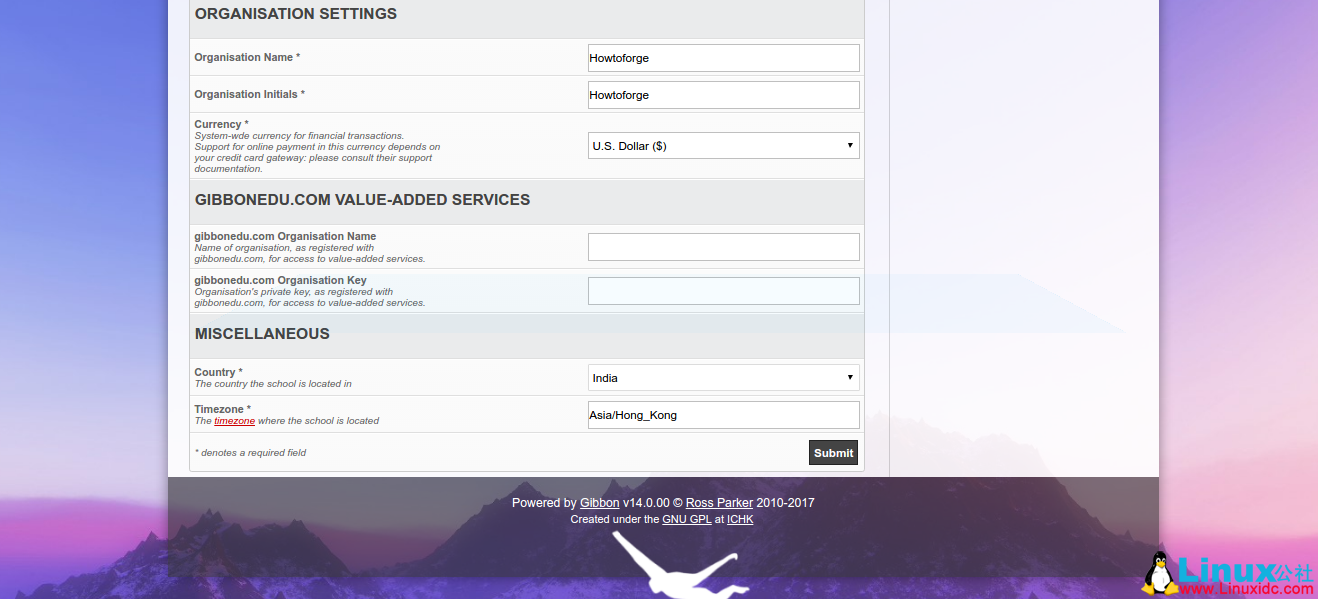
在帐户配置,系统设置和组织设置中,提供所有必要的信息,然后单击提交按钮。Gibbon 安装成功后,您应该看到以下页面:

接下来,点击去您的 Gibbon 主页,您应该看到以下图像中的 Gibbon 登录页面:
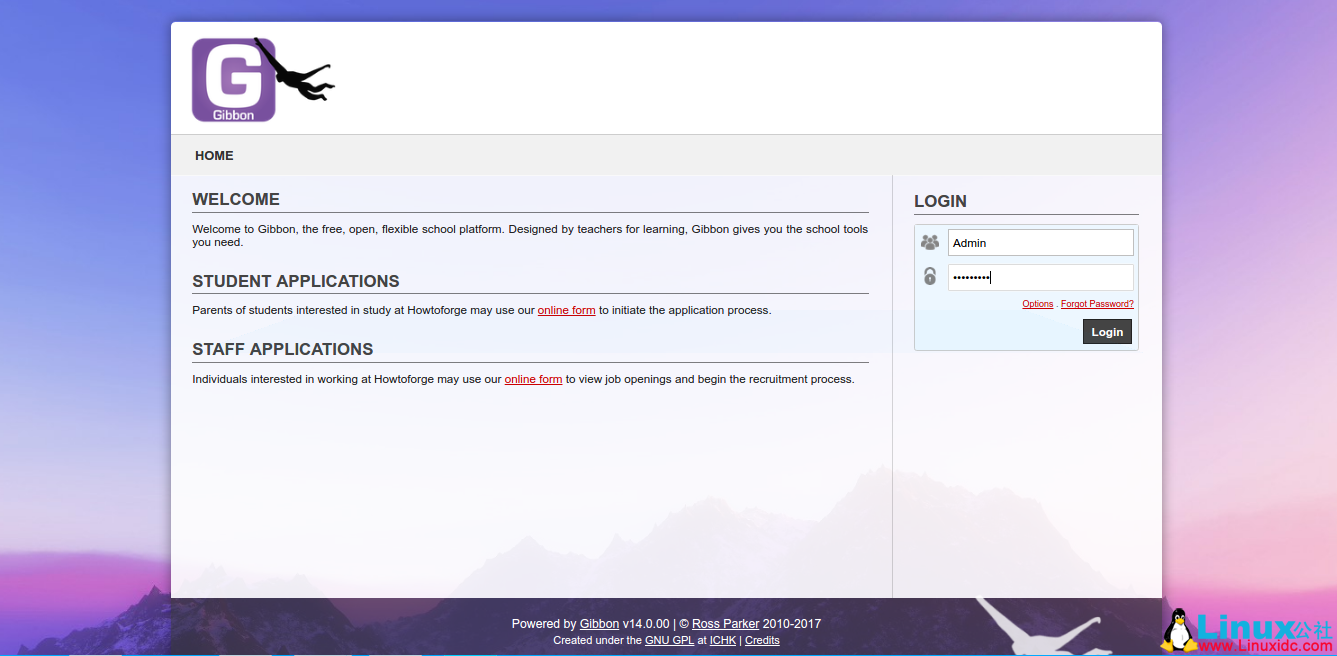
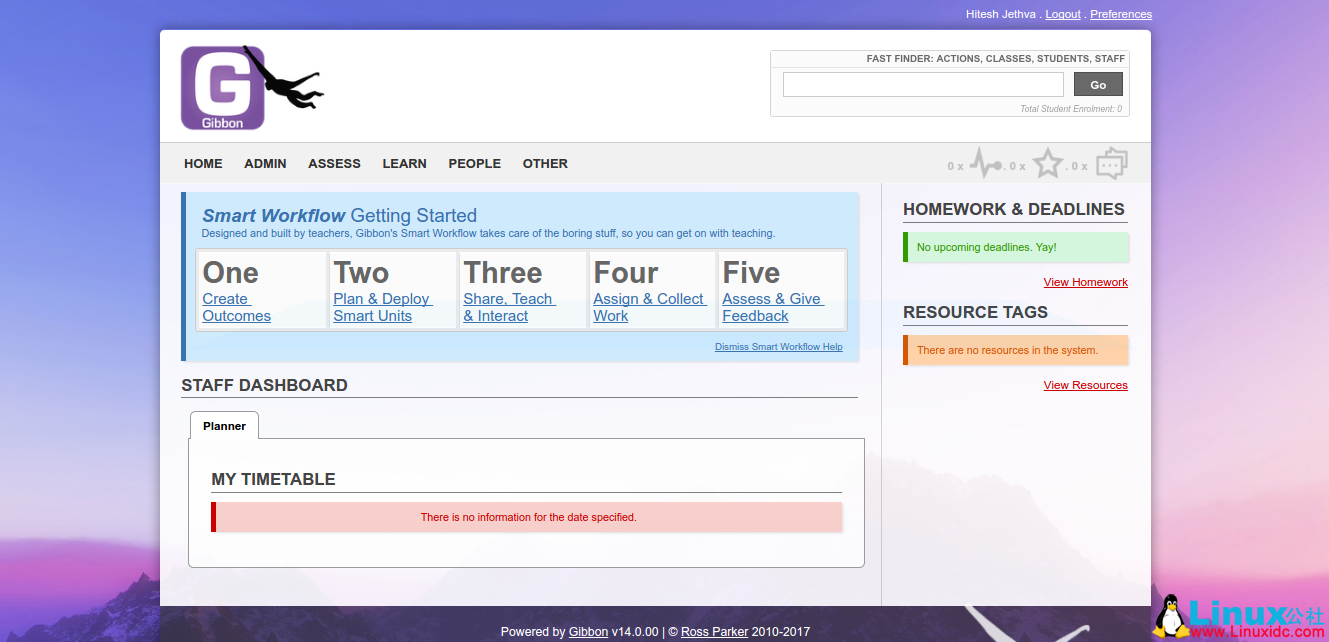
提供您的管理员凭据并单击登录按钮,您应该在以下图像中看到 Gibbon 默认仪表板:
安装 Gibbon 后,建议您设置所有 Gibbon 文件的权限,以便它们不可公开写入。您可以通过运行以下命令来执行此操作:
sudo chmod -R 755 /var/www/html/gibbon
总结
恭喜!您已经在 Ubuntu 16.04 服务器上成功安装并配置了 Gibbon。您可以查看官方 Gibbon 网站了解更多帮助或有用信息。
本文永久更新链接地址 :http://www.linuxidc.com/Linux/2017-07/145590.htm
Gibbon 是一个免费的开源网络教育管理系统,可用于解决教师和学生日常问题。Gibbon 是非常灵活,可扩展和可应用的应用程序,具有许多功能,包括在线申请表,信使,计划员,外部评估等等。Gibbon 帮助教师轻松了解每个学生在每个学科中的起伏,并以一切可能的方式帮助学生。Gibbon 有许多模块用于扩展不同类型的学校通常需要的功能。您可以根据您的要求轻松打开或关闭每个模块。
在本教程中,我们将在 Ubuntu 16.04 服务器上逐步安装 Gibbon。
要求
- 您的服务器已经安装 Ubuntu 16.04 系统。
- 您的服务器上的静态 IP 地址设置为 192.168.15.189
- 您的服务器上具有 sudo 用户设置的非 root 用户。
更新基本系统
在安装 Gibbon 之前,建议使用最新的稳定版本来更新系统。您可以通过运行以下命令来执行此操作:
sudo apt-get update -y
sudo apt-get upgrade -y
一旦您的系统更新,请重新启动系统并使用 sudo 用户登录。
安装 Apache Web Server
Apache Web 服务器需要安装 Gibbon。 您可以通过运行以下命令轻松安装 Apache 和其他必需的库:
sudo apt-get install apache2 apache2-bin libapache2-mod-php7.0 -y
安装 Apache Web 服务器后,启动 Apache 服务,并使用以下命令启动使它在启动时启动:
sudo systemctl start apache2
sudo systemctl enable apache2
完成后,您可以继续安装 PHP。
安装 PHP
Gibbon 还需要 PHP 和其他 PHP 库。 您可以通过运行以下命令来安装它们:
sudo apt-get install php7.0 php7.0-mcrypt php7.0-curl php7.0-gd php7.0-json php7.0-mysql php7.0-xml php7.0-zip -y
安装 PHP 后,您将需要调整 PHP 设置。您可以通过编辑 php.ini 文件来执行此操作:
sudo nano /etc/php/7.0/cli/php.ini
进行以下更改:
| file_uploads = On | |
| allow_url_fopen = On | |
| dispaly_errors = Off | |
| error_reporting = E_ALL & ~E_NOTICE | |
| register_globals = off | |
| magic_quotes_gpc = Off | |
| set max_input_vars = 4000 |
完成后保存并关闭文件。
安装并配置 MariaDB
接下来,MariaDB 需要存储 Gibbon 的数据库。您可以通过运行以下命令来安装它:
sudo apt-get install mariadb-server mariadb-client -y
安装 MariaDB 之后,您需要先确保安全。您可以通过运行以下命令来保护它:
sudo mysql_secure_installation
回答以下所有问题:
| NOTE: RUNNING ALL PARTS OF THIS SCRIPT IS RECOMMENDED FOR ALL MariaDB | |
| SERVERS IN PRODUCTION USE! PLEASE READ EACH STEP CAREFULLY! | |
| In order to log into MariaDB to secure it, we'll need the current | |
| password for the root user. If you've just installed MariaDB, and | |
| you haven't set the root password yet, the password will be blank, | |
| so you should just press enter here. | |
| Enter current password for root (enter for none): | |
| OK, successfully used password, moving on... | |
| Setting the root password ensures that nobody can log into the MariaDB | |
| root user without the proper authorisation. | |
| You already have a root password set, so you can safely answer 'n'. | |
| Change the root password? [Y/n] n | |
| ... skipping. | |
| By default, a MariaDB installation has an anonymous user, allowing anyone | |
| to log into MariaDB without having to have a user account created for | |
| them. This is intended only for testing, and to make the installation | |
| go a bit smoother. You should remove them before moving into a | |
| production environment. | |
| Remove anonymous users? [Y/n] Y | |
| ... Success! | |
| Normally, root should only be allowed to connect from 'localhost'. This | |
| ensures that someone cannot guess at the root password from the network. | |
| Disallow root login remotely? [Y/n] Y | |
| ... Success! | |
| By default, MariaDB comes with a database named 'test' that anyone can | |
| access. This is also intended only for testing, and should be removed | |
| before moving into a production environment. | |
| Remove test database and access to it? [Y/n] Y | |
| - Dropping test database... | |
| ... Success! | |
| - Removing privileges on test database... | |
| ... Success! | |
| Reloading the privilege tables will ensure that all changes made so far | |
| will take effect immediately. | |
| Reload privilege tables now? [Y/n] Y | |
| ... Success! | |
| Cleaning up... | |
| All done! If you've completed all of the above steps, your MariaDB | |
| installation should now be secure. | |
| Thanks for using MariaDB! |
安装 MariaDB 后,使用以下命令登录到 MariaDB 控制台:
mysql -u root -p
输入您的 root 密码并使用以下命令为 Gibbon 创建数据库:
MariaDB [(none)]>CREATE DATABASE gibbon_db;
为 Gibbon 创建数据库后,使用以下命令创建用户名和密码:
MariaDB [(none)]>CREATE USER ‘gibbon’@’localhost’ IDENTIFIED BY ‘password’;
接下来,使用以下命令向 Gibbon 数据库授予权限:
MariaDB [(none)]>GRANT ALL PRIVILEGES ON gibbon_db.* TO ‘gibbon’@’localhost’;
接下来,运行 FLUSH PRIVILEGES 命令,以使权限表由 MariaDB 重新加载,我们可以使用新的证书:
MariaDB [(none)]>FLUSH PRIVILEGES;
最后,使用以下命令退出 MariaDB 控制台:
MariaDB [(none)]>\q
开始安装 Gibbon
您可以从他们的官方网站下载最新版本的 Gibbon。运行以下命令下载它:
wget https://github.com/GibbonEdu/core/archive/v14.0.00.zip
下载 Gibbon 后,使用以下命令解压缩下载的文件:
unzip v14.0.00.zip
接下来,将提取的目录移动到 Apache Web 根目录:
sudo mv core-14.0.00 /var/www/html/gibbon
接下来,您将需要更改 gibbon 目录的所有权,并给予必要的权限:
sudo chown -R www-data:www-data /var/www/html/gibbon
sudo chmod -R 777 /var/www/html/gibbon
接下来,您将需要为 Gibbon 创建一个 Apache 虚拟主机文件。您可以通过在 /etc/apache2/sites-available/ 目录中创建 gibbon.conf 文件:
sudo nano /etc/apache2/sites-available/gibbon.conf
添加以下行:
| <VirtualHost *:80> | |
| ServerAdmin admin@yourdomain.com | |
| DocumentRoot "/var/www/html/gibbon/" | |
| ServerName yourdomain.com | |
| ServerAlias www.yourdomain.com | |
| <<Directory "/var/www/html/gibbon/"> | |
| Options FollowSymLinks | |
| AllowOverride All | |
| Order allow,deny | |
| allow from all | |
| </Directory> | |
| ErrorLog /var/log/apache2/gibbon-error_log | |
| CustomLog /var/log/apache2/gibbon-access_log common | |
| </VirtualHost> |
完成后保存并关闭文件,然后使用以下命令启用虚拟主机文件:
sudo a2ensite gibbon
最后,重新启动 apache2 服务,以便它读取新的 virtualhost 配置:
sudo systemctl restart apache2
更多详情见请继续阅读下一页的精彩内容 :http://www.linuxidc.com/Linux/2017-07/145590p2.htm


