共计 3765 个字符,预计需要花费 10 分钟才能阅读完成。
1、演示环境:
192.168.1.145:CentOS 6.9 x86_64,Apache服务器
192.168.1.146:CentOS 7.4 x86_64,私建的 CA 服务器
备注:Apache和 CA 可以位于同一台服务器
2、192.168.1.145安装 httpd 服务,并启动:
# yum -y install httpd –> 版本:httpd-2.2.15
# cd /etc/httpd/conf
# cp httpd.conf httpd.conf.bak
# vim httpd.conf –> ServerName localhost:80
# service httpd start
# ss -tnl | grep :80
3、创建虚拟主机页面存放目录及测试页:
# mkdir -pv /web/vhosts/htdocs
# cd /web/vhosts/htdocs
# vim index.html –> <h3>Index Page</h3>
# vim test.html –> <h3>Test Page</h3>
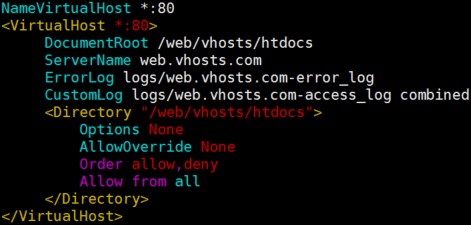
4、创建基于主机名的虚拟主机:
# vim /etc/httpd/conf/httpd.conf,末尾新增如下代码:
# service httpd reload
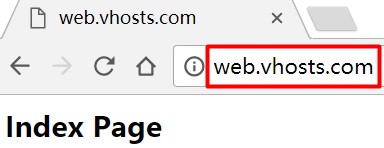
5、以管理员权限运行 notepad,修改本地Windows 10 的C:\Windows\System32\drivers\etc\hosts文件,末尾新增代码:192.168.1.145 web.vhosts.com,保存修改后访问测试页

![]()
6、192.168.1.146创建私有CA:
(1)安装相关软件包:# yum -y install openssl openssh-clients
备注:OpenSSL的配置文件是/etc/pki/tls/openssl.cnf,此处无需修改,使用默认配置即可
(2)创建保存证书信息的数据库文件:# touch /etc/pki/CA/index.txt
(3)创建保存证书序列号的文件:# echo 01 > /etc/pki/CA/serial
(4)生成私钥cakey.pem:# (umask 077; openssl genrsa -out /etc/pki/CA/private/cakey.pem 2048)

备注:genrsa子命令常用选项
genrsa:用于生成 RSA 密钥对的 OpenSSL 子命令
-out cakey.pem:私钥保存位置
2048:密钥长度,也可以使用 1024 或4096
更多 genrsa 子命令选项可查看:# man genrsa
(5)生成 CA 证书cacert.pem:
# openssl req -new -x509 -key /etc/pki/CA/private/cakey.pem -days 7300 -out /etc/pki/CA/cacert.pem

其中 ca.keyso.com 为证书颁发者
备注:req子命令常用选项
req:用于证书签署请求和证书生成的 OpenSSL 子命令
-new:生成新证书签署请求
-x509:专用于 CA 生成自签证书
-key cakey.pem:生成 CA 证书请求时用到的私钥
-days 7300:证书的有效期限为 20 年
-out cacert.pem:证书的保��路径
更多 req 子命令选项可查看:# man req
7、192.168.1.145生成证书签署请求文件并发送至192.168.1.146:
(1)安装相关软件包:# yum -y install openssh-clients
(2)创建用于存放密钥的目录:# mkdir -pv /etc/httpd/ssl
(3)生成私钥web-vhosts-com.key:# (umask 077; openssl genrsa -out /etc/httpd/ssl/web-vhosts-com.key 2048)
 (4)生成证书签署请求文件web-vhosts-com.csr:
# openssl req -new -key /etc/httpd/ssl/web-vhosts-com.key -days 7300 -out /etc/httpd/ssl/web-vhosts-com.csr
 其中 web.vhosts.com 为证书颁发的对象
(5)将证书签署请求文件 web-vhosts-com.csr 发送至192.168.1.146:
# scp /etc/httpd/ssl/web-vhosts-com.csr root@192.168.1.146:/etc/pki/CA/certs
8、192.168.1.146签署证书并发还给192.168.1.145:
(1)签署证书:
# openssl ca -in /etc/pki/CA/certs/web-vhosts-com.csr -days 7300 -out /etc/pki/CA/certs/web-vhosts-com.crt
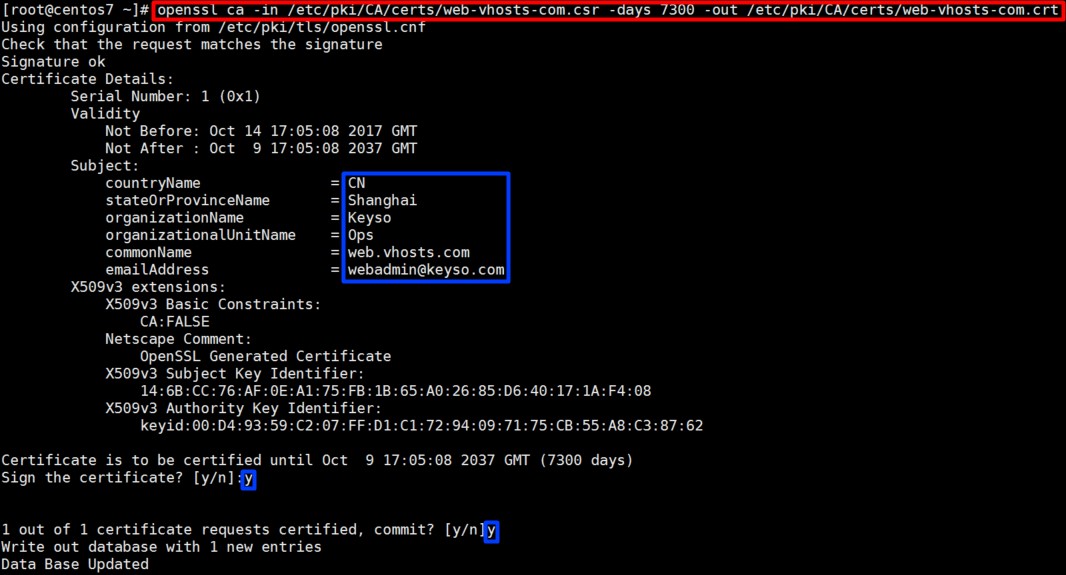 备注:ca子命令常用选项
ca:用于签署证书请求的 OpenSSL 子命令
-in web-vhosts-com.csr:证书签署请求文件路径
-days 7300:证书的有效期限为 20 年
-out web-vhosts-com.crt:证书的保存路径
更多 ca 子命令选项可查看:# man ca
 (2)将证书 web-vhosts-com.crt 发还给192.168.1.145:
# scp /etc/pki/CA/certs/web-vhosts-com.crt root@192.168.1.145:/etc/httpd/ssl
(3)192.168.1.145查看证书信息:

# openssl x509 -in /etc/httpd/ssl/web-vhosts-com.crt -noout -text //显示的信息多
# openssl x509 -in /etc/httpd/ssl/web-vhosts-com.crt -noout -subject
# openssl x509 -in /etc/httpd/ssl/web-vhosts-com.crt -noout -serial

备注:
使用私钥 web-vhosts-com.key 和证书 web-vhosts-com.crt 生成微软专用证书web-vhosts-com.crt.pfx:
# cd /etc/httpd/ssl
# openssl pkcs12 -export -out web-vhosts-com.pfx -inkey web-vhosts-com.key -clcerts -in web-vhosts-com.crt

使用微软专用证书 web-vhosts-com.pfx 生成私钥 web-vhosts-com.key 和证书web-vhosts-com.crt:
# openssl pkcs12 -in web-vhosts-com.pfx -nodes -out web-vhosts-com.pem
![]()
# openssl rsa -in web-vhosts-com.pem -out web-vhosts-com.key
![]()
# openssl x509 -in web-vhosts-com.pem -out web-vhosts-com.crt
9、192.168.1.145配置 Apache 支持SSL:
(1)安装 SSL 模块:# yum -y install mod_ssl
备注:yum方式安装的 Apache 默认没有装载 SSL 模块,即没有 /etc/httpd/conf.d/ssl.conf 配置文件,也没有 /usr/lib64/httpd/modules/mod_ssl.so 模块文件
![]()
(2)配置 HTTPS 虚拟主机并访问测试页:
# vim /etc/httpd/conf/httpd.conf,末尾新增如下代码:
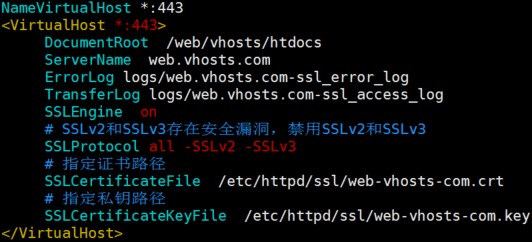
备注:上述内容也可在配置文件 /etc/httpd/conf.d/ssl.conf 中直接修改
# httpd -t
# service httpd reload
# ss -tnl | grep :443
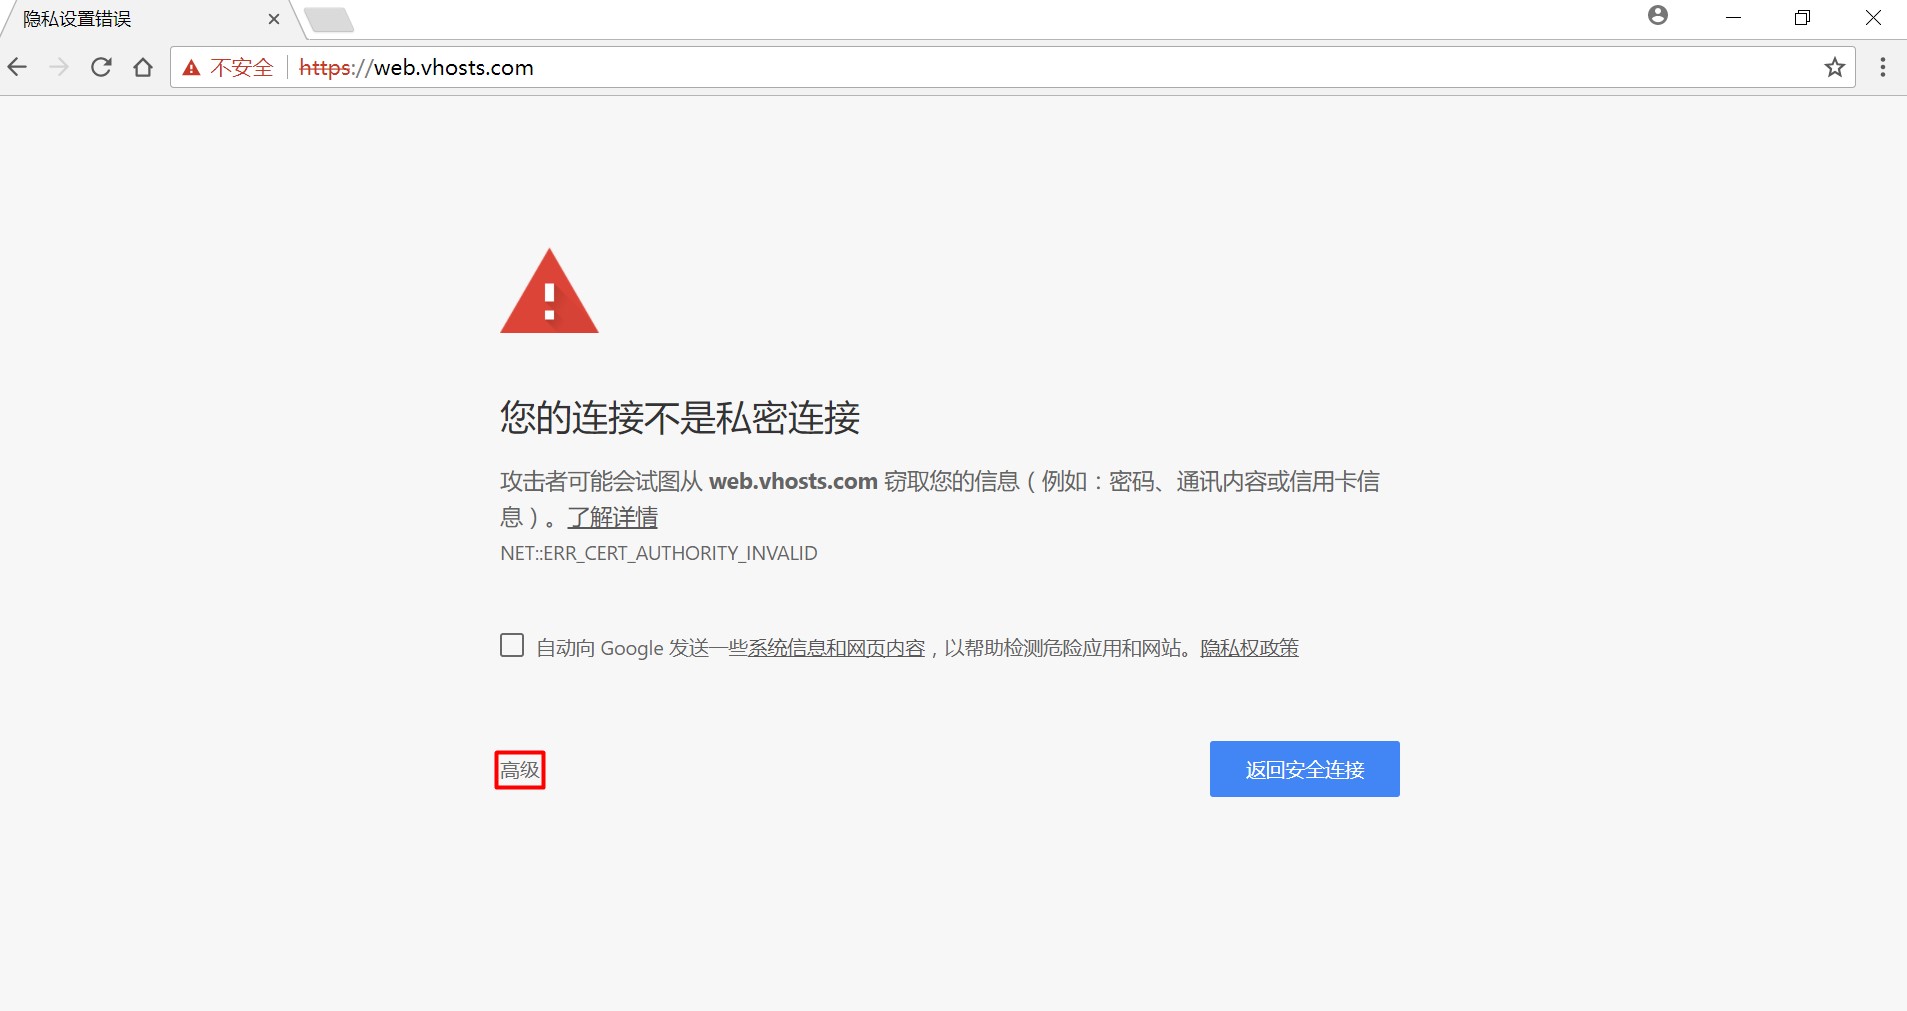
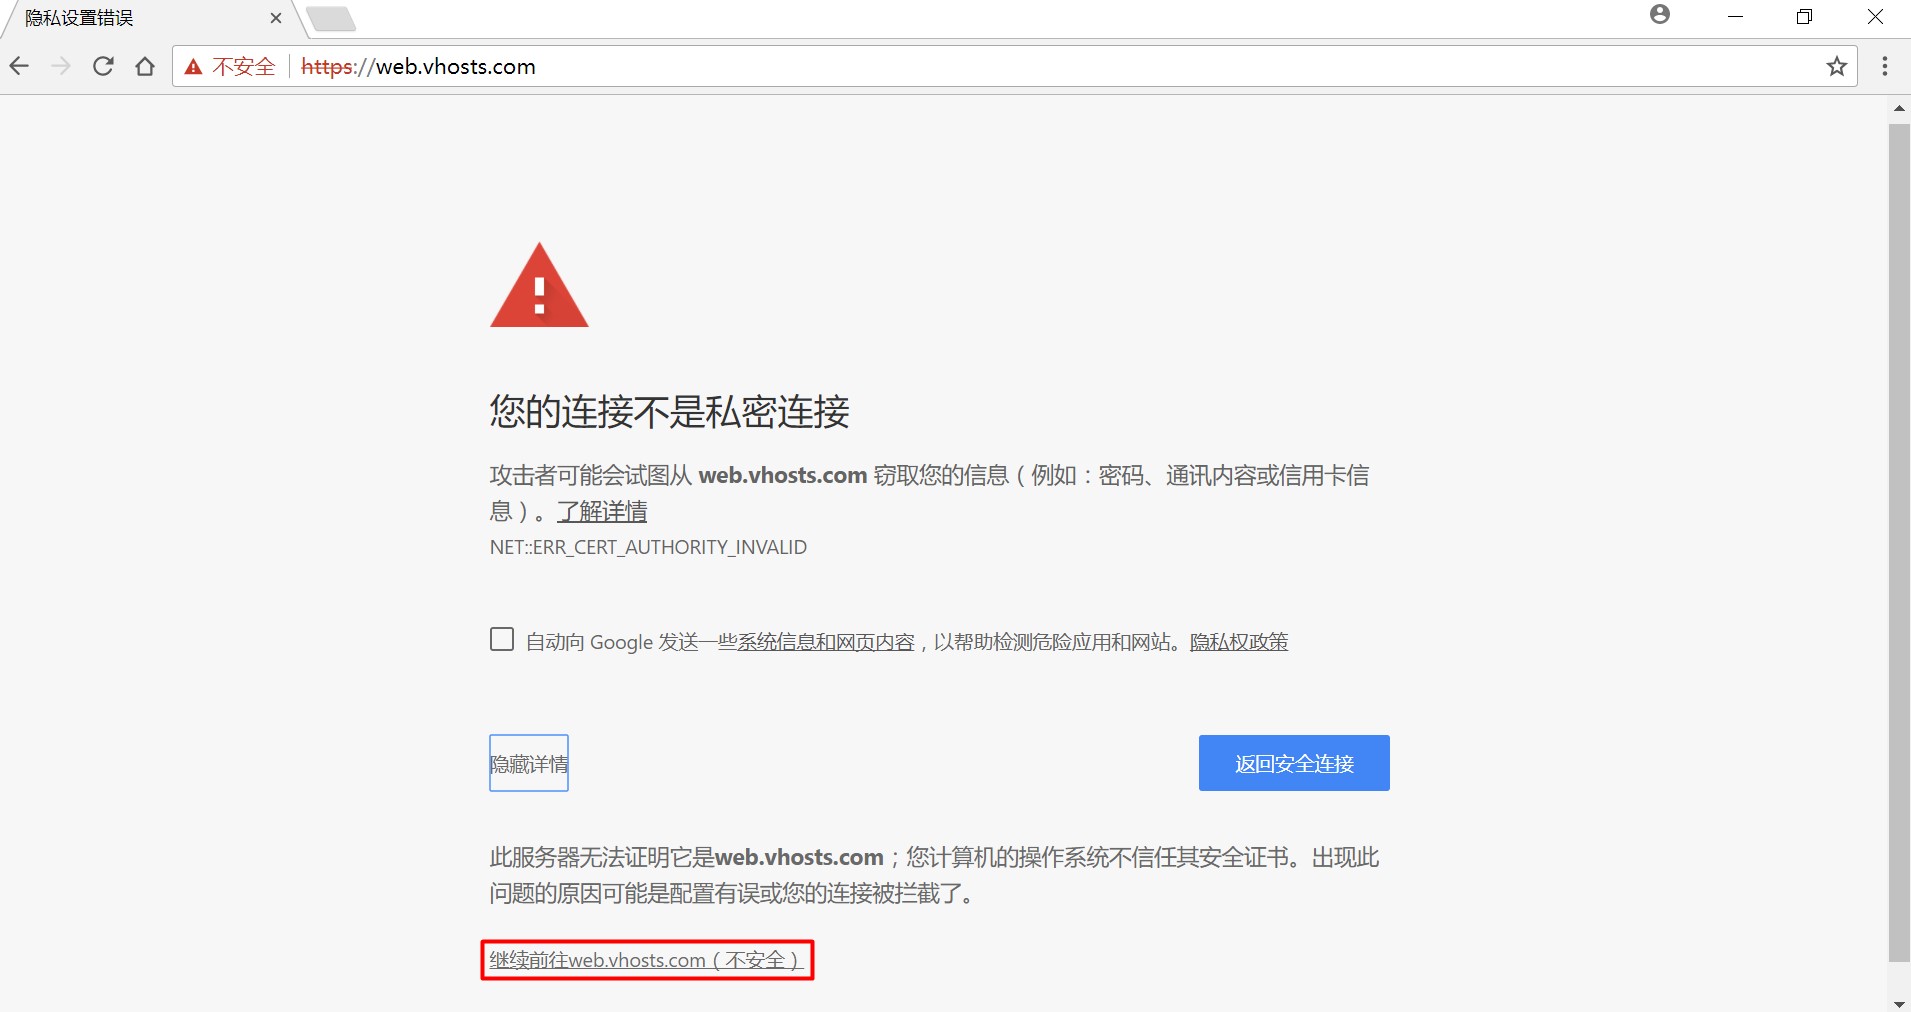


(3)将所有 HTTP 请求(80端口)重定向到 HTTPS(443 端口),并访问测试页:
# vim /etc/httpd/conf/httpd.conf,在 <VirtualHost*:80> 和</VirtualHost>标签中新增如下代码:
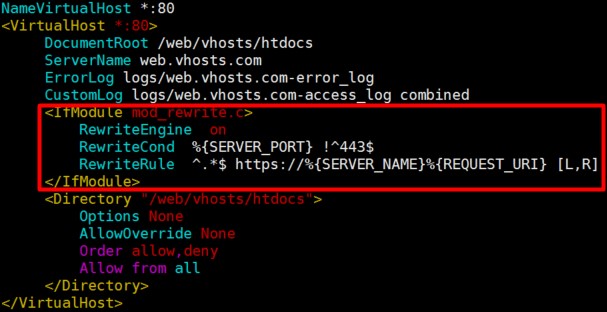
# httpd -t
# service httpd reload
直接访问web.vhosts.com,会自动跳转至https://web.vhosts.com

直接访问web.vhosts.com/test.html,会自动跳转至https://web.vhosts.com/test.html

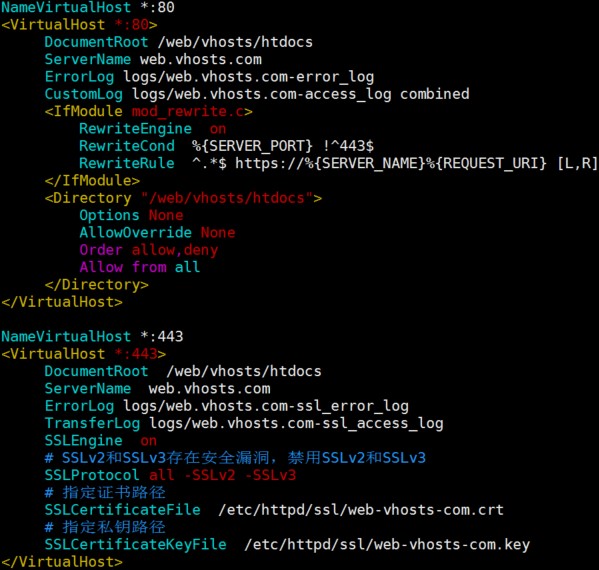
/etc/httpd/conf/httpd.conf最终末尾一共新增了如下代码:
10、在 360 安全浏览器中安装证书:
(1)360安全浏览器中访问效果:

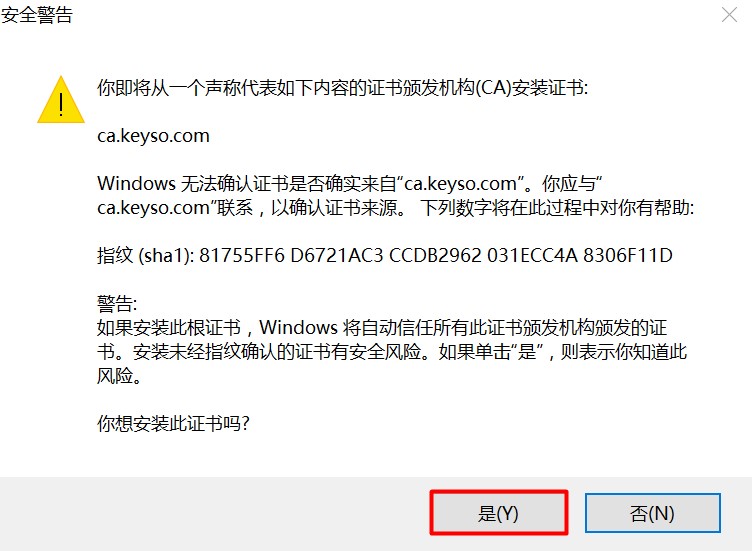
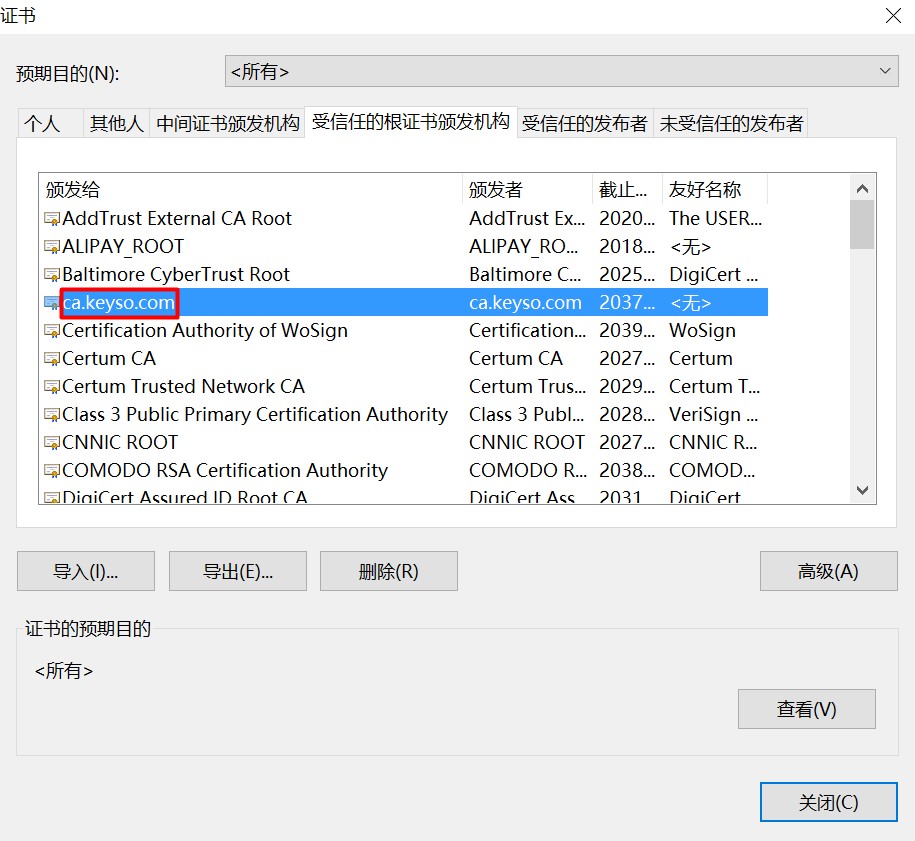
(2)将 192.168.1.146 中的证书 /etc/pki/CA/cacert.pem 保存至本地 Windows10 桌面,并重命名为cacert.crt
(3)在 360 安全浏览器中安装证书:设置 –> 安全设置 –> 管理 HTTPS/SSL 证书
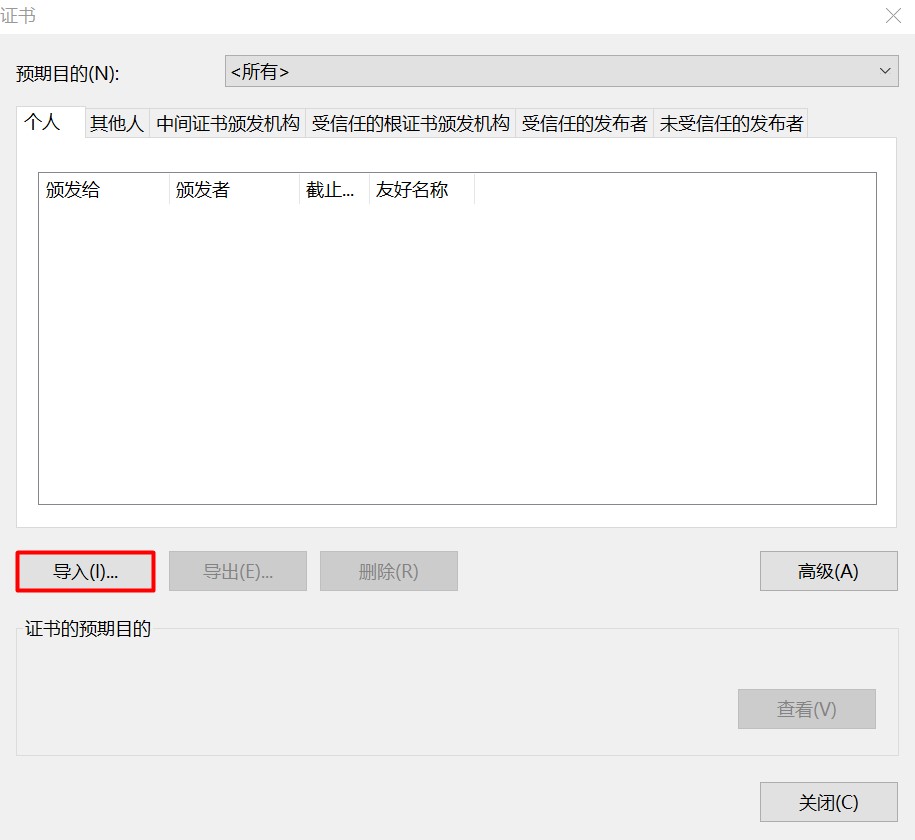
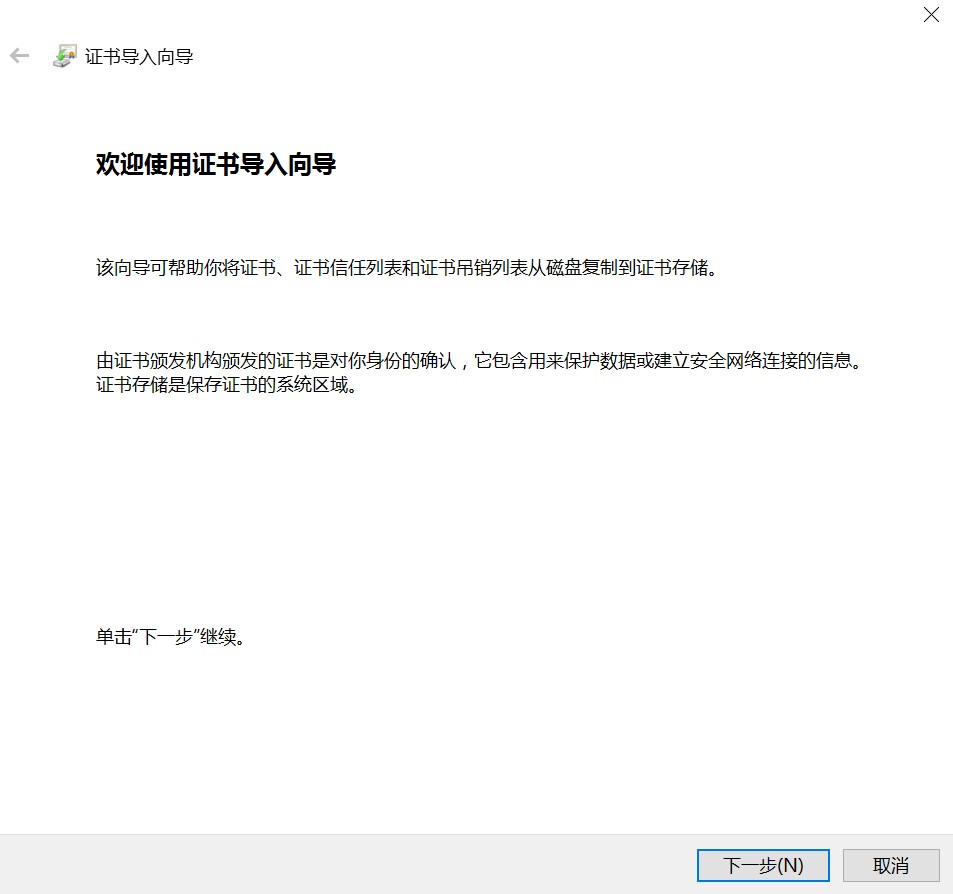

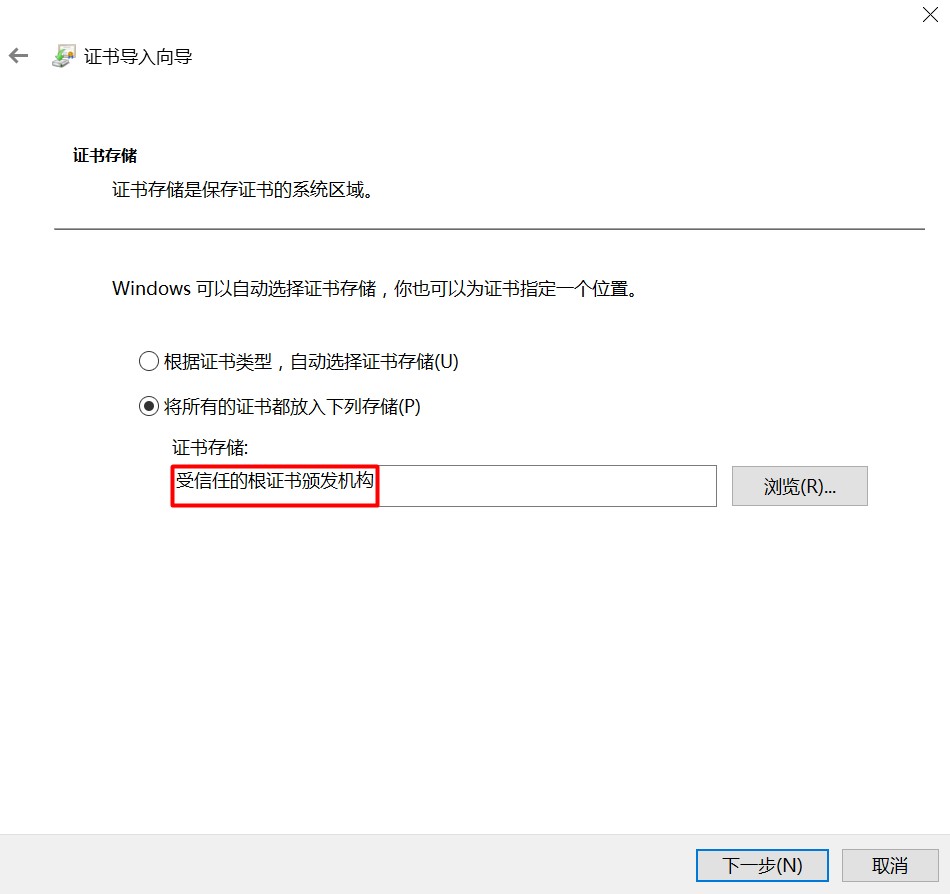
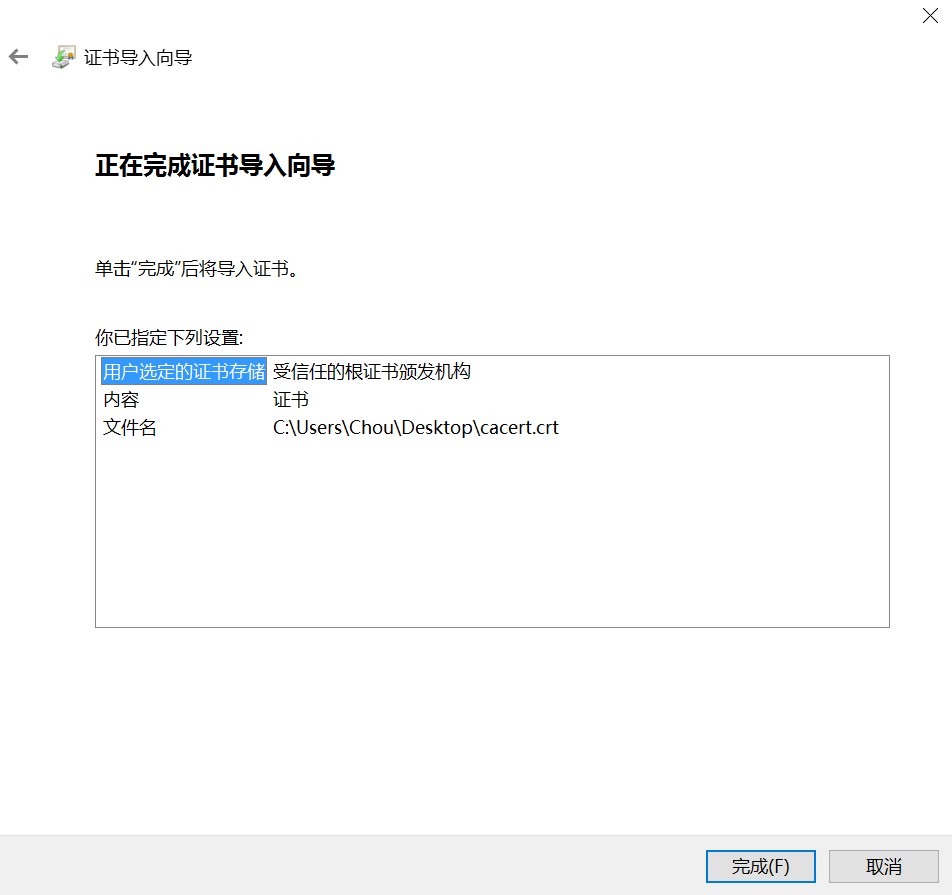

(4)重新打开 360 安全浏览器,再次访问测试页:


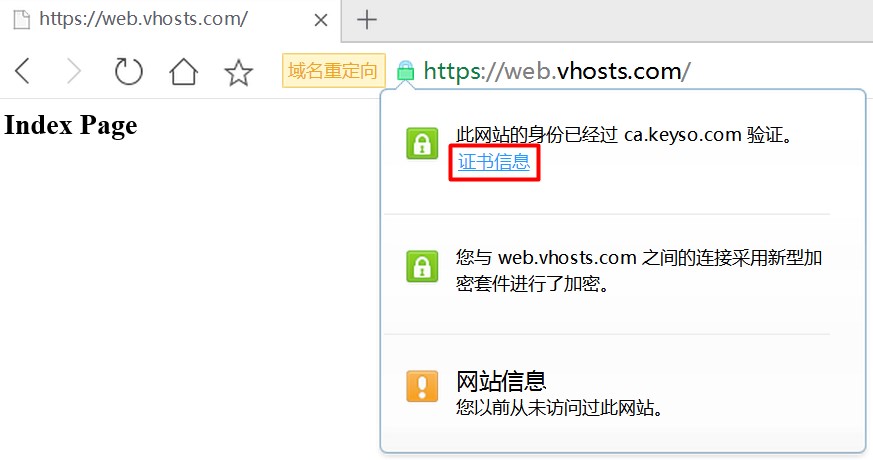
已没有“证书风险”的提示
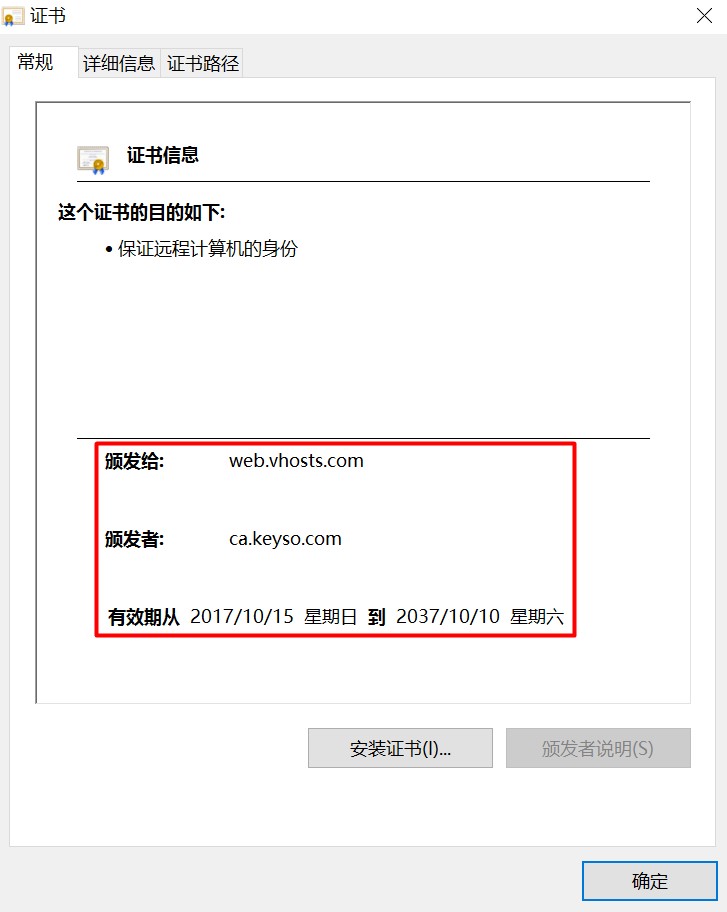
(5)查看证书信息:
备注:如果是生产环境中需要使用证书,建议从正规的证书颁发机构处申请。
本文永久更新链接地址:http://www.linuxidc.com/Linux/2017-10/147664.htm


