共计 20787 个字符,预计需要花费 52 分钟才能阅读完成。
本文简单介绍 memcached 服务器端的安装配置,与 php-memcache 客户端连接服务器端的配置与操作。
一.简介
1. 简介
Memcached 是一款开源、高性能、分布式内存对象缓存系统,可应用各种需要缓存的场景,其主要目的是通过降低对 Database 的访问来加速 web 应用程序。
Memcached 一般的使用场景是:通过缓存数据库查询的结果,减少数据库访问次数,以提高动态 Web 应用的速度、提高可扩展性。
本质上,memcached 是一个基于内存的 key-value 存储,用于存储数据库调用、API 调用或页面引用结果的直接数据,如字符串、对象等小块任意数据。
工作流程如下:
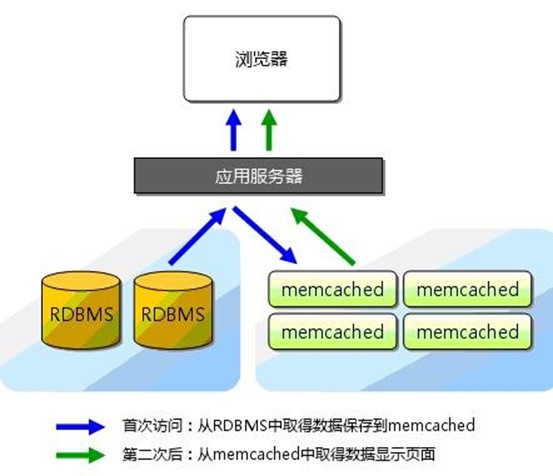
2. 注意点
- 简单 key-value 存储:服务器不关心数据本身的意义及结构,只要是可序列化数据即可;存储项由 ” 键、过期时间、可选的标志及数据 ” 四个部分组成。
- 功能实现一半依赖于客户端,一半基于服务器端:客户端负责发送存储项至服务器端、从服务端获取数据以及无法连接至服务器时采用相应的动作;服务端负责接收、存储数据,并负责数据项的超时过期。
- Memcached 虽然是 ” 分布式 ” 缓存服务器,但服务器端并没有分布式功能,即不在服务器间进行数据同步及共享信息,” 分布式 ” 完全取决于客户端的实现。
-
清理超期数据:默认情况下,Memcached 是一个 LRU 缓存,同时按事先预订的时长清理超期数据;但事实上,memcached 不会删除任何已缓存数据,只是在其过期之后不再为客户所见;而且,memcached 也不会真正按期限清理缓存,而仅是当 get 命令到达时检查其时长。
二.环境
1. OS
Server:CentOS-7-x86_64-1511
IP:10.11.4.190
2. Memcached 版本
1)libevent
libevent-2.1.8
官网:http://libevent.org/
下载:http://ftp.lfs-matrix.net/pub/blfs/conglomeration/libevent/
2)memcached
memcached-1.4.39
官网:https://memcached.org/
下载:https://memcached.org/files/memcached-1.4.39.tar.gz
三.安装 Memcached 服务器
Memcached 服务器端的安装相对简单。
1. 安装 libevent
#Memcached 依赖于 libevent API,libevent 是个程序库,它将 Linux 的 epoll、BSD 类操作系统的 kqueue 等事件处理功能封装成统一的接口,即使对服务器的连接数增加,也能发挥 O(1)的性能
[root@memcached ~]# cd /usr/local/src/
[root@memcached src]# wget http://ftp.lfs-matrix.net/pub/blfs/conglomeration/libevent/libevent-2.1.8-stable.tar.gz
[root@memcached src]# tar -zxvf libevent-2.1.8-stable.tar.gz
[root@memcached src]# cd libevent-2.1.8-stable
[root@memcached libevent-2.1.8-stable]# ./configure --prefix=/usr/local/libevent
[root@memcached libevent-2.1.8-stable]# make
[root@memcached libevent-2.1.8-stable]# make install

#测试是否安装成功
[root@memcached libevent-2.1.8-stable]# ll /usr/local/libevent/lib/ | grep libevent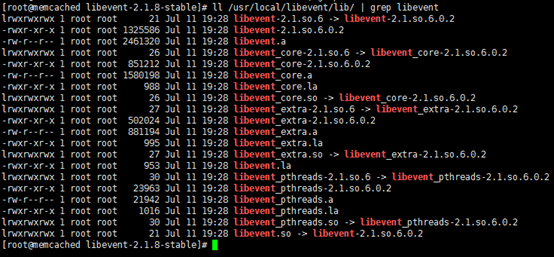
2. 安装 memcached
[root@memcached ~]# cd /usr/local/src/
[root@memcached src]# tar -zxvf memcached-1.4.39.tar.gz.tar
[root@memcached src]# cd memcached-1.4.39

#注意编译前,生成 Makefile 文件时,libevent 的路径
[root@memcached memcached-1.4.39]# ./configure --prefix=/usr/local/memcached -with-libevent=/usr/local/libevent
[root@memcached memcached-1.4.39]# make
[root@memcached memcached-1.4.39]# make install
3. 设置环境变量
#简单通过软链接的方式设置环境变量
[root@memcached ~]# ln -s /usr/local/memcached/bin/* /usr/local/bin/
4. 设置 iptables
#tcp11211 端口是 memcached 默认监听端口
[root@memcached ~]# vim /etc/sysconfig/iptables
-A INPUT -p tcp -m state --state NEW -m tcp --dport 80 -j ACCEPT
-A INPUT -p tcp -m state --state NEW -m tcp --dport 11211 -j ACCEPT

[root@memcached ~]# service iptables restart
5. 启动
6. 验证
1)端口
[root@memcached ~]# netstat -tunlp
2)telnet 连接
#可以通过 telnet 连接 memcached 服务器进行数据存储,及数据获取;
#详细的 memcached 的命令可参考:http://www.linuxidc.com/Linux/2017-11/148429.htm ;
#以下红色字体是命令输入,截图可见命令输入与回显
[root@memcached ~]# telnet 10.11.4.190 11211
version            #查看版本
set test 0 0 5     #设置”key”,<command name> <key> <flags> <exptime> <bytes>
mymem              #输入“value”值,<data block>,字节数与 key 中的设的“bytes”相同
get test           #获取已设的 key 的数据
quit               #退出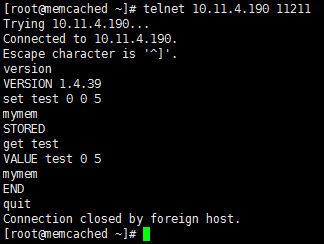
7. 设置开机启动
[root@memcached ~]# vim /etc/rc.d/init.d/memcached

#!/bin/sh
#
# memcached: MemCached Daemon
#
# chkconfig: - 90 25
# description: MemCached Daemon
#
# Source function library.

. /etc/rc.d/init.d/functions
. /etc/sysconfig/network

#注意:可执行文件路径根据情况调整
MEMCACHED="/usr/local/memcached/bin/memcached"

start()
{echo -n $"Starting memcached: "
#注意:参数根据情况调整
daemon $MEMCACHED -u root -d -m 256 -p 11211 -c 1024 -P /usr/local/memcached/memcached.pid
echo
}

stop()
{echo -n $"Shutting down memcached: "
killproc memcached
echo
}

[-f $MEMCACHED ] || exit 0

# See how we were called.
case "$1" in
start)
start
;;

stop)
stop
;;

restart|reload)
stop
start
;;

condrestart)
stop
start
;;

*)

echo $"Usage: $0 {start|stop|restart|reload|condrestart}"
exit 1
esac
exit 0

[root@memcached ~]# chmod 775 /etc/rc.d/init.d/memcached
[root@memcached ~]# chkconfig --level 35 memcached on四.安装配置基于 PHP 的客户端
Memcache 支持多客户端,如 perl,php,Python,c/c++ 等等,这里主要基于 php 配置。
其中 nginx 与 php 的详细配置请见:http://www.linuxidc.com/Linux/2017-10/147551.htm
1. 安装配置 nginx
#nginx 版本:1.12.0

#创建用户
[root@memcached ~]# groupadd www
[root@memcached ~]# useradd -g www -s /sbin/nologin www

#安装依赖包
[root@memcached ~]# yum install pcre pcre-devel openssl openssl-devel zlib zlib-devel -y

#编译安装
[root@memcached ~]# cd /usr/local/src/
[root@memcached src]# wget http://nginx.org/download/nginx-1.12.0.tar.gz
[root@memcached src]# tar -zxvf nginx-1.12.0.tar.gz
[root@memcached src]# cd nginx-1.12.0
[root@memcached nginx-1.12.0]# ./configure --prefix=/usr/local/nginx --without-http_memcached_module --user=www --group=www --with-http_stub_status_module --with-http_ssl_module --with-http_gzip_static_module
[root@memcached nginx-1.12.0]# make
[root@memcached nginx-1.12.0]# make install

#修改用户 / 组
[root@memcached nginx-1.12.0]# chown -R www:www /usr/local/nginx

#设置开机启动
[root@memcached ~]# vim /etc/rc.d/init.d/nginx
[root@memcached ~]# chown www:www /etc/rc.d/init.d/nginx
[root@memcached ~]# chmod 775 /etc/rc.d/init.d/nginx
[root@memcached ~]# chkconfig --level 35 nginx on

#启动
[root@memcached ~]# service nginx start
2. 安装配置 php
#php 版本:5.6.31

#安装依赖包
[root@memcached ~]# yum install -y gcc gcc-c++ autoconf libjpeg libjpeg-devel libpng libpng-devel freetype freetype-devel libpng libpng-devel libxml2 libxml2-devel zlib zlib-devel xml2 xml2-devel openssl openssl-devel glibc glibc-devel glib2 glib2-devel bzip2 bzip2-devel ncurses ncurses-devel curl libcurl-devel gdbm-devel db4-devel libXpm libXpm-devel libX11 libX11-devel gd-devel gmp-devel readline-devel libxslt-devel expat-devel xmlrpc-c xmlrpc-c-devel

#编译安装 libmcrypt 库,
[root@memcached ~]# cd /usr/local/src/
[root@memcached src]# wget http://nchc.dl.sourceforge.net/project/mcrypt/Libmcrypt/2.5.8/libmcrypt-2.5.8.tar.gz
[root@memcached src]# tar -zxvf libmcrypt-2.5.8.tar.gz
[root@memcached src]# cd libmcrypt-2.5.8
[root@memcached libmcrypt-2.5.8]# ./configure
[root@memcached libmcrypt-2.5.8]# make
[root@memcached libmcrypt-2.5.8]# make install

#编译安装 php
[root@memcached ~]# cd /usr/local/src/
[root@memcached src]# wget http://php.net/distributions/php-5.6.31.tar.bz2
[root@memcached src]# tar -jxvf php-5.6.31.tar.bz2
[root@memcached src]# cd php-5.6.31
[root@memcached php-5.6.31]# ./configure --prefix=/usr/local/php --with-config-file-path=/usr/local/php/etc --with-MySQL --with-pdo-mysql --with-mysqli --with-openssl --with-freetype-dir --with-jpeg-dir --with-png-dir --with-zlib-dir --with-mhash --with-mcrypt --with-bz2 --enable-zip --with-curl --with-gettext --with-iconv --with-xmlrpc --enable-fpm --enable-sockets --enable-sysvshm --enable-mbstring --enable-pdo --enable-libxml --enable-xml --enable-soap --enable-session --enable-ctype --enable-ftp --enable-bcmath --enable-shmop --enable-inline-optimization --enable-opcache --enable-mbregex --enable-pcntl --enable-cgi --enable-wddx
[root@memcached php-5.6.31]# make
[root@memcached php-5.6.31]# make install

#php.ini 文件
[root@memcached ~]# cp /usr/local/src/php-5.6.31/php.ini-production /usr/local/php/etc/php.ini
[root@memcached ~]# ln -s /usr/local/php/etc/php.ini /etc/php.ini

#php-fpm.conf 文件,取消”;pid = run/php-fpm.pid”的注释,同时修改运行账号通 nginx 服务的运行账号一致
[root@memcached ~]# cp /usr/local/php/etc/php-fpm.conf.default /usr/local/php/etc/php-fpm.conf
[root@memcached ~]# ln -s /usr/local/php/etc/php-fpm.conf /etc/php-fpm.conf
[root@memcached ~]# sed -i 's|;pid = run/php-fpm.pid|pid = run/php-fpm.pid|g' /usr/local/php/etc/php-fpm.conf
[root@memcached etc]# sed -i 's|user = nobody|user = www|g' /usr/local/php/etc/php-fpm.conf
[root@memcached etc]# sed -i 's|group = nobody|group = www|g' /usr/local/php/etc/php-fpm.conf

#设置开机启动
[root@memcached ~]# cp /usr/local/src/php-5.6.31/sapi/fpm/init.d.php-fpm /etc/rc.d/init.d/php-fpm
[root@memcached ~]# chown www:www /etc/rc.d/init.d/php-fpm
[root@memcached ~]# chmod 755 /etc/rc.d/init.d/php-fpm
[root@memcached ~]# chkconfig --level 35 php-fpm on

#设置 nginx 支持 php
[root@memcached ~]# vim /usr/local/nginx/conf/nginx.conf
#第 2 行,取消 user 的注释,修改运行账号为 www www,与 /usr/local/php/etc/php-fpm.d/www.conf 中的 user/group 配置一致
user www www;
#第 45 行,添加 index.php
index index.html index.htm index.php;
#第 65~71 行,取消 FastCGI server 部分 location 的注释;注意 fastcgi_param 行的参数, 改为 $document_root$fastcgi_script_name,或者使用绝对路径
#pass the PHP scripts to FastCGI server listening on 127.0.0.1:9000
#
location ~ \.php$ {
root html;
fastcgi_pass 127.0.0.1:9000;
fastcgi_index index.php;
fastcgi_param SCRIPT_FILENAME $document_root$fastcgi_script_name;
include fastcgi_params;
}

#验证测试
[root@memcached ~]# echo -e "<?php\nphpinfo();\n?>" > /usr/local/nginx/html/index.php
[root@memcached ~]# chown -R www:www /usr/local/nginx/html/
[root@memcached ~]# chmod -R 700 /usr/local/nginx/html/
[root@memcached ~]# service nginx restart
[root@memcached ~]# service php-fpm start 更多详情见请继续阅读下一页的精彩内容:http://www.linuxidc.com/Linux/2017-11/148428p2.htm
3. 安装 libmemcached
#memcached 在 1.2.4 版本(含)以上增加了 CAS(Check and Set)协议, 即对同一 key 的多进程的并发处理问题;
#类比数据库,如果同时有多个进程对同一张表的同一数据进行更新,数据库可以锁定整张表,也可以锁定表内某一行数据,memcached 的 CAS 功能与此相似;
#但 php-memcache 扩展不支持 CAS,需要先安装 php-memcached 扩展(注意与 php-memcache 扩展的区别),php-memcached 扩展基于 libmemcached,所以要先安装 libmemcached,即 php-memcached 的库。

#libmemcached 版本:1.0.18
#https://launchpad.net/libmemcached/+download

#下载 libmemcached
[root@memcached ~]# cd /usr/local/src/
[root@memcached src]# wget https://launchpadlibrarian.net/165454254/libmemcached-1.0.18.tar.gz

#编译安装,生成 Makefile 文件时,切记“--with-memcached”参数
[root@memcached src]# tar -zxvf libmemcached-1.0.18.tar.gz.tar
[root@memcached src]# cd libmemcached-1.0.18
[root@memcached libmemcached-1.0.18]# ./configure --prefix=/usr/local/libmemcached --with-memcached
[root@memcached libmemcached-1.0.18]# make
[root@memcached libmemcached-1.0.18]# make install
4. 安装 php-memcached
#php-memcached 版本:2.2.0(3.0.0 及以上版本针对 php7.0 及以上版本)
#http://pecl.php.net/package/memcached

#php 扩展分原生扩展与第三方扩展,在 php 的源码解压包下的“ext/”目录下可查看所有的原生扩展,php-memcached 及 php-memcache 属于第三方扩展。

#下载 php-memcached
[root@memcached ~]# cd /usr/local/src/
[root@memcached src]# wget http://pecl.php.net/get/memcached-2.2.0.tgz

#编译安装
#phpize: 用于扩展 php 模块,通过 phpize 可以建立 php 的外挂模块
#--enable-memcached: 配置编译环境,编译器编译 php 源码时使能相应扩展
#--with-php-config:指定 php-config 文件路径
#--with-libmemcached-dir:指定 libmemcached 安装目录
#--disable-memcached-sasl:去使能 sasl 认证,因为没有预安装相应功能
#make:把源码编译成 xxxxx.so 文件
#make install: 把 xxxxx.so 文件移动到当前安装 php 的扩展目录
[root@memcached src]# tar -zxvf memcached-2.2.0.tgz
[root@memcached src]# cd memcached-2.2.0
[root@memcached memcached-2.2.0]# /usr/local/php/bin/phpize
[root@memcached memcached-2.2.0]# ./configure --enable-memcached --with-php-config=/usr/local/php/bin/php-config --with-libmemcached-dir=/usr/local/libmemcached --disable-memcached-sasl
[root@memcached memcached-2.2.0]# make
[root@memcached memcached-2.2.0]# make install

5. 安装 php-memcache
#php-memcached 版本:2.2.7(stable version)
#http://pecl.php.net/package/memcache

#下载 php-memcache
[root@memcached ~]# cd /usr/local/src/
[root@memcached src]# wget http://pecl.php.net/get/memcache-2.2.7.tgz

#编译安装
[root@memcached src]# tar -zxvf memcache-2.2.7.tgz
[root@memcached src]# cd memcache-2.2.7
[root@memcached memcache-2.2.7]# /usr/local/php/bin/phpize
[root@memcached memcache-2.2.7]# ./configure --enable-memcache --with-php-config=/usr/local/php/bin/php-config
[root@memcached memcache-2.2.7]# make
[root@memcached memcache-2.2.7]# make install 

6. 安装 php-intl(原生扩展样例,非必须项)
#php-intl 版本:3.0.0
#http://pecl.php.net/package/intl

#php-intl 是 php 国际化扩展,是 ICU 库的一个包装器,安装 php-intl 扩展前要先安装 ICU 库
[root@memcached ~]# yum install -y icu libicu libicu-devel

#下载 php-intl;
#通过查看 php 源码解压包下的“ext/”目录,php-intl 属于原生扩展,理论上可以不用下载,直接在“ext/”下相应扩展目录下编译安装即可;
[root@memcached ~]# cd /usr/local/src/
[root@memcached src]# wget http://pecl.php.net/get/intl-3.0.0.tgz

#编译安装
[root@memcached src]# tar -zxvf intl-3.0.0.tgz
[root@memcached src]# cd intl-3.0.0
[root@memcached intl-3.0.0]# /usr/local/php/bin/phpize
[root@memcached intl-3.0.0]# ./configure --enable-intl --with-php-config=/usr/local/php/bin/php-config
[root@memcached intl-3.0.0]# make
[root@memcached intl-3.0.0]# make install

7. 启用扩展
php 启用扩展有 2 种方式(本文介绍方式 1):
- 直接在 php.ini 文件中添加扩展如“extension = xxx.so”;
- 单独创建 ini 文件,然后 php.ini 调用这些创建的文件即可(可通过 php5enmod 工具支持或者手工配置)。
#修改 php.ini,添加扩展,可在第 732 行后添加扩展(非必须);
# 第 732 行的”extension_dir”路径修改为绝对路径(非必须,相对路径也可),即以上各扩展“make install”之后的安装路径
[root@memcached ~]# vim /usr/local/php/etc/php.ini
[Intl]
extension = intl.so
[Memcached]
extension = memcached.so
[Memcache]
extension = memcache.so

[root@memcached ~]# service php-fpm restart
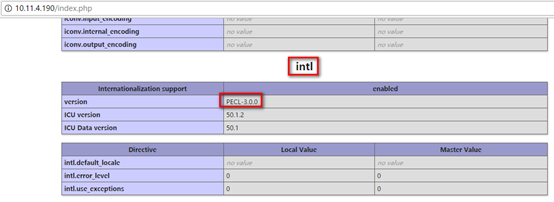
8. 验证扩展是否安装成功
#查看扩展模块方式
[root@memcached ~]# /usr/local/php/bin/php -m | grep -E 'memcache|intl'
#phpinfo()方式,利用前面已经生成的 index.php 文件即可
http://10.11.4.190/index.php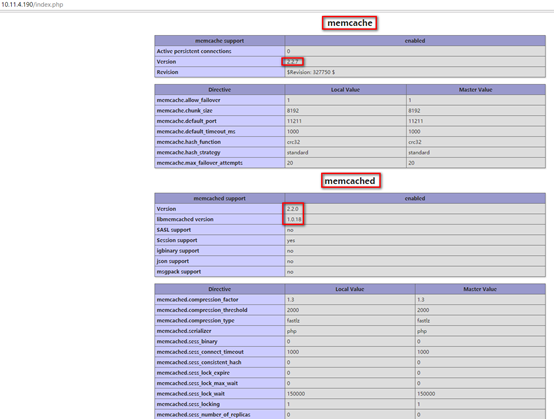
9. php-memcache 访问 memcached 服务器
#修改 index.php
[root@memcached ~]# cd /usr/local/nginx/html/
[root@memcached html]# cp index.php index.php.bak
[root@memcached html]# echo "" > index.php
[root@memcached html]# vim index.php

<?php
$memcache = new Memcache;                                            #创建一个 memcache 对象
$memcache->connect('localhost', 11211) or die ("Could not connect"); #连接 memcached 服务器
$memcache->set('key', 'memcache-test');                              #设置 1 个变量到内存中,key=key, value=memcache-test
$get_value = $memcache->get('key');                                  #从内存取出 key 的 value
echo $get_value;                                                     #回显
?> 浏览器访问:http://10.11.4.190/index.php

本文永久更新链接地址:http://www.linuxidc.com/Linux/2017-11/148428.htm
本文简单介绍 memcached 服务器端的安装配置,与 php-memcache 客户端连接服务器端的配置与操作。
一.简介
1. 简介
Memcached 是一款开源、高性能、分布式内存对象缓存系统,可应用各种需要缓存的场景,其主要目的是通过降低对 Database 的访问来加速 web 应用程序。
Memcached 一般的使用场景是:通过缓存数据库查询的结果,减少数据库访问次数,以提高动态 Web 应用的速度、提高可扩展性。
本质上,memcached 是一个基于内存的 key-value 存储,用于存储数据库调用、API 调用或页面引用结果的直接数据,如字符串、对象等小块任意数据。
工作流程如下:

2. 注意点
- 简单 key-value 存储:服务器不关心数据本身的意义及结构,只要是可序列化数据即可;存储项由 ” 键、过期时间、可选的标志及数据 ” 四个部分组成。
- 功能实现一半依赖于客户端,一半基于服务器端:客户端负责发送存储项至服务器端、从服务端获取数据以及无法连接至服务器时采用相应的动作;服务端负责接收、存储数据,并负责数据项的超时过期。
- Memcached 虽然是 ” 分布式 ” 缓存服务器,但服务器端并没有分布式功能,即不在服务器间进行数据同步及共享信息,” 分布式 ” 完全取决于客户端的实现。
-
清理超期数据:默认情况下,Memcached 是一个 LRU 缓存,同时按事先预订的时长清理超期数据;但事实上,memcached 不会删除任何已缓存数据,只是在其过期之后不再为客户所见;而且,memcached 也不会真正按期限清理缓存,而仅是当 get 命令到达时检查其时长。
二.环境
1. OS
Server:CentOS-7-x86_64-1511
IP:10.11.4.190
2. Memcached 版本
1)libevent
libevent-2.1.8
官网:http://libevent.org/
下载:http://ftp.lfs-matrix.net/pub/blfs/conglomeration/libevent/
2)memcached
memcached-1.4.39
官网:https://memcached.org/
下载:https://memcached.org/files/memcached-1.4.39.tar.gz
三.安装 Memcached 服务器
Memcached 服务器端的安装相对简单。
1. 安装 libevent
#Memcached 依赖于 libevent API,libevent 是个程序库,它将 Linux 的 epoll、BSD 类操作系统的 kqueue 等事件处理功能封装成统一的接口,即使对服务器的连接数增加,也能发挥 O(1)的性能
[root@memcached ~]# cd /usr/local/src/
[root@memcached src]# wget http://ftp.lfs-matrix.net/pub/blfs/conglomeration/libevent/libevent-2.1.8-stable.tar.gz
[root@memcached src]# tar -zxvf libevent-2.1.8-stable.tar.gz
[root@memcached src]# cd libevent-2.1.8-stable
[root@memcached libevent-2.1.8-stable]# ./configure --prefix=/usr/local/libevent
[root@memcached libevent-2.1.8-stable]# make
[root@memcached libevent-2.1.8-stable]# make install

#测试是否安装成功
[root@memcached libevent-2.1.8-stable]# ll /usr/local/libevent/lib/ | grep libevent
2. 安装 memcached
[root@memcached ~]# cd /usr/local/src/
[root@memcached src]# tar -zxvf memcached-1.4.39.tar.gz.tar
[root@memcached src]# cd memcached-1.4.39

#注意编译前,生成 Makefile 文件时,libevent 的路径
[root@memcached memcached-1.4.39]# ./configure --prefix=/usr/local/memcached -with-libevent=/usr/local/libevent
[root@memcached memcached-1.4.39]# make
[root@memcached memcached-1.4.39]# make install
3. 设置环境变量
#简单通过软链接的方式设置环境变量
[root@memcached ~]# ln -s /usr/local/memcached/bin/* /usr/local/bin/
4. 设置 iptables
#tcp11211 端口是 memcached 默认监听端口
[root@memcached ~]# vim /etc/sysconfig/iptables
-A INPUT -p tcp -m state --state NEW -m tcp --dport 80 -j ACCEPT
-A INPUT -p tcp -m state --state NEW -m tcp --dport 11211 -j ACCEPT

[root@memcached ~]# service iptables restart
5. 启动
6. 验证
1)端口
[root@memcached ~]# netstat -tunlp
2)telnet 连接
#可以通过 telnet 连接 memcached 服务器进行数据存储,及数据获取;
#详细的 memcached 的命令可参考:http://www.linuxidc.com/Linux/2017-11/148429.htm ;
#以下红色字体是命令输入,截图可见命令输入与回显
[root@memcached ~]# telnet 10.11.4.190 11211
version            #查看版本
set test 0 0 5     #设置”key”,<command name> <key> <flags> <exptime> <bytes>
mymem              #输入“value”值,<data block>,字节数与 key 中的设的“bytes”相同
get test           #获取已设的 key 的数据
quit               #退出
7. 设置开机启动
[root@memcached ~]# vim /etc/rc.d/init.d/memcached

#!/bin/sh
#
# memcached: MemCached Daemon
#
# chkconfig: - 90 25
# description: MemCached Daemon
#
# Source function library.

. /etc/rc.d/init.d/functions
. /etc/sysconfig/network

#注意:可执行文件路径根据情况调整
MEMCACHED="/usr/local/memcached/bin/memcached"

start()
{echo -n $"Starting memcached: "
#注意:参数根据情况调整
daemon $MEMCACHED -u root -d -m 256 -p 11211 -c 1024 -P /usr/local/memcached/memcached.pid
echo
}

stop()
{echo -n $"Shutting down memcached: "
killproc memcached
echo
}

[-f $MEMCACHED ] || exit 0

# See how we were called.
case "$1" in
start)
start
;;

stop)
stop
;;

restart|reload)
stop
start
;;

condrestart)
stop
start
;;

*)

echo $"Usage: $0 {start|stop|restart|reload|condrestart}"
exit 1
esac
exit 0

[root@memcached ~]# chmod 775 /etc/rc.d/init.d/memcached
[root@memcached ~]# chkconfig --level 35 memcached on四.安装配置基于 PHP 的客户端
Memcache 支持多客户端,如 perl,php,Python,c/c++ 等等,这里主要基于 php 配置。
其中 nginx 与 php 的详细配置请见:http://www.linuxidc.com/Linux/2017-10/147551.htm
1. 安装配置 nginx
#nginx 版本:1.12.0

#创建用户
[root@memcached ~]# groupadd www
[root@memcached ~]# useradd -g www -s /sbin/nologin www

#安装依赖包
[root@memcached ~]# yum install pcre pcre-devel openssl openssl-devel zlib zlib-devel -y

#编译安装
[root@memcached ~]# cd /usr/local/src/
[root@memcached src]# wget http://nginx.org/download/nginx-1.12.0.tar.gz
[root@memcached src]# tar -zxvf nginx-1.12.0.tar.gz
[root@memcached src]# cd nginx-1.12.0
[root@memcached nginx-1.12.0]# ./configure --prefix=/usr/local/nginx --without-http_memcached_module --user=www --group=www --with-http_stub_status_module --with-http_ssl_module --with-http_gzip_static_module
[root@memcached nginx-1.12.0]# make
[root@memcached nginx-1.12.0]# make install

#修改用户 / 组
[root@memcached nginx-1.12.0]# chown -R www:www /usr/local/nginx

#设置开机启动
[root@memcached ~]# vim /etc/rc.d/init.d/nginx
[root@memcached ~]# chown www:www /etc/rc.d/init.d/nginx
[root@memcached ~]# chmod 775 /etc/rc.d/init.d/nginx
[root@memcached ~]# chkconfig --level 35 nginx on

#启动
[root@memcached ~]# service nginx start
2. 安装配置 php
#php 版本:5.6.31

#安装依赖包
[root@memcached ~]# yum install -y gcc gcc-c++ autoconf libjpeg libjpeg-devel libpng libpng-devel freetype freetype-devel libpng libpng-devel libxml2 libxml2-devel zlib zlib-devel xml2 xml2-devel openssl openssl-devel glibc glibc-devel glib2 glib2-devel bzip2 bzip2-devel ncurses ncurses-devel curl libcurl-devel gdbm-devel db4-devel libXpm libXpm-devel libX11 libX11-devel gd-devel gmp-devel readline-devel libxslt-devel expat-devel xmlrpc-c xmlrpc-c-devel

#编译安装 libmcrypt 库,
[root@memcached ~]# cd /usr/local/src/
[root@memcached src]# wget http://nchc.dl.sourceforge.net/project/mcrypt/Libmcrypt/2.5.8/libmcrypt-2.5.8.tar.gz
[root@memcached src]# tar -zxvf libmcrypt-2.5.8.tar.gz
[root@memcached src]# cd libmcrypt-2.5.8
[root@memcached libmcrypt-2.5.8]# ./configure
[root@memcached libmcrypt-2.5.8]# make
[root@memcached libmcrypt-2.5.8]# make install

#编译安装 php
[root@memcached ~]# cd /usr/local/src/
[root@memcached src]# wget http://php.net/distributions/php-5.6.31.tar.bz2
[root@memcached src]# tar -jxvf php-5.6.31.tar.bz2
[root@memcached src]# cd php-5.6.31
[root@memcached php-5.6.31]# ./configure --prefix=/usr/local/php --with-config-file-path=/usr/local/php/etc --with-MySQL --with-pdo-mysql --with-mysqli --with-openssl --with-freetype-dir --with-jpeg-dir --with-png-dir --with-zlib-dir --with-mhash --with-mcrypt --with-bz2 --enable-zip --with-curl --with-gettext --with-iconv --with-xmlrpc --enable-fpm --enable-sockets --enable-sysvshm --enable-mbstring --enable-pdo --enable-libxml --enable-xml --enable-soap --enable-session --enable-ctype --enable-ftp --enable-bcmath --enable-shmop --enable-inline-optimization --enable-opcache --enable-mbregex --enable-pcntl --enable-cgi --enable-wddx
[root@memcached php-5.6.31]# make
[root@memcached php-5.6.31]# make install

#php.ini 文件
[root@memcached ~]# cp /usr/local/src/php-5.6.31/php.ini-production /usr/local/php/etc/php.ini
[root@memcached ~]# ln -s /usr/local/php/etc/php.ini /etc/php.ini

#php-fpm.conf 文件,取消”;pid = run/php-fpm.pid”的注释,同时修改运行账号通 nginx 服务的运行账号一致
[root@memcached ~]# cp /usr/local/php/etc/php-fpm.conf.default /usr/local/php/etc/php-fpm.conf
[root@memcached ~]# ln -s /usr/local/php/etc/php-fpm.conf /etc/php-fpm.conf
[root@memcached ~]# sed -i 's|;pid = run/php-fpm.pid|pid = run/php-fpm.pid|g' /usr/local/php/etc/php-fpm.conf
[root@memcached etc]# sed -i 's|user = nobody|user = www|g' /usr/local/php/etc/php-fpm.conf
[root@memcached etc]# sed -i 's|group = nobody|group = www|g' /usr/local/php/etc/php-fpm.conf

#设置开机启动
[root@memcached ~]# cp /usr/local/src/php-5.6.31/sapi/fpm/init.d.php-fpm /etc/rc.d/init.d/php-fpm
[root@memcached ~]# chown www:www /etc/rc.d/init.d/php-fpm
[root@memcached ~]# chmod 755 /etc/rc.d/init.d/php-fpm
[root@memcached ~]# chkconfig --level 35 php-fpm on

#设置 nginx 支持 php
[root@memcached ~]# vim /usr/local/nginx/conf/nginx.conf
#第 2 行,取消 user 的注释,修改运行账号为 www www,与 /usr/local/php/etc/php-fpm.d/www.conf 中的 user/group 配置一致
user www www;
#第 45 行,添加 index.php
index index.html index.htm index.php;
#第 65~71 行,取消 FastCGI server 部分 location 的注释;注意 fastcgi_param 行的参数, 改为 $document_root$fastcgi_script_name,或者使用绝对路径
#pass the PHP scripts to FastCGI server listening on 127.0.0.1:9000
#
location ~ \.php$ {
root html;
fastcgi_pass 127.0.0.1:9000;
fastcgi_index index.php;
fastcgi_param SCRIPT_FILENAME $document_root$fastcgi_script_name;
include fastcgi_params;
}

#验证测试
[root@memcached ~]# echo -e "<?php\nphpinfo();\n?>" > /usr/local/nginx/html/index.php
[root@memcached ~]# chown -R www:www /usr/local/nginx/html/
[root@memcached ~]# chmod -R 700 /usr/local/nginx/html/
[root@memcached ~]# service nginx restart
[root@memcached ~]# service php-fpm start 更多详情见请继续阅读下一页的精彩内容:http://www.linuxidc.com/Linux/2017-11/148428p2.htm


