共计 4543 个字符,预计需要花费 12 分钟才能阅读完成。
正文
1、实验环境
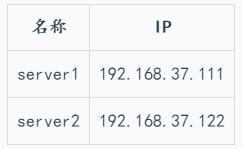
我们需要准备两台虚拟机,把这两台虚拟机组成集群,实现会话保持。
2、配置 server1
2.1 修改 nginx 配置文件
| [] | |
| upstream tomcat_cluser { | |
| server 192.168.37.111:8080 weight=1; | |
| server 192.168.27.122:8080 weight=2; | |
| } | |
| location / { | |
| proxy_pass http://tomcat_cluser; | |
| } | |
| location ~* \.(jsp|do)$ {proxy_pass http://tomcat_cluser; | |
| } |
修改完成之后,重启我们的 nginx 服务。
2.2 修改 tomcat 配置文件
| [root@server1 ~]# vim server.xml | |
| <Cluster className="org.apache.catalina.ha.tcp.SimpleTcpCluster" channelSendOptions="8"> | |
| <Manager className="org.apache.catalina.ha.session.DeltaManager" | |
| expireSessionsOnShutdown="false" notifyListenersOnReplication="true"/> | |
| <Channel className="org.apache.catalina.tribes.group.GroupChannel"> | |
| <Membership className="org.apache.catalina.tribes.membership.McastService" address="228.0.0.4" port="45564" frequency="500" dropTime="3000"/> | |
| <Receiver className="org.apache.catalina.tribes.transport.nio.NioReceiver" address="auto" port="4000" autoBind="100" selectorTimeout="5000" maxThreads="6"/> | |
| <Sender className="org.apache.catalina.tribes.transport.ReplicationTransmitter"> | |
| <Transport className="org.apache.catalina.tribes.transport.nio.PooledParallelSender"/> | |
| </Sender> | |
| <Interceptor className="org.apache.catalina.tribes.group.interceptors.TcpFailureDetector"/> | |
| <Interceptor className="org.apache.catalina.tribes.group.interceptors.MessageDispatch15Interceptor"/> | |
| </Channel> | |
| <Valve className="org.apache.catalina.ha.tcp.ReplicationValve" filter="/"/> | |
| <Valve className="org.apache.catalina.ha.session.JvmRouteBinderValve"/> | |
| <ClusterListener className="org.apache.catalina.ha.session.ClusterSessionListener"/> | |
| </Cluster> |

2.3 创建一个 session 页面
| [root@server1 webapps]# mkdir test | |
| [root@server1 webapps]# vim test/session.jsp | |
| <%@ page language="Java" %> | |
| <html> | |
| <head><title>TomcatA</title></head> | |
| <body> | |
| <h1><font color="blue">TomcatA</h1> | |
| <table align="centre" border="1"> | |
| <tr> | |
| <td>Session ID</td> | |
| <% session.setAttribute("abc","abc"); %> | |
| <td><%= session.getId() %></td> | |
| </tr> | |
| <tr> | |
| <td>Created on</td> | |
| <td><%= session.getCreationTime() %></td> | |
| </tr> | |
| </table> | |
| </body> | |
| </html> |
2.4 修改web.xml
| [] | |
| [] | |
| session.jsp | |
| [] | |
| [] | |
| [] | |
| [] | |
| web.xml | |
| [] |
在 web.xml 下 在 </web-app> 上方加入<distributable/>
设置一个标签
修改完成之后,重启我们的 tomcat 服务:
| [] | |
| [] |
接着,我们就去修改第二台机器。
三、配置 server2
3.1 修改 tomcat 配置文件
本台机器和第一台机器的设置相似,直接把文件拷过来就可以了:
| [root@server1 ~]# scp /usr/local/tomcat/conf/server.xml root@192.168.37.122:~ | |
| root@192.168.37.122's password: | |
| server.xml 100% 8026 7.8KB/s 00:00 | |
| [root@server2 conf]# cp ~/server.xml . | |
| cp: overwrite‘./server.xml’? yes |
3.2 创建一个 session 页面
| [root@server2 webapps]# mkdir test | |
| [root@server2 webapps]# vim test/session.jsp | |
| <%@ page language="java" %> | |
| <html> | |
| <head><title>TomcatB</title></head> | |
| <body> | |
| <h1><font color="blue">TomcatB</h1> | |
| <table align="centre" border="1"> | |
| <tr> | |
| <td>Session ID</td> | |
| <% session.setAttribute("abc","abc"); %> | |
| <td><%= session.getId() %></td> | |
| </tr> | |
| <tr> | |
| <td>Created on</td> | |
| <td><%= session.getCreationTime() %></td> | |
| </tr> | |
| </table> | |
| </body> | |
| </html> |
3.3 修改web.xml
| [] | |
| [] | |
| session.jsp | |
| [] | |
| [] | |
| [] | |
| [] | |
| web.xml | |
| [] |
在 web.xml 下 在 </web-app> 上方加入<distributable/>
设置一个标签
修改完成之后,重启我们的 tomcat 服务:
| [] | |
| [] |
四、测试
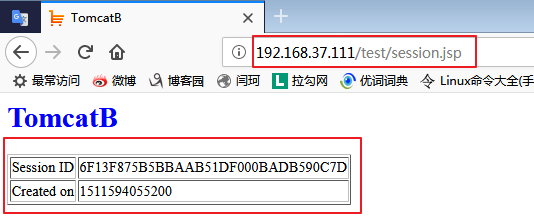
我们直接去网页测试我们的会话保持实现没有:

可以看出,我们的会话保持已经实现。
实验完成。
更多 Tomcat 相关教程见以下内容:
CentOS 6.6 下安装配置 Tomcat 环境 http://www.linuxidc.com/Linux/2015-08/122234.htm
RedHat Linux 5.5 安装 JDK+Tomcat 并部署 Java 项目 http://www.linuxidc.com/Linux/2015-02/113528.htm
Tomcat 权威指南(第二版)(中英高清 PDF 版 + 带书签) http://www.linuxidc.com/Linux/2015-02/113062.htm
Tomcat 安全配置与性能优化 http://www.linuxidc.com/Linux/2015-02/113060.htm
Linux 下使用 Xshell 查看 Tomcat 实时日志中文乱码解决方案 http://www.linuxidc.com/Linux/2015-01/112395.htm
CentOS 64-bit 下安装 JDK 和 Tomcat 并设置 Tomcat 开机启动操作步骤 http://www.linuxidc.com/Linux/2015-01/111485.htm
Ubuntu 16.04 下安装 Tomcat 8.5.9 http://www.linuxidc.com/Linux/2017-06/144809.htm
Ubuntu 16.04 安装 Tomcat 8 图解 http://www.linuxidc.com/Linux/2017-10/147773.htm
Tomcat 配置文件 server.xml 详解 http://www.linuxidc.com/Linux/2017-10/148003.htm
Tomcat 单机多实例部署 - 多项目部署 http://www.linuxidc.com/Linux/2017-10/147259.htm
Tomcat 的详细介绍:请点这里
Tomcat 的下载地址:请点这里
本文永久更新链接地址:http://www.linuxidc.com/Linux/2017-11/149006.htm


