共计 4990 个字符,预计需要花费 13 分钟才能阅读完成。
Nginx 专为性能优化而开发,最知名的优点是它的稳定性和低系统资源消耗,以及对 HTTP 并发连接的高处理能力,单个物理服务器可支持 30000-50000 个并发请求。
Nginx 的安装文件可以从官方网站 http://www.nginx.org/ 下载, 下面以 Nginx1.12 版本为例,基于 CentOS7,部署 Nginx 网站服务。
-
安装 Nginx
第一步源码编译安装
1. 安装支持软件
Nginx 的配置及运行需要 gcc、gcc-c++、make、pcre、pcre-devel、zlib-devel 软件包的支持,以便提供相应的库和头文件,确保 Nginx 安装顺利。
创建 yum 仓库的步骤详细步骤请参考 Linux 下通过 rdesktop 远程登陆 Windows 系统
yum install gcc gcc-c++ make pcre pcre-devel zlib-devel -y如果是在有网络的情况下,CentOS7 无需创建 yum 仓库,直接执行 yum list 命令更新一下 yum 源, 稍微等待一会儿。
 yum list    // 更新 yum 源
 yum install gcc gcc-c++ make pcre pcre-devel zlib-devel -y
2. 创建运行用户、组
Nginx 服务程序默认以 nobody 身份运行,建议为其创建专门的用户账号,以便更准确的控制其访问权限,增加灵活性,降低安全风险。
useradd -M -s /sbin/nologin nginx // 创建一个名为 nginx 用户,不建立宿主文件夹,禁止登录到 shell 环境3. 编译安装
tar xzvf nginx-1.12.0.tar.gz -C /opt // 解压 Nginx 软件至 opt 目录下cd /opt/nginx-1.12.0/ // 切换到 Nginx 目录下根据实际需要配置 Nginx 的具体选项,配置前可参考“./configure –help”给出的说明。
./configure \
–prefix=/usr/local/nginx \
–user=nginx \
–group=nginx \
–with-http_stub_status_module
- –prefix:指定 Nginx 的安装目录
- –user:指定 Nginx 的运行用户
- –group:指定 Nginx 的运行组
- –with-http_stub_status_module:启用 http_stub_status_module 模块以支持状态统计,便于查看服务器的连接信息
make                // 生成二进制文件
make install        // 编译安装
4. 为主程序 Nginx 创建链接文件
创建 Nginx 主程序的链接文件是为了方便管理员直接“nginx”命令就可以调用 Nginx 的主程序。
ln -s /usr/local/nginx/sbin/nginx /usr/local/sbin/第二步检查配置文件并启动 Nginx 服务
1. 检查配置文件
Nginx 的主程序提供了“-t”选项来对配置文件进行检查,以便找出不当或错误的配置。
[root@centos7-1 nginx-1.12.0]# nginx -t
nginx: the configuration file /usr/local/nginx/conf/nginx.conf syntax is ok
nginx: configuration file /usr/local/nginx/conf/nginx.conf test is successful
2. 启动 Nginx
直接运行 Nginx 即可启动 Nginx 服务器
[root@centos7-1 nginx-1.12.0]# nginx
[root@centos7-1 nginx-1.12.0]# killall -1 nginx       // 重启 nginx 服务
[root@centos7-1 nginx-1.12.0]# killall -3 nginx      // 停止 nginx 服务
3. 使用 Nginx 服务脚本
为了使 nginx 服务的启动、停止、重载等操作更加方便,可以编写 nginx 服务脚本,并使用 chkconfig 和 systemctl 工具来进行管理,这更加符合系统的管理习惯。
[root@centos7-1 nginx-1.12.0]# vim /etc/init.d/nginx

#!/bin/bash
# chkconfig: - 99 20
# description: Nginx Service Control Script
PROG="/usr/local/nginx/sbin/nginx"               // 主程序路径
PIDF="/usr/local/nginx/logs/nginx.pid"           //PID 存放路径
case "$1" in
  start)
    $PROG
    ;;
  stop)
    kill -s QUIT $(cat $PIDF)              // 根据 PID 中止 nginx 进程
    ;;
  restart)
    $0 stop
    $0 start
    ;;
  reload)
    kill -s HUP $(cat $PIDF)              // 根据进程号重载配置
    ;;
  *)
        echo "Usage: $0 {start|stop|restart|reload}"
        exit 1
esac
exit 0[root@centos7-1 nginx-1.12.0]# chmod +x /etc/init.d/nginx
[root@centos7-1 nginx-1.12.0]# chkconfig --add nginx // 添加为系统服务
[root@centos7-1 nginx-1.12.0]# systemctl start nginx.service第三步确认 Nginx 服务是否正常运行
通过检查 Nginx 程序的监听状态,或者在浏览器中访问此 Web 服务,默认页面将显示“Welcome to nginx!”
[root@centos7-1 nginx-1.12.0]# netstat -antp | grep nginx
tcp        0      0 0.0.0.0:80              0.0.0.0:*               LISTEN      54386/nginx: master
[root@centos7-1 nginx-1.12.0]# yum install elinks -y
[root@centos7-1 nginx-1.12.0]# elinks http://localhost // 使用 elinks 浏览器
-
配置访问状态统计页面
Nginx 内置了 HTTP_STUB_STATUS 状态统计模块,用来反馈当前的 Web 访问情况。要使用 Nginx 的状态统计功能,除了启用内建模块以外,还需要修改 nginx.conf 配置文件,指定访问位置并添加 stub_status 配置代码。
[root@centos7-1 nginx-1.12.0]# cd /usr/local/nginx/conf
[root@centos7-1 conf]# mv nginx.conf nginx.conf.back
[root@centos7-1 conf]# grep -v "#" nginx.conf.back > nginx.conf     // 过滤配置文件 #号注释的信息
[root@centos7-1 conf]# vim nginx.conf

server {listen       80;
        server_name  localhost;
    charset utf-8;

        location / {
            root   html;
            index  index.html index.htm;
        }

      //在 "server" 这里插入的这 4 行的信息
        location ~ /status {// 访问位置为 /status
        stub_status   on;                        //打开状态统计功能
        access_log off;                          //关闭此位置的日志记录
        }

        error_page   500 502 503 504  /50x.html;
        location = /50x.html {root   html;}

       }
    }
新的配置生效后,在浏览器中访问 nginx 服务器的 /status 网站位置,可以看到当前的状态统计信息。
systemctl reload nginx.service                  // 重新加载 nginx 服务
systemctl stop firewalld.service               // 关闭防火墙
systemctl disable firewalld.service         // 禁用防火墙
其中,“Active connections”表示当前的活动连接数;而“server accepts handled requests”表示已经处理的连接信息。三个数字依次表示已处理的连接数、成功的 TCP 握手次数、已处理的请求数。
-
配置 Nginx 的访问控制
1. 基于用户授权的访问控制
(1). 使用 htpasswd 生成用户认证文件,如果没有该命令,可使用 yum 安装 httpd-tools 软件包,用法与 Apache 认证时方式一样,在 /usr/local/nginx/ 目录生成 passwd.db 文件,用户名是 test,密码输入 2 次。
yum install httpd-tools -y // 安装 httpd-tools 软件包[root@centos7-1 ~]# htpasswd -c /usr/local/nginx/passwd.db test New password: // 设置 test 用户密码 Re-type new password: Adding password for user test [root@centos7-1 ~]# cat /usr/local/nginx/passwd.db // 查看生成的用户认证文件 test:$apr1$WfkC0IdB$sMyjqJzg2tcqcIe1mJ8LI/
(2). 修改密码文件的权限为 400,将所有者改为 nginx,设置 nginx 的运行用户能够读取。
[root@centos7-1 ~]# chmod 400 /usr/local/nginx/passwd.db
[root@centos7-1 ~]# chown nginx /usr/local/nginx/passwd.db
[root@centos7-1 ~]# ll -d /usr/local/nginx/passwd.db
-r--------. 1 nginx root 43 6月  20 14:45 /usr/local/nginx/passwd.db
(3). 修改主配置文件 nginx.conf,添加相应认证配置项。
[root@centos7-1 ~]# vim /usr/local/nginx/conf/nginx.conf

location / {auth_basic "secret";       //添加认证配置
            auth_basic_user_file /usr/local/nginx/passwd.db;
            root   html;
            index  index.html index.htm;
        }
(4). 检测语法、重启服务
[root@centos7-1 ~]# nginx -t
nginx: the configuration file /usr/local/nginx/conf/nginx.conf syntax is ok
nginx: configuration file /usr/local/nginx/conf/nginx.conf test is successful
[root@centos7-1 ~]# systemctl restart nginx.service
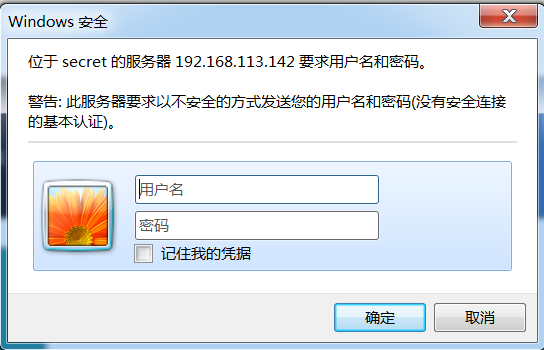
(5). 用浏览器访问网址,检验控制效果。

需要输入用户名和密码进行访问,验证通过才能进行访问。
2. 基于客户端的访问控制
Nginx 基于客户端的访问控制要比 Apache 的简单,规则如下:
- deny IP/IP 段:拒绝某个 IP 或 IP 段的客户端访问
- allow IP/IP 段:允许某个 IP 或 IP 段的客户端访问。
- 规则从上往下执行,如匹配规则停止,不在往下匹配。
(1). 修改主配置文件 nginx.conf,添加相应认证配置项。
[root@centos7-1 ~]# vim /usr/local/nginx/conf/nginx.conf

  location / {deny 192.168.113.132;          //客户端 IP
            allow all;
            root   html;
            index  index.html index.htm;
        }
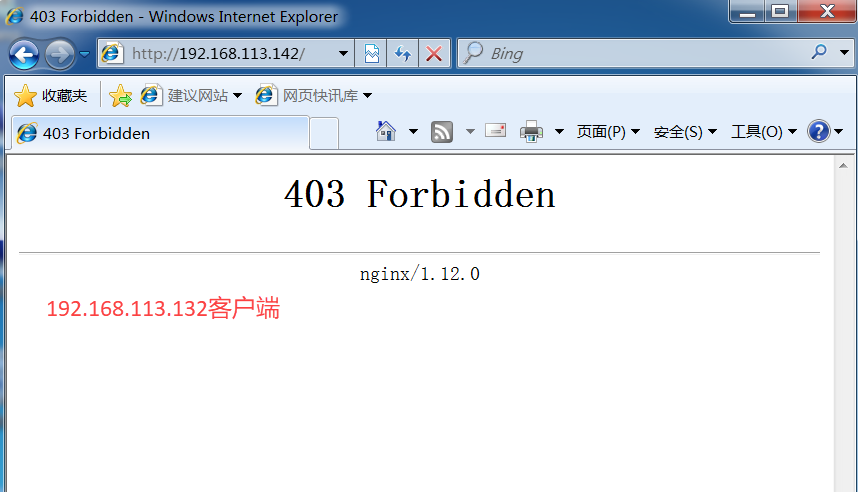
deny 192.168.113.132 表示这个 ip 地址访问会被拒绝,其他 IP 客户端正常访问。
(2). 重启服务器访问网址,页面已经访问不到。
[root@centos7-1 ~]# systemctl restart nginx.service 

要注意的是如果是用域名访问网页,需要配置 DNS 域名解析服务器,详细步骤参考使用 Bind 部署 DNS 域名解析服务器之正向解析。
:


