共计 9239 个字符,预计需要花费 24 分钟才能阅读完成。
前言
想必大家对于 Nginx 和 Tomcat 都非常熟悉了,Nginx 的应用非常广泛,不仅是对 web 静态资源非常友好,而且也是非常实用的反向代理和负载均衡软件。结合后端 Tomcat 的服务,从而搭建 Nginx+Tomcat 集群。
对于直接想要实践的朋友而言可以获取本文的链接中的软件包后直接看第三备份的内容。
一、集群搭建结构及拓扑
1.1 集群架构图示
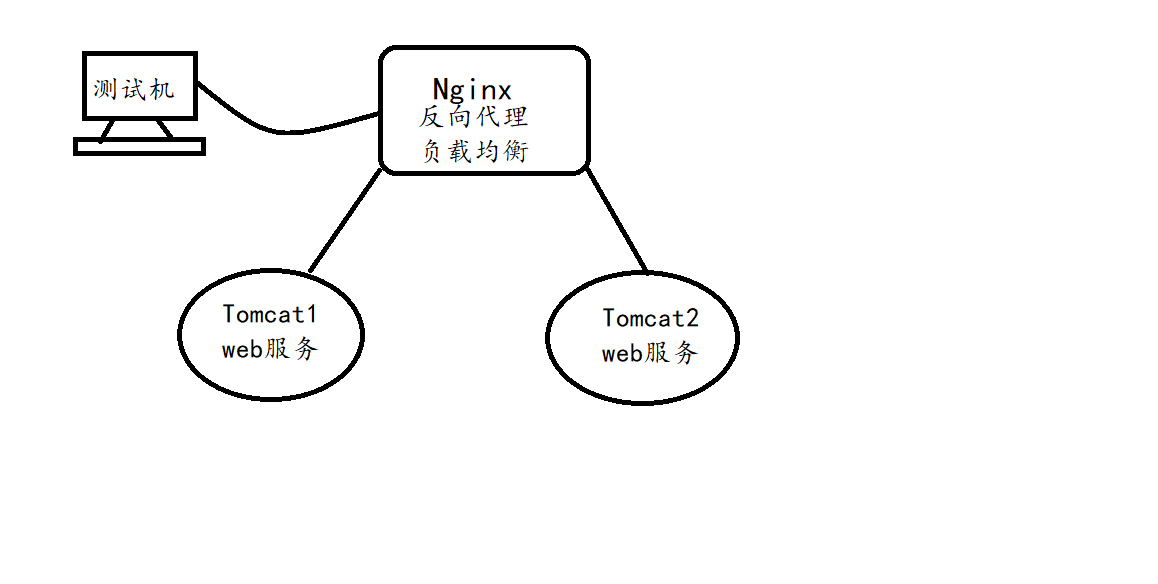
Nginx+Tomcat 集群的结构示意图如下:

1.2 系统环境与地址规划
使用三台 CentOS7 服务器(7.4),规划如下:
| 服务器 | 网卡模式 | IP 地址 |
|---|---|---|
| Nginx | NAT | 20.0.0.128 |
| Tomcat1 | NAT | 20.0.0.130 |
| Tomcat2 | NAT | 20.0.0.136 |
1.3 拓扑图如下

1.4 相关资源软件
链接:https://pan.baidu.com/s/1Qdla-vrpcspcAKJucZdSUg
提取码:40it
二、搭建思路及核心部分配置
根据上述的结构图示,为了完成该实践内容,需要先梳理搭建的思路,搞清楚核心部分的操作与配置。
1、首先我们需要在三台服务器上编译安装对应的服务(软件包在上面的链接中),测试服务是否正常;
2、其次基于核心功能:负载均衡以及动态分离,需要一步一步理清楚
基于负载均衡
负载均衡是在 Nginx 服务器上配置的,就需要对 nginx 的主配置文件进行配置,实现负载均衡的模块是使用 upstream 模块以及对应需要的算法(本文使用简单的加权轮循算法实现负载均衡)。核心配置:
| #server 指令外层 | |
| upstream tomcat-server {server 20.0.0.130:8080 weight=1; | |
| server 20.0.0.136:8080 weight=1; | |
| } | |
| #server 指令中 | |
| location / {root html; | |
| index index.html index.htm; | |
| proxy_pass http://tomcat-server; | |
| } |
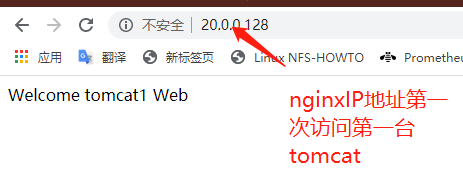
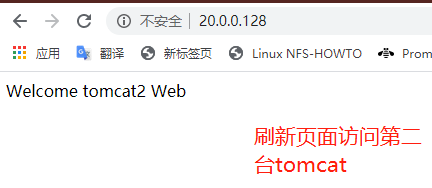
访问 nginx 的服务器地址,可以轮循访问后端的两台真实的 Tomcat 服务器。
基于动态分离
我们知道对于 Nginx 而言,其对静态资源的支持是非常友好的,而 Tomcat 对于 Java 的动态 web 页面的支持非常好。所以需要实现动态分离就是将静态请求给予 nginx 服务器运行,Tomcat 负责处理类似 jsp 文件的动态请求。
本次案例使用 nginx 服务器和一台 Tomcat 服务器做动态分离。最终将结合静态图片让 nginx 负责处理,而使用 Tomcat 处理动态页面。
核心配置:
nginx 服务器:
| location ~.*\.(gif|jpg|jpeg|png|bmp|swf|css)$ {root html/demo; | |
| expires 30d; | |
| } | |
| location ~.*.jsp$ {## 匹配 jsp 页面跳转代理服务器池 | |
| proxy_pass http://tomcat-server; | |
| proxy_set_header Host $host; | |
| } | |
| location / {root html; | |
| index index.html index.htm; | |
| #proxy_pass http://tomcat-server; | |
| } |
tomcat 服务器:
| <Context docBase="/usr/local/tomcat/webapps/demo" path="" reloadable="false"> | |
| </Context> |
3、在部署和配置的过程中,进行必要的验证
好了大致的流程和核心配置讲完了,下面开始本次案例的完整演示。
三、部署流程与实践过程
负载均衡集群搭建
3.1 部署配置两个 tomcat 服务器
由于部署两个 tomcat 服务器的流程几乎一致(除了页面显示的内容部分不一致,当然是为了验证负载均衡),并且不显得本文过于冗长,就演示 tomcat1 服务器上的部署。
3.1.1 安装 jdk
| ==================================================================================== | |
| tomcat1 | |
| [root@localhost ~]# hostnamectl set-hostname tomcat1 | |
| [root@localhost ~]# su | |
| [root@tomcat1 ~]# cd /opt/ | |
| [root@tomcat1 opt]# ls | |
| apache-tomcat-9.0.16.tar.gz jdk-8u91-linux-x64.tar.gz rh | |
| [root@tomcat1 opt]# tar zxf jdk-8u91-linux-x64.tar.gz -C /usr/local/ | |
| [root@tomcat1 opt]# vim /etc/profile #声明环境变量 | |
| # 末尾 | |
| export JAVA_HOME=/usr/local/jdk1.8.0_91 | |
| export JRE_HOME=${JAVA_HOME}/jre | |
| export CLASSPATH=.:${JAVA_HOME}/lib:${JRE_HOME}/lib | |
| export PATH=${JAVA_NAME}/bin:$PATH | |
| [root@tomcat1 opt]# source /etc/profile |
3.1.2 部署安装 tomcat
| [root@tomcat1 opt]# ls | |
| apache-tomcat-9.0.16.tar.gz jdk-8u91-linux-x64.tar.gz rh | |
| [root@tomcat1 opt]# tar zxf apache-tomcat-9.0.16.tar.gz -C /usr/local/ | |
| [root@tomcat1 opt]# cd /usr/local/ | |
| [root@tomcat1 local]# ls | |
| apache-tomcat-9.0.16 bin etc games include jdk1.8.0_91 lib lib64 libexec sbin share src | |
| [root@tomcat1 local]# mv apache-tomcat-9.0.16/ tomcat | |
| [root@tomcat1 local]# cd tomcat/ | |
| [root@tomcat1 tomcat]# ls | |
| bin conf lib logs README.md RUNNING.txt webapps | |
| BUILDING.txt CONTRIBUTING.md LICENSE NOTICE RELEASE-NOTES temp work | |
| [root@tomcat1 bin]# ls #将下面中的启动脚本和关闭脚本建立软链接 | |
| bootstrap.jar ciphers.sh daemon.sh setclasspath.bat startup.sh version.bat | |
| catalina.bat commons-daemon.jar digest.bat setclasspath.sh tomcat-juli.jar version.sh | |
| catalina.sh commons-daemon-native.tar.gz digest.sh shutdown.bat tomcat-native.tar.gz | |
| catalina-tasks.xml configtest.bat makebase.bat shutdown.sh tool-wrapper.bat | |
| ciphers.bat configtest.sh makebase.sh startup.bat tool-wrapper.sh | |
| [root@tomcat1 bin]# ln -s /usr/local/tomcat/bin/startup.sh /usr/local/bin | |
| [root@tomcat1 bin]# ln -s /usr/local/tomcat/bin/shutdown.sh /usr/local/bin | |
| # 创建站点目录以及文件(web 页面) | |
| [root@tomcat1 local]# mkdir -p /web/webapp1 | |
| [root@tomcat1 local]# cd /web/webapp1/ | |
| [root@tomcat1 webapp1]# vim index.jsp | |
| <%@ page language="java" import="java.util.*" pageEncoding="UTF-8"%> | |
| <html> | |
| <head> | |
| <title>JSP test1 page</title> #网页标题名字 | |
| </head> | |
| <body> | |
| <% out.println("Welcome tomcat1 Web");%> #网页内容为:welcome tomcat1 web 唯一需要在 tomcat2 上面更改配置的部分(再次声明这样是为了验证效果,生产环境中是一致的哈~)</body> | |
| </html> | |
| [root@tomcat1 webapp1]# vim /usr/local/tomcat/conf/server.xml #配置服务文件在 149 行添加 context 标签语句 | |
| 148 <Host name="localhost" appBase="webapps" | |
| 149 unpackWARs="true" autoDeploy="true"> | |
| 150 <Context docBase="/web/webapp1" path=""reloadable="false"> | |
| 151 </Context> | |
| [root@tomcat1 webapp1]# startup.sh #开启服务 | |
| Using CATALINA_BASE: /usr/local/tomcat | |
| Using CATALINA_HOME: /usr/local/tomcat | |
| Using CATALINA_TMPDIR: /usr/local/tomcat/temp | |
| Using JRE_HOME: /usr/local/jdk1.8.0_91/jre | |
| Using CLASSPATH: /usr/local/tomcat/bin/bootstrap.jar:/usr/local/tomcat/bin/tomcat-juli.jar | |
| Tomcat started. | |
| [root@tomcat1 webapp1]# netstat -ntap | grep 8080 #检查 tomcat 服务是否开启 | |
| tcp6 0 0 :::8080 :::* LISTEN 2020/java | |
| [root@tomcat1 webapp1]# systemctl status firewalld.service #查看防火墙对防火墙进行设置 | |
| ● firewalld.service - firewalld - dynamic firewall daemon | |
| Loaded: loaded (/usr/lib/systemd/system/firewalld.service; enabled; vendor preset: enabled) | |
| Active: active (running) since 日 2020-04-05 11:04:32 CST; 19min ago | |
| ...... | |
| [root@tomcat1 webapp1]# firewall-cmd --zone=public --add-port=8080/tcp --permanent | |
| success | |
| [root@tomcat1 webapp1]# firewall-cmd --reload | |
| success |
3.2 部署配置 nginx 服务器
3.2.1 手工编译安装 nginx 服务(这里不必多说了哈)
| [] | |
| [] | |
| [] | |
| [] | |
| [] | |
| [] | |
| [] |
3.3 配置验证实现负载均衡
3.3.1upstream 模块实现负载均衡
| [root@nginx nginx-1.12.0]# vim /usr/local/nginx/conf/nginx.conf | |
| # 在 nginx.conf 的 gzip 下面写入 tomcat 服务器池,tomcat-server 表示一个名称,可以理解为服务器的域名 | |
| #gzip on; | |
| upstream tomcat-server { | |
| server 20.0.0.130:8080 weight=1;# 根据加权轮循算法调度访问后端的 tomcat 服务器 | |
| server 20.0.0.136:8080 weight=1; | |
| } | |
| location / { | |
| root html; | |
| index index.html index.htm; | |
| proxy_pass http://tomcat-server; #配置代理服务器 | |
| } | |
| [root@nginx nginx-1.12.0]# nginx -t #检查配置文件的语法 | |
| nginx: the configuration file /usr/local/nginx/conf/nginx.conf syntax is ok | |
| nginx: configuration file /usr/local/nginx/conf/nginx.conf test is successful | |
| [root@nginx nginx-1.12.0]# nginx #启动服务 | |
| [root@nginx nginx-1.12.0]# netstat -napt | grep nginx | |
| tcp 0 0 0.0.0.0:80 0.0.0.0:* LISTEN 53804/nginx: master | |
| [root@nginx nginx-1.12.0]# firewall-cmd --zone=public --add-port=80/tcp --permanent | |
| success | |
| [root@nginx nginx-1.12.0]# firewall-cmd --reload | |
| success |
3.3.2 验证负载均衡
客户机上访问 nginx 服务器地址,然后刷新一次,结果如下面两张图:


动态分离实现过程演示
此次只是为了实现动静分离的目的,所以只需要进行必要的演示即可,采用 nginx 服务器和一台 tomcat 服务器即可。
3.4 模拟访问动静态资源(非同一 web 页面)
为了方便管理还是推荐写一个 nginx 服务的管理脚本
| [root@nginx nginx-1.12.2]# vim /etc/init.d/nginx ## 编写 service 启动脚本 | |
| #!/bin/bash | |
| # chkconfig: - 99 20 | |
| # description: Nginx Service Control Script | |
| PROG="/usr/local/nginx/sbin/nginx" | |
| PIDF="/usr/local/nginx/logs/nginx.pid" | |
| case "$1" in | |
| start) | |
| $PROG | |
| ;; | |
| stop) | |
| kill -s QUIT $(cat $PIDF) | |
| ;; | |
| restart) | |
| $0 stop | |
| $0 start | |
| ;; | |
| reload) | |
| kill -s HUP $(cat $PIDF) | |
| ;; | |
| *) | |
| echo "Usage: $0 {start|stop|restart|reload}" | |
| exit 1 | |
| esac | |
| exit 0 | |
| [root@nginx nginx-1.12.2]# chmod +x /etc/init.d/nginx | |
| [root@nginx nginx-1.12.2]# chkconfig --add nginx |
3.4.1 暂时注释原有的 nginx 的代理服务配置
| location / {root html; | |
| index index.html index.htm; | |
| #proxy_pass http://tomcat-server; | |
| } |
3.4.2 修改默认的站点目录文件(显示页面)(声明 nginx 作为静态资源访问的请求处理端)
| [root@nginx html]# vim index.html | |
| <html> | |
| <head> | |
| <title>Welcome to nginx!</title> | |
| <style> | |
| body {width: 35em; | |
| margin: 0 auto; | |
| font-family: Tahoma, Verdana, Arial, sans-serif; | |
| } | |
| </style> | |
| </head> | |
| <body> | |
| <h1>Welcome to nginx!</h1> | |
| <p><em>this is a static web page.</em></p> #em 表示斜体 | |
| </body> | |
| </html> |
重启服务此时访问 nginx 服务器,获取的是:

3.4.3 在 tomcat1 上写一个 jsp 的动态页面
| # 创建一个站点目录 demo,编写一个 jsp 脚本 | |
| vim /usr/local/tomcat/webapps/demo/index.jsp | |
| <%@ page language="java" contentType="text/html; charset=UTF-8" pageEncoding="UTF-8"%> | |
| <%@ page import="java.util.Date" %> | |
| <%@ page import="java.text.SimpleDateFormat" %> | |
| <html> | |
| <head> | |
| <meta http-equiv="Content-Type" content="text/html; charset=UTF-8"> | |
| <title> 动态页面 </title> | |
| </head> | |
| <body> | |
| <div> 动态页面 1</div> | |
| </body> | |
| </html> | |
| 更改 server.xml | |
| <Host name="localhost" appBase="webapps" | |
| unpackWARs="true" autoDeploy="true"> | |
| <Context docBase="/usr/local/tomcat/webapps/demo" path="" reloadable="false"> | |
| </Context> | |
| <!--<Context docBase="/web/webapp1" path="" reloadable="false"> | |
| </Context> --> |
那么此时在 nginx 服务器上需要 location 对访问的 jsp 文件进行 ip 跳转访问的配置:
| location ~.*.jsp$ {## 匹配 jsp 页面跳转代理服务器池 | |
| proxy_pass http://tomcat-server; | |
| proxy_set_header Host $host; | |
| } |
3.4.4 测试验证

3.5 对于同一 web 页面实现动态访问 tomcat,静态资源从 nginx 上获取
使用一张图片作为 jsp 文件,其中包含一张 jpg 格式的图片从 nginx 服务器上获取
具体配置如下
nginx 上:需要创建 demo 目录(demo 和 tomcat 上的目录的名称必须一致)存放 jpg
| # 首先取消上面的代理注释内容,因为测试的时候访问的是 20.0.0.128 | |
| server {listen 80; | |
| server_name localhost; | |
| location ~.*\.(gif|jpg|jpeg|png|bmp|swf|css)$ {root html/demo; | |
| expires 30d; | |
| } | |
| #charset koi8-r; | |
| #access_log logs/host.access.log main; | |
| location ~.*.jsp$ {## 匹配 jsp 页面跳转代理服务器池 | |
| proxy_pass http://tomcat-server; | |
| proxy_set_header Host $host; | |
| } | |
| location / {root html; | |
| index index.html index.htm; | |
| proxy_pass http://tomcat-server; | |
| } |
tomcat:
jsp 文件中添加一个图片链接:
| [root@tomcat1 demo]# vim /usr/local/tomcat/webapps/demo/index.jsp | |
| <%@ page language="java" contentType="text/html; charset=UTF-8" pageEncoding="UTF-8"%> | |
| <%@ page import="java.util.Date" %> | |
| <%@ page import="java.text.SimpleDateFormat" %> | |
| <html> | |
| <head> | |
| <meta http-equiv="Content-Type" content="text/html; charset=UTF-8"> | |
| <title> 动态页面 </title> | |
| </head> | |
| <body> | |
| <div> 动态页面 1</div><br> | |
| <img src="cat.jpg"> #添加的内容 | |
| </body> | |
| </html> | |
| ~ |
jsp 资源:在 demo 目录下
| [] | |
| index.jsp |
图片资源在:html 目录下
| [] | |
| 50x.html demo index.html | |
| [] | |
| [] | |
| cat.jpg | |
| [] |
此时重启 nginx 服务访问 20.0.0.128
第一次访问的是文字 + 图片,第二次由于在第二台服务器上没有进行相关配置则访问内容依旧和之前负载均衡的内容一样。


简单总结
其实结合此次实践,可以理解如何将动静分离和负载均衡结合起来,从而搭建 nginx+tomcat 集群服务了。如果说最后实现动态文字所代表的动态资源,加上这个可爱的小猫代表的静态资源(理解动静分离),结合前面的负载均衡完善 tomcat2 服务器配置就可以根据算法实现负载均衡了。
总之,我们需要对配置文件非常熟悉,了解其功能模块,最后需要明白是如何基于各种模块或指令上下文进行访问跳转的,匹配的关系需要理清楚(逻辑关系)。
:


