共计 21733 个字符,预计需要花费 55 分钟才能阅读完成。
一、单机版 redeis
1. 安装包下载
http://download.Redis.io/releases/ 下载 redis 的压缩包,并放在 /usr/soft 文件夹下
2. 解压压缩包:
tar -zxf redis-3.0.7.tar.gz
3. 安装
这里安装 redis 在 /usr/local/redis 文件夹中
进入安装包:cd /usr/soft/redis-3.0.7,执行命令
make PREFIX=/usr/local/redis/ install
安装成功后

redis.conf 是 redis 的配置文件,redis.conf 在 redis 源码目录。注意修改 port 作为 redis 进程的端口,port 默认 6379。
4. 在安装目录中创建目录 conf, 将 redis 源安装文件中的 redis.cinf 拷贝到 redis 的安装目录中
cp /usr/soft/redis-3.0.7/redis.conf /usr/local/redis/bin/
5.redis 启动
直接运行./redis-server 是前台启动,在关闭运行的窗口后 redis 也将关闭
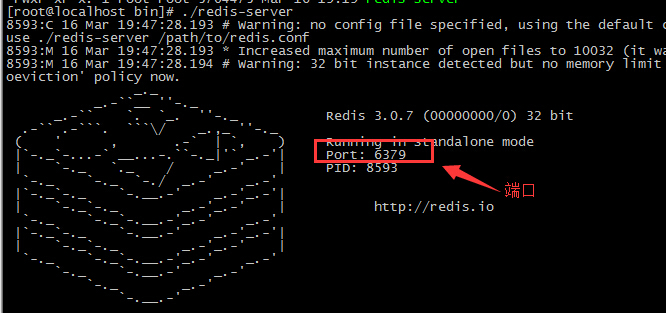
为了关闭窗口后不关闭 redis,需要使用后台启动
5.1 修改 redis.conf 的 daemonize 的 no 为 yes

使用以下命令启动
./redis-server redis.conf
6. 检测 redis 是否运行正常
6.1 使用 ps -ef|grep redis 查看进程
6.2 使用 redis 的客户端查看

当输入 ping 命令时,返回 PONG 就表示连接正常
7. 通过 jedis 连接 redis 单机
需要的依赖
| <dependency> | |
| <groupId>redis.clients</groupId> | |
| <artifactId>jedis</artifactId> | |
| <version>2.7.0</version> | |
| </dependency> |
可以使用以下代码测试
| /** | |
| * jedis 测试 单机版 | |
| */ | |
| @Test | |
| public void testJedisSingle(){Jedis jedis = new Jedis("192.168.198.130", 6379); | |
| jedis.set("test", "this i a test"); | |
| String str = jedis.get("test"); | |
| System.out.println("---:"+str); | |
| // 关闭 jedis 的链接 | |
| jedis.close();} | |
| /** | |
| * 使用连接池 | |
| */ | |
| @Test | |
| public void testJedisPool(){JedisPool jedisPool = new JedisPool("192.168.198.130", 6379); | |
| Jedis jedis = jedisPool.getResource(); | |
| String str = jedis.get("test"); | |
| System.out.println("---:"+str); | |
| jedis.close();} |
8. jedis 与 spring 整合
添加配置文件 applicationContext-jedis.xml
| <beans xmlns="http://www.springframework.org/schema/beans" | |
| xmlns:context="http://www.springframework.org/schema/context" xmlns:p="http://www.springframework.org/schema/p" | |
| xmlns:aop="http://www.springframework.org/schema/aop" xmlns:tx="http://www.springframework.org/schema/tx" | |
| xmlns:xsi="http://www.w3.org/2001/XMLSchema-instance" | |
| xsi:schemaLocation="http://www.springframework.org/schema/beans http://www.springframework.org/schema/beans/spring-beans-4.0.xsd | |
| http://www.springframework.org/schema/context http://www.springframework.org/schema/context/spring-context-4.0.xsd | |
| http://www.springframework.org/schema/aop http://www.springframework.org/schema/aop/spring-aop-4.0.xsd http://www.springframework.org/schema/tx http://www.springframework.org/schema/tx/spring-tx-4.0.xsd | |
| http://www.springframework.org/schema/util http://www.springframework.org/schema/util/spring-util-4.0.xsd"> | |
| <!-- 读取 jedis 配置文件;这里可以不用配置,-dao 已经配置了扫描配置文件 --> | |
| <!-- <context:property-placeholder location="classpath:/properties/*.properties"/> --> | |
| <!-- 连接池配置 --> | |
| <bean id="jedisPoolConfig" class="redis.clients.jedis.JedisPoolConfig"> | |
| <!-- 最大连接数 --> | |
| <property name="maxTotal" value="30" /> | |
| <!-- 最大空闲连接数 --> | |
| <property name="maxIdle" value="10" /> | |
| <!-- 每次释放连接的最大数目 --> | |
| <property name="numTestsPerEvictionRun" value="1024" /> | |
| <!-- 释放连接的扫描间隔(毫秒)--> | |
| <property name="timeBetweenEvictionRunsMillis" value="30000" /> | |
| <!-- 连接最小空闲时间 --> | |
| <property name="minEvictableIdleTimeMillis" value="1800000" /> | |
| <!-- 连接空闲多久后释放, 当空闲时间 > 该值 且 空闲连接 > 最大空闲连接数 时直接释放 --> | |
| <property name="softMinEvictableIdleTimeMillis" value="10000" /> | |
| <!-- 获取连接时的最大等待毫秒数, 小于零: 阻塞不确定的时间, 默认 -1 --> | |
| <property name="maxWaitMillis" value="1500" /> | |
| <!-- 在获取连接的时候检查有效性, 默认 false --> | |
| <property name="testOnBorrow" value="true" /> | |
| <!-- 在空闲时检查有效性, 默认 false --> | |
| <property name="testWhileIdle" value="true" /> | |
| <!-- 连接耗尽时是否阻塞, false 报异常,ture 阻塞直到超时, 默认 true --> | |
| <property name="blockWhenExhausted" value="false" /> | |
| </bean> | |
| <!--jedis 客户端单机版 --> | |
| <bean id="redisClient" class="redis.clients.jedis.JedisPool"> | |
| <constructor-arg name="host" value="${JEDIS_HOST}"></constructor-arg> | |
| <constructor-arg name="port" value="6379"></constructor-arg> | |
| <constructor-arg name="poolConfig" ref="jedisPoolConfig"></constructor-arg> | |
| </bean> | |
| <bean id="redisClientDao" class="com.taotao.rest.dao.impl.JedisClientSingle"></bean> <!-- 定义自己定义的 jedis 工具类 --> | |
| </beans> |
测试
| /** | |
| * 结合 spring 的 redis 单机版测试 | |
| */ | |
| public void testSpringSingle(){ApplicationContext context = new ClassPathXmlApplicationContext("classpath:/spring/applicationContext-*.xml"); | |
| JedisPool jedisPool = (JedisPool)context.getBean("redisClient"); | |
| Jedis jedis = jedisPool.getResource(); | |
| jedis.set("key1", "1111"); | |
| String str = jedis.get("key1"); | |
| System.out.println("--:"+str); | |
| jedis.close(); | |
| jedisPool.close();} |
这里可是自己封装一个工具类
| package com.taotao.rest.dao.impl; | |
| import org.springframework.beans.factory.annotation.Autowired; | |
| import redis.clients.jedis.Jedis; | |
| import redis.clients.jedis.JedisPool; | |
| import com.taotao.rest.dao.JedisClient; | |
| /** | |
| * 在配置文件中注解 | |
| * | |
| * @author Administrator | |
| * | |
| */ | |
| public class JedisClientSingle implements JedisClient { | |
| private JedisPool jedisPool; | |
| public String get(String key) {Jedis jedis = jedisPool.getResource(); | |
| String str = jedis.get(key); | |
| jedis.close(); | |
| return str; | |
| } | |
| public String set(String key, String value) {Jedis jedis = jedisPool.getResource(); | |
| String str = jedis.set(key, value); | |
| jedis.close(); | |
| return str; | |
| } | |
| public String hget(String hkey, String key) {Jedis jedis = jedisPool.getResource(); | |
| String str = jedis.hget(hkey, key); | |
| jedis.close(); | |
| return str; | |
| } | |
| public Long hset(String hkey, String key, String value) {Jedis jedis = jedisPool.getResource(); | |
| Long result = jedis.hset(hkey, key, value); | |
| jedis.close(); | |
| return result; | |
| } | |
| public long incr(String key) {Jedis jedis = jedisPool.getResource(); | |
| Long result = jedis.incr(key); | |
| jedis.close(); | |
| return result; | |
| } | |
| public long expire(String key, int seconds) {Jedis jedis = jedisPool.getResource(); | |
| Long result = jedis.expire(key, seconds); | |
| jedis.close(); | |
| return result; | |
| } | |
| public long ttl(String key) {Jedis jedis = jedisPool.getResource(); | |
| Long result = jedis.ttl(key); | |
| return result; | |
| } | |
| public long del(String key) {Jedis jedis = jedisPool.getResource(); | |
| Long result = jedis.del(key); | |
| return result; | |
| } | |
| public long hdel(String hkey, String key) {Jedis jedis = jedisPool.getResource(); | |
| Long result = jedis.hdel(hkey, key); | |
| return result; | |
| } | |
| } |
二、集群版 redis 搭建
1.1. 集群原理
1.1.1. redis-cluster 架构图

架构细节:
(1)所有的 redis 节点彼此互联(PING-PONG 机制), 内部使用二进制协议优化传输速度和带宽.
(2)节点的 fail 是通过集群中超过半数的节点检测失效时才生效.
(3)客户端与 redis 节点直连, 不需要中间 proxy 层. 客户端不需要连接集群所有节点, 连接集群中任何一个可用节点即可
(4)redis-cluster 把所有的物理节点映射到[0-16383]slot 上,cluster 负责维护 node<->slot<->value
Redis 集群中内置了 16384 个哈希槽,当需要在 Redis 集群中放置一个 key-value 时,redis 先对 key 使用 crc16 算法算出一个结果,然后把结果对 16384 求余数,这样每个 key 都会对应一个编号在 0-16383 之间的哈希槽,redis 会根据节点数量大致均等的将哈希槽映射到���同的节点
1.1.2. redis-cluster 投票: 容错
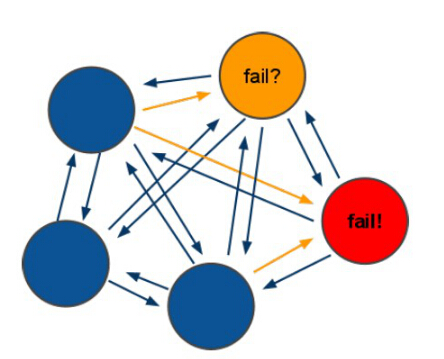
(1)领着投票过程是集群中所有 master 参与, 如果半数以上 master 节点与 master 节点通信超过(cluster-node-timeout), 认为当前 master 节点挂掉.
(2): 什么时候整个集群不可用(cluster_state:fail)?
a: 如果集群任意 master 挂掉, 且当前 master 没有 slave. 集群进入 fail 状态, 也可以理解成集群的 slot 映射 [0-16383] 不完成时进入 fail 状态. ps : redis-3.0.0.rc1 加入 cluster-require-full-coverage 参数, 默认关闭, 打开集群兼容部分失败.
b: 如果集群超过半数以上 master 挂掉,无论是否有 slave 集群进入 fail 状态.
ps: 当集群不可用时, 所有对集群的操作做都不可用,收到 ((error) CLUSTERDOWN The cluster is down) 错误
2. 安装 ruby 环境
redis 集群管理工具 redis-trib.rb 依赖 ruby 环境,首先需要安装 ruby 环境:
安装 ruby
| yum install ruby | |
| yum install rubygems |
安装 ruby 和 redis 的接口程序(需要安装文件 redis-3.0.0.gem)
拷贝 redis-3.0.0.gem 至 /usr/local 下
执行:
gem install /usr/local/redis-3.0.0.gem
3. 集群节点的规划
这里在同一台服务器用不同的端口表示不同的 redis 服务器,如下:
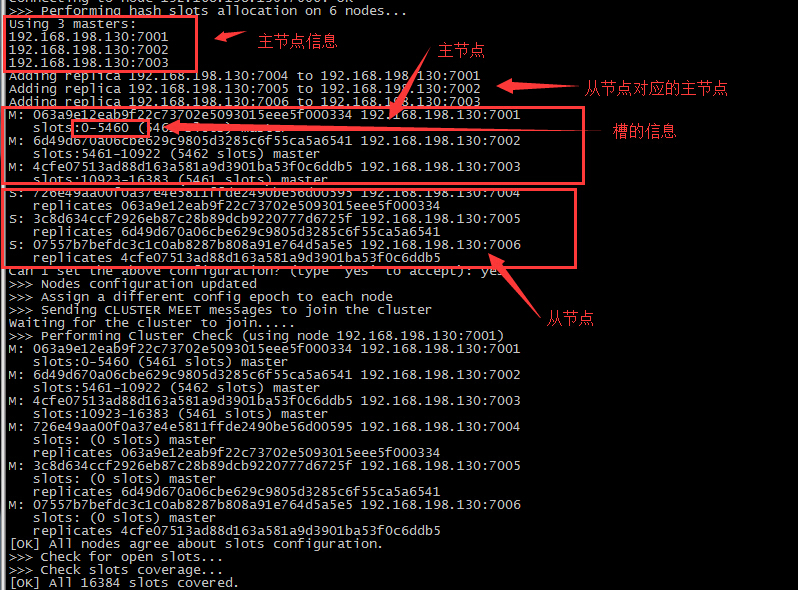
主节点:192.168.198.130:7001 192.168.198.130:7002 192.168.198.130:7003
从节点:192.168.198.130:7004 192.168.198.130:7005 192.168.198.130:7006
在 /usr/local 下创建 redis-cluster 目录,其下创建 7001、7002。。7006 目录,如下

将 redis 安装目录 bin 下的文件拷贝到每个 700X 目录内,同时修改每个的 redis.conf 中的端口为 7001-7006,同时释放出 redis.conf 中的注释的


同时将 redis 源码目录 src 下的 redis-trib.rb 拷贝到 redis-cluster 目录下
[root@localhost redis-cluster]# cp /usr/soft/redis-3.0.7/src/redis-trib.rb /usr/local/redis-cluster/
使用后台启动的方式启动每个 redis

执行 redis-trib.rb,此脚本是 ruby 脚本,它依赖 ruby 环境
./redis-trib.rb create --replicas 1 192.168.198.130:7001 192.168.198.130:7002 192.168.198.130:7003 192.168.198.130:7004 192.168.198.130:7005 192.168.198.130:7006 // 集群中 redis 的 ip 和脚本
启动成功后如下图
如果执行时报如下错误:
[ERR] Node XXXXXX is not empty. Either the node already knows other nodes (check with CLUSTER NODES) or contains some key in database 0
解决方法是删除生成的配置文件 nodes.conf,如果不行则说明现在创建的结点包括了旧集群的结点信息,需要删除 redis 的持久化文件后再重启 redis,比如:appendonly.aof、dump.rdb
使用客户端进行链接测试

其中 - c 表示要链接到集群 必须使用这个参数 查看集群状态信息
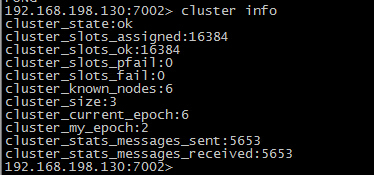
4. 添加主节点 下面添加 7007 为 master 主节点

修改 redis.conf 中的端口为 7007,并启动 7007运行命令
./redis-trib.rb add-node 192.168.198.130:7007 192.168.198.130:7001
运行成功结果
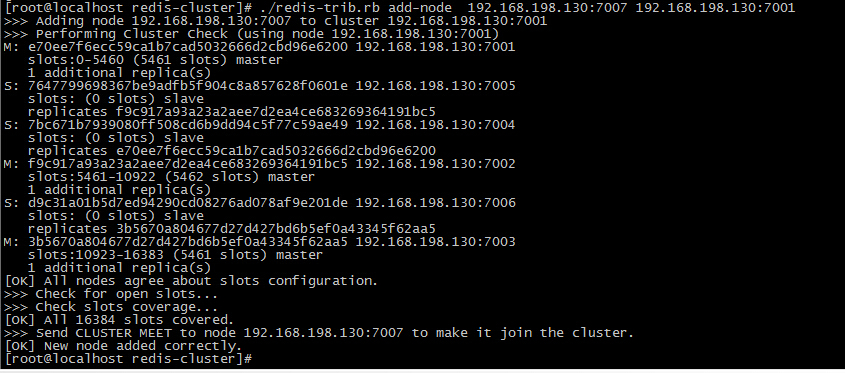
查看情况

5.hash 槽重新分配 从上图我们可以看到 7007 还没有分配槽5.1 连接上集群
./redis-trib.rb reshard 192.168.198.130:7001(连接集群中任意一个可用结点都行)
5.2 第二步:输入要分配的槽数量
输入 500 表示要分配 500 个槽
更多详情见请继续阅读下一页的精彩内容:http://www.linuxidc.com/Linux/2017-03/141396p2.htm
5.3 第三步:输入接收槽的结点 id

这里准备给 7007 分配槽,通过 cluster nodes 查看 7007 结点 id 为 15b809eadae88955e36bcdbb8144f61bbbaf38fb
输入:15b809eadae88955e36bcdbb8144f61bbbaf38fb
5.4 第四步:输入源结点 id

这里输入 all
5.5 第五步:输入 yes 开始移动槽到目标结点 id

分配成功后可以查看对应的信息

6. 添加从节点
集群创建成功后可以向集群中添加节点,下面是添加一个 slave 从节点。添加 7008 从结点,将 7008 作为 7007 的从结点。
./Redis-trib.rb add-node –slave –master-id 主节点 id 添加节点的 ip 和端口 集群中已存在节点 ip 和端口
执行命令(7007 的 id 可以通过连接客户端使用 cluster nodes 查看)
./redis-trib.rb add-node --slave --master-id db786026ed607786d6db1aaab94fd73d1ac3c8f4 192.168.198.130:7008 192.168.198.130:7001

注意:如果原来该结点在集群中的配置信息已经生成 cluster-config-file 指定的配置文件中(如果 cluster-config-file 没有指定则默认为 nodes.conf),这时可能会报错:
[ERR] Node XXXXXX is not empty. Either the node already knows other nodes (check with CLUSTER NODES) or contains some key in database 0
解决方法是删除生成的配置文件 nodes.conf,删除后再执行./redis-trib.rb add-node 指令
查看分配情况

7. 删除节点
./redis-trib.rb del-node 节点的 ip:端口 节点 id

这是删除会报错,需要将该结点占用的 hash 槽分配出去(参考 hash 槽重新分配章节)
8.Java 测试
| @Test | |
| public void testJedisCluster(){HashSet<HostAndPort> nodes = new HashSet<HostAndPort>(); | |
| nodes.add(new HostAndPort("192.168.198.130", 7001)); | |
| nodes.add(new HostAndPort("192.168.198.130", 7002)); | |
| nodes.add(new HostAndPort("192.168.198.130", 7003)); | |
| nodes.add(new HostAndPort("192.168.198.130", 7004)); | |
| nodes.add(new HostAndPort("192.168.198.130", 7005)); | |
| nodes.add(new HostAndPort("192.168.198.130", 7006)); | |
| JedisCluster cluster = new JedisCluster(nodes); | |
| cluster.set("jedisClusterKey", "hello_world"); | |
| String str = cluster.get("jedisClusterKey"); | |
| System.out.println("---:"+str); | |
| // 关闭连接 | |
| cluster.close();} |
使用 spring
| <beans xmlns="http://www.springframework.org/schema/beans" | |
| xmlns:context="http://www.springframework.org/schema/context" xmlns:p="http://www.springframework.org/schema/p" | |
| xmlns:aop="http://www.springframework.org/schema/aop" xmlns:tx="http://www.springframework.org/schema/tx" | |
| xmlns:xsi="http://www.w3.org/2001/XMLSchema-instance" | |
| xsi:schemaLocation="http://www.springframework.org/schema/beans http://www.springframework.org/schema/beans/spring-beans-4.0.xsd | |
| http://www.springframework.org/schema/context http://www.springframework.org/schema/context/spring-context-4.0.xsd | |
| http://www.springframework.org/schema/aop http://www.springframework.org/schema/aop/spring-aop-4.0.xsd http://www.springframework.org/schema/tx http://www.springframework.org/schema/tx/spring-tx-4.0.xsd | |
| http://www.springframework.org/schema/util http://www.springframework.org/schema/util/spring-util-4.0.xsd"> | |
| <!-- 读取 jedis 配置文件;这里可以不用配置,-dao 已经配置了扫描配置文件 --> | |
| <!-- <context:property-placeholder location="classpath:/properties/*.properties"/> --> | |
| <!-- 连接池配置 --> | |
| <bean id="jedisPoolConfig" class="redis.clients.jedis.JedisPoolConfig"> | |
| <!-- 最大连接数 --> | |
| <property name="maxTotal" value="30" /> | |
| <!-- 最大空闲连接数 --> | |
| <property name="maxIdle" value="10" /> | |
| <!-- 每次释放连接的最大数目 --> | |
| <property name="numTestsPerEvictionRun" value="1024" /> | |
| <!-- 释放连接的扫描间隔(毫秒)--> | |
| <property name="timeBetweenEvictionRunsMillis" value="30000" /> | |
| <!-- 连接最小空闲时间 --> | |
| <property name="minEvictableIdleTimeMillis" value="1800000" /> | |
| <!-- 连接空闲多久后释放, 当空闲时间 > 该值 且 空闲连接 > 最大空闲连接数 时直接释放 --> | |
| <property name="softMinEvictableIdleTimeMillis" value="10000" /> | |
| <!-- 获取连接时的最大等待毫秒数, 小于零: 阻塞不确定的时间, 默认 -1 --> | |
| <property name="maxWaitMillis" value="1500" /> | |
| <!-- 在获取连接的时候检查有效性, 默认 false --> | |
| <property name="testOnBorrow" value="true" /> | |
| <!-- 在空闲时检查有效性, 默认 false --> | |
| <property name="testWhileIdle" value="true" /> | |
| <!-- 连接耗尽时是否阻塞, false 报异常,ture 阻塞直到超时, 默认 true --> | |
| <property name="blockWhenExhausted" value="false" /> | |
| </bean> | |
| <bean id="redisClientClusterDao" class="com.taotao.rest.dao.impl.JedisClientCluster"></bean> | |
| <!-- redis 集群 --> | |
| <bean id="redisCluster" class="redis.clients.jedis.JedisCluster"> | |
| <constructor-arg name="nodes"> | |
| <set> | |
| <bean class="redis.clients.jedis.HostAndPort"> | |
| <constructor-arg name="host" value="192.168.198.130"></constructor-arg> | |
| <constructor-arg name="port" value="7001"></constructor-arg> | |
| </bean> | |
| <bean class="redis.clients.jedis.HostAndPort"> | |
| <constructor-arg name="host" value="192.168.198.130"></constructor-arg> | |
| <constructor-arg name="port" value="7002"></constructor-arg> | |
| </bean> | |
| <bean class="redis.clients.jedis.HostAndPort"> | |
| <constructor-arg name="host" value="192.168.198.130"></constructor-arg> | |
| <constructor-arg name="port" value="7003"></constructor-arg> | |
| </bean> | |
| <bean class="redis.clients.jedis.HostAndPort"> | |
| <constructor-arg name="host" value="192.168.198.130"></constructor-arg> | |
| <constructor-arg name="port" value="7004"></constructor-arg> | |
| </bean> | |
| <bean class="redis.clients.jedis.HostAndPort"> | |
| <constructor-arg name="host" value="192.168.198.130"></constructor-arg> | |
| <constructor-arg name="port" value="7005"></constructor-arg> | |
| </bean> | |
| <bean class="redis.clients.jedis.HostAndPort"> | |
| <constructor-arg name="host" value="192.168.198.130"></constructor-arg> | |
| <constructor-arg name="port" value="7006"></constructor-arg> | |
| </bean> | |
| </set> | |
| </constructor-arg> | |
| <constructor-arg name="poolConfig" ref="jedisPoolConfig"></constructor-arg> | |
| </bean> | |
| </beans> |
测试代码
| /** | |
| * 结合 spring 的 jedis 集群版 | |
| */ | |
| @Test | |
| public void testSpringJedisCluster(){ApplicationContext context = new ClassPathXmlApplicationContext("classpath:/spring/applicationContext-*.xml"); | |
| JedisCluster jedisCluster = (JedisCluster)context.getBean(JedisCluster.class); | |
| jedisCluster.set("key2", "3333"); | |
| String str = jedisCluster.get("key2"); | |
| System.out.println("--:"+str); | |
| jedisCluster.close();} |
封装的工具类
| package com.taotao.rest.dao.impl; | |
| import org.springframework.beans.factory.annotation.Autowired; | |
| import redis.clients.jedis.JedisCluster; | |
| import com.taotao.rest.dao.JedisClient; | |
| /** | |
| * 集群不用 jedisCluster.close(); 否则下次不能连接 | |
| * @author Administrator | |
| * | |
| */ | |
| public class JedisClientCluster implements JedisClient{ | |
| private JedisCluster jedisCluster; | |
| public String get(String key) {String str = jedisCluster.get(key); | |
| return str; | |
| } | |
| public String set(String key, String value) {String str = jedisCluster.set(key, value); | |
| return str; | |
| } | |
| public String hget(String hkey, String key) {return jedisCluster.hget(hkey, key); | |
| } | |
| public Long hset(String hkey, String key, String value) {return jedisCluster.hset(hkey, key, value); | |
| } | |
| public long incr(String key) {return jedisCluster.incr(key); | |
| } | |
| public long expire(String key, int seconds) {return jedisCluster.expire(key, seconds); | |
| } | |
| public long ttl(String key) {return jedisCluster.ttl(key); | |
| } | |
| public long del(String key) {return jedisCluster.del(key); | |
| } | |
| public long hdel(String hkey, String key) {return jedisCluster.hdel(hkey, key); | |
| } | |
| } |
Redis 的详细介绍:请点这里
Redis 的下载��址:请点这里
本文永久更新链接地址:http://www.linuxidc.com/Linux/2017-03/141396.htm
一、单机版 redeis
1. 安装包下载
http://download.Redis.io/releases/ 下载 redis 的压缩包,并放在 /usr/soft 文件夹下
2. 解压压缩包:
tar -zxf redis-3.0.7.tar.gz
3. 安装
这里安装 redis 在 /usr/local/redis 文件夹中
进入安装包:cd /usr/soft/redis-3.0.7,执行命令
make PREFIX=/usr/local/redis/ install
安装成功后

redis.conf 是 redis 的配置文件,redis.conf 在 redis 源码目录。注意修改 port 作为 redis 进程的端口,port 默认 6379。
4. 在安装目录中创建目录 conf, 将 redis 源安装文件中的 redis.cinf 拷贝到 redis 的安装目录中
cp /usr/soft/redis-3.0.7/redis.conf /usr/local/redis/bin/
5.redis 启动
直接运行./redis-server 是前台启动,在关闭运行的窗口后 redis 也将关闭

为了关闭窗口后不关闭 redis,需要使用后台启动
5.1 修改 redis.conf 的 daemonize 的 no 为 yes

使用以下命令启动
./redis-server redis.conf
6. 检测 redis 是否运行正常
6.1 使用 ps -ef|grep redis 查看进程
6.2 使用 redis 的客户端查看

当输入 ping 命令时,返回 PONG 就表示连接正常
7. 通过 jedis 连接 redis 单机
需要的依赖
| <dependency> | |
| <groupId>redis.clients</groupId> | |
| <artifactId>jedis</artifactId> | |
| <version>2.7.0</version> | |
| </dependency> |
可以使用以下代码测试
| /** | |
| * jedis 测试 单机版 | |
| */ | |
| @Test | |
| public void testJedisSingle(){Jedis jedis = new Jedis("192.168.198.130", 6379); | |
| jedis.set("test", "this i a test"); | |
| String str = jedis.get("test"); | |
| System.out.println("---:"+str); | |
| // 关闭 jedis 的链接 | |
| jedis.close();} | |
| /** | |
| * 使用连接池 | |
| */ | |
| @Test | |
| public void testJedisPool(){JedisPool jedisPool = new JedisPool("192.168.198.130", 6379); | |
| Jedis jedis = jedisPool.getResource(); | |
| String str = jedis.get("test"); | |
| System.out.println("---:"+str); | |
| jedis.close();} |
8. jedis 与 spring 整合
添加配置文件 applicationContext-jedis.xml
| <beans xmlns="http://www.springframework.org/schema/beans" | |
| xmlns:context="http://www.springframework.org/schema/context" xmlns:p="http://www.springframework.org/schema/p" | |
| xmlns:aop="http://www.springframework.org/schema/aop" xmlns:tx="http://www.springframework.org/schema/tx" | |
| xmlns:xsi="http://www.w3.org/2001/XMLSchema-instance" | |
| xsi:schemaLocation="http://www.springframework.org/schema/beans http://www.springframework.org/schema/beans/spring-beans-4.0.xsd | |
| http://www.springframework.org/schema/context http://www.springframework.org/schema/context/spring-context-4.0.xsd | |
| http://www.springframework.org/schema/aop http://www.springframework.org/schema/aop/spring-aop-4.0.xsd http://www.springframework.org/schema/tx http://www.springframework.org/schema/tx/spring-tx-4.0.xsd | |
| http://www.springframework.org/schema/util http://www.springframework.org/schema/util/spring-util-4.0.xsd"> | |
| <!-- 读取 jedis 配置文件;这里可以不用配置,-dao 已经配置了扫描配置文件 --> | |
| <!-- <context:property-placeholder location="classpath:/properties/*.properties"/> --> | |
| <!-- 连接池配置 --> | |
| <bean id="jedisPoolConfig" class="redis.clients.jedis.JedisPoolConfig"> | |
| <!-- 最大连接数 --> | |
| <property name="maxTotal" value="30" /> | |
| <!-- 最大空闲连接数 --> | |
| <property name="maxIdle" value="10" /> | |
| <!-- 每次释放连接的最大数目 --> | |
| <property name="numTestsPerEvictionRun" value="1024" /> | |
| <!-- 释放连接的扫描间隔(毫秒)--> | |
| <property name="timeBetweenEvictionRunsMillis" value="30000" /> | |
| <!-- 连接最小空闲时间 --> | |
| <property name="minEvictableIdleTimeMillis" value="1800000" /> | |
| <!-- 连接空闲多久后释放, 当空闲时间 > 该值 且 空闲连接 > 最大空闲连接数 时直接释放 --> | |
| <property name="softMinEvictableIdleTimeMillis" value="10000" /> | |
| <!-- 获取连接时的最大等待毫秒数, 小于零: 阻塞不确定的时间, 默认 -1 --> | |
| <property name="maxWaitMillis" value="1500" /> | |
| <!-- 在获取连接的时候检查有效性, 默认 false --> | |
| <property name="testOnBorrow" value="true" /> | |
| <!-- 在空闲时检查有效性, 默认 false --> | |
| <property name="testWhileIdle" value="true" /> | |
| <!-- 连接耗尽时是否阻塞, false 报异常,ture 阻塞直到超时, 默认 true --> | |
| <property name="blockWhenExhausted" value="false" /> | |
| </bean> | |
| <!--jedis 客户端单机版 --> | |
| <bean id="redisClient" class="redis.clients.jedis.JedisPool"> | |
| <constructor-arg name="host" value="${JEDIS_HOST}"></constructor-arg> | |
| <constructor-arg name="port" value="6379"></constructor-arg> | |
| <constructor-arg name="poolConfig" ref="jedisPoolConfig"></constructor-arg> | |
| </bean> | |
| <bean id="redisClientDao" class="com.taotao.rest.dao.impl.JedisClientSingle"></bean> <!-- 定义自己定义的 jedis 工具类 --> | |
| </beans> |
测试
| /** | |
| * 结合 spring 的 redis 单机版测试 | |
| */ | |
| public void testSpringSingle(){ApplicationContext context = new ClassPathXmlApplicationContext("classpath:/spring/applicationContext-*.xml"); | |
| JedisPool jedisPool = (JedisPool)context.getBean("redisClient"); | |
| Jedis jedis = jedisPool.getResource(); | |
| jedis.set("key1", "1111"); | |
| String str = jedis.get("key1"); | |
| System.out.println("--:"+str); | |
| jedis.close(); | |
| jedisPool.close();} |
这里可是自己封装一个工具类
| package com.taotao.rest.dao.impl; | |
| import org.springframework.beans.factory.annotation.Autowired; | |
| import redis.clients.jedis.Jedis; | |
| import redis.clients.jedis.JedisPool; | |
| import com.taotao.rest.dao.JedisClient; | |
| /** | |
| * 在配置文件中注解 | |
| * | |
| * @author Administrator | |
| * | |
| */ | |
| public class JedisClientSingle implements JedisClient { | |
| private JedisPool jedisPool; | |
| public String get(String key) {Jedis jedis = jedisPool.getResource(); | |
| String str = jedis.get(key); | |
| jedis.close(); | |
| return str; | |
| } | |
| public String set(String key, String value) {Jedis jedis = jedisPool.getResource(); | |
| String str = jedis.set(key, value); | |
| jedis.close(); | |
| return str; | |
| } | |
| public String hget(String hkey, String key) {Jedis jedis = jedisPool.getResource(); | |
| String str = jedis.hget(hkey, key); | |
| jedis.close(); | |
| return str; | |
| } | |
| public Long hset(String hkey, String key, String value) {Jedis jedis = jedisPool.getResource(); | |
| Long result = jedis.hset(hkey, key, value); | |
| jedis.close(); | |
| return result; | |
| } | |
| public long incr(String key) {Jedis jedis = jedisPool.getResource(); | |
| Long result = jedis.incr(key); | |
| jedis.close(); | |
| return result; | |
| } | |
| public long expire(String key, int seconds) {Jedis jedis = jedisPool.getResource(); | |
| Long result = jedis.expire(key, seconds); | |
| jedis.close(); | |
| return result; | |
| } | |
| public long ttl(String key) {Jedis jedis = jedisPool.getResource(); | |
| Long result = jedis.ttl(key); | |
| return result; | |
| } | |
| public long del(String key) {Jedis jedis = jedisPool.getResource(); | |
| Long result = jedis.del(key); | |
| return result; | |
| } | |
| public long hdel(String hkey, String key) {Jedis jedis = jedisPool.getResource(); | |
| Long result = jedis.hdel(hkey, key); | |
| return result; | |
| } | |
| } |
二、集群版 redis 搭建
1.1. 集群原理
1.1.1. redis-cluster 架构图

架构细节:
(1)所有的 redis 节点彼此互联(PING-PONG 机制), 内部使用二进制协议优化传输速度和带宽.
(2)节点的 fail 是通过集群中超过半数的节点检测失效时才生效.
(3)客户端与 redis 节点直连, 不需要中间 proxy 层. 客户端不需要连接集群所有节点, 连接集群中任何一个可用节点即可
(4)redis-cluster 把所有的物理节点映射到[0-16383]slot 上,cluster 负责维护 node<->slot<->value
Redis 集群中内置了 16384 个哈希槽,当需要在 Redis 集群中放置一个 key-value 时,redis 先对 key 使用 crc16 算法算出一个结果,然后把结果对 16384 求余数,这样每个 key 都会对应一个编号在 0-16383 之间的哈希槽,redis 会根据节点数量大致均等的将哈希槽映射到���同的节点
1.1.2. redis-cluster 投票: 容错

(1)领着投票过程是集群中所有 master 参与, 如果半数以上 master 节点与 master 节点通信超过(cluster-node-timeout), 认为当前 master 节点挂掉.
(2): 什么时候整个集群不可用(cluster_state:fail)?
a: 如果集群任意 master 挂掉, 且当前 master 没有 slave. 集群进入 fail 状态, 也可以理解成集群的 slot 映射 [0-16383] 不完成时进入 fail 状态. ps : redis-3.0.0.rc1 加入 cluster-require-full-coverage 参数, 默认关闭, 打开集群兼容部分失败.
b: 如果集群超过半数以上 master 挂掉,无论是否有 slave 集群进入 fail 状态.
ps: 当集群不可用时, 所有对集群的操作做都不可用,收到 ((error) CLUSTERDOWN The cluster is down) 错误
2. 安装 ruby 环境
redis 集群管理工具 redis-trib.rb 依赖 ruby 环境,首先需要安装 ruby 环境:
安装 ruby
| yum install ruby | |
| yum install rubygems |
安装 ruby 和 redis 的接口程序(需要安装文件 redis-3.0.0.gem)
拷贝 redis-3.0.0.gem 至 /usr/local 下
执行:
gem install /usr/local/redis-3.0.0.gem
3. 集群节点的规划
这里在同一台服务器用不同的端口表示不同的 redis 服务器,如下:
主节点:192.168.198.130:7001 192.168.198.130:7002 192.168.198.130:7003
从节点:192.168.198.130:7004 192.168.198.130:7005 192.168.198.130:7006
在 /usr/local 下创建 redis-cluster 目录,其下创建 7001、7002。。7006 目录,如下

将 redis 安装目录 bin 下的文件拷贝到每个 700X 目录内,同时修改每个的 redis.conf 中的端口为 7001-7006,同时释放出 redis.conf 中的注释的


同时将 redis 源码目录 src 下的 redis-trib.rb 拷贝到 redis-cluster 目录下
[root@localhost redis-cluster]# cp /usr/soft/redis-3.0.7/src/redis-trib.rb /usr/local/redis-cluster/
使用后台启动的方式启动每个 redis

执行 redis-trib.rb,此脚本是 ruby 脚本,它依赖 ruby 环境
./redis-trib.rb create --replicas 1 192.168.198.130:7001 192.168.198.130:7002 192.168.198.130:7003 192.168.198.130:7004 192.168.198.130:7005 192.168.198.130:7006 // 集群中 redis 的 ip 和脚本
启动成功后如下图

如果执行时报如下错误:
[ERR] Node XXXXXX is not empty. Either the node already knows other nodes (check with CLUSTER NODES) or contains some key in database 0
解决方法是删除生成的配置文件 nodes.conf,如果不行则说明现在创建的结点包括了旧集群的结点信息,需要删除 redis 的持久化文件后再重启 redis,比如:appendonly.aof、dump.rdb
使用客户端进行链接测试

其中 - c 表示要链接到集群 必须使用这个参数 查看集群状态信息

4. 添加主节点 下面添加 7007 为 master 主节点

修改 redis.conf 中的端口为 7007,并启动 7007运行命令
./redis-trib.rb add-node 192.168.198.130:7007 192.168.198.130:7001
运行成功结果

查看情况

5.hash 槽重新分配 从上图我们可以看到 7007 还没有分配槽5.1 连接上集群
./redis-trib.rb reshard 192.168.198.130:7001(连接集群中任意一个可用结点都行)
5.2 第二步:输入要分配的槽数量
输入 500 表示要分配 500 个槽
更多详情见请继续阅读下一页的精彩内容:http://www.linuxidc.com/Linux/2017-03/141396p2.htm


